Our test of aggressive rubbing compounds for heavily oxidized fiberglass hulls also gave us an opportunity to look at the tools and techniques involved in resuscitating a neglected hull. Although this can be tedious work, it is one of those jobs, like varnishing, that offers instant gratification. The fruits of your labor-unlike that new sanitation hose you sweated over last fall-are apparent to everyone.
Restoring old gelcoat is a matter of degrees. Youll need to inspect the health of your gelcoat and decide which solution is best for you. If restoring the hull requires wet-sanding or rubbing compound, the general rule is to start with the least aggressive approach. Only when its obvious that you are making no progress with an abrasive material (either sandpaper or compound) should you move up to more aggressive media.
If the gelcoat is deeply scratched, gouged, or looking thin in some areas, it may be time to sand and paint the hull (Practical Sailor covers hull paint:December 2012, February 2011, August 2009). Remember that gelcoat is only a thin layer to begin with-it varies from boat to boat, and its thinnest at the bow, corners, and curves-and an aggressive buffing compound may take that layer down to fiberglass. Using a gelcoat restorer (July 2011) is another option, but be aware of their pros and cons.
If oxidation and minor scratches are your problems, a rubbing compound system (followed by a wax) should be enough to restore shine. However, if the rubbing compound is getting you nowhere (try a test patch), and after washing the rubbed area, the oxidation is still visible, its time to wet-sand the hull. Assuming, of course, you’ve got enough gelcoat to sand.
Follow the wet sand with a fast-cut, coarse-grit rubbing compound. This can be followed by a medium- or fine-grit compound; if the boat is less than three years old or the oxidation is only mild, you can go straight to a medium- or fine-grit compound. Follow the compounds with a polish and a good boat wax (September 2010 and July 2009) like Collinite’s No. 885 Fleetwax. A good wax will help protect the hull, so you wont have to buff so aggressively in the future.

Boat Buffing Techniques and Tips
Wet sanding: Start with 600- to 800-grit wet-dry sandpaper. Pros we talked with prefer Sunmight, 3M, and Mirka sandpapers; they don’t load up as quickly and last longer. While you can wet-sand by hand using a rubber block, we suggest using a pneumatic or electric, dual-action (DA) orbital sander to make the job faster. Nelson Roberts of Atlantis Boatworksin Sarasota, Fla., showed us his coveted sander, a pricey device made by Mirka, which has developed an alternative to pneumatic and heavy electric tools. 3M recommends finish sanding with 1500-grit because its easier to buff out a 1500-grit scratch then an 800-grit one. Be sure to keep the hull wet. If youre sanding by hand, soak the sandpaper in a bucket of fresh water until youre ready to use it. Be very careful at the hull corners and the top of the topsides where gelcoat is usually the thinnest.
If youre using an electric sander, mist the hull surface with a spray bottle. Mix a few drops of dish detergent in the water to keep the hull or paper evenly wet and keep it wetter longer. Rinse the surface often to look for potential burn-through areas, and look at it from several angles. You can use a window squeegee to quick dry the surface after a rinse to get a low-glare look at the gelcoat. Do not use circular movements. Wet-sand until the hull has an even dullness, a matte finish; then rinse with fresh water.
Compounds: Apply the compound generously to the buffing pad, keep it wet, and go slowly. If you don’t feel any drag on the pad, and its sliding around during application, its time to clean or change the pad. Scrape it and add more product-a star tool or a screwdriver can help clean a loaded pad-or change the pad. After applying the compound, wipe off excess with a clean rag; if its hard to wipe off, you can wet the area with fresh water, then wipe.

Compounding Tools
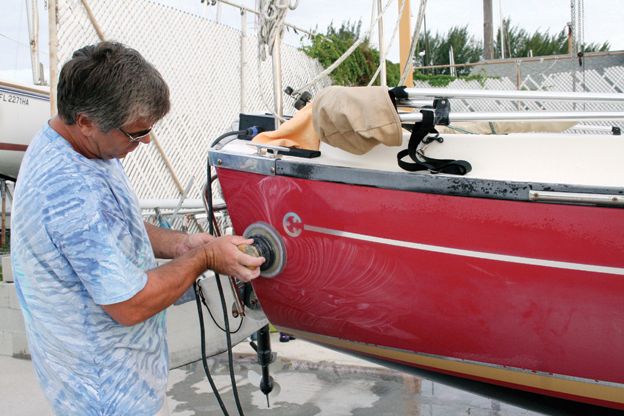
A successful refinishing job is the result of using the right products and the right tools. We recommend using a machine polisher for applying rubbing compound. In PS Editor Darrell Nicholson’s previous blog post, Waxing and Polishing Your Boat, he talked about a few tools, including the one he uses for big jobs: the DeWalt DW849,a Dewalt variable-speed polisher. (By the way, if you havent checked out that blog post yet, your probably should. It is the mother-of-all-fiberglass restoring posts, with some great links.)
For the buffing compound test, we took a cue from local pros and used a Shurhold 3100 variable-speed electric polisher. The 3100 is lightweight, has six speeds, an adjustable D handle, and an optional side handle. With the 3100, start with it set on 3 or 4 (3 is roughly 1500 RPM); add speed for a shinier finish. 3M recommends running a buffer at 1500-1800 RPM. The Mirka tool is speed sensitive when buffing, so for the best gloss, start at a slow speed, grind in the compound well, then move to a faster speed to finish. To get to tight, small areas, use an angle-drill with 3-inch pads, which Mirka makes. For a detailed look at other options for buffer/polishers, check out Waxing and Polishing Your Boat.
Wool buffing pads are better than foam or cotton because they hold the rubbing compound better. Quality pads can last years. To reuse a buffing pad, wash it in a clothes washing machine using warm water; we suggest doing this at the laundromat. Follow with a load or two of rags to soak up any possiblecompound residue.Also, Shurhold makes a specialty buffing pad cleaner, the Serious Pad Cleaner, which we reviewed in the April 2014Chandlery.


