


In our ongoing quest to keep things dry down below when we head offshore, we face plenty of opposition. It’s hard enough with the crew trooping up and down the companionway in wet boots and gear, but when the rail is down with water surging aboard, or the rain is drumming on the cabintop, we definitely don’t need drippy leaks adding to the water level and wet-bunk annoyance.
So this spring we’ve tackled a couple of projects aboard our Bristol 40 yawl, Willow, in hopes that life below will be downright arid this summer.
Project One: Leaky Ports
The first project was to re-bed all 10 port lights. Two ports were opening ones and the rest were fixed. After 22 years and lots of miles, the leakage had become too bad to ignore.
Before reinstalling all the port lights, we researched which sealant to use. We had just a few requirements for the sealant: It had to be easy to use, work with Plexiglas™, last long enough that we would never have to do this job again, and not leak. We also didn’t want to do anything permanent to hinder any future owner’s glass replacement.
After reviewing the bewildering choices of caulks, sealants, and adhesives available for porthole installations, we decided to ask someone more knowledgeable than us. We keep Willow at Oak Harbor Marina in Pasadena, MD. Kendall Broman, the owner, replaces lots of portholes on boats. The last thing he wants is for one of his installations to leak. Those problems tend to create irate boat owners and can cost Ken money.
For the past couple of years, Ken has been using a Dow Corning sealant for all of his porthole installations. Since switching to this sealant, he hasn’t had any leakage problems. So, based on his recommendation, we decided to give it a try.
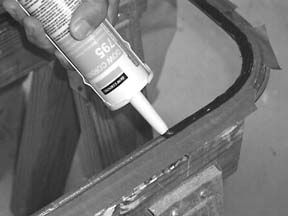
Dow Corning® 795 Silicone Building Sealant is a one-part silicone-based sealant. It is used in the building industry for structural and non-structural glazing applications. In other words, it can hold in the glass panels used in modern office buildings. The sealant comes in 10.3-fl. oz. cartridges that work in a standard caulking gun. It can be installed over a wide temperature range (-10 to 122°F), has very little odor, and stays where you put it. According to the Dow Corning product data sheet, it “has the consistency of toothpaste.” We prefer to think that it has a consistency similar to cake icing out of a can. It comes in 11 colors: black, white, gray, limestone, bronze, sandstone, adobe tan, dusty rose, rustic brick, blue spruce, and charcoal. We elected to use the basic black. We paid $5.70 per tube for the sealant from a local contractor building supply distributor.
As you can see from the accompanying photos, using 795 is just like other caulks. We first used it to glue the Plexiglas into the outer porthole frames. We clamped these down and let it cure overnight. As an interesting note, while none of the Plexiglas was warped, some of our bronze frames were. The 795 sealant held the frames to the straightness of the Plexiglas, thereby removing the warps.
The 795 data sheet says that the tack-free time is three hours and cure time is seven to 14 days. We did not test this, but we could remove the clamps after 24 hours with no problems.
With the Plexiglas/frame combination, 795 made it relatively easy to install the portholes in Willow. A caulk bead on the outside frame helped hold the porthole in place while we applied more caulk on the inside to fill all the gaps.
To make cleanup easier, it’s important to use masking tape on everything. After installing the ports, we immediately removed the tape.
While the 795 sealant is still uncured, it will clean up with a solvent. We used mineral spirits, which worked very well. After curing, it’s relatively easy to remove the cured 795 with a razor knife or a fingernail.
How well does 795 stand the test of time? We don’t know, yet. However, based on Ken’s observations, the intended application for the product, and our own initial observations, it appears that this product will be well-suited for marine use.
Aboard Willow, we used approximately one tube of 795 per porthole. At a cost of $5.70 per tube, this was, for us, an attractive alternative to other marine-focused sealants.
Project Two: Hole in Roof
We strive to minimize all holes through our hulls and decks. For most of these holes, a little forethought, a little caulk, and the proper fitting keeps the water out. However, for those of us with keel-stepped masts, life has never been simple. Properly chocking the mast in place at the partners and keeping water out seemed to be mutually exclusive.
Over the years, there have been many attempts at chocking masts and keeping water out. Many will remember wood wedges that were hammered into place between the mast and the mast collar. The better ones were cut in inverted “L” shapes to keep them from falling through the partners.
Some owners used hard rubber to chock the mast. Instead of using wedges, you used the natural resiliency of the rubber to chock the mast in place. First the mast was pulled in one direction and a rubber pad inserted between the mast and the collar. Then, you pulled the mast in the other direction (with winches), compressing the first pad, and inserted the second rubber pad. If needed, this was also done with the sides of the mast.
Sealing the mast hole from water leaks has been even more problematic. People use all sorts of things to keep water from flowing through the gaps: tape, heat shrink material, vinyl, caulk, acrylic fabric, and inner tubes. However, nothing seems to last very long or seal water out completely.
Enter the liquid mast wedge: Since 1993, Spartite™ has been on the market for both chocking the mast and sealing the mast hole. Spartite, made by CASS Polymers of Michigan, is a two-part pre-polymer (similar to a urethane) that you mix and pour between the mast and the mast collar. Once it cures, its low shrinkage (0.001″ per inch) and the resiliency (Shore hardness 60D) chocks the mast in place.
Since Spartite pours as a liquid, it fills the space and keeps the water out. According to the Spartite literature, it “fills 99.9% of the void between the mast and the partners.” We couldn’t verify that number but, after trying Spartite, it does seem to completely fill the space.
The Spartite 2000 kit comes in two different sizes: kit 2000-1 for up to 51 in³ and kit 2000-2 for up to 102 in³. These volumes correspond with the void volume between the mast and mast collar.
Aboard our 1980 Bristol 40 yawl, Willow, the mainmast is keel-stepped, whereas the mizzenmast is deck- stepped. Unlike many newer boats, Willow has a molded fiberglass mast collar instead of an aluminum collar. The reason for pointing out this difference will shortly become apparent.
The standard way to use Spartite is to have it bond to the mast but not to the walls of the mast collar. The cured Spartite plug is then reusable each time the mast is restepped. However, if the Spartite also bonds to the mast collar, then the crane will have a major problem lifting the mast out of the boat. There have been cases when the Spartite had to be drilled out before the mast was removed.
Even if Spartite doesn’t bond to the mast collar, if there are any voids, horizontal runs, or other irregularities in the mast collar, these areas can cause Spartite to, in the words of Jeff Hugar, marketing coordinator, “die-lock it in place.” Also important would be the presence or absence of a draft, meaning an angle or taper designed into the mast partners.
Measure twice. With the mainmast out of the boat, we looked at the inside of the mast collar. It seemed as if there was a draft, but it was hard to tell. So, before putting in the mast and pouring the Spartite, we checked the mast collar by making a plug from plaster of paris. This is a very inexpensive way to check for a proper mast collar shape.
Before pouring the plaster, we made a temporary floor below the mast partners to keep the plaster from running out. Once the plaster hardened, we found that the plaster plug wouldn’t come out. After cutting it out, we were able to see on the plug the problem areas in the mast collar. Luckily, we were able to file these areas smooth and polish them with successively finer grades of sandpaper. If this hadn’t worked, we would have had to use a filler material and smooth it out.
Jeff Hugar recommends that the mast collar, if fiberglass, have a gelcoat overcoat so that the Spartite won’t have anything to grip.
Spartite requires some minimum dimensions for its use. The required depth is a minimum of 2″ for up to a 45′ boat; above that, add 1/2″ for each additional 10′. The Spartite must also come 1/4″ above the mast collar and extend out at least 1/4″ past the collar opening, forming a lip to help keep water out.
Preliminary steps. The recommended release agent to keep Spartite from bonding to the mast collar is petroleum jelly. The Spartite literature is adamant about not using anything else. Since the void between the mast and the collar was tight on Willow, we decided to apply the jelly before restepping the mast, while we had all the room to work. This was a good idea, except that all the wires and lower seven feet of the mast got covered in jelly as the mast was dropped in.
Before pouring the Spartite, there are a number of preliminary steps. The first is to get the mast exactly positioned in the partners. Accomplishing this without chocks on Willow required us to tie lines from the lower mast to various points on deck.
The Spartite kit includes just about everything you need to do the job, including mixing sticks and gloves, but it doesn’t come with petroleum jelly. According to Hugar, one of the biggest problems their customers have is using the wrong release agent, so it seems to us that the inclusion of the jelly in the kit would help eliminate potential problems.
After cleaning the mast with acetone, we next had to build a clay floor to stop the Spartite from running down the mast. The instructions say to insert the clay from the top, however we chose to do this from below so that we wouldn’t contaminate the clean mast with the clay.
The instructions have two recommendations for putting on the petroleum jelly: if you have a bendy spar, put the jelly on the mast; otherwise let the Spartite bond to the mast. We don’t have a bendy spar and wanted the Spartite to bond to the mast. We covered the mast inside the collar area with wax paper and applied more petroleum jelly to the inside of the mast collar. The wax paper kept the jelly from going on the mast. After applying the jelly, we removed the wax paper.
Next, we had to build a dam to form the lip on the top of the mast collar. The instructions recommended using masking tape. We tried that, but because of the outside slope of the mast collar, this caused the tape to pucker. We switched to duct tape. The puckers didn’t all disappear, but they were better. Before coating the mast collar top and the tape dam with jelly, we marked a 1/4″ mark on the tape for a pour level.
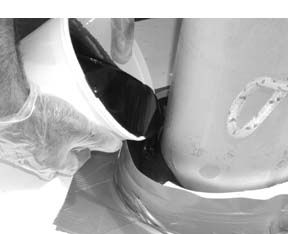
Mixing and pouring. The kit made mixing the Spartite very easy. There are two cans—a rectangular one and a round one. You pour the rectangular can into the round can and stir. Then, you pour the mixture into a small paint cup and stir again. The cup is cardboard and can be bent to create a pouring spout.
Once you mix the two different parts, you have to work quickly. The pot life is approximately seven minutes. We found that pouring the Spartite was simple, but the viscosity caused it to find its level in the mast space slowly. Afraid that it would start setting up before leveling, we poured from two different sides of the mast.
After a few minutes, we could feel the heat from its curing. After an hour we removed the tape and trimmed the edge with a razor blade.
Spartite takes four days or so to fully cure. After that time, we removed all the lines holding the mast in place and scraped out the clay floor (the worst part of the job).
There are three final steps to the installation. UV will cause cosmetic checks in Spartite. To prevent this, either paint the Spartite plug (the directions recommend Testor plastic model paint) or cover the plug with a mast boot. We elected to use our old boot to cover the plug.
If you don’t bond the Spartite plug to the mast, you’ll need to add setscrews fore and aft through the mast collar and at least 1/4″ into the Spartite plug.
Last, you may need to run a bead of non-silicone caulk around the areas that aren’t bonded—the mast collar and the lip, and at the mast if you didn’t bond to the mast.
Next Time. If we were to install Spartite again, we would do a few things differently. First, we’d make sure that the tape dam had no puckers. We thought that the weight of the Spartite would force out the puckers, but we were wrong. Next time, faced with the same situation, we would use the supplied clay to make a dam above the collar.
We did get some Spartite on the mast above the partners when we were pouring. It came off easily with a razor blade, but next time we’d try to pour towards the tape, not the mast.
It was hard to know the level at which the liquid Spartite would settle. Next time, we would make a mark on the tape 1/4″ above the mast collar all the way around. That way, we could pour the liquid Spartite until the line on all sides of the mast collar was under the liquid.
Conclusion
We were pleasantly surprised by the completeness of the Spartite kit (except for the jelly). It should be an example to other manufacturers.
The installation went very smoothly, though having two people available made the job a lot smoother. So far, it has kept out rainwater. Time will tell how well the Spartite system works under tougher conditions. We’ll be testing it this summer on a 2,000-mile ocean sail, and will report back with our findings, including how the mast comes out next time.
Also With This Article
Click here to view photo series #1.
Click here to view photo series #2.
Contact – Dow Corning Corporation, Midland, MI, 517/496-6000, www.dowcorning.com. TCC Spartite LLC, 877/772-7848, www.spartite.com.


