PS contributor Joe Minick and his wife, Lee, are cruising the Mediterranean aboard their Mason 43, Southern Cross.
After 26 years, it was painful, but not surprising, to find our much-esteemed teak deck failing, irreparably. It had started life as half-inch teak planks, bedded, caulked, and fastened in the traditional manner with screws, but weather and wear had finally thinned the teak to the point where splits could often be found radiating from the bungholes.
We extended the life of the deck another season by injecting epoxy into the cracks, but a year later, many had opened again. It was time to make a decision before leaks began to play havoc with the core of the deck.
After years of cruising with a teak deck, we knew most of its pros and cons. Pros: aesthetically pleasing and a first-rate nonskid, kind to bare feet, and relatively easy to clean. Cons: hot in a warm climate, expensive, and potentially high maintenance. We began to think that maybe a change was in order.
As we explored the possibilities, we found it was almost impossible to get any kind of accurate estimate of the cost of converting to a painted deck without knowing more. Was there gelcoat with nonskid under the teak? Was there hidden water damage that would require extensive repairs before the deck could be painted after the teak was removed? A bit of work with a hammer and chisel revealed that there was only fiberglass laminate under the teak, no gelcoat or nonskid.
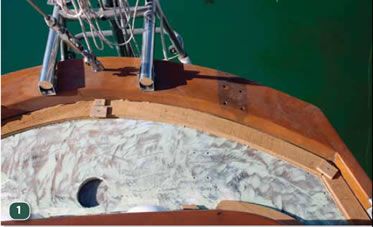
Damage assessment would have to wait until we removed all the teak, but other problems were apparent. The edge of the coachroof was molded to accept the edge of the teak plank, and scupper drains through the fiberglass cockpit coamings and toerail would be above the deck after the teak was removed.
Converting to a painted deck would require extensive fairing along with several layers of gelcoat and a new nonskid applied. Twice in the past, we had added nonskid coatings to an existing deck. One deck was rolled with a layer of tacky resin that was then painted; the other involved applying a course aggregate to the paint before spray-painting. There are effective paint-on nonskid options, but neither of the products or methods we used produced what I felt was a great offshore nonskid, and both were hard to clean.
The stick-on nonskid Treadmaster, while possibly not meeting everyone’s aesthetic expectations, would provide a truly nonskid surface. (See the November 2021 issue at www.practical-sailor.com for our long-term test of nonskid paints and adhesive-backed pads.)
The estimated cost of a painted deck was mounting rapidly, and I didn’t feel we were qualified to handle the job by ourselves, so we started reviewing options for a new teak deck. Although oily teak defies many kinds of glue, advanced adhesives for this task have been around long enough to establish a good track record. Bonding the teak to the deck means no more worrisome screws and their holes into the deck core. Teak was expensive, but we could handle a lot of the work ourselves, and the total cost was potentially lower than painting, if we could provide much of the labor.
The decision was made, and we arranged for a berth alongside the quay in a marina with a reputable marine carpentry shop. They recommended doing the work afloat to avoid the risk of falling and to avoid the heavy labor of hauling lengths of teak, tools, and weights up a 12-foot ladder. It was good advice.
Major Tasks
We faced several challenges that were easier said than done:
- Removing the deck hardware; virtually everything was bolted through the deck.
- Removing the old teak and preparing the deck for bonding new teak.
- Cutting, bonding, and caulking the new teak.
- Re-installing the deck hardware.
Removing the deck hardware took eight days with two people working 12 hour days. The stanchions and pulpits alone had over 120 bolts through the deck. The list went on and on, including cleats, anchor rollers, windlass, and more, but it was something we could handle. Although labor intensive, it was a good cost-cutter for us.
Removing the old deck was a long and arduous job with a chisel and hammer. We left the screws in place and drove a chisel along under a plank, breaking it off each time a screw was encountered. Unfortunately, the fiberglass laminate under the deck was occasionally nicked by the chisel.
After the teak and all associated rubble were bagged and carted away, the screws were removed with a screwdriver where possible and vise grips where not. We broke a few screws and left them in the deck to be sealed with epoxy during the next phase. A surface grinder cleaned the old caulk off before we filled the old screw holes with epoxy and applied a thin coat of epoxy to the entire deck to repair the chisel scrapes and seal the laminate. This was sanded before bonding, to provide “tooth” for the adhesive. We felt we could handle everything except preparing and bonding the new teak, so we sought the assistance of the carpenter to help with this task.
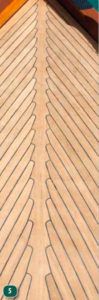
Teak decks are traditionally laid with an outer panel or frame inside the toe-rail and an inner frame around the coachroof and cockpit coamings. The outer frame may be omitted if the curvature of the rail is mild enough to allow a standard width plank to be sprung into place along the toerail, but an inner frame is almost always required to accept the end of individual planks where the curvature is more pronounced. A king plank is commonly used to join the end of the planks on the bow and at the stern.
The wood shop cut and milled the teak planks to half-inch thickness and three different widths to accommodate the frames, planks, and king plank. The planks were relieved along both edges to about half their thickness to provide a caulking groove, and we were ready to begin.
There is more than one way to spring planks into place for bonding, but a common trick is drill a small hole near the edge of the plank that holds a piece of scrap wood. Then a wedge is driven between it and the plank to spring it into place alongside its neighbor. Heavy weights are applied to hold it while the adhesive cures. The drilled holes should all be repaired with epoxy before installing the next plank, but some installers rely on the adhesive under the next plank to fill them and this may be equally satisfactory.
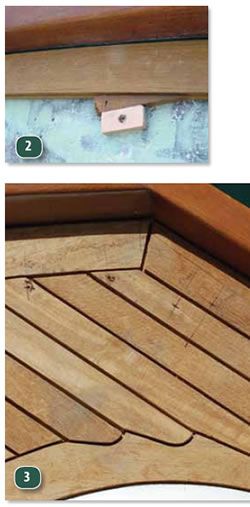
Caulking, while messy, was straight forward. As the entire deck needed a light sanding, we didn’t tape the seams and relied on sanding to remove the excess. It pays to remove, seal, or cover just about everything for this phase. The caulk dust seems to find its way into every possible opening.
It took a month to re-install the deck hardware. All the holes had disappeared under the new teak, and initially we relied heavily on our plan to re-drill them from below. This worked fairly well for the larger holes we made with hole saws and a drum sander. That changed when it came to drilling the bolt holes perpendicular to the deck and parallel to each other while standing on our heads in a locker. With backing plates on one side and hardware on the other, the holes had to be true.
Fortunately, we had taken the time to measure and mark the location of most holes, using the toerail or coachroof as our reference. In the end, drilling from the top down, where one could more accurately see the angle of the drill, proved to be the best choice, but it would have been difficult without the carefully measured and marked locations.
Considerations and Planning
I estimated the job would take two months, but it actually took us three months and a day to complete, working long hours every day in a climate where it never rained, but the summer heat was intense. Without awnings, we wouldn’t have been able to endure it, but we avoided any chance of rain with several hundred holes in the deck exposed. If rain is expected, you’ll need some means of temporarily closing all holes in the deck until the new teak is in place.
We reused almost all the hardware fasteners. Careful bagging and labeling makes this a lot easier, although a few bent screws must inevitably be replaced, arbitrarily replacing all the fasteners would add significantly to the expense of the project.
A large number of heavy weights will be needed. When planks are sprung into place, there is tendency for an edge to lift that can only be overcome with lots of downward pressure. Pieces of railroad track worked well for us but avoid using sand bags or similar approaches. The flexibility inherent with bags can allow an edge to lift, and it’s vital that the teak be pressed firmly into contact with the deck at all points.
Ends of planks can be readily cut and shaped with a fine-toothed blade in a saber saw and drum sander. If available, a carefully handled pistol grip or D-handle router works well for trimming up, but if in doubt, stick to the drum sander and a sanding block. I made good use of a Dremel tool with a smaller drum sander for shaping smaller openings cut into the new deck for fuel and water fills and the like.
Plan to prepare and lay a maximum of one plank per day per side, and even this will be a long day’s work. Reading up on patterns and layouts for traditional teak decks will help you understand the process of adding a new set of cutouts to the king plank as pairs of planks are laid up to the bow or stern. Actually bonding the king plank is done last, after everything else is in place. Photograph every inch of the deck before you start.
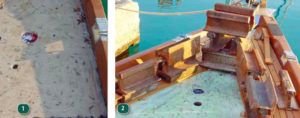
2. Bonding one new plank on each side. Heavy weights are needed and must cover virtually every inch for the length of the plank. Note the wedges springing each new plank up tight against its neighbor.
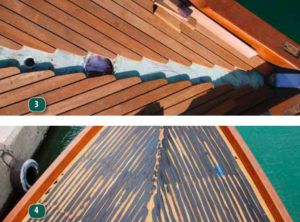
4. Caulking is a long, messy job that seems to take forever. Plan ahead and have cleanup tools, containers for trash, and extra help available. Try to avoid applying in direct sunlight. After curing for four to five days, the deck can be sanded to remove the excess caulk and create a smooth, clean surface.