


There was a time when laid decks — teak, yellow pine, or fir — were the hallmark of a true yacht. The bare wood gave secure footing, easy maintenance, and reasonable protection from leaks. Since the advent of fiberglass, those same laid decks, almost universally of teak, have continued to represent that hallmark. However, they have become at least as much a cosmetic feature as a functional one.
288
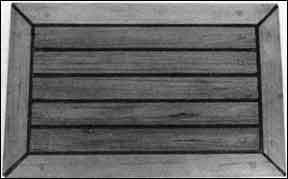
Teak decks, cockpit seats, cockpit sole, hatchtops, and cabin sole all lend themselves to being planked (or sheathed) in a traditional manner Almost no project can do more to “dress up” a boat than some laid decking, and it is a job the average boatowner can do himself. This article describes a simple method for laying decking, one we have used ourselves.
Let’s start with a glance at what such a project entails. Laid teak decking is expensive. As a purchased option on a production 35-footer it may run as much as $4500. The present cost of teak bought in small lots runs over $5 per board foot, and the price of glues and caulking approaches that of vintage cognac. A reasonable estimate for materials alone is about $8 per square foot, to say nothing of the labor, whether you pay a professional or do it yourself putting a fair value on your time and skills.
The idea is to lay a deck that looks traditional and solid. However, since the underlying structure, say cored fiberglass, is strong enough not to need the planking, the planking can be reasonably thin. For the typical production boat up to about 35′ the teak can be about 5/16″ thick, 3/8″ at the most. At this thickness the weight of the decking is about 112 lbs per square foot, not so much that it should seriously decrease stability.
The problem with laying a deck this thin is that fastening is a problem. If it were screwed to the underlying deck in the traditional fashion, the bungs (plugs) used over the fastenings would only be 1/8″ or so thick, so thin they would be impossible to keep in place and relatively soon worn through.
500
The solution is to glue the deck down and avoid using any permanent fastenings. With modern epoxies this system has been used for years by production boatbuilders (where, in fact, we came across it originally). Our own laid teak cockpit (seats and sole) done in this manner has lasted for four years with no signs of problems. Best of all, the system lends itself to amateur use.
The secret of doing the job depends on the right glue and then using only as many temporary fastenings as necessary to hold the planking in place long enough for the glue to set. When the fastenings are removed, the holes they were in are counterbored and bungs set in. Only you know that what looks like traditionally fastened decking is just as strong but was easier to lay than the “real thing.”
Materials and Tools
To lay decking in this fashion, start by measuring the area you wish to plank. It is best to work with smaller areas such as the cockpit sole or hatches before tackling the deck itself, realizing that laying a whole deck is a monumental project.
To determine the area, draw it to scale and decide what pattern of planking is best suited to it. Avoid trying to bend the planking to follow a curve; the thin wood we are using is hard to bend without splitting. Round all dimensions upward to take waste into account and buy plenty of wood for all the decking you plan to do.
The materials you will need are the following:
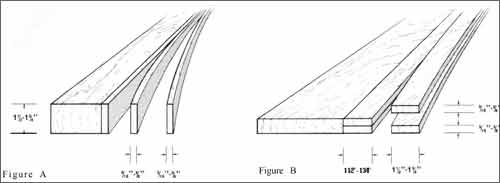
Wood: Teak (and for this project we cannot imagine using any other wood) is best bought dressed: sawn and planed (on one side, the top) to finished dimensions. The planks should be 11/2″ to 13/4″ wide for the most “authentic” look. There are two ways to have it sawn: ripsaw a teak plank of the proper thickness to produce slices of the width of your planking (Figure A); or slice thinner boards that have been ripsawn into strips the width of the planking (Figure B). The latter may be a bit more expensive but it may also be easier to obtain dressed 1″ boards than the 2″ dressed needed for the former.
288
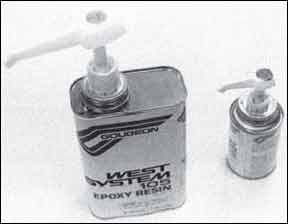
Glue: For best adhesion use a quality epoxy for laminating wood, thickened so that it stays in place when spread in a generous film. We recommend Gougeon epoxy. Start with the regular Gougeon laminating epoxy resin and add chopped strands or fibers (not microspheres, microballoons, Cabosil or any other mere thickening agents that do not serve to retain the strength of the glue). The glue should have the viscosity of mayonnaise (a lump should hang from an inverted putty knife without dripping off).
Caulking: This is not the place to get into any argument about what caulking to use -one part, two part, polysulfide, Thiokol, etc. The planking we are putting on uses caulking only cosmetically, not for permanent waterproofing; our suggestion is black Life-Caulk in cartridges.
Fasteners: Since fastenings are temporary we suggest #1• regular steel pan-head self-tapping sheet metal screws 1/2” long. Flathead screws tend to split thin teak if driven in too hard near the ends of planks.
A supply of 3/8” teak bungs
A handful of scrap wood the thickness of the seams between the planks (such as l/4” plywood) and a few inches long. These serve as spacers so that the seams are a uniform width.
Tools: One of the charms of laying this type of decking is that the tools needed are typically found in most home workshops: power hand drill, a drill bit slightly smaller in diameter than the screws, and a 3/8″ counterbore power sander, orbital (“vibrating” type), plus sandpaper square, either a framing square or a tri-square screwdriver putty knife for spreading glue cartridge type caulking gun mitre box and saw table saw with carbide blade (if ripping the teak planking) a few weights such as five-pound pigs of lead or even some bricks
Laying the Decking
Start by thoroughly sanding the surfaces on which the planking is to be laid. If the surface is reasonably new gelcoat (with or without a molded non-skid pattern), much of it should be removed down to the laminate underneath: unless all traces of wax are removed it will prevent adhesion of the glue. Older gelcoat that has never been waxed or painted does not need such thorough sanding. If in doubt, mix a small drop of glue, let it harden in droplet form on the gelcoat and then try to tap it loose. You should have to sand it down or, if it does come loose, it should take a chip of gelcoat with it.
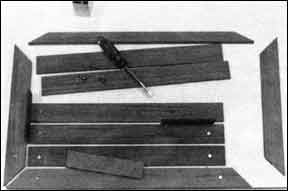
From the scale plan (or pattern) you made to determine the amount of materials, cut all the pieces of planking to fit. If the area has deck fittings or follows a contour, use a precise pattern and first fit the planking to these shapes. Then wrap it in waxed paper (so it does not get inadvertently glued down) and screw it in place with no glue under it.
288
Then lay the straight planking out on the area to check dimensions. Once you start gluing and screwing you won’t want to be interrupted by the need to make more saw cuts or do fine fitting. If you have a choice, start at a straight edge and work toward a curve or a taper.
When the planking has been cut and fitted, mix and thicken the glue, enough to do about one hour’s work (less if the temperature is hot or the deck is being laid in the sun). Remember to mix two-part glue first, then add the fibers.
By using a thick glue there should be no need to drill pilot holes for the screws before setting each piece of planking in place. The stickiness of the glue plus the use of spacers should let you drill while holding the plank without its slipping. Tape the drill so that the holes will only be as deep as the screws are long. Remember, you only need to use enough screws so that the plank stays firmly in place until the glue cures. On smooth, flat surfaces weights alone may suffice.
Spread the glue thickly, especially in localized hollows. Don’t scrimp. The virtue of epoxy glues is that, unlike other types, they bridge gaps; that is, epoxies retain their strength even where the two surfaces being glued are not in direct contact. Use that virtue in laying the decking but don’t allow voids.
Lay each plank in the glue and move it around enough to assure that the glue transfers to the entire underside of the wood. It is okay if the glue squeezes up a bit between the planks as you set them in place; just don’t let so much get pushed up that it fills the seam.
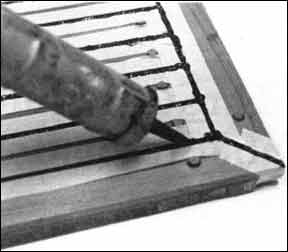
As soon as one plank is in place and screwed or weighted down, spread more glue and go on to the next. If using planking with square edges, set spacers between the planks at regular intervals (every 2’ or so) and push the next plank tight against the spacer before drilling and fastening. As long lengths of teak may be slightly warped, you may need a screw or two in mid-span to keep the edge against the spacers.
As soon as the glue has begun to set, gently slide the spacers out; if left in place the glue at the bottom of the seams will make them stick as fast as the planking. Removing them then may result in edges of the teak planking chipping (a lesson passed on from the heart).
288
Once the glue under the straight planks has cured, remove any edge pieces that were temporarily screwed down, spread glue under them and fasten them down. Carefully wipe clean any glue that pushes out on the outside edges of planks. Even residual glue will show up as yellow and unsightly when it cures and will be next to impossible to remove.
Finally, after all the pieces are in place and the glue has cured completely; remove all screws, redrill with the counterbore almost to the bottom of each plank, and plug with bungs. Glue the bungs in; this the one time it pays to glue bungs as there would never be any reason to remove them.
Finishing Off
When all of the planking has been bunged and the glue is dry, carefully chisel the bungs off almost flush. Sand the new decking well with a moderately coarse sandpaper (say, 80 grit). If any plank stands higher than surrounding ones, sand or plane it level.
Next tape along each seam edge with masking tape and fill each seam with black caulking compound, overfilling the seams slightly. Then drag a putty knife blade along the top of every seam to even and smooth the tops. Remove the tape and let the caulking set.
If during finishing you discover that any planking has a void under it (it will be springy or a tap with a hard object will make a hollow sound), drill a 3/8” hole through the teak into the void. Use that hole to fill the void with glue using a glue syringe, then bung the hole.
Finally, sand the whole area with progressively finer sandpaper grits until the surface is smooth. Slightly round any sharp corners. Do not use any teak dressings or sealers until you are certain the caulking is completely cured. There have been too many recurring reports of sealers chemically attacking various caulking compounds, especially those that have not thoroughly cured.


