


“She’s not very fast in light air. After all, she’s a cruising boat.” Are you still using that excuse for the poor light air performance of your boat? While you may never be able to turn the Seu Slug into Superboat there’s a good chance that you can measurably improve the light air performance of the typical production boat with little more than a fair amount of elbow grease. The secret is to pay attention to underwater fairness and smoothness.
In light air, a major portion of the total resistance of a sailboat derives from skin friction. To oversimplify, the smoother the boat’s “skin” — the submerged part of the vessel — the less power is required to drive it to a given speed. Put another way, given two boats identical in every way, including sail area, the boat with the smoother bottom will be slightly faster than a boat with a rough bottom in light air.
“Smooth’ and “rough” are, of course, relative terms. For practical purposes, the bottom of a displacement-type sailboat can be considered smooth if the surface varies no more than 2 mils — .002″! Before you throw up your hands in despair, it should be pointed out that a surface of this quality is not that hard to achieve. The base surface of the typical production fiberglass boat is this smooth when it comes from the mold. The smoothness begins to be compromised almost immediately, however, as through hull fittings, transducers, and bottom paint are added.
288
Most racing sailors have learned the value of a smooth bottom. Ironically, cruising sailors can benefit at least as much from the creation of a low-resistance bottom as racing sailors, although you rarely see a cruising or daysailing boat with a bottom to match that of a good racing boat. Why handicap a cruising boat, which is probably already underpowered in light air, by having a bottom which almost guarantees reduced performance in the lightest conditions? Almost any tub can be driven to hull speed with 20 knots of breeze, even if it has foot-long grass and an acre of barnacles on the bottom. But it takes a smooth bottom to help it along in a three knot zephyr.
You can begin along the path to a fast bottom by recessing or fairing in through hull fittings that protrude beyond the surface of the hull, particularly in the forward half of the boat. Typically, this means the head intake and discharge fittings.
Whether you decide to recess fittings or fair them in depends on the hull construction, the amount of money you want to spend, and the amount of time you want to spend.
Fairing In
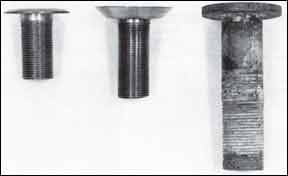
The normal through hull, with rounded edges to the external flange which sits on the surface of the hull, is more suited to fairing in than to recessing. Through hull fittings specifically designed to be recessed have either a flange with vertical sides – sort of like the butt hinge designed to be recessed in the edge of a door -or they are beveled on the underside of the flange. If you want to spend the least amount of money and time, you’ll simply fair in the surface mounted through hulls. If you want the lowest resistance bottom, you’ll recess or replace them.
If you have a small boat with a fairly thin skin, it will probably be safer to fair in -building up material rather than to recess, which must inevitably remove some of the hull laminate. Likewise, if the hull is cored, and the outer laminate is thin, it is safer to fair in than to recess, unless the hull is solid laminate in the way of the through hull fittings. It’s fairly conservative to say that if the hull is less than 3/8” thick at the location of the through hull, you should fair in rather than recess the fitting.
Fairing in a fitting is pretty much the same, whatever the hull material. The only caveat is that with metal boats, you must not damage the barrier coats between metal and bottom paint. If you expose steel or aluminum, you must build up the barrier system again before fairing in. With metal boats, the adhesion of the fairing putty used is then limited to the strength of the barrier coat’s adhesion to the base metal,
Less care is required with a wood or fiberglass hull. Bottom paint surrounding the through hull to be faired in should be removed, and the gelcoat or wood sanded with medium grit paper in preparation for the application of fairing compound.
288
The larger the area over which you fair in the fitting, the more effective the job will be in terms of reducing drag. Obviously, at some point fairing in over an increasingly larger area simply doesn’t pay off. It becomes a lot of work without commensurate return on your time.
As a general rule, you should fair a through hull over the area of a circle whose radius is equal to about 4” for every 1/8” the fitting protrudes above the surface of the hull. For example, the typical 1 l/2” through hull for a head discharge sticks about 1/4” above the surface of the hull. Therefore, you should fair it in over an area that extends eight inches in all directions from the outside edge.
The actual fairing process is straightforward. Remember, bottom paint is removed and the surface given some “tooth” by sanding in the area to be faired. In addition, the bronze through hull must be sanded bright for adhesion of the fairing compound.
With a pencil, draw a circle on the hull around the fitting, the circle defining the area to be faired in. This area, and the outside of the through hull fitting, should receive a prime coat of clear epoxy resin to improve the bonding of the fairing compound.
The fairing putty should be epoxy based, using either microballoons or microspheres for thickening. Microspheres are slightly less dense, and their white color gives you a fairing putty that more or less matches the white bottom gelcoat of most boats. You can use a premixed putty such as Marinetex, but this is quite a bit more expensive than making your own from epoxy resin and fillers. In addition, making your own putty allows you to control the viscosity, making a putty as wet or dry as you need.
Using a trowel, wide putty knife, or flexible spatula of the type used in auto body work, trowel the putty onto the wet unfilled prime coat of resin. Smooth the mixture on the hull, tapering the thickness from the edge of the through hull out to the circle you’ve drawn on the hull. Get the fairing compound as smooth as you can, tapering as evenly as possible. The smoother you put it on in the initial application, the less sanding and spot filling you must do after the first coat has dried.
Putting on the fairing compound is trickier than it sounds. You must mix a putty of a consistency that is full-bodied enough not to sag off the hull while it dries, but is not so thick and dry that it can’t be smoothed with a trowel. A mixture the consistency of cake frosting is just about right.
Once the putty has set up, fair it in to the surrounding hull, making the transition as smooth as possible. Trowel on another coat of putty in any low spots, which can be detected by running a straightedge over the faired area. In any area where daylight shows under the straightedge, fill with more compound. Remember, the larger the area you fair in, the less disturbed will be the water flow over the hull.
Once you’re satisfied with the smoothness of the job, prime the area, including any adjacent gelcoat that has been sanded, with a two-part epoxy primer. Wet sand this smooth before bottom painting.
Recessing
Although fairing in goes quickly and is just about minimum cost, it is really a second-best solution. Recessing the through hull flush with the skin of the boat is more effective in creating a low drag surface. Recessing is usually more work, however, and may cost more if you don’t already have the tools to do the job.
Special through hull fittings are made for flush mounting. Oddly enough, the ones we’ve seen are really a poor design for the job, because they’re fairly difficult to install, and have a flange that is too thick to use in the typical fiberglass production boat without reinforcement of the inside of the hull. The flush fittings work best if the hull skin is 5/8” thick or more, which means either a wooden boat, or a large fiberglass boat.
In addition, if you decide to replace your existing surface mounted fittings with flush fittings, you’ll have to lay out about $15 for a flush 3/4” through hull, and about $30 for a similar l1/2″ fitting.
Flush fittings are frequently used in fiberglass boats with cored hulls, since the total hull thickness is enough to accept then without weakening the layup excessively. However, the core material must be removed around the through hull, and solid glass laid up in its place. This is far easier to do in the original hull layup than in an existing hull, although it can be done if you’re a real masochist.
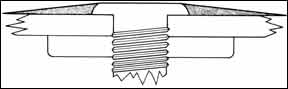
Cutting the mortise for a recessed through hull is the hardest job, because the mortise must be flat on the bottom, beveled on the edges. The accompanying illustration should make the problem more clear.
If you want to recess a through hull on a cored boat, take a deep breath and steel your nerves: here’s how to do it.
Remove the through hull and the seacock. Get your new flush-type through hull, and get a hole saw the diameter of the flange of the through hull fitting. Hole saws, designed to fit the chuck of a drill motor, are available at any large hardware store. Sizes are usually available in 1/16” increments. Note that a different size hole saw is required for every different size through hull fitting, so by now you’re going to have to spend some money. A hole saw arbor costs about $8, the hole saws about $8 to $12 each. A $2.99 multi-sized hole saw from the discount store may get you through one hole, if you never think you’re going to use it again.
288
Now comes the scary part. Cut a hole through the outer skin of the boat, concentric with the existing hole for the through hull, that is the size of the flange of the new flush through hull fitting. Don’t cut through the inner skin!
Next, dig out the core material around your cut for a distance of an inch or more, cutting back with a sharp knife or chisel. Clean the remains of the core material thoroughly from the inner surfaces of both fiberglass skins. What you are going to end up with is a solid glass section of hull in the way of the through hull fitting, and you want to remove all traces of core material that might inhibit the bond between the hull skins and the new glass you put in.
Test the fit of the through hull fitting in the holes you’ve cut in the hull. The through hull must be held in place while the new glass layup kicks off, and it must be held in place with as little movement as possible. A through hull retaining nut, which is designed to hold the fitting in place when it is installed without a seacock, will probably be adequate for securing the fitting during the critical cure period of the new fiberglass. It may, however, be necessary to physically hold things in place on the inside of the boat. A steady hand on the threaded tail of the through hull will do the job. Since the glass mixture may get hot, the steady hand should be gloved. To fill the cavity you’ve created by removing core material, you’ll need loose fiberglass fibers, or chopped strand mat, which easily pulls apart. Also required are rubber gloves, acetone, and polyester resin. Epoxy resin would work fine, but the cure time is longer and the cost greater.
Thoroughly wax the new through hull fitting, filling the threads as much as possible. Also wax the retaining nut that will be used to hold the fitting in place.
Because polyester resin will kick off quickly in the thick mixture you’re going to make, do a dry run before committing yourself to the job.
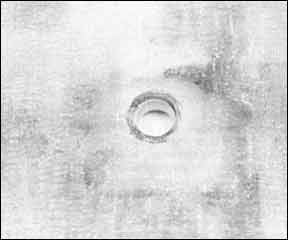
The idea is to pack the area where you’ve removed the core material with a thick mixture of fibers and resin, then insert the through hull in place. When your glass mixture cures, you should have a perfect imprint of the through hull fitting in the hull, with solid fiberglass surrounding the fitting. The hull will be locally reinforced, and there will be no possibility of water penetrating the core.
This seemingly complicated process is basically the same method that boatbuilders use in original construction when flush fittings are installed in a cored hull, except that they have the advantage of doing it during the hull taking only a few minutes rather than the several hours you’ll have to spend.
Remember:
-Work fast.
-Use the minimum amount of catalyst in your resin.
-Make the mixture dense -more fiber than resin.
-Brush the inside surfaces of the hull skins with unfilled resin before jamming the mix in, to seal the edges of the core.
-clean up resin overflow on the outside of the hull with acetone before the resin kicks off.
Mask off the areas of the outside of the hull adjacent to your work area, using polyethylene. Remove the masking immediately once everything is in place and spills are cleaned up.
To insure a perfectly flush fitting in the final installation, the through hull should actually be pulled slightly below the outer surface of the skin during the molding process. This allows a little room for bedding compound under the flange when the fitting is actually installed.
Because a lot of hands are required in the short time you have to work the catalyzed glass mixture, it’s helpful to have another person assisting at this stage. The helper will be most useful on the inside of the boat, installing the retaining nut and holding the through hull in position.
As soon as the resin mixture has kicked off, remove the through hull. Chances are that it will be lightly bonded in place, no matter how thoroughly you wax it. Light tapping with a wood or plastic mallet, or a hammer and a softwood block, should free it from the hull.
Before final installation of the through hull, heat it with a propane torch to remove the wax. Remember that paraffin is flammable, so hold the fitting with pliers or set it on the ground before heating. Obviously, this job should be done outdoors.
You should also round the edges of the transition between the bottom of the through hull flange mortise and the hole through the hull for the stem of the fitting to leave a space for bedding compound. It may also be necessary to cut the stem shorter to allow it to screw far enough into the seacock to be flush with the surface of the hull. Any glass dribbles on the inside of the hull should also be sanded or ground off before installing the seacock.
Recessing in Solid Hulls
Most uncored fiberglass hulls simply aren’t thick enough for the use of a standard flush fitting. If you want flush fittings on a thin solid hull, it will be necessary to lay up fiberglass on the inside of the hull, in effect building a glass backing block under the seacock at least as thick as the hull skin, preferably thicker. This is messy and a little time consuming.
Ideally, the buildup should cover an area no less than one foot square, and consist of alternating layers of mat and roving, with the resin carefully squeegeed out, just like laying up a hull. There is some risk of distoring the hull locally from the heat of laying up this fairly large patch, so it is best done a few layers at a time. Wax-free laminating resin must be used, or the interlaminar bond will be poor.
Once the backing block is laid up, you can cut for the flush fitting using the same method described for cored hulls. A fair amount of grinding and smoothing will be required on the inside of the hull after the interior layup is added, to make the job look clean and professional. If you don’t make it look clean and professional -and this goes for all work you do on the boat -the improvements may actually decrease the value of your boat, or make it difficult to sell.
Flush Fittings in Wood Hulls
Installing flush fittings in a single skin wood hull is easier than in any glass hull, since the planking is thick, there is no core to remove, and a backing block should already be in place under the seacock.
Two methods are acceptable. Using a hole saw and chisel, cut a circular mortise in the planking the depth of the through hull flange and the diameter of the inside surface of the through hull flange. The bevel can then be cut in with a sharp carving blade.
If you’re not skilled with carving tools, cut the mortise the size of the outside (larger) surface of the through hull flange, and fill in the gap between the beveled surface of the through hull and the bottom of the mortise with a mixture of epoxy and microballoons, using the same basic method required for molding the through hull recess in a cored fiberglass hull. Be sure to wax the fitting when doing this, or it will stick firmly -and permanently -to the hull. After the epoxy filler has kicked off, remove the fitting, dewax, and reinstall, using a bedding compound under the flange, just as in a glass boat.
Other Solutions
If installing the typical flush through hull fitting sounds like a big job, you can rest assured that it is. A much more easily installed flush fitting is made in Europe, but does not appear to be available in this country. The European fitting has a relatively small flange, and the edges of the flange are neither rounded, like a surface mount fitting, nor beveled on the underside, like the typical flush fitting. Rather, the edges are vertical sided. This means that cutting a mortise is a simple one-step operation, involving only a large spade bit or a hole saw and chisel to cut and finish the recess.
In addition, the flange is fairly thin, so that the mortise depth is shallow, allowing installation in fairly thin fiberglass hulls without heavy reinforcing on the inside of the hull.
If your hull is thick enough, or if you’re willing to do a little more work on the inside of the boat to locally strengthen the hull, you can flush recess a through hull designed for surface mounting, using the same method required for the European-type fitting.
Using a hole saw, cut a circle in the hull the depth and diameter of the through hull flange. Using a chisel, clean out the fiberglass within the circle you’ve cut, so that you end up with a circular mortise whose depth is equal to the thickness of the through hull flange. In practice, the mortise should be very slightly deeper than the flange thickness. This allows you to coat the inside of the mortise with a layer of resin to prevent any wicking of water in the laminate.
You need not glob resin in. Just use enough for a surface seal, being careful to keep the edges of the mortise free of standing resin. You don’t want to create a fillet of resin in the mortise that keeps the fitting from pulling in all the way.
As with all installations of through hulls, round the transition between the bottom of the mortise and the hole through the hull for the stem of the fitting. This rounded area will hold enough bedding compound to keep the fitting from leaking. Without it, it is easy to squeeze out all the compound under the fitting during installation, particularly if the through hull fitting is screwed into the seacock, rather than screwing the seacock onto the through hull fitting.
Once the fitting is installed, trowel the edges of the mortise with epoxy putty to smooth the transition between hull and through hull fitting. Sand the putty smooth, touch up any voids, and prime with epoxy primer. Wet sand perfectly smooth before applying bottom paint. The result is a perfectly recessed through hull, without replacing any existing fittings.
Caveats
Several rules apply when recessing fittings, whether you use special flush fittings or regular surface mount through hull fittings:
-The depth of the mortise must not exceed half the skin thickness of the hull unless the inside of the hull is reinforced.
-Backing blocks are essential on the inside of the hull to help distribute load.
-No hull coring material should be left exposed. If you cannot meet these conditions, you must not recess through hull fittings. Rather, they must be faired in externally.
One the more tricky jobs in recessing any type of fitting is cutting a circular mortise that is perfectly concentric with the existing hole through the hull for the stem of the fitting. The simplest way, although its accuracy may not be perfect, is to carve a soft wood plug to fill the existing hole, then carefully locate the center by measuring for and drilling a small pilot hole in the center of the plug. The wood plug should be cut off flush with the outside of the hull before getting to the meat of the job. The plug is left in place during all the concentric cutting, then knocked out. Very slight error in concentricity can be eliminated by slight grinding of the edges of the through hull or the edges of the mortise, although the best course is to be very careful in locating the center before doing any cutting. Take your time.
Conclusion
Reducing the drag of through hull fittings is only the first step in creating a low resistance bottom. It can be a reasonably simple project if you take the short course fairing in but can quickly develop into a fairly time consuming job if you choose the more effective solution recessing the fittings flush to the surface of the boat.
You are not likely to notice an immediate improvement in the performance of the boat, since we’re talking about relatively small changes. However, they all add up. If you combine reducing through hull drag with other bottom improvements, such as careful attention to the application of bottom paint, you will be well on the way to measurable improvements in performance, without spending much money.


