With tropical storm season under way, my mind turned to the topic of chafe protection for lines. For a broader look at hurricane preparation, my annually updated and recirculated hurricane season blog post has links to several previous Practical Sailor tests and articles related to chafe in mooring and dock lines. One of the most interesting reports is how impermeable hoses, like garden hose or the reinforced hose commonly used for boat plumbing, is far less desirable than purpose-designed chafe gear, which allows the rope to cool. Intra-fiber chafe and the associated heat buildup has been blamed for many dockline, snubber and anchor line failures. In this post, we’ll revisit one solution that comes up again and again anytime we talk about chafe protection: the leather chafe guard.
The following short description of do-it-yourself chafe protection, written by PS contributing Editor Ralph Naranjo, appeared in the July 2011 issue of Practical Sailor. Refer to the complete article for a complete description. The article will be among many updated and expanded test reports that appears in Practical Sailor’s soon-to-be released “Hurricane Preparedness Guide.” A comprehensive look at the gear and tactics that can be applied to the wide range of situations a cruising sailor might encounter, The Hurricane Preparation Guide is meant to supplement the standard guidance offered by various advisory groups and experts, such as the Hurricane Manual for Marine Interests.
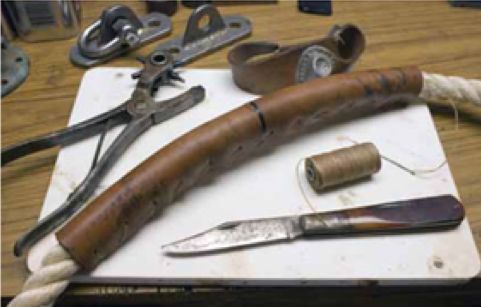
Being a team of diehard do-it-yourselfers, we decided to try our own hand at devising a workable solution to defeating line chafe. After fiddling with canvas, old fire hose, and even messing around with some Kevlar, we settled on leather—an old riggers standby. It proved to be rugged and remained intact after we put it through our chafe protection routine on the belt sander. The fabrication process was kids craft 101, and there was something quite seafaring about the result.
Our approach was straight out of the old-salt column. Using a sharp knife and metal straight edge, we lopped off the size patch we needed. Holes were punched opposite each other at 1/2-inch intervals, and for temporary use, we zigzagged small cord the length of the leather. For a more permanent installation, we hand-stitched the leather in place, tucking locking stitches into the rope at each end. Holes were made with a pliers-like hole punch, and we fashioned our chafe strips to be long enough to cover the hard points, adding an additional 25 percent to the length to handle stretch and any minor slippage.
Whether laced on for short-term use or stitched more permanently in place, the leather rode smoothly in chocks and prevented the hard edge of an alloy rail from damaging rope fibers. Care needs to be taken to keep the more fragile stitched seam from facing the action and becoming the surface that handles the abrasion. But the same holds true for commercial products that rely on velcro closures.
All in all, we concluded that if you have the time and enjoy the tradition of handworking a seamanship solution, definitely go find some leather. If you would rather spend the time sailing, purchase an over-the-counter solution (see PS, July 2011 online). But above all, be ready to add anti-chafe gear to your lines when good weather turns bad; a good outcome is all about staying put.


My favorite anti chafe solution is easier but not as handsome. Using scraps of old dacron sailcloth (faded to brown) I cut trapezoidal pieces – approximately 15 and 24 inches on the parallel edges and about 9 inches tall. I lay the short parallel edge against the line and roll the rest around, secure the ends with black tape and maybe an additional tape around the middle. The trapezoidal shape provides a nice taper at the ends.
The old sail cloth is water-permeable, keeping the line wet to combat stretch friction. The dacron is extremely chafe resistant. Cheap if you have a scrap of old sail available.
good article and photo-poor
We have been using elk hide and dyneema thread. Adding to the conversation, different leathers have different thicknesses and wear characteristics.
What type and thickness is the leather and were do you get it?
Moose hide is very durable and softens nicely as it is worked.
Just punch a hole at each end of a piece of garden hose that you haven’t had the good sense to throw away yet, slide the hose to where ever you need it, and attach it by tying a piece of strong line through the hole you made and around the line. Use plastic hose. It slips best through/around chocks etc. Cheap too. Leather looks best, but are you after looks at the dock, or are you going sailing?
I like vinyl tubbing. Quick and easy.