


Batstat 300 Battery Monitor
There are items on our boats that we tend to ignore and take for granted until something happens. One of these is the starting battery. We turn the key or press a button and we expect the engine to start. If the starting battery is bad, we may get a slow turning engine, a clicking starter solenoid or the ultimate heart-stopping sound of… nothing. One hand clapping.
We spend a lot of attention and money caring about the boat’s house battery bank. We measure battery voltages and amp-hours used to get an inkling of the current battery state. The starting battery is different. In that case we don’t care about amp-hours. What we care about with the starting battery is the marine cranking amps (MCA) that it can supply for the engine.
Batcon, Inc. of Ft. Walton Beach, Florida, produces a line of starting battery monitoring devices designed to alert you ahead of time to a failing starting battery. We looked at the Batstat 300, which is designed for marine applications to monitor a single engine’s starting battery.
The device tests the starting battery under a load condition, using the starter motor as the load. It monitors the voltage at the starting battery both during and after cranking the starter motor. While cranking, the voltage at the starting battery can drop to 10 volts or even less. The Batstat 300 monitors the voltage drop and also the rate at which the battery voltage returns to its resting value. If either of these conditions are outside of the parameters built into the Batstat 300, a red LED will light on the gauge. The LED will stay on until the ignition switch is turned off. Turning the ignition key back on will arm the Batstat 300 to again monitor the starting battery.
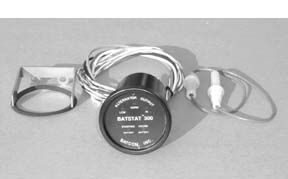
The Batstat 300 has a round black gauge, similar to any engine instrument gauge. It fits into a 2″ hole and needs 3″ of depth behind the panel. There are four wires coming out of the back of the gauge to connect to the starting battery, the house battery, and the ignition switch. The wires are 11″ long. Then there’s an 8′ wire pair, used as a temperature-sensing thermistor that is used to correct the starting battery algorithm in the Batstat 300.
In addition to monitoring the starting battery, the Batstat 300 monitors the alternator output with three LEDs: low, norm, and hi. However, the instructions don’t mention the voltage range that each LED covers.
We rigged a quick test of the Batstat 300 with a multiple-output DC power supply and also tied into a starting battery. The Batstat 300 functioned as advertised, though we could only simulate a bad starting battery with the power supply.
The Batstat 300 is always on. Its standby current draw is a measly 7 milliamps.
The instructions that came with the device are skimpy and a little confusing. The addition of a graphic showing an installation, as is shown on Batcon’s web site, would help a lot. The instructions say to use 18-20 AWG wire for extending the battery connect wires. However, the ABYC standards say to not use anything under 16 AWG. The instructions are also missing warranty information, LED voltage ranges, the operating voltage and current, plus the replacement fuse sizes for the battery wire in-line fuses.
As for the unit itself, we have a few concerns, not with its operation, but with its ruggedness. We’d be concerned about how splashproof the gauge front is without a cover glass or other protection. The wires coming out the back of the gauge have no strain relief at the gauge and should not be pulled on. We would restrain the wires to one of the mounting studs on the gauge.
At night, the LED light can “bleed” through the plastic overlay, illuminating the extra holes in the case behind the overlay. We presume that these holes are used for the Batstat 305, a twin-engine version of this gauge.
The Batstat 300 comes with everything you need to install it except the extra wire to connect it to your batteries. Included with the gauge are the mounting hardware, a bezel gasket, and two in-line fuse holders with pigtails. The Batstat 300 sells for $99.99 and has a 90-day manufacturer’s replacement policy.
Batcon, Inc., 109 South Ave., Ft. Walton Beach, FL 32547, 850/863-8828, www.batconinc.com.
———-
Link Tools
Shortly after we reviewed nautical toolkits (March 2002), Link Tools, a name new to us, contacted us with a proposal to evaluate its products. To that end, we obtained Link’s 41-Piece 3/8″-Drive Locking System Set.
Before opening the fitted blue plastic carrying case, we skimmed the included catalogue (you can find the information at www.link-tools.com) and immediately discovered Link’s market discriminator: components that lock together, and release by one hand if needed-noteworthy advantages if you use a socket set where the tools or you, or both, must operate in cramped quarters. In addition, you enjoy these features even if you use sockets from other manufacturers, as long as they have indents on the drive end.
We successfully tested numerous configurations, adding Craftsman and Snap-On components.
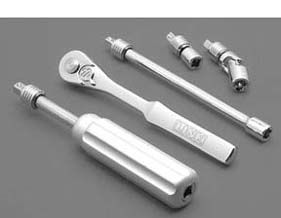
This socket set, the largest Link currently offers, packs a lot into only 41 tools:
• 1 UniDriver / 6″ extension
• 1 Automatic locking ratchet, 7-1/4″
• 2 Drive extensions, 2″ and 6″ long
• 1 Universal joint
• 2 Sparkplug sockets, 5/8″ and 13/16″
• 9 Sockets, 6-point, 5/16″ to 13/16″
• 11 Sockets, 6-point, 8mm to 18mm
• 5 Allen wrenches in sockets, 3/16″, 5/16″, 3/8″, 6mm, 10mm
• 5 Torx bits in sockets, T25, T30, T40, T45, T50
• 2 Screwdriver bits in sockets, slotted, 9/32″, 5mm
• 2 Screwdriver bits in sockets, Phillips, #1 and #2
To achieve the design objective, each coupling of two components is secured by a case-hardened steel pin, activated by a spring-loaded collar around the driving member. The pin replaces the ball bearing commonly used by many other manufacturers. Put a socket on one of the extensions as you normally would, but to remove it you grasp the extension with one hand and move the locking collar with your thumb and index finger. Gravity alone is sufficient to separate the components.
We were able to add and remove all components very easily. The more components you link together, the less you need a universal joint (see photo). Yet you can pull on both ends and the components stay locked until you uncouple them. The ratchet handle is smooth and easy on the hands. This set was so pleasurable to use that we found ourselves looking for applications.
The UniDriver connects into the system at both ends. It’s a 6″ extension, a screwdriver and a nutdriver in one tool. It has a large, comfortable aluminum handle around a steel drive shaft, and will take the same torque as the other components. We used it for all three applications and found it became the centerpiece of the set, with the ratchet used only for final tightening.
For strength, Link says it heat-treats the chrome-vanadium steel to 130% of ANSI standards. We would be even more impressed if actual safe torque limits were shown. Against corrosion, Link first plates the steel with nickel, then again with chrome. Even the insides of the sockets are plated.
Link is a young company, one of whose principals invented the original quick-release ratchet in 1962 and holds the patents for today’s locking system.
The tools are guaranteed “as long as you own” them. This set sells for a somewhat staggering $250. The smaller set, minus the sockets, sells for $150, giving you Link’s new technology to use with your existing sockets. A 1/4″-drive set is also available.
As with all things, value is subjective. All we can say is that quality and innovation are both present in Link’s tools, and that the problems these designs solve are real ones. High though the prices may be, this is a case, we suspect, of getting what you pay for. Do not drop these overboard.
Link Tools International, 2440 Lakeview Ave., Chicago IL 60614; 888/433-4234; www.link-tools.com.
———-
Zipper Rescue Revisited
Five years ago, Practical Sailor introduced to readers a fine gentleman named Mike McCabe.
Boston-born and a graduate of Lowell College, the then 39-year-old McCabe had run for 12 years a canvas shop in Idaho that catered to nature lovers and outdoor adventurers. McCabe is one of them.
Amazed that jackets, sleeping bags and other gear are often discarded simply because the zippers fail, McCabe exercised his curiosity and soon slipped into a small business of fixing zippers. He found it so easy, he was embarrassed to charge much for it.
“When a zipper fails,” he told PS, “it’s usually the slider, the little moveable part that closes and opens the zipper teeth. In less than five minutes, it can be fixed if bent, or replaced if worn.”
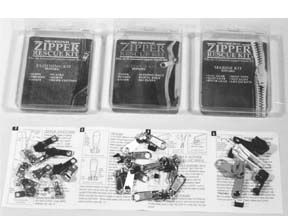
Rather than do everything in his shop, McCabe elected to put together little kits containing a 12-panel folding manual, and an assortment of sliders and end stops. Because zippers come on such a wide variety of gear-from tiny nylon ones on women’s clothing to big tough plastic versions on wet suits and boat canvas-he wound up with three kits (called Clothing, Outdoor, and Marine), which still sell for $12.95 each, $24 for two and $35 for all three, postage paid.
Practical Sailor’s little article attracted interest to McCabe, who became known far and wide as “Zipperman.” His business, called ZRK Enterprises (for Zipper Rescue Kits) has prospered, and the zipper kits have found their way into JoAnn’s Fabric Stores and catalogs like Clotilde, Home Sew, REI, and Campmor.
Because of calls from boatowners, McCabe looked into the problem of headliners, which can be troublesome. If you have a Hobie 33, an S2, Ericson, Islander, or any other boat that uses such a zippered headliner, you’re likely to be aware of this.
“The builders used a 5 mm plastic coil zipper, which is good, but a pot metal slider that doesn’t last long in the marine environment,” McCabe said. “With the slide consumed by corrosion, most boat owners resort to duct tape, which is pretty ugly.”
McCabe now has plastic sliders for headliner zippers that are easy to install and will last indefinitely. He said that if you have such a headliner, you should consider replacing the slider before you have to get at deck hardware or wiring underneath. The slider works with most boat cushions, too.
Because of other requests, McCabe, who takes pride in being able to solve almost any zipper problem, also has developed zipper kits for the convertible tops of Mazda Miatas and Jeeps.
He is, of course, very popular with the motorcycle set, whose members may be the most devout zipper users.
We offer this update about a man who found something unique and useful to do because, first, we continue to get calls (“I remember seeing the article, and I need the address or phone.”). Second, McCabe has moved his shop from Idaho to Oregon (see below). Third, although we’re extremely unhappy to report it, since we last wrote of Mike, he’s developed ALS (amyotrophic lateral sclerosis), aka Lou Gehrig’s Disease. It you call him with a zipper problem, he will, as usual, go sled-length to come up with the answer. His speaking voice isn’t what it was, but the mind behind the voice, and the willingness to help, is all there.
There’s still no cure for ALS, although life expectancies are increasing somewhat through better management of the disease’s effects. It’s pleasing to think that, just as Mike has devoted thought and effort to maximizing the lifespan of useful gear, he, too, may be given enough time for doctors and researchers to come up with a way to defeat this disease.
The troops on the front line can always use focus and funding. There are a lot of resources on the Internet. You could start with the ALS Association (www.alsa.org; 888/949-2577). ZRK, 279 Palm Ave., Ashland, OR 97520, 800/735-4620, www.zipperrescue.com.
———-
Inflatable Distress Flag
One of the more effective, if least spectacular, daytime emergency signals is the simple distress flag-a 3′ x 3′ square of bright orange plastic sheet with a black square and circle printed on it. It’s distinctive and visible as long as it’s held open. No pyrotechnics, no smoke, no batteries. It’s an inexpensive device that would seem to be hard to improve upon.
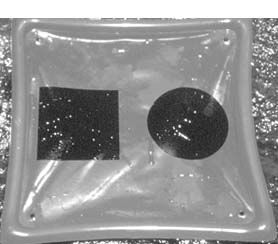
Nevertheless, ACR Electronics has figured out a neat way to make a good device even better. The ACR Inflatable Flag takes the basic flag and adds a 2″ diameter orally inflatable tube around all four edges. When the tube is inflated, the flag becomes a self-supporting 38″ square.
The Inflatable Flag offers several advantages over the more-usual non-inflatable version: It doesn’t require any wind to extend it fully when held or tied to an oar or mast, and it can be used by as an (unofficial) flotation device.
It weighs almost a pound and a half and measures 5″ x 7″ x 2″ folded in an uninflated condition, which makes it unlikely that it would be carried on one’s person. In its inflated state it’s bulky, so it wouldn’t normally be left that way.
However, it would make a valuable addition to a liferaft’s safety equipment. Once inflated, it could function as a rain collector or sunscreen. If dropped into the water, it will float and provide some buoyancy to a swimmer, as well as provide a visible signal for passing aircraft.
The ACR Inflatable Flag meets the USCG requirement for a daytime emergency signal. It’s well constructed. The flag itself is made of vinyl about twice as thick as other flags we’ve encountered. There are four grommets for attaching ties, and there are four sturdy 30″ polypropylene rope tethers.
It would be nice if ACR were to provide a carrying bag, but even without one, the ACR Inflatable Flag seems well worth the $15 it lists for.
ACR Electronics, Inc., 6767 Ravenswood Road, Fort Lauderdale, FL 33312; 954/981-3333; www.acrelectronics.com.
———-
Snap Installation Tool
Snaps, commonly used to attach canvas on a boat, need to be replaced from time to time. Most of us use a miniature holder and punch that comes with a snap assortment kit. Although the holder and punch get the job done, it’s not the most accurate means of delivering force. The result can be an improperly formed rivet and a snap that soon comes apart. Another consideration with the hammer and punch method is that something firm is needed to hammer against. That can be awkward or impossible.
Canvas shop professionals use a C-shaped vise-plier style tool that works well, but at a cost of $180, it’s too expensive for the average boater. Snap installation tools that resemble a modified set of regular pliers cost only about $20, but they lack the force or repeatability of a vise-plier tool.
Time Saver Tool Corp. has a clever solution: inexpensive attachments for Vise Grip-type pliers. Called a Vise Plier Attachment, it consists of two nylon attachments-one to hold the button head and the other to hold the button socket-that clip onto the tool’s jaws. The attachments automatically center the snap and allow a consistent amount of force to be used for multiple snaps.
Use 10″ straight vise pliers with good alignment. Put the button head in one attachment, the button socket in the other, set the vise pliers for medium pressure, and squeeze. The “rivet” is well formed and secure, and canvas can be worked on in place.
The tool worked well for us. We got a perfectly installed snap every time. One limitation is that the snap must be located no further from the material edge than the length of the vise plier jaws, although we found it possible to scrunch things up a little farther.
Vise Plier attachments are listed for $6 per set in the BoatU.S. catalog. Another set of attachments is available for installing eyelets.
Time Saver Tool Corp. Lansing, IL 60438; 708/418-5864.


