


A companionway slider and hatch boards are the most common type of cabin entry on sailboats. Its seaworthy, lightweight, and inexpensive. Unfortunately, you can’t leave the hatch open when it’s raining without getting water below. Swapping the hatch boards for a hinged door is a popular upgrade, but in many boats there simply isn’t space for an opened door.
A dodger or hard top is another possibility, but dodgers increase windage, disrupt movement on deck, interfere with line and sail handling, partially block the view forward, and are expensive and heavy. Many sailors simply don’t sail in the rain often enough justify the downsides. However, after just one steamy evening below during a summer thunderstorm, buttoned up tight, and you’ll give your eye teeth for a little more air.
For my new-to-me boat, a Corsair F 24 trimaran, I envisioned a streamlined mini-dodger that would offer protection from spray and rain from forward or straight down. Access would be fast and it would not interfere with sailing, or add windage or weight.
The answer was a mini-dodger fabricated from a sheet of fiberglass shower-liner material. It snaps into the slider grove in seconds, and by virtue of being cut slightly wider than the opening, it flexes into a cone-shaped arch, tapering down to nothing at the forward end of the slider and providing a small overhang on the cockpit end.
Although the arch is not tall enough to enter the cabin standing, we can either crouch or sit on the sill and slide in. In the rain you can leave the slider open, with some or all of the boards left out, according to the wind direction. A screen inside blocks the bugs. With a small cabin, this is enough ventilation in the rain. Three ties secure it to the slider handle. The ties, combined with a tight fit, have made it secure in all winds.
The tie points are reinforced with a second layer of fiberglass to insure durability, and a rubberized extension on the forward edge makes for a good seal. Best of all, it can store flat under the V-berth mattress, taking no space and easily forgotten until it rains.
Making the Mini-Dodger
Measure the slider opening, including the width, and the length of the groove with the boards in and the hatch adjusted in the ideal open position (see below). Decide how much overhang you like. Depending on the angle of the companionway boards, six inches is typically enough. Decide how much arch you like, and estimate that arch with a tape measure. You want enough camber to spring it into the track. If camber is than 4 inches or more than 10 inches, it could slip or pop out of the track.
If there is a handle on the top of the slider, determine how far the slider must be open for the handle to clear the mini-dodger. This handle will provide secure tie-down points. If there is no handle, you can create a pair of hold-downs at the aft end of the companion way, or by a tight strap over the top.
Cut a test piece of posterboard similar to the shape you think will best fit. Test the fit, adding cut-outs, locating tie points, and adjusting for a custom fit. Once a final outline is selected, cut from 2.2 millimeter (.09-inch) thick fiberglass shower surround material. It can be cut to fit with a cut-off disk in an angle grinder or cutting with a razor utility knife (box-cutter), using the score-and-snap method. We found a 48-inch by 8-foot Smooth White Fiberglass Reinforced Plastic (FRP) Wall Panel from Lowes Home Store for $65.
All of the corners, inside and outside, should be rounded to avoid stress concentrations. The schematic drawings for the mini-dodger are posted along with this article at www.practical-sailor.com.
Add reinforcement patches for the tie points and exposed corners by cutting scraps to fit and bonding them using epoxy thickened with colloidal silica or microfibers (prepare the surface by wiping with acetone and sanding). Taper the patch edges and wipe the epoxy smooth to provide smooth transitions. For the corner and edge patches, overlap the edge slightly and then trim away with a disk sander when cured. Sand all edges with 200-grit paper to eliminate splinters.
Drill holes for the tie-down cords; I used three on the slider handle only, both for security and to create the camber. You can also install ties at the aft corners of the overhang to connect to hooks or eyes in the cabin top. Trim the aft edge as needed to be certain you can remove the hatch boards with the mini-dodger in place.
Secure the cords to the dodger with stopper knots, seal the holes with a dab of polyurethane caulk, and cover the holes and knots with scrap Sunbrella ovals (ask your local canvas shop) bonded with polyurethane. This gives it a clean look. There are many other ways to attach the lines. The trick is to keep any holes watertight.
I left the pebble finish-face up for several reasons; it is more difficult to bond the reinforcements, the smooth surface should repel dirt better, and it’s shiny. I have used the same material for window covers for many years. It resists UV very well (Practical Sailor DIY Fiberglass Hatch Covers, Mach 2016).
Our observations suggest this is a drop-in fit for Catalinas, Beneteaus, J-boats, and some Hunters and Pearsons. If your boat doesn’t have a track that will work, suitable aluminum track is available at hardware stores such as Home Depot and can be added above or outside of the existing track. Water will drain into the track, so it must be angled and sloped to allow drainage.
If your slide runs on top of the companionway, the dodger could also be secured without a track, using ties, or studs with knobs. This won’t fit all boats, but maybe we have given you a starting point for your own invention.
The result is a sleek dodger, reminiscent of the sleek cabintop of an Open 60 (or a Contessa 26). The cost is less than $70 (with lots of material left over), it weighs only five pounds, and it stows under the mattress, ready to be installed in a minute whenever rain threatens. It’s a simple, inexpensive, companionway solution that should last as long much longer than any canvas dodger.
Avid sailor and ice-climber, Drew Frye is a technical editor at Practical Sailor. He has a background in chemistry and engineering blogs about cruising products at www.sail-delmarva.blogspot.com.
Two often we look at marine stores for solutions to our boat problems. This simple fix uses a flexible fiberglass shower panel that is relatively cheap and easy to work with.
As with many projects involving cutting and fitting a new component, it is best to start with a template made of cardboad or stiff posterboard. This gives you plenty of opportunity to make adjustments to the fit and the placement of the tie-downs.
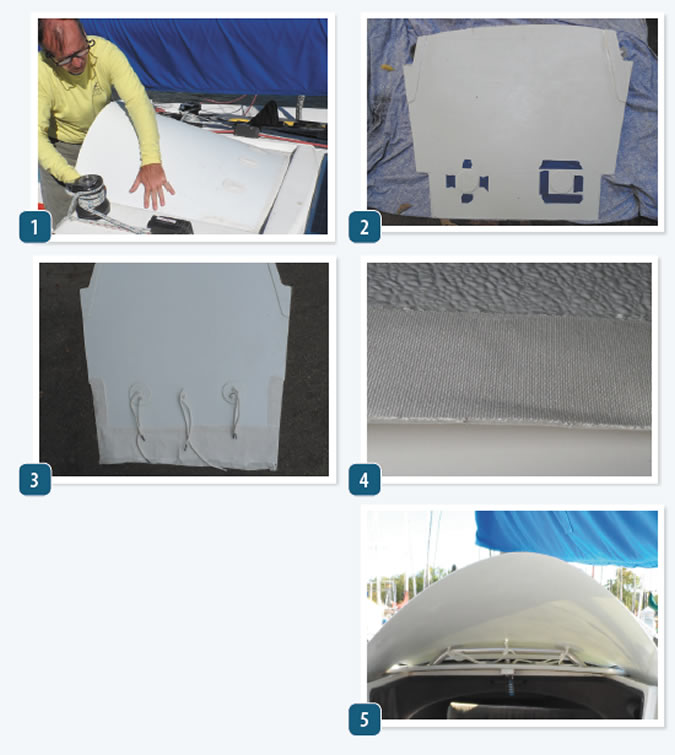
1. Test the fit, first with posterboard, and then with your finished shape before drilling holes for the tie-downs.
2. The reinforcement layers of scrap fiberglass at the tie points are bonded in place using epoxy thickened with colloidal silica or microfibers.
3. The underside of the cover, showing the reinforcing patches is ready for the final trim to fit.
4. A strip of Sunbrella wrapped around the edges and bonded with polyurethane epoxy protects the relatively think edges.
5. The installed dodger lashes down on the sliding hatch. In the event weather gets really wild and we need the hatch closed for safety, it can be removed in a matter of seconds.


Have you any more photos? I can’t envision what it looks like.
Thank you – Dennis