


After hundreds of years of seafaring, there shouldn’t be any new rope tricks. Then new high-strength materials like Amsteel came along, suggesting new applications for old-school knot craft. The age-of-sail strop morphed into the versatile the soft shackle (see Going Soft on Shackles, April 2015). Racing sailors employ it to eliminate weight aloft, and cruisers like the economy and versatility. We’ve found good uses for soft shackles on jib sheets and ground tackle, but the strop is also alive and well, securing tarps and gear. The best part is you can make them from old rope, costing nothing.
A strop is a short length of rope with a fixed loop used to connect to ropes, or join to itself. In this case we’re talking about a strop with a fixed loop at one end and a knot in the other, with the loop carefully sized so that the knot cannot slip through unless someone pushes it while the line is completely slack.
It is not required for the loop to noose closed under load, as it does in a soft shackle, because nylon and polyester, particularly in used line, have much greater friction. We’ve used simple knotted strops on genoa clews, although we switched to Dyneema soft shackles a few years ago because the greater strength made them smaller, prone to snags, and longer lasting.
There are also numerous low-load applications where custom-tied strops can simplify daily operations, reduce frustrations, and even add a little nautical flavor. Unlike metal alternatives, they can’t scratch decks or spars, corrode, or stain, and unlike knots, they never jam while under load or freeze up in the winter.
Certainly there are as many ways to tie these as there are riggers, and as many uses as there are boats. We will describe the two variations we have found useful.
Long Strop
We use long strops to secure tarps, and others have used modified versions tied in Amsteel on halyards (different knots are used with Amsteel because of its slipperiness). One end can be permanently secured, or both ends can be free.
1. Tie an Oystermans stopper knot (Ashley #526) in the end, leaving a 4-inch tail. The Oystermans stopper grips better than the common Figure 8 stopper knot (see adjacent photos).
2. Tie a bowline with a bight or some other secure loop 16-18 inches up the line. The loop should fit the end knot, even after tightening.
Adjustable Strop
We first saw these in use on a tall ship as part of the lashings securing a tender on the deck. This is tied with either hollow braid rope or by using only the cover of double-braid rope.
The accompanying photos show cover-only from retired 3/8-inch polyester double braid. New line is easier to splice, but wheres the charm or the economy in that?
1. Cut a length about three times the required length plus about 32 inches.
2. Tie an Oystermans stopper knot in a scrap line. The knot serves as a template, used only to judge the sizes of the loops you’ll make.
3. Double the rope to form a bight, this spot marks buttonhole end of your strop, formed by an eye splice.
4. Form a locked Brummel eye splice at the bight (See www.animatedknots.com/brummel/), but instead of burying the end, pull it through to accept the next splice .
5. Using the standing end in Step 4, form a second loop by creating a locked brummel splice about two inches from the first loop.
6. Continue alternately crossing and Brummel-splicing the lines until the desired number of loops are formed, or until you are within 16 inches of the shortest end.
7. Pass one of the covers (whichever is shorter) into the core of the other and bring it out the end.
Tie an Ashley stopper knot with the end, leaving a 4-inch tail.
Avid sailor and ice-climber, Drew Frye is a technical editor at Practical Sailor. He blogs about cruising products at www.sail-delmarva.blogspot.com.
The handy adjustable strop can be formed out of hollow braid or the cover of double-braid rope. We’d not use old rope for essential work that involves heavy dynamic loads.
- A second loop is formed by creating a locked brummel splice (See, www.animatedknots.com/brummel/).
- The third pass has begun. Marks on the rope can help guide the passes to keep them evenly spaced.
- After the last loop, the final pass goes down the center of the hollow tail.
- The newly formed core-and-cover tail are trimmed and finished—hot sealed, or whipped and stitched.
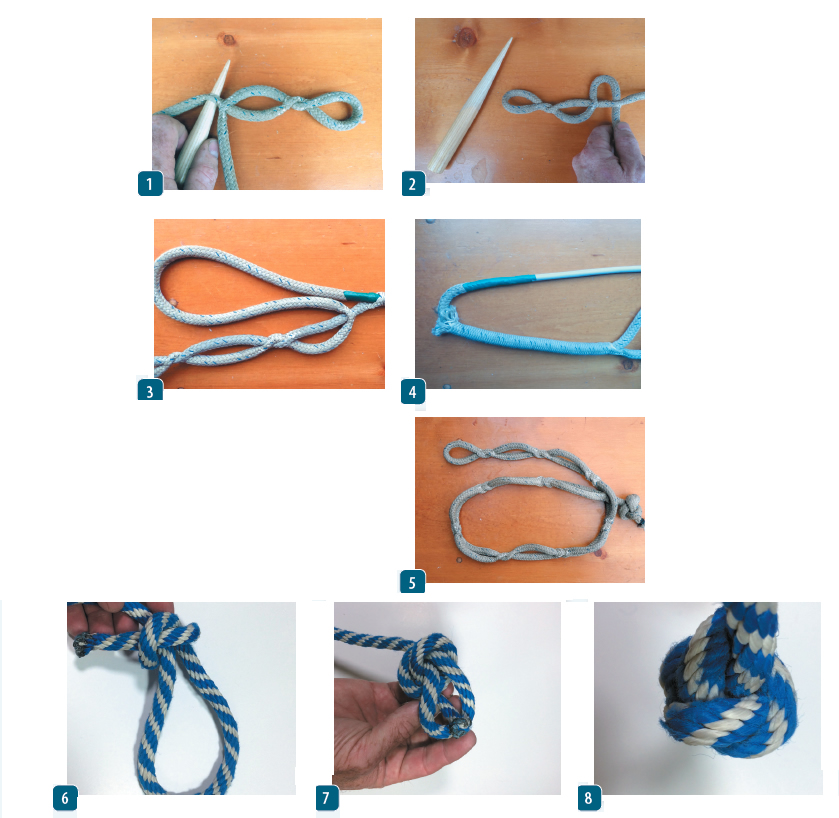
- The Oysterman’s stopper knot (Ashley #526), finishes off the adjustable strop.
- An overhand noose starts the Oysterman’s stopper, (see www.animatedknots.com/ashleystopper/).
- The large loop is pulled tight after the final pass, leaving a short tail.
- The back presents three staggered lobes for gripping the “buttonholes.”


