


Recovering a person in the water is a daunting problem. If the seas are rough enough to fall overboard, it’s not easy to hold the boat alongside in a controlled manner. Cold water often saps the strength of the swimmer so much that they can’t hold on to a rope or lifesaving device.
Once you finally bring the victim alongside the boat, there is the matter of hoisting them aboard. A ladder can work if the victim is able and the seas are not too large, but depending on the motion of the boat, the position of the ladder, and the state of the swimmer, it’s often impractical.
Life rings are throwable and a rope can be attached (but often is not), but the swimmer has to hold on while you bring them alongside, and life rings are useless for hoisting the victim aboard. Horseshoe buoys are tough to throw, hard to climb into, and generally not configured for lifting. The Lifesling II (see PS January 2006 “Slings, Scoops, and Ladders,”), Lalizas Lifelink, and Jimmy Green Marine Oscar are floating slings that you climb into which can then be used to hoist you aboard. But the swimmer must be able to climb into it, and must be able and remember to keep their elbows down during hoisting. At nearly $200 they are also a little pricey.
A Japanese Coast Guard junior officer came up with an idea for super low-cost alternative that could be made from Dollar Store parts and placed on every fishing boat. Known simply as the Anshinya (translated as “peace of mind”), it is made from pool noodles cut into segments, a few knots, and a clip.
Tough less durable than a Lifesling II, the Anshinya can be assembled from inexpensive parts in 15 minutes. (Note of caution: UV rays can cause pool noodles and some floating lines to deteriorate rapidly, so protect from the sun and replace them at regular intervals.)
Materials
- 120 feet of floating waterski line. About $30.
- Aluminum wire-gate climbing carabiner. These are very corrosion resistant, strong (4,500 pounds), and the easiest type to clip with gloves and cold hands. It is this last factor that makes them suitable for most rescue applications. Working a snap-shackle with one hand while struggling to swim in rough, cold water, possibly in the dark, is just not practical. Use whipping twine to secure the carabiner tightly into place so that it can’t slide or fall out. Captive-eye carabiners are available, but avoid stainless versions, which are too hard to open. About $6.
- 2.5-inch diameter pool noodle. We tested both 2.5-inch (about $1) and 3.5-inch jumbo noodles (about $6). We found the 2-inch size is easier to use, although the 3.5-inch noodles provide over twice the flotation. Length ranges from 52-63 inches, the smaller length is enough.
Total cost, with rope, is about $42. Our test version was made from surplus materials on-hand.
Directions
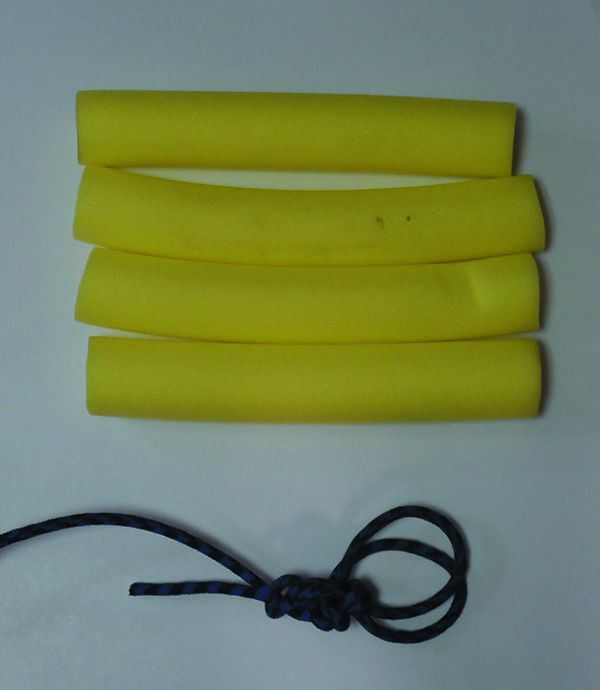
- Cut the noodle into 4 equal pieces of about 12-16 inches (check for fit). Total length is between 52” to 64”
- Starting with 20-foot length of high quality floating line, tie a bowline on a bight on one end. This provides two loops; one for attaching a line, leaving the other free for clipping the carabiner or other recovery device. Leave the end long and tuck it into the first noodle segment.
- Thread the line through one of the noodle pieces, and tie an overhand loop tightly against the piece. The loop should be about 6 inches long; enough to easily insert a gloved hand.
- Repeat three more times. Leave the end long after the last knot and tuck it into the last noodle segment.
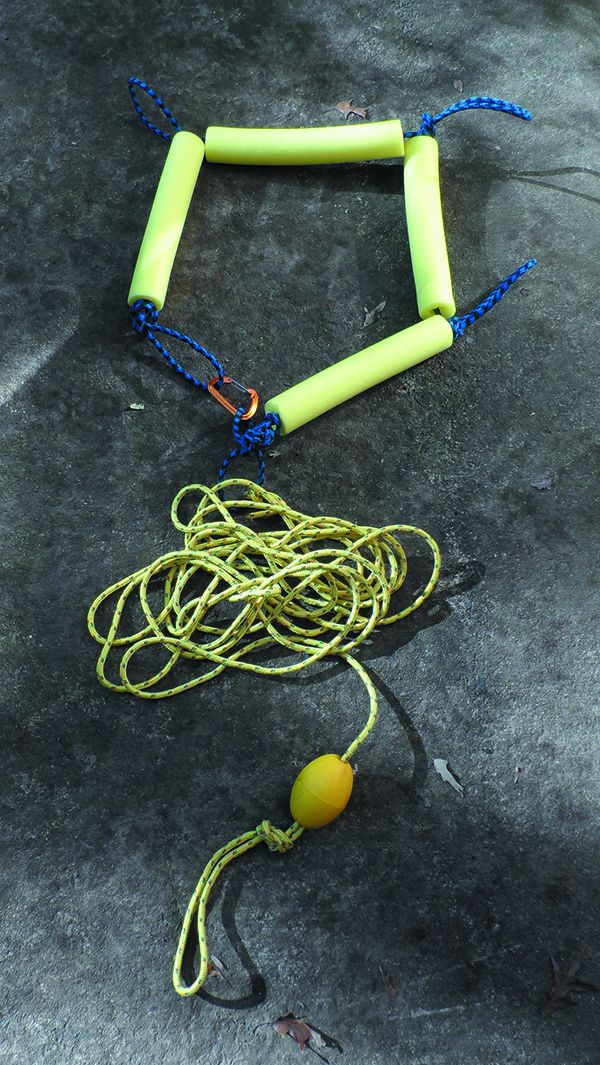
- Seize the carabiner to the last loop so it will stay fixed. To don the rescue sling, the swimmer can wrap the Anshinya around himself and clip it to one of the other loops.
- Attach the remaining line (about 100 feet).
Conclusion & Caution
This is not an alternative to USCG and ISO-approved lifesaving equipment. Far from it. But we see it as an alternative for poor fishermen (or sailors), for whom a Lifesling II is too costly. We also believe existing products can learn from and improve upon the design. For example: we liked the ease of entry in rough conditions and increased security, but didn’t particularly like the reduced flotation.
Practical Sailor Testing
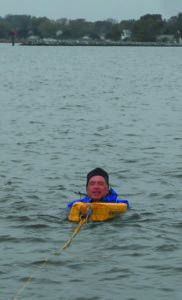
The Anshinya seemed like an interesting idea, so we tested it side-by-side with a Lifesling II. In a perfect Lifesling rescue the boat circles around the person in the water, and the Lifesling is barely moving at contact (see PS September 2019, “Rethinking MOB Recovery” and PS January 2010, “Man-overboard Retrieval Techniques”). To make things more challenging and to replicate less-than-perfect scenarios, we towed the sling past the swimmer at speed, requiring the swimmer to catch the sling, get into it, and then find a comfortable towing posture.
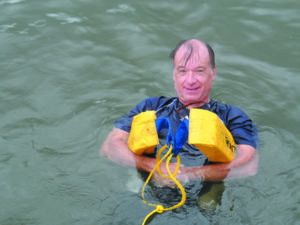
Low speed (1-2 knots). Our testers found it easier to wrap the Anshinya under your arms and clip in than to get inside the Lifesling II. We can imagine situations where the swimmer could not get into a Lifesling II because of waves, uncoordination in water, and an inflated PFD, leaving them with only an elbow hooked through the Lifesling. This problem has been reported.
The Anshinya felt more secure once clipped around your chest, because it can be adjusted to fit. Clipping in cold water with gloves was very easy. However, we can easily imagine a panicked and poorly trained swimmer might not understand what to do.
The use of a Lifesling is far more obvious. The Lifesling II provides more flotation (7.5 pounds using 2.5-inch noodles vs. 17 pounds), an important difference in rough conditions. However, upgrading the Anshinya with 3.5-inch noodles makes the flotation roughly equal, depending on noodle length.
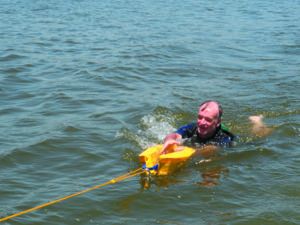
Higher speeds (2-4 knots). It easy to get an elbow through the Lifesling, but nearly impossible to get into the sling if there is a strong pull. The Anshinya can still be wrapped around the swimmer at considerable speed if the swimmer is mindful.
To don the Anshinya, lock your hand in the lead loop, grab the trailing end with the carabiner, and bring it forward under your arms and clip. It is also easier to roll on your back for safe towing at some speed. With the Lifesling II, if the boat is moving, you are forced onto your chest and get a face full of water and difficulty breathing.
Hoisting. Comfort is similar; the Lifesling is wider, but the Anshinya is better fitted, resulting in similar comfort. The security of the Anshinya is considerably better when adjusted to fit; clipped at full length it is similar in fit to the Lifesling, but clipped at only three sections it fits more securely and is less prone to sliding off when worn over bulky clothing if the arms are raised.
Deploying. The rail-mounted Lifesling storage pouch is also a vital part of the whole package—it’s always ready and requires no training to deploy. Ideally, the Anshinya requires similar storage. Although we tested the Anshinya open, there is no reason you cannot deploy the Anshinya pre-clipped into a loop. We recommend this. The swimmer can always adjust it in the water as needed.
Practical Sailor has done multiple reports on deploying and using the Lifesling II, a piece of equipment that is required by most offshore races. Several articles have focused on the proper recovery technique, and lifting see (PS September 2019, “Rethinking the MOB Recovery”). We also cautioned about the effects of UV exposure on the webbing beckets on older models (see PS August 2016, “Lifesling Beckets Fail”). What many sailors fail to realize is that properly donning a Lifesling II is harder than it appears.
- The Lifesling II will not open if it is being towed.
- A sure way to stay connected to the Lifesling is to cross and lock your arms.
- If your arms are not locked as the Lifesling II is retrieved, the victim can slip out.
- The Lifesling is comfortable once you are in it, but retrieval is face first.
- The Anshinya allowed the victim to face backward during retrieval, making it easier to breathe.

Conclusion
We recommend sticking with well-tested products like the Lifesling II. But for those who can’t buy one, for whatever reason, the Anshinya could be a lifesaver.
Whichever device you use, we recommend practicing with the Lifesling in both calm and breezy conditions. Getting into the sling is more difficult if the boat is moving relative to the swimmer or there are waves. Practice with the boat moving slowly, so that you can see it is not a simple matter of pulling it over your head. You are more likely holding on with one elbow looped through it, and then rolling into it.
Additionally, practice hoisting. Either a halyard or line from the boom can be used, and the best location should be determined, typically just forward of the mast or beside the cockpit, depending both on layout, lifeline openings, and the motion of the boat (if moving forward, even slowly, farther aft is easier).


Do you have to face forward when being towed in the Lifesling? Can you face backwards, or does that cause you to slip out? It seems facing backwards would prevent you from getting water in your face while being towed.