


Splicing is king in any discussion of line termination. By carefully tucking cover and core back into the line, or weaving strands in laid line, and using patterns that have been perfected over time, we can create virtually full-strength terminations that will last the life of the line without maintenance.
However, there are downsides. Many lines require a long bury. This bury is large and stiff, and may not fit through blocks, particularly if the line size is already large in relation to the blocks. Riggers curse this situation, where either the builder went too small with blocks or sheaves, or more likely, some previous owner upped the line size to make it easier to handle, only to increase friction instead. Splicing is also a skill that many sailors today have not developed or practiced, and it can be difficult in field conditions. Finally, older lines are stiff and notoriously difficult to splice; while some can be washed, softened, and spliced, some firmer lines are just plain impossible. The sailor who has an old, but still useful line that requires a splice-a halyard with just one frayed spot that could easily be re-used as a sheet, for example-needs an alternative.
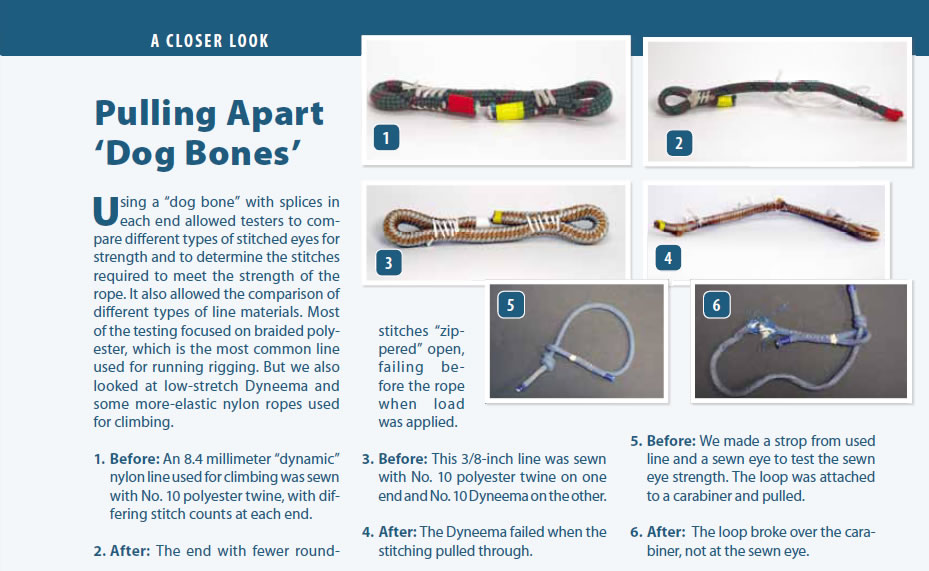
A Knotty Solution
Knots are often the best substitute for a splice. They are fast, simple, and of known reliability. The knot has the same properties of abrasion and ultraviolet resistance as the cordage material itself and will serve as long as the line. On the other hand, knots can be bulky and snag-prone, and they weaken the line.
The extent of weakening depends on the line size, construction, and the knot used, but a knot can weaken a line by anywhere from 20 to 55 percent. Additionally, a knots efficiency is less when using slippery, high-modulus lines, even when covered with a polyester jacket.
Although Practical Sailor has had surprisingly good results tying some high-modulus lines (see PS November 2010) that were commonly believed not to hold knots, others refuse to hold the most common knots at high load. Many appear to hold at moderate loads, but slip apart or tear the cover under full tension.
Luckily, there are several alternatives to splices and knots that can work well in a variety of applications.
Seizings: Using smaller-diameter twine or wire to seize rope or wire-rope is as traditional as sailing. Who has not seen a tall ships standing rigging secured by dead eyes and seizings, tightly wound whipping twine seizing the bitter end to the standing end to form an eye?
For this report, we evaluated various types of seizings as a substitute for eyesplices. See the accompanying How We Tested for details of our testing,
Sewn eyes: Sewn eyes (see Other Stitching Techniques that Work Well) are less commonly used with cordage and sailing, but we see them all the time in vital webbing such as safety harnesses and on sails themselves. Sewn eyes remain a common termination in both construction and tree work industries, which are nearly as demanding as marine trades.
The sewn eyes found in commercial use are often protected with heavy heat-shrink tubing and generally last as long as the line. While these eyes are sewn by machine, we wanted to see whether hand-sewn eyes could match machine-sewn eyes in attainable strength.
Stitched and seized eyes: As a sort of belt-and-suspenders approach, we also looked at a combination of sewn (stitched) and seized eyes. Would doing both increase the strength of the eye splice?
Seizings, sewn eyes, or stitched-and-seized eyes can be used in many onboard applications. Using these for genny sheets is okay; they are easy to monitor and inspect, and they hang up less than knots. Travelers, vangs, and main sheets also are good applications. Weve seen folks use them on too-small-to-splice lazy jacks, but we don’t think thats a good application because of the UV and exposure to chafe. Like a halyard, a lazyjack is a better candidate for a knot instead of stitched eye, in our opinion.
What We Tested
Our testers recognized that different rope materials, weaves, and diameters would act differently, but evaluating more than a few was beyond the scope of this project. To limit the test field, we focused on used polyester double braid, the most common rope in recreational sailing, and the sort of line most likely to be repaired or re-purposed by a budget-minded sailor. To round out the field and to broaden our understanding of stitching used in webbing, we also included two more elastic materials-dynamic nylon rope and tubular nylon webbing.
Because we were testing used line, one question lingered: Does the reduced strength of the used line reduce splice strength? Of course it does. But we also found that if the line is in good-enough condition to reuse, proper stitching technique does not further harm the rope or reduce its strength.
For example, unless we used inappropriate materials, either the stitching broke cleanly with no damage to the rope (indicating weak stitches or thread), or the rope failed at the beginning of the stitching or at the eye. Sometimes the rope broke far from the eye-indicating the stitched eye was nearly as strong as the rope.
Because seizing involves gripping the seized parts, we wondered if the cover texture mattered. After testing a variety of brands of polyester and nylon double-braid lines, we could not conclusively say whether this made a difference. Texture seemed to be a minor factor.
Our other stretchy test products were 9/16-inch and 1-inch Climb-Spec nylon tubular webbing from Bluewater. We tested a few scraps of other webbing types, sufficient to convince us that our sewing methods delivered comparable results from other webbing materials. (We will be publishing a separate report on stitching webbing in a later issue.)
Stitching ropes requires a good sewing palm or something similar to push the needle through the rope. On particularly stiff line, we had to pull the needle through with pliers. A stitching awl could be used for this purpose, but we found a sailmakers needle to be more versatile, allowing us to change stitch styles and apply seizings without pausing to switch tools.
Most of our test line was so stiff that it could not be softened and spliced. Knotting, sewing, and seizing were the only alternatives.
Polyester Double-Braid
Before settling down to systematic test of materials, we evaluated a variety of simple, yet robust stitching methods, suitable for the DIY sailor working in the field. We did not explore machine stitching-beyond a few informative phone calls-because a special machine is required. It is certainly a proven and practical commercial method, and a wide range of industrial equipment is fabricated that way. We were content with our hand-stitched results.
We used doubled-waxed twine in all testing; doubling reduces the number of passes through the rope, minimizing damage to the rope. It better fills the needle hole, and the wax protects the thread and improves sewability. Conventional wisdom holds that the twine should be 1/12 to 1/16 of the diameter of the rope.
We found that when using modern rope materials, even larger twine-1/8 to 1/10 of the diameter of the rope (about the size of a typical cover strand)-yielded higher strength and was more resistant to UV and chafe. The additional effort required was no big deal. This size still breaks cleanly without causing rope damage. Larger twine can pull through the rope, or concentrate the stress in one area, weakening the splice.
We tested high-strength Dyneema and Kevlar twine, but we found an increased tendency for the twine to cut through at high loads. The resistance to stretching resulted in splices that were 10- to 20-percent weaker than if they were sewn with the same diameter of polyester twine. Dont use Dyneema thread with polyester or nylon webbing or rope; in the end, we decided polyester delivered the most consistent results.
Relatively even stitch tension is important. This means that you need to wrap the thread around the needle or thumb of the sewing palm after every stitch, or tug with pliers. Minor inconsistencies in stitch tension will equalize under load, and the twine will slip during the first load cycle.
We found that nylon twine was not a good choice for stitching or seizings; the twine stretches, and the stitching-even good tight seizing stitches-will loosen.
Round Stitching Technique
We tested perimeter round-stitching, basting, seizing, and some hybrid approaches. The following is a description of what we found to be the most effective technique, perimeter round-stitching. See the accompanying Other Stitching Techniques that Work Well for descriptions of the other techniques.
Perimeter round-stitching will take place over a length of rope that is the equivalent of six to eight times the diameter of the rope. For example, stitching 3/8-inch line requires about 2.5 inches of available line, not counting the tail of the line (about 3.8 inches in length) that will not be stitched. If you plan to taper the end to reduce snags, then you can pull out a length of core from the end that is twice the diameter of the core, and sew the cover to the standing part. This optional taper is only for snag reduction and does not contribute any strength.
To determine how many stitches are required, take the breaking strength of the rope and divide it by four times the twine strength. (When using this formula, remember that the stitches are doubled.) As a safety margin for our field-testing on the boat, testers took this number and added another 50 percent, so if the calculation gave us 12 stitches, we used 18.
We spaced the stitches about two cover strands apart and found that this created a splice where the line was weakened by no more than 15 percent.
Here are step-by-step instructions for round stitching:
Form a loop in the rope with the bitter end extending at least eight times the rope diameter after the loop. You can insert a thimble if you like, but this is not required.
Begin by forming a loop in the twine and hitching around one side.
Pass round stitches through both lines. The stitches should vary in location in the core, staggered from barely past the cover to near the center.
Stitch downward toward the bitter end, pass the needle through, and continue stitching up the other side to the throat of the splice.
Form a round seizing at the throat, using No. 3388 from the Ashley Book of Knots for guidance. (Round seizing is also found in most other knot books.) The seizing should be two layers-lower turns and riders-about eight to 10 turns or as long as twice the ropes diameter.
Finish the seizing with a seizing hitch (Ashley Book of Knots No. 3390) or flat knot (Ashley Book of Knots No. 3385). This throat seizing is vital as it protects the first few stitches from the peeling force generated by the eye (throat) angle.
A seizing may also be applied at the tail end, where it helps with wear.
A thimble is not needed if the radius of the attachment is about the same as the diameter of the rope. A bend in the line that is equal to one times the diameter of the rope will weaken the rope by about 50 percent, but there are two legs and only 50 percent is carried on each side. The diameter of the hardware we tested against was half the size of the diameter of the rope, and we never broke a line at the bearing surface.
Hybrid methods
We wanted to see whether combining several methods could produce something stronger or more durable. When we combined round stitching and basting, we found that the round stitches shifted less and bore the entire load, while basting shifted more and contributed nothing.
We also tried combining stitching with seizing; the seizing shifted more than the stitching, which bore the entire load. A contributing factor is that rope becomes smaller in diameter when a heavy load is applied, even when seizing is applied very tightly. In our experiments, when 30 percent of the ropes breaking strength was applied to the splice, the seizings began to loosen. When 80 percent of the ropes breaking strength was applied, they could easily be moved with the fingers.
Bottom line: If seizing is applied to provide protection against wear, it should be applied to a line that is pre-tensioned so that it will stay in place; a serving mallet helps.
Lab Observations
Our testing yielded plenty of lessons and gave us enough confidence to use stitched eyes for critical applications. Weve presented only a portion of the data here. Here are some rules of thumb and simplified discussion points that emerged.
Zippering: If sewn in the patterns we suggest, the failure of a few threads does not lead to rapid unraveling or failure. During many of our tests, we carefully cut away stitches while under full load until failure, incorporating these results when calculating the recommended stitching schedule.
UV and wear protection: We assume that all stitched constructions will be protected with some covering or coating. Although whipping twine is typically similar in size to cover strands and more durable, protecting the stitching remains part of the job. (We will be comparing chafe protection and whipping twine in a future article.)
Uneven tension does not result in a weak splice: We are not machines and our work is not particularly neat. Although we were careful to pull each round stitch taut, we were not obsessive. In fact, on some trials, we were downright careless, and the results were very nearly the same. As the load comes on, the twine shifts as needed to carry the load, and the zigzag nature of a round stitch helps, as does wax on the twine. Reasonably neat work is all that is required. The best reason to tension stitching is to pull it into the cover and reduce susceptibility to wear.
The pre-compression of rope before sewing did not help. Although we want to pre-stretch rope when using seizing, this is not true for sewn eyes. Some people suggest that pre-compressing the line with clamps or with a row of basting stitches down the middle increases strength. We tried both and found no improvement in strength. Furthermore, pre-compression can make it very difficult to pass the needle and can result in increased damage to the rope. The round stitching on both sides results in considerable compression, like a lacing, and is enough.
An additional 30 percent stitching, beyond the calculated figure, slightly increases efficiency. This is indicated in the adjacent tables.
A cover-only splice can work, but it has limits. Typically, the cover of polyester double braid carries 50 percent of the load in a splice. Wondering how secure a splice using only the cover of an old rope might be, we sewed cover-only splices on particularly ratty-looking, 5/16-inch traveler and 3/8-inch topping-lift lines. To our great surprise, all held to within 20 percent of the remaining line strength, although this was only 44 percent of its strength new.
For tight splices, like those around a small shackle or carabiner, it helps that the cover is flat. We are not suggesting cover-only eyes for anything other than reeving new lines where ordinary splices are too large.
Avoid stitching over melted ends. The burr that is created by melting can abrade the threads of the stitching.
Field Observations
Onboard testing has already given us some important insight into stitched eyes.
Wet-dry cycles and high load cycling loosened seizings that were not installed with considerable pre-tension. This problem was most obvious in splices with round stitching under the seizing.
Genoa sheets are perhaps the most difficult application, with flogging against shrouds taking a toll. A very durable covering is required. We started with shrink wrap and tore it within hours. A replacement tubular webbing cover is doing well.
Bottom line: All sewn splices are performing well after six months, some at high load factors. Whipping twine and covering durability will be addressed in a future article.
Conclusions
Both (perimeter) round-stitched and basted/whipped sewn eyes are viable alternatives to splicing when neither conventional splices nor knots will serve. The strength is predictable, and the stitching is durable, provided you add extra stitching to protect against wear, and properly sheath the stitching to protect it from ultraviolet rays and chafe. Perimeter round-stitching proved about two times stronger than basting and many times stronger than our amateur seizings.
We have a stronger preference for stitching over seizing because it is easier to do and the results are more predictable. Although seizing is time-proven on hemp rope, we don’t recommend this for amateurs, and we would never suggest this for nylon rope (because of its elasticity, nylon gets skinny under load, loosening seizings), particularly three-strand nylon, which every sailor should know how to splice.
Although all the sewing materials we tested were adequate, we prefer larger-diameter twine, within the guidelines given. As we will describe in more detail in our upcoming article, testers favored the Robline braided polyester whipping twine. It created fewer tangles and made it easier to create evenly tensioned stitches. The suggested twine, when doubled, is generally about the same size and strength as the strands used in braided cover. Staying within the cover-strand size range maximizes durability and avoids localized overload. We did not like Dyneema thread for stitching polyester or nylon; polyester twine performed much better. Dyneema twine is the right choice for sewing Dyneema products, and the abrasion resistance is superior.
Sewn splices of webbing and nylon dynamic line benefit from reinforcement with nylon webbing. Simply insert a length of matching width tubular nylon webbing between the layers, overhanging the tail by three-quarters-inch and sew down. Any high-load webbing project should be reinforced in this manner, whether hand or machine sewn.
As for long-term reliability, only time will tell. Because the suggested stitching schedules include a 50-percent margin, beyond what was determined by testing, it is probable that the splice will remain greater than line strength for five to 10 years-the expected life of the line. The twine will weaken and fray over this time, so even our sheathed unions need regular inspection. Well be long-term testing to determine durability. Based on what we found, the splice should remain as strong as the line.
Our testers experience so far confirms that long-term durability is attainable, but we are going to spend the next four years systematically testing both coatings and physical coverings, in the lab and on the water. There are some exciting line coating products on the market and very little data on how these products perform in the real world. We have started abrasion testing in the lab using an abrasion machine, and the durability of these sewn eyes has surprised us.

After dozens of tests, we came up with these minimums for twine strength, length of round-stitching, stitch count, and the spacing required to match the indicated line-strength for polyester double braid. The schedule includes a 100-percent safety factor for wear; half of the stitches would hold the load. Marlow and Robline offer whipping twines of various sizes and strengths.


I’d love to see a picture or detailed description that shows “perimeter round-stitching”. It’s not really described in the article and a web search reveals not much.
DIY Sewn Splice by Drew Frye
https://www.youtube.com/watch?v=y7DgVSvhsjM
I second the motion! What exactly do you mean by “round stitch”? Some close up photos would work wonders, as I can’t find anything with an on-line search except for this article. Otherwise DuckDuckGo comes up with knitting topics.
A picture is worth a thousand words, or in this case a power point would be a great help.
Completely agree with these guys.
Meanwhile I plan on buying the ABOK to help explain the Round stitch.
Pictures, Pictures, please.
A picture that actually showed both sides of the stitching in detail would really help. It is unclear what is meant by “Stitch downward toward the bitter end, pass the needle through, and continue stitching up the other side to the throat of the splice.”. And what is unclear is whether or not the stitches ever cross each other. I have made some sample dog bones but it is very awkward trying to stitch down and then back up without crossing the stitches. Please add some detail.
All right, I think I figured it out. I knew my previous post would cause my brain to figure this out–I swear as soon as I’m ready to ask for help it means I’m usually on the verge of figuring it out. Maybe this would be obvious to someone in the sailing world, I’m sewing for arborist purposes, but based on the pictures, and my complete lack of familiarity with stitching anything, I was sewing on the wrong plane. Basically if you make an eye and lay the rope flat on a table I was stitching down one side, drawing the twine across both, and then stitching up the other. I could be wrong now, but I think it is supposed to be stitching across/through both lines, drawing the twine across, and then pushing the needle through both lines. Sewing as I just described at least allowed me to actually sew down toward the bitter end on one side, pass the needle through, and then sew UP the other side towards the throat of the eye. Assuming I’m correct I would heartily suggest a tiny bit of clarification be added to the article. This is great information and the strength of my amateur sewn eyes is incredible. I’ve only tested them by using a 3 ton come-a-long to apply tension but the stitches held and did not visibly distort–very impressed and I strongly encourage anyone on the fence to just jump in and start sewing. One customization I made was to blunt my needle to try and damage fewer strands in the rope.