

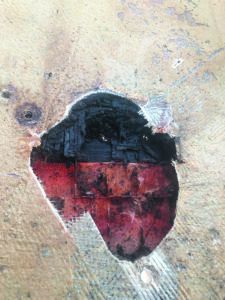
One of the “never-evers” of boat building is to use high density polyethylene (HDPE) as a backing plate or load bearing spacer, but the builder did just that. The plastic can split under load, allowing the fitting to wobble, gradually turning the bolt holes into egg shapes, and allowing water into the core. Yes, the builder should have sealed core surrounding the bolt hole with epoxy but they didn’t (see the Inside PS blog post “Rotten to the Core”). The plywood backing plate was saturated and rotted, followed by about 2 square feet of core in the surrounding area, mostly down slope. Thankfully, there were barriers of solid glass that positively prevented further spread.
We considered injecting the core with a polyurethane foam or epoxy (see PS July 2020, “Can Glue Injection Fix a Rotten Core?”). But a cursory inspection revealed that the core had the consistency of wet peat moss, so we decided surgery was the only truly reliable repair. Someday we will sell the boat, and we believe that repairs should always be at least as good as the rest of the boat. We also don’t care to own a boat that we know is rotting on the inside. It just doesn’t feel good.
Working overhead is more complicated than working from the top, where gravity helps hold things in place, but assuming some sort of hull liner, you can avoid the cosmetic challenges of perfect fairing, gel coating, color matching, and matching non-skid patterns. If you can overcome the access challenges and don’t have a lot of fancy joinery to remove, working from inside can be easier, with just a little added know-how. The approach is particularly suited for times of year when weather would prevent working outside without a full tent or indoor storage.
GETTING READY
Ventilation is critical. Place a box fan in a deck hatch to ventilate the cabin. Do this first, to reduce heat in summer, and prevent the accumulation of dust and fumes. You’ll still need a full-face respirator at times, but moving large volumes of air away from the work space greatly improves safety, neatness, and comfort. Be sure to use a NI0SH approved respirator (see PS September 2017, “The Best Respirators for the Boatyard”). Remove cushions and cover everything. It’s easy to get epoxy where you do not intend. Determine the original inside glass layup. Either research forums, take a core sample, or take a close look at what you cut out. Consider adding one additional layer, since your hand-layup may not be as efficient as the vacuum-bagged original.
GETTING STARTED
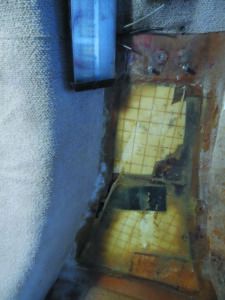
Cut the inner skin. An angle grinder with a cut-off blade is fast, dusty, and can cut the upper skin too unless you are well-practiced. Alternatively, an oscillating multi-tool is slower, but controllable, safe, and can reach more areas. We used both. A drywall knife and electric drill with a cup brush are helpful for removing core. A flat disk wire wheel is useful for getting under edges. It is smart to keep the molded fiberglass boundary of the core area intact; this provides a thickness reference point and makes finishing much easier. Clean it out the core beneath this boundary area with the flat wheel. Later, you will fill it with thickened epoxy, slide the new core inside, and then wrap the glass over the nice curved transition. Remove only core you can get without damaging the skins. Often isolated sections will be undamaged, sealed off by epoxy that saturated the kerfs in the balsa. There is no reason you can’t leave these pieces in place if they are sound.
Don’t be tempted to reuse the existing skin. It is probably damaged, or will be in the removal process, and more importantly, there is simply no way it will conform tightly to the new core. There will be gaps, which are vital to avoid.
The same goes if you are working from the topside and there is non-skid you would like to preserve. It will be very challenging to close the seam and still preserve the original appearance. New glass layers will be much stronger. In most cases, it is easier to use a paint or a non-skid gelcoat mold to match the old non-skid. Gibco makes flexible repair molds that match most patterns (www.gibco.com), but you can also make your own for much less money using an old hatch or a piece of deck as a pattern (grist for another DIY report).
Remove any carpet adhesive about 2 inches back from the margins. This will be the bonding area for the new skin. Do not attempt to just sand it off; it is gummy and the residue will be pushed farther into the surface rather than removed. Instead, get what you can with a scraper if soft, or a wire cup brush in a high speed drill if is dried and crumbly. Wipe up the rest with acetone, and then sand.
INSTALLING THE NEW CORE
Replace any plywood backers where hardware penetrated with either solid glass or Coosa Board. Ply wicks water even faster than balsa. In properly installed balsa, the kerfs are well sealed with epoxy, preventing water from spreading through the laminate. Coosa Board is strong enough in compression for most bolting loads and will not wick water, making it safe even without an epoxy seal (See PS February 2020, “Tough, Versatile Coosa Board, Suitable for Many Projects”). If you need more strength, add an extra layer of 1708 cloth to the inside skin while it is open, fill with Coosa Board, and add an extra layer on the outside, too.
If it is not pre-scored, score the foam core to create kerfs. These will allow the core to bend to match curved surfaces (see PS October 2007, “In cored hull construction, does high-tech mean high-quality?”). It should be floppy in your hands. Pre-scored Corecell is not floppy enough to conform to curved decks. Scored end grain balsa is fine.
Apply thickened epoxy to the core with a grooved spreader. You can make one in a few minutes from the small disposable spreaders with a razor knife. About 3/16-inch thickness is about right. The mixture should be thick enough to stick over head, but thin enough to flow into the kerfs. Mayonnaise is about right.
Install the core in small sections. More than one square foot is just too hard to handle overhead, and there is no strength advantage in using big sheets. Core can be cut into small pieces to fit odd spaces. Putty-in the gaps and roll firmly with a grooved roller to create a bond and force the epoxy up into the kerfs.
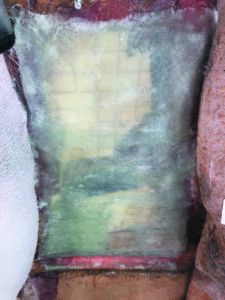
Let the core bonding epoxy cure. Sand off smooth. An orbital sander will work, but be gentle because core will sand easily. You want a smooth surface so that the glass will go on smoothly. If there are rough areas after sanding, apply a thin layer of mayonnaise-consistency thickened epoxy over the bad areas; you can glass right over this while it is still curing.
APPLYING THE NEW SKIN
This step requires some previous experience with laminating fiberglass, the free downloadable West Systems guide can walk you through the process (www.westsystem.com/wp-content/uploads/Fiberglass-Manual-2015.pdf). Use only small pieces of cut glass, about the size of notebook paper or strips no wider than six inches. Gravity is working against you, and any bigger sizes will not stay in place while the epoxy cures.
Pre-wet the fiberglass on a large plastic cutting board or similar work surface by pouring thin streams of mixed epoxy resin and working it into the glass with a spreader. Be certain to wet the edges or these will fall down when placed overhead. Do this before placing it on the ceiling. Trying to apply epoxy overhead with a brush is a nightmare.
Press the pre-wet pieces in place like sticking pizza dough to the ceiling. Use one-inch overlaps. Once placed, roll out air bubbles with a grooved roller. The pieces should become uniformly translucent, and the excess epoxy will come to the top, where it will help saturate the next layer you place. Add additional epoxy overhead with a brush as needed, but don’t put much on the brush and do this only for touch-ups.
Don’t apply more than a few layers before the underlying layers have kicked to a slightly firm state. With fast hardener and warm conditions, this should take only 20 minutes or less. Excessive layers can exotherm, becoming very hot. This weakens the epoxy, can cause bubbling and distortion, and it will reduce the working time of subsequent layers below the practical limit. Second, multiple layers get heavy and may fall off. You don’t need that kind of frustration.
Change gloves often. They get sticky as the epoxy starts to kick and pull threads from the cloth. Every 10 minutes is not too often. Wipe your tools down at the same time.
CLEANING UP
Wipe everything down with vinegar when you are done, keeping it away from the repaired area. This will neutralize small smears of epoxy that suck under the drop cloths, allowing them to be cleaned up later. Clean your tools, first with vinegar, then with soap and water. Acetone can also be used to wipe up any thin remnants in areas where soap and water are not practical.
FINISHING UP
Reinstall the liner and the cosmetics are done. In general, there is little need for finish sanding or fairing. There is no need to use finish glass or veil mat, just 1708 biaxial or equivalent to match the preexisting lay-up.
Install all hardware with epoxy plugs and good bedding. You don’t want to do this again!
SUMMARY
Unless you have a lot of finely finished teak joinery to remove, this is a two- to four-day job. Day One you pull the liner off, investigate the damage, and plan. Day Two you tear off the skin, remove core, and dry (with the wet core gone it dries fast), and put the new core up. Day Three you sand the core and apply the new skin. Day four, you replace the liner and install hardware.
Like many boat projects, if you did it right, the result is invisible. Only you know that she is now as good as new. At least in this one area.
Some of the wiring on my Corsair F-24 is run inside the cabin, on top of the liner but hidden from view behind removable strips of carpet (actually a surface cover fabric marketed as “Frontrunner”). The fabric is adhered with Velcro. This same trick works for disguising seams, where the liner does not fit back together perfectly. Cut strips about 1 ½ inches wide with a hot knife to prevent fraying. You can also cut with scissors and coat the edges with latex varnish, which is less visible than solvent varnish. Lightly coat the backing with 3M Super 77 spray adhesive, and apply the hook portion of self-adhesive Velcro. This will allow self-adhesive Velcro to bond permanently. These “hider strips” will stick to the carpet liner, securing the wires in an accessible and chafefree manner, and disguising new seams. So long as they run along natural corners, they are unobtrusive.
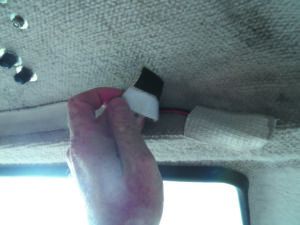
1. The hook portions of Velcro tape — one black strip and one white stripe were glued to this fabric carpet strip of the same color as the liner to hide wiring.

2. Here we use a strip of Velcro-backed matching towel to hid a seam in the liner where two sections of liner joint


Two additions.
1. The necessity for drying the opened area needs to be stressed.
2. After too much resin in my hair after using countless gallons in aviation and boat repair, I lay up cloth on plastic sheets. I mark off the size on the work table lay on the plastic taped in place and then add the layups wetting the glass as I go. After rolling it out with a ribbed roller to rid the fiberglass of bubbles and excess resin, I use a pizza cutter to cut the layup to size and carry to the repair area. On an under surface I leave the plastic in place until it at least starts to set helping it stay in place. Then for cosmetics I replace the plastic with peel ply. Come back the next day, no sags, no drips, no frustration with all laminations done first on my lamination table.