Photos by Tim Cole
Practical Sailor has made its mark by diving deep into the boat owners rite of bottom painting. Over the years, we have slaved away, painting fiberglass samples with a multitude of formulations and placing them in harms way in various locations to gauge their performance. Weve come away with some strong ideas about what works and what doesn’t for the do-it-yourselfer-and that includes the myriad ways boat owners can remove layers of bottom paint so they can start afresh.
Rarely, however, have we focused on what it takes in terms of time and dollars to obtain a professional bottom job. Heres the question: Whats it like and how much will it cost to have an experienced hand remove old bottom paint down to bare laminate, then rebuild barrier and antifouling coats using a modern system?
Last years purchase of our project boat First Light, a late-70s vintage Ted Hood/Dieter Empacher Bristol 35.5 centerboard sloop, afforded an opportunity to see whats involved with a full-bottom restoration.
First blush? It was pricey, but it was rewarding. Think of it like buying a new furnace for your house. Its necessary, and its expensive. You seldom see it, and its hard to show off to the neighbors, but its nice to know its there. Heres what you can expect if you choose to go this route.
Sand Blasting
The Holy Grail of successful bottom paint application is adhesion, and that means removing years of old paint-every last flaking bit of it-to get a lasting result.
Using a hard bottom paint (paints that release biocide, but leave behind a layer cake of resins, binders, and pigments on the hull) means you will need to strip the hull after about eight to 10 years. It was hard to tell how many layers of old paint were stuck to First Lights hull, but all the telltale signs of old-paint buildup were present: huge voids, paint hanging in sheets, variations in color. Getting new paint onto the boat and getting it to stick were clearly rendering each yearly application less and less effective. We needed to take it down to bare gelcoat and start over with a contemporary epoxy barrier coat and antifouling marriage.
There are several paint removal methods open to the do-it-yourself boat owner looking to save, and Practical Sailor has covered them all. (See online version of this article for links.) They include age-old scrape and sand methods, and chemical peel-and-strip systems. Typically, there are environmental considerations associated with any of these methods, which offered further argument for us to go with the pros.
After doing a cost and time analysis (see Sodablasting 101 and a Mathematical Decision-maker, PS October 2011 online), we settled on having the hull sandblasted by a professional. Sandblasting is a misnomer for the process, as actual sand is seldom used these days. Instead, there are several choices of abrasive material available for paint removal, ranging from walnut shells to recycled plastics.
Similar to sandpaper that is rated by grit, blasting media is categorized by hardness, mesh size, and sharpness. The more abrasive the media is, the more skill required of the operator. Not only does the operator have to be concerned about scouring too deeply and removing gelcoat, but he or she must also be wary about generating too much heat, which can also harm the surface.
Most hull-blasting companies advertise their media as being more environmentally friendly than others. In truth, most blasting media can be recycled and used again, or is disposed of in an environmentally considerate way. So the more important concern for the boat owner is price and expertise.
Although most medium to large cities will have professional blasting services, not all are familiar with the intricacies of removing paint from a fiberglass boat. Before choosing your contractor, be sure to have a frank discussion with the candidates about their experience with fiberglass boats, and the specific material and equipment they intend to use. And just as you would do when hiring a contractor for a home repair, you will want to get references. Because of environmental restrictions associated with conventional bottom-paint stripping, most areas that have a large number of dry-stored boats will have one or more operators that are experienced with blasting hulls.
Initially, we considered sodablasting First Lights bottom. This is generally considered a less aggressive process, suitable for plastics that are even softer than fiberglass. But following the recommendation of a local expert, we decided to contact local sandblaster Phil Harding, from Fairfield County, Conn., who uses a silica media for blasting.
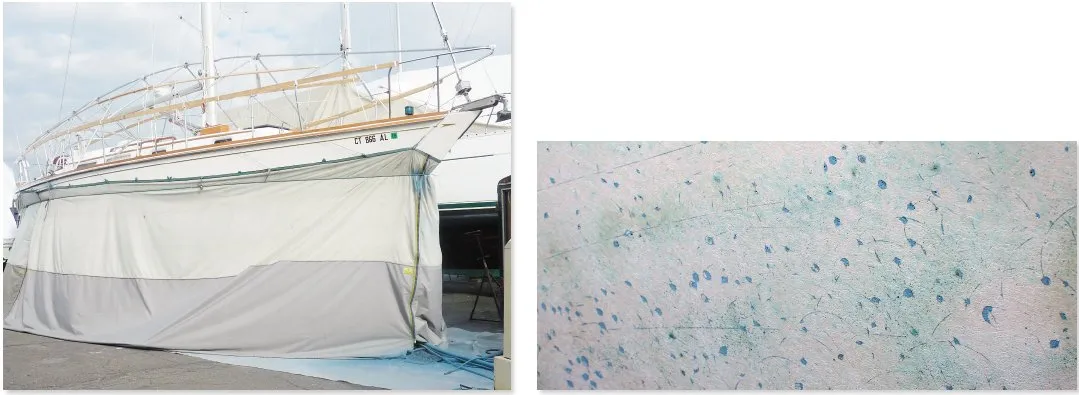
Using silicas, though inexpensive, is generally frowned upon because prolonged exposure has been linked to silicosis, a lung disease. Harding, who arrived at the boat with tarps, blast equipment, and plenty of help, had much experience working with the media and took every precaution, including a one-piece Tyvek suit and breathing apparatus.
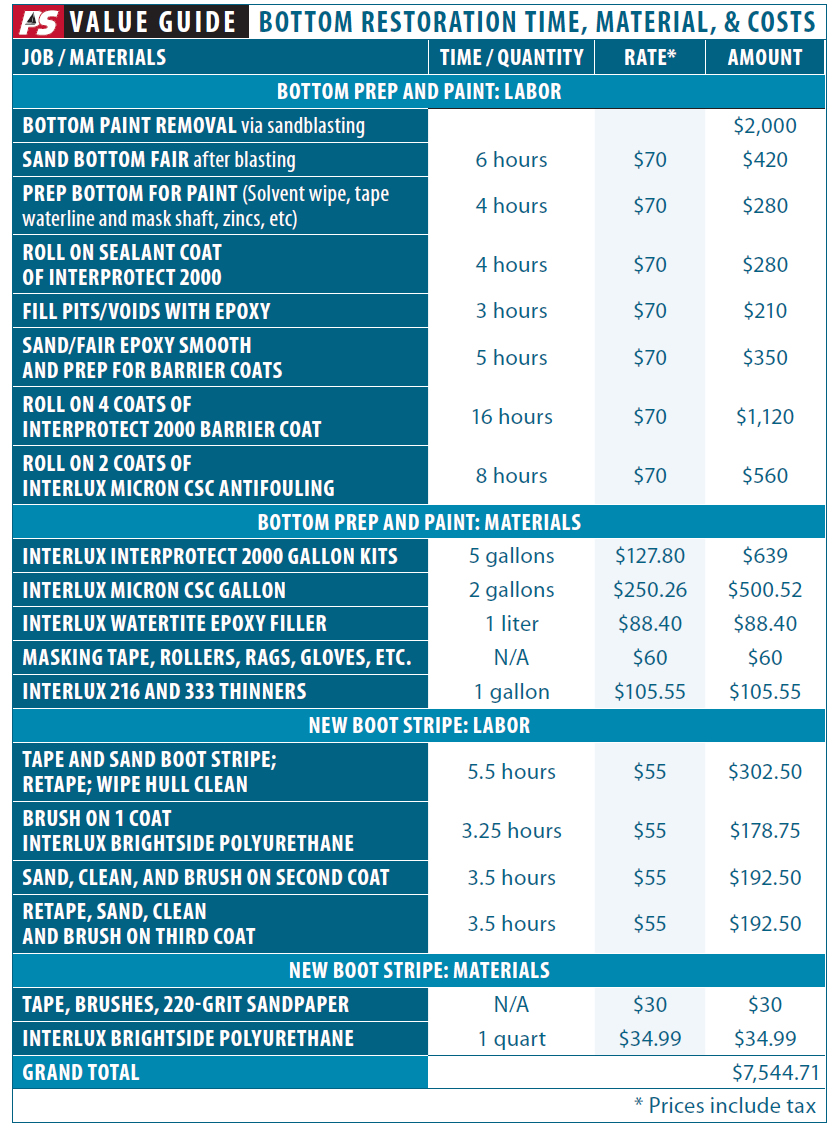
In the end, the monstrous job of stripping years of paint off a 35.5-foot boat took the professionals only two hours. And thanks to finding the right talent and equipment, we felt good about the $2,000 decision.
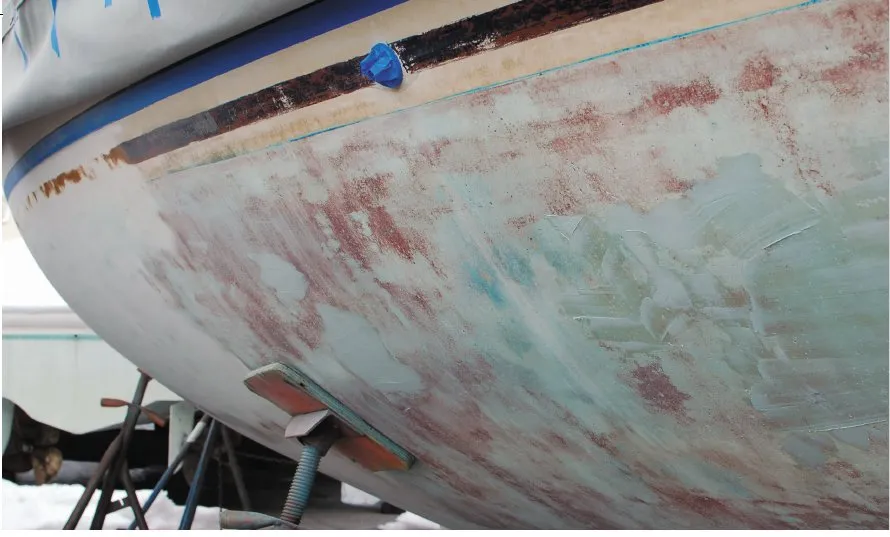
First, we felt First Lights robust, all-glass construction, with no outward signs of blistering, delamination, or other failures, could withstand the punishment that blasting entails. Plus, Harding was especially careful not to blast too deep. He got down to the last, innermost paint layer, and wisely left it for careful machine sanding prior to bottom prep. He also blasted up close to the waterline. Weve heard stories about timid blasters who leave the last bit of waterline sanding to the owner. Harding was pretty delicate, if such a term can be applied to this industrial process. Excess blasting would have risked grinding off gelcoat, which would have required expensive and time-consuming filling later.
First Light did have small pits of indeterminate origin in the laminate that needed to be filled with epoxy. The sandblasting process exposed these pits handsomely, affording an opportunity for closer inspection and to fill and seal them with epoxy. They were limited to the bow area and the waterline (along with a nice, long scratch from a long-forgotten contact with a rock) and were small enough not to cause undue alarm.
Sandblasting (or sodablasting) is a nasty job, and getting old paint removed from the hull is only part of the hassle. The job isn’t done until all the blast media bearing old paint is removed from the job site and disposed of properly or recycled. Having a pro take care of this chore added to our general relief.
We scheduled the paint removal for early fall, so we could get a jump on sanding and painting when the Northeasts hellish winter of 2015 abated in the spring. As it turned out, getting this done early helped secure the services of bottom-painter Ted Anderson at Metal Marine, who also came highly recommended. Getting Anderson lined up for the first weather window meant we were able to splash the boat in early May.
Raising Waterline
Anderson studied First Lights bottom carefully and pronounced the paint removal job a success, leaving a light patina to be sanded and smoothed later. No major surprises.
First Light is a 1978 cruiser with very few go-fast pretensions. The genoa tracks are set on the toerail. There is no mainsheet traveler. The sail inventory consists of a workmanlike genoa on a roller-furler and a mainsail that uses the Dutchman containment system instead of lazy jacks. Shes intended for light Long Island Sound gadabouts and the obligatory sundowner, and she carries this laid-back attitude nobly. We were initially bothered by her double-boot stripe waterline because it just looked too low. This nagging feeling was confirmed last season when we found pronounced tea stains on the stem and even some mild algae growth owing to the slight bow-down trim imposed by her all-chain rode in the focsle and the weight of her main water tank under the forward V-berth.
Anderson acquiesced to our request to raise the waterline. This meant that considerable additional surface area would need to be sanded and faired, adding time and materials to the job. The accompanying photos show the brown remnant of the former lower boot stripe. Anderson deemed it unnecessary to remove every last granule of old boot-stripe paint because it was smooth with no adhesion problems.
Epoxy Barrier Coat
After the bottom was sanded and cleaned with solvent, Anderson needed to apply the epoxy fairing compound. The plan was to fill in the pits and void, then fair the hull using an orbital sander. Applying a single layer of epoxy filler was inadequate. Anderson ultimately had to fill and sand three times, finishing the final sanding job with 80-grit sandpaper. After the first layer of barrier coat went on thick and smooth, we knew First Lights bottom was going to be better than new.
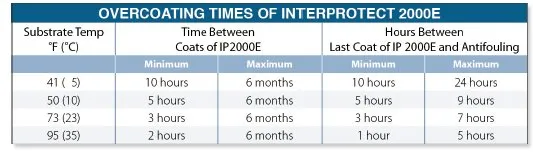
The strategy called for five coats of Interluxs Interprotect 2000 E-in alternating layers of gray and white to make it easier to see coverage areas-then two coats of antifouling. This is when paying attention to the coating instructions was key.
The bond between epoxy filler and subsequent layers of barrier coat is important but not as critical as the last layer of barrier coat and first layer of antifouling. (See table.) Time, temperature, the schedule of the applicator, and other factors need to be considered, and the best thing to do is read the instructions and use compatible products.
For bottom paint, we used Interlux Micron VOC with Biolux. We could have used any of the multi-season ablatives from Pettit, Blue Water, or Sea Hawk-or even started from scratch with one of Epaints eco-friendly formulas-but for this job, we felt comfortable remaining with the Interlux family of products.
Other items on the supply checklist included: A half-dozen rolls of 3M blue masking tape; quarter-inch nap, solvent-safe paint rollers; rags; gloves; and compatible paint thinners.
Even the taping process required extra care. You want two layers of tape over most protected areas not only to maintain a crisp line but to ensure a line of defense if the top tape layer is scuffed or torn in the sanding process. Anderson also used multiple layers of tape where the hull rounded at the bow and aft, under the counter, and along the new boot stripe, through-hulls, and zincs. Using additional tape higher than the line means you can roll on barrier coat or antifouling without stopping, making for a faster application. Moving quickly is important, if you want to make an overcoat-timing deadline. (See table on right.)
Conclusion
Refinishing the bottom of First Light reinforced PSs belief that turning to seasoned pros can be a cost-effective approach to some boatyard work that would otherwise require hours (days) of labor with some unsavory chemicals.
Chemical stripping-especially with some of the ecofriendly products profiled in our last article on this subject -remains a viable do-it-yourself option for people with plenty of time on their hands. The elbow grease required is easy to underestimate, but each year, we get letters from readers who were quite happy with the results of their DIY projects. (See Past Adventures with Chemical Strippers, PS October 2011 online.)
Of the two types of media PS testers have used for blasting, we prefer the soda, simply because it is cleaner, less aggressive, and requires much less sanding and prep after the blasting. While it typically is more expensive, it can be competitively priced with other approaches that use less-expensive media, especially in regions where there are multiple operators.
Our second choice of blasting media would be walnut shell, a favorite option for owners of wooden boats. Those with badly rusted, external iron keels will want to use a more aggressive, descaling media. Severely rusted, iron keels may benefit from descaling with a needle gun prior to blasting. For more on the First Light restoration, including video links and a table breaking down the costs, see the online version of this article.