

Ever since electronic or sonar/transducer type depth sounders have been around, sailors and captains have had love/hate debates over how a depth sounder should be calibrated and displayed, especially on sailboats. One group believes the readings should provide the depth at the waterline, basically from the surface of the water to the bottom of the sea or lake. Whilst another group believes it should provide the depth from under the keel itself. And yet, another group, albeit thankfully smaller, believe it should be from the sounding unit, wherever it happens to be installed. I’ll leave that latter group out of “this” debate, as that just makes no sense.
As for the first two groups, both sides offer very logical and reasonable arguments in favor of their position. One group feels the need to know the depth from under the keel is more important so one will know how much clearance there is. So, if the depth sounder reads 2 feet for example, then they know there’s 2 feet of clearance below the keel. The other group feels the need to know the actual depth from the surface to the bottom is more important information to have at any given time.
Total Depth Argument
I happen to be from the second group. For me, knowing the actual depth means I can quickly determine the amount of anchor scope I’ll need when anchoring. So, if the reading says 7 feet, I know how much scope I need by simply multiplying by whatever scope ratio I want. I also know that if my draft is 5 feet, I have 2 feet of clearance under the keel. Very simple!
Below Keel Argument
The argument from the first group is that all they need to do is add the measurement from the bottom of the keel to the waterline to their depth sounder reading. So, if the sounder reads 2 feet, they would add the measurement from the bottom of the keel to the waterline, say 5 feet. In this example, the depth overall would be 7 feet. But then comes the need to drop the anchor. They need to add the 2 feet to the 5 feet, then multiply by the desired scope ratios.
So, if you like exercising your brain with extra math, I guess the latter group might be for you.
How To Calibrate (Most) Depth Sounders
Before calibration, comes location—where to install the transducer sending unit. Many things must be considered. While it sounds basic, knowing where the slings go during haul out and launches is important in order to make sure the slings or cradle pads/seats are not where the transducer sending unit is located. The same goes for any other equipment under the waterline, like speedometer wheels. If your sailboat goes on a trailer, this too must be considered to ensure the bunks or rollers do not damage any underbelly accessories.
Transducer Location
If it’s a sailboat, the preferred transducer location is center hull, just ahead of the keel. If this is not possible, up to 10 in. off center is an acceptable offset for most transducers. Mine is dead center, about 3 feet ahead of the keel and out of the way of the slings. For power boats, anywhere ahead of the props, but as close to the back as possible, is preferred. Since power boats have bows that rise up when in motion, installing the sonar unit forward would not be very useful.
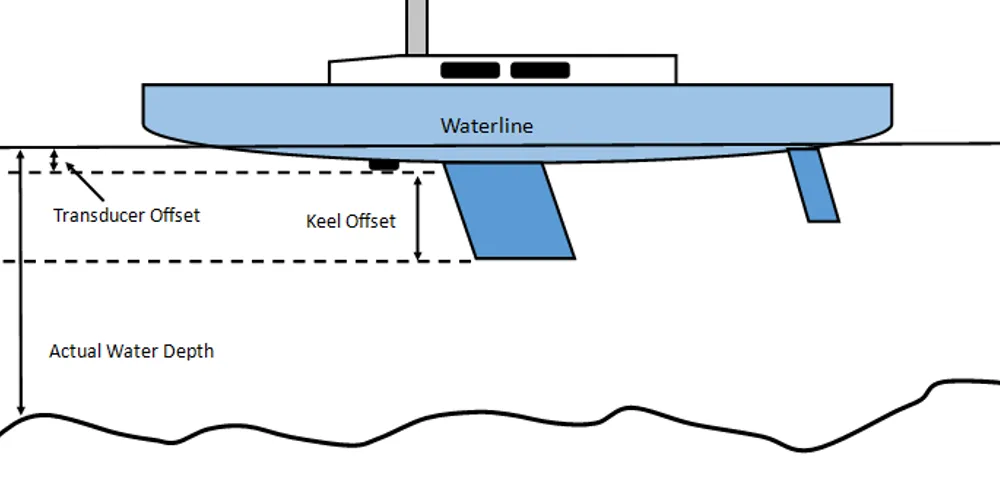
Necessary Measurements
Once installed and before starting the calibration instructions, you will need to know or take a few measurements first. Note, taking these measurements is much easier while out of the water.
- Measure the distance from the transducer location to the waterline (transducer offset).
- What is the total draft of the boat (from the waterline to the bottom of the keel).
- and finally, the measurement from the transducer location to keel bottom (keel offset).
With these, you will be able to program the offset you want. In other words, it is now time to decide which group you want to belong to: total depth or below the keel depth?
Total Depth
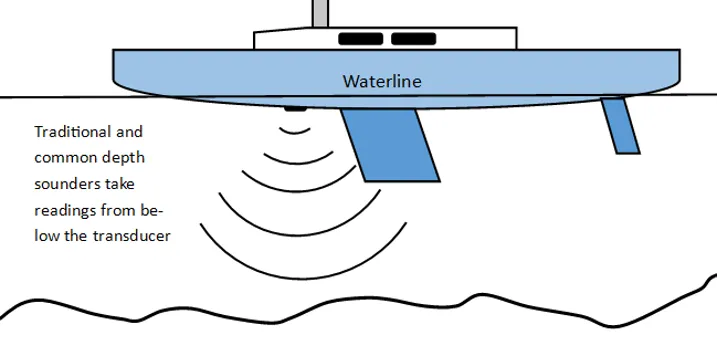
If you choose the total depth group, you will need to enter a positive (+) offset adding the measurement from the transducer to the waterline (transducer offset). This will add this measurement to the depth from the transducer to the bottom of the water.
For example: the transducer reads 7 feet depth + 2 feet (transducer offset) = a display reading of 9 feet.
Below Keel
If you choose the below keel group, you will need to enter a negative (-) offset. This will deduct the measurement from the transducer to the bottom of the keel (keel offset) from the transducer reading.
For example: the transducer reads 7 feet depth – 5 feet (keel offset) = a display reading of 2 feet.
Whichever you choose, ensure all crew are aware of what the reading indicates. Also, make certain they know if you set the display to feet or meters, especially if your display doesn’t indicate this important detail. One foot is much less than a meter.
Depth Alarm
Another important function most depth sounders provide is depth alarms. Most have a shallow depth alarm and a deep-water alarm. You can set the alarms to go off if and when the reading is to what you choose to set it at. In my case, I have a 4-ft. draft and have set my shallow depth alarm at 5.5 ft. You can also set a deep-water alarm. So, if dropping anchor is needed quickly, you can see how deep the water is and determine if this is a good spot. Do you have enough rode to anchor safely?
It’s Where You Are, Not Where You’re Going
Notwithstanding your preferred settings, remember this: Regardless of which group you belong to or how you set your depth sounder, it will still only give you the depth where you are now, not what depth is coming. So, knowing your area or studying charts and chartplotters in lesser known areas is important.
There is some good news however. Although they are more expensive and may require some minor modifications under the boat, there are depth sounders that project forward, providing you with some idea of what’s ahead. Some will even provide some sonar type imaging of the bottom terrain and profile coming up. For example, the Garmin Panoptix PS51-TH offers the FrontVü feature that allows you to view topography up to 300 feet ahead ($1,600 USD). As progress and development moves forward, these units will hopefully come down in price and be more readily available.![]()
I’d enjoy hearing which group you belong to and why? I do read and reply to all comments.


One final step. Anchor over hard sand, close to the depth of your keel. Go for a swim and measure. Like mast height above the water, there is theory and then there is knowing the number at which you will touch. Charted depths are just an estimated historical number, that in may cases dates to the 70s, and tides vary with the wind.
There is also some variability in very soft mud. I’ve been places where I lost the echo.
Thank Drew.
When determining anchor scope, you should not use depth from waterline; you should be using depth from anchor roller, so you still need to add something to the depth reading from waterline. I have a catamaran with the depth reading from the bottom of the keel. With a 4-foot draft and 3 more feet to the anchor roller, I add 7 to the depth reading. For a 5:1 scope i can quickly take one-half of that number then add a zero to determine how much anchor rode to let out. Ten-foot depth reading + 7 = 17. Divide by 2 = 8.5, add zero for 85 feet of rode.
Hi John and thanks for that excellent feed back. You are correct, by adding that extra distance, waterline to the anchor roller, you end up increasing your scope, which is always a good thing! More is better as they say, while still being aware of your swing rate when in a busy anchorage. Thanks for reading and sharing.
Should be with the depth at the waterline. Chart reading needs to be compared to actual water depth. Navigation is easy if I can compare chart work with my position.
Rich
Hi Rich, thanks for your comment. I agree and that’s my setting as well. But, as the previous reader, John Robbins commented, chartsplotters and charts are readings that may be outdated. So keep that in mind. Also, to determine anchor rode ratio, do not neglect the freeboard distance. Read John’s comment for more details.
Setting the depth readout to the water line makes it easier to align the reading to depths on the chart. You still have to adjust for tidal height.
Setting the depth to the keel makes it easier to see when you will go aground. No calculation.
When the boat is on the hard, a laser level makes it easier to take accurate measurements. Set the level to the transducer location and take a measurement to a point on the ground. Then set the level to either the waterline or keel bottom and measure to the same point on the ground. It’s the height difference is entered as the depth sounder offset.
Thanks B.. I appreciate the additional information and technique to set the depth sounder. That’s pretty much how I measure my data as well. I keep that data in my log book specifications page.
Another consideration is asking other boaters for their depth reading. Depth below someone else’s keel is meaningless and yet, that’s what one often gets.
Hi Jack. Thanks for your comment. I do agree with you that asking other boaters what their depth is, will not help as the depth of where you are, is most likely different. I’ve never heard of anyone doing this…
Interestingly I am of both camps and always have two depth displays when on soundings. One (with the 50kHz transducer) is set to total depth and is useful for running a contour like the 100 fathom line. The other, with a 200kHz transducer is set to depth under the keel. They are clearly labeled and both serve a purpose.
Wow, now that covers all the bases! Like wearing a belt AND suspenders at the same time. Lol. Thanks for reading PS and commenting.
My older boat is sailed in a large, shallow body of water that’s productive because of agricultural fertilizer runoff and relatively warm temperatures. The water tends to be opaque, and with shallow depths, a sounder is useful. When I replaced the old neon-bulb blipper with a digital device, I just assumed it was depth under surface. One year on the first sail, my Dad and I looked overboard and saw the bottom. That usually meant “you’re aground” because of the opacity. But this year, the phytoplankton and algae had not bloomed. We decided to check the sounder’s reading with an improvised leadline. Turns out the sounder was reading 3′ low–making the reading the depth under the keel (centerboard up). That seemed just fine so I have left it that way ever since. Adding 3 to the readout is not a difficult math problem.
In the Great Lakes we don’t have tides bit we do have long-term quasi-cyclical water level fluctuations, as well as an annual seasonal cycle. I’ve lived through several periods of 6′ changes. Charted depths on the Lakes are to Low Water Datum, so we always have to do some calculation to determine what the chart numbers mean right now, depending where we are in the season and in the long-term fluctuation.
Chris Campbell
Lakes Michigan and Huron in Michigan
Hi Chris and thanks for reading PC taking the time to share your « situation ». I too sail in relatively shallow waters and this year, in the St-Lawrence, with record low waters, many boaters hit and grounded themselves it what we’ve always assume we’re safe areas. Another thing to watch for in our conditions, is false readings to thick underwater plant growth.
Having a swing keel is also another thing to consider with a depth sounder. With one of my former boats that had a 2 to 4.4 feet swing keel, I had set the alarm at 5 feet, will setting the reading to actual water depth. (Water surface to bottom of the pond!)
My older boat, a Seafarer Polaris (1961, 26′ sloop) has a centerboard and not a swing keel, so it’s more forgiving. The board can just swing up. I went without a sounder for a couple years. There was a known shoal area of small rocks off a river mouth. When water levels are low, the board can bounce a bit on them. It’s always alarming. The original board was steel so I hated to bounce it and knock paint off. Copper antifouling plus steel make a battery, so I always tried to keep my primer intact. A number of years ago I replaced the original board with bronze, so corrosion is no longer an issue.
Once my Dad and I were sailing toward a shallow area and decided it was time to come about. We threw the helm over and nothing happened. That moment we had grounded on sand, silently. We cranked the board up and the bow fell off on the new tack. It’s nice having a functioning sounder to avoid surprises like that.
Chris Campbell
I love these stories. Especially when dads are involved. My is no longer with us, but I have terrific memories with him and sailing.
My Dad is gone too, but sailing is when I heard most of his stories. My eulogy at the funeral was a retelling of several of them, which illustrated his principles and character. One, the sailing one, was just interesting. At the end of WW II he and a buddy were in a little restaurant in the Netherlands. A local yacht club was having a meeting there. Yanks were their heroes so they asked the two Americans if they would be interested in sailing the next day. On the boat, Dad observed a line of bullet holes on the bright-finished hatch cover. He inquired. The skipper replied that he had been strafed by a German pilot one day, who did that out of pure malice. He vowed never to cover the holes. Later, way offshore, Dad asked about the depth. He expected some vast number. The skipper grabbed a wooden pole, poked it overboard, and said “About 6 feet.” We have Dad’s B&W photos from the day.
Great story!
Ironically, I was measuring for depth sounder offset just today. One refinement to the article. Measure WL, Transducer, and bottom of Keel to concrete when on the hardstands. Then subtract for the blocking (keel above concrete) and calculate draft and depthsounder offset.
Measure WL both port and starboard, then take the mean. My boat lists to starboard by one inch. Negilible generally, but I was taught to round off only at the end of measures and calculations.
I am of the Waterline camp. That corresponds to the chart, accounting for height of tide, and interpolating for our location. I set the depth alarm to account for draft, plus room for error and time to tack away. Tides vary in water I sail. “Will I be aground at low tide 0 dark thirty, when I rather be asleep” is common question.
Hi Randall, thanks for being a PS reader and taking to time to share your technique. You are correct that knowing you’re personal reality is important, if not critical. Sailing in sea water, where tides play an important role versus fresh water is a consideration one must be on guard for. Not only tides, but how the boat actually floats in salt water versus fresh water must be noted. I, like you, am a water line depth sailor. I give myself a 2 feet extra clearing under the keel on my alarm. Maybe more than necessary, but that’s where my comfort level is. This past season, with record low water levels, thick and dense seaweed growth was a big factor is setting off false alarms. But also help me steer away from these areas before getting caught. There’s just so much weed cutters can do! Thanks again Randall.