
")
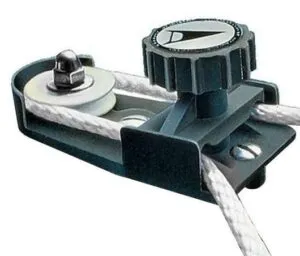
Whether you own a Raymarine Tiller Pilot (ST1000 or ST2000) or the Simrad Tillerpilot (TP10, TP22 or TP32), the day may come when this autopilot for your tiller-steered boat stops working. Detailed below is a variation on an old idea for an easily home-built device—let’s call it the Teaky Tiller Pilot—that will fill in in a pinch. As a bonus, the device also serves as a tiller lock that will reduce wear on your rudder bushings while you are away from your boat.
Did your electronic tiller pilot get too wet in a storm or too hot on a sunny day? Raymarine and Simrad tiller pilots have been around for decades and have sold by the tens of thousands. That’s why tales abound on online sailing forums as to how and why these devices fail. You’ll also find a variety of do-it-yourself (DIY) repair videos on YouTube, but that won’t help you when you’re out on a sail and the autopilot call it quits.
My Teaky Tiller Pilot idea is simple and obvious, but a cursory search online didn’t turn up anything quite like it. Practical Sailor came close with the 2023 article on the “$15 Do-it-Yourself Tiller Lock,” but the Teaky Tiller Pilot has that idea beat on price and ease of finding the raw materials. You’ll need just a stick of wood and a 3/8 stainless bolt, nut and washers. I found a suitable stick among scraps and paid about $5 for the hardware.
Tiller Pilot Failure
I had my own experience with a tiller pilot failure recently while sailing with a friend. We were letting my Raymarine ST2000 do the steering during a lunch break when we suddenly realized we were drifting off course. I looked at the display and found that it had gone blank. Not enough power? That didn’t make sense, given that my instruments were still going strong. I checked my chartplotter’s power-level display and found that the house battery was still in the low 12-volt range—more than enough for a device with an operating voltage range of 10 V to 16 V. I tried unplugging and plugging the tiller pilot back into the cockpit-mounted power socket, but no dice.
Fortunately, the unit had died with the pushrod extended far enough to keep us on an acceptable course. With a bit of sail adjustment, I could sail for a minute or more at a stretch before the boat would gradually fall off the wind. At that point I could just lift the stick, get back on course and drop the device back in place for another minute of freedom.
A Streamlined Fix
That got me to thinking: What if I had a stick with a series of holes drilled every inch or so that would give me a choice of tiller positions—much like the locking screws available on wheel-steered boats? There are plenty of DIY and commercial tiller lock options, such as the $43 Davis Tiller Tamer, but tiller pilot owners (whether Raymarine or Simrad) already have mounting sockets and tiller pins installed in ideal positions. Why clutter the cockpit with jury-rigged supplementary lines to trip over?
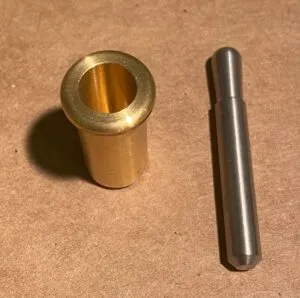
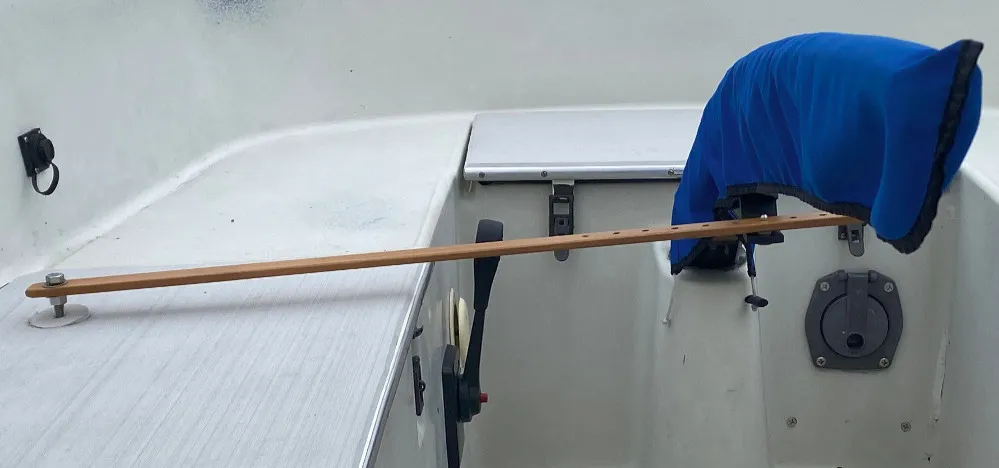
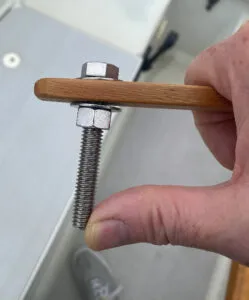
I had previously fashioned a stick to hold my rudder in a centered position when docked. On one end of the stick I placed a stainless 3/8 diameter by 2 ½-inch bolt that I could insert into the tiller pilot’s mounting socket. On the other end I carefully measured and drilled just one ¼-inch hole that fits over the tiller pin to hold the rudder in place. My intent was to reduce wear on the rudder bushings, as the unattended tiller would otherwise constantly swing back and forth as the boat moved with changing currents and winds.
Trial and Error
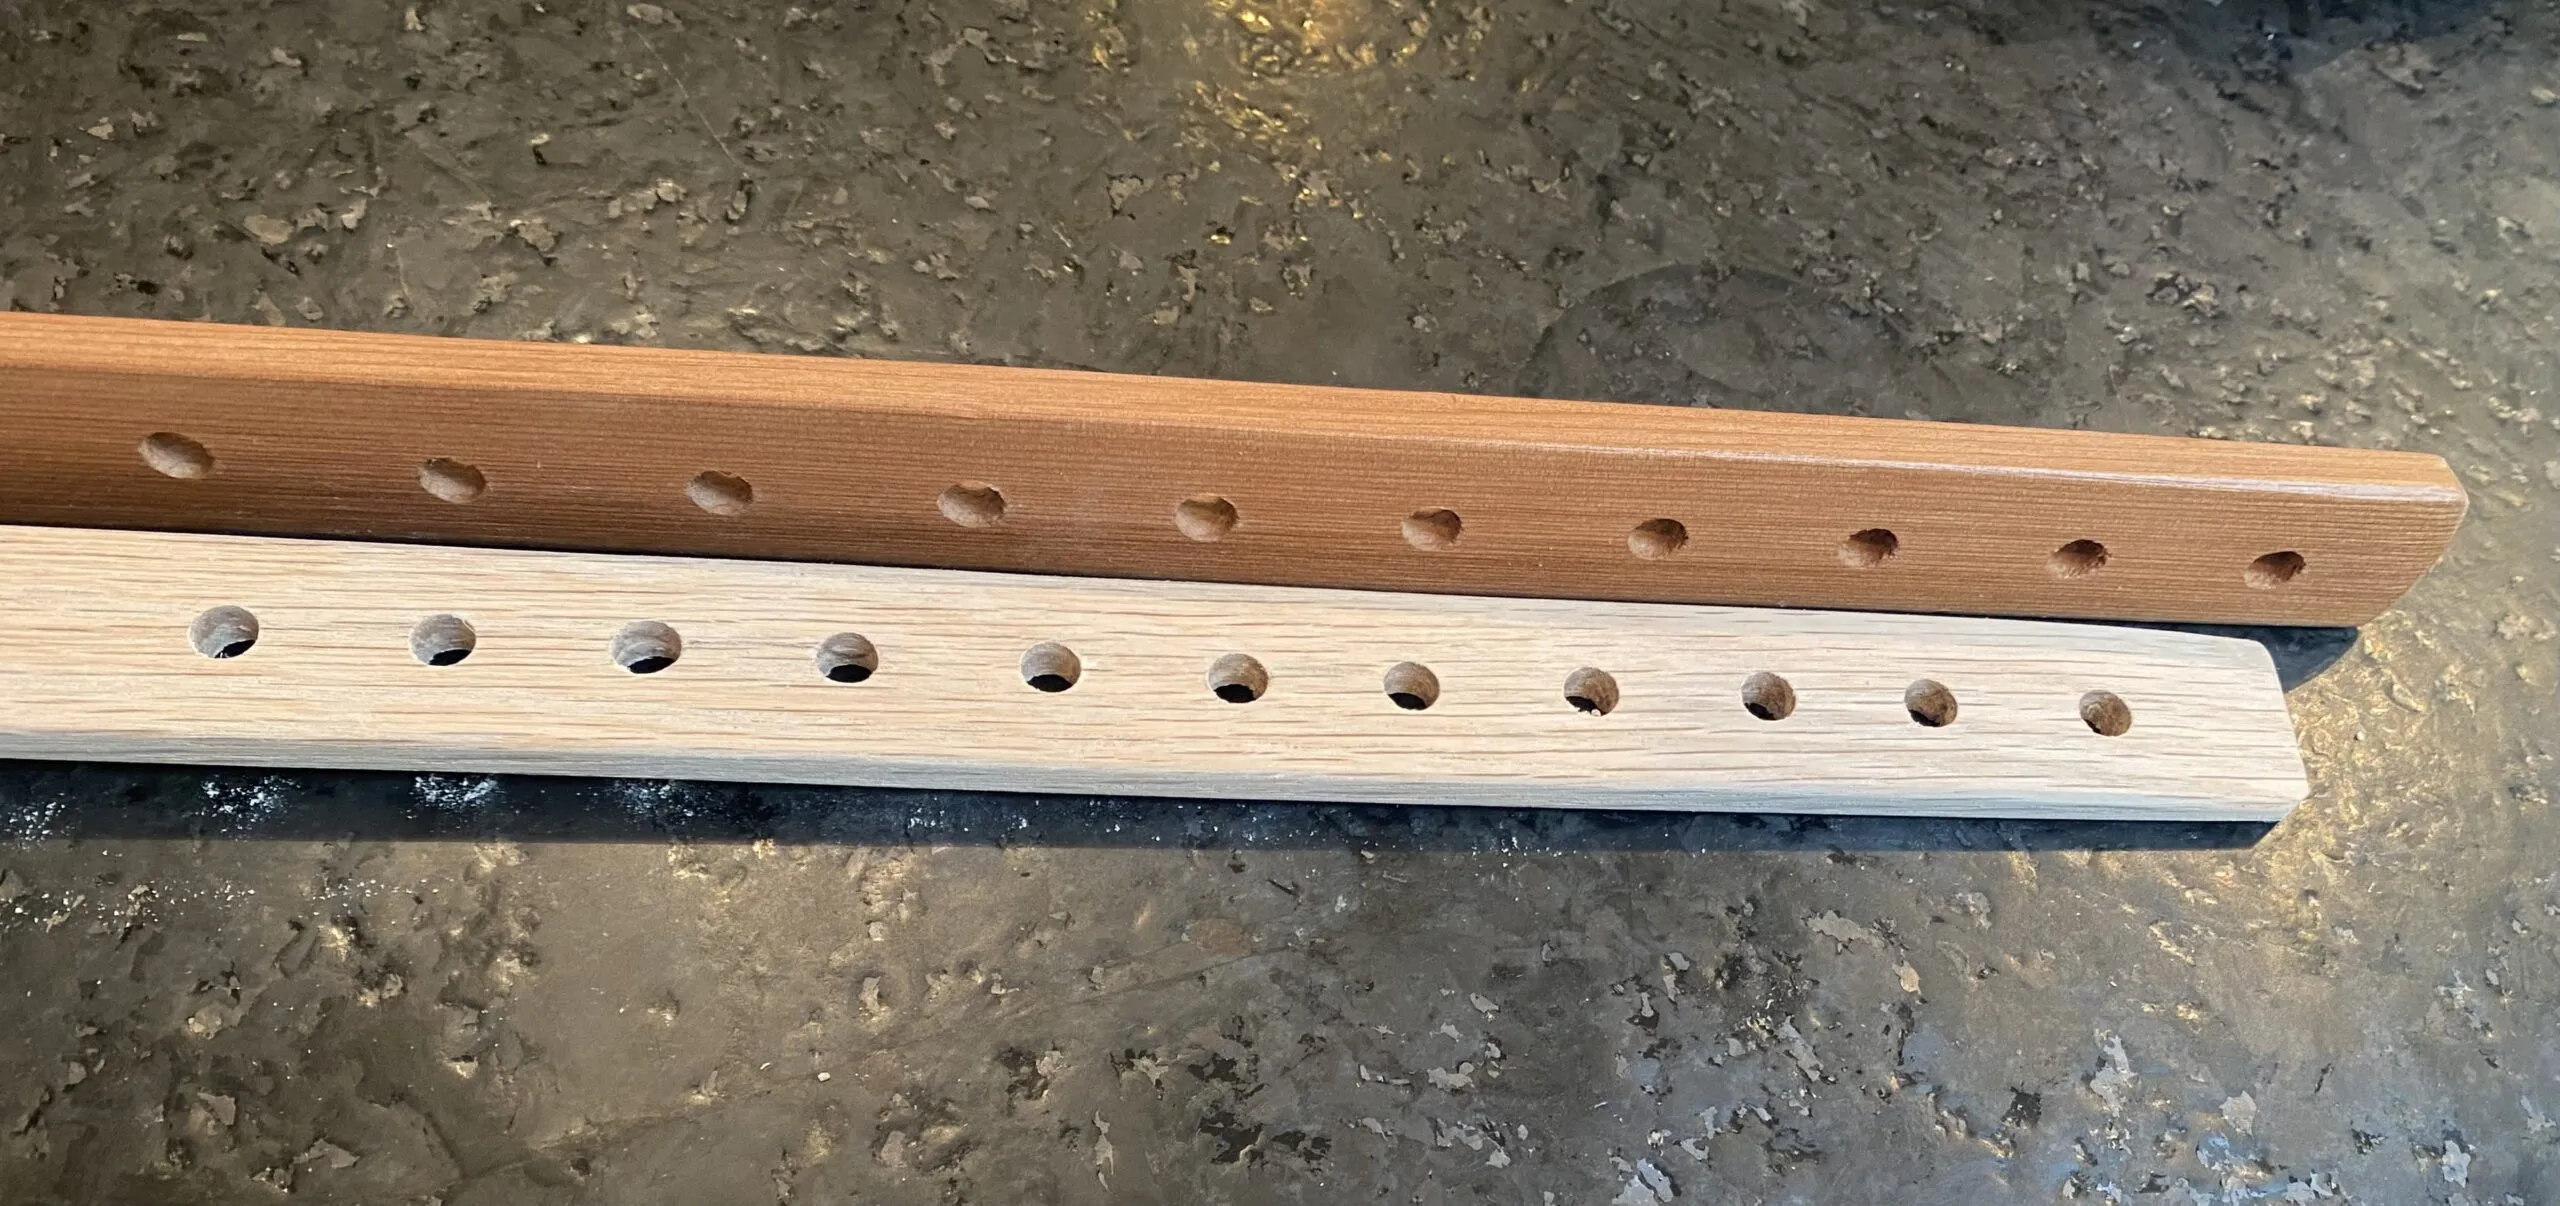
Unfortunately, I had cut this stick off too short to drill more holes and offer a range of positions on both sides of the rudder’s centered position. Starting from scratch, I found a longer, 1-inch wide by 3/8-inch thick stick and drilled a series of ¼-in. holes at one-inch intervals along the center line of the stick at one end. At the other end I drilled a 3/8-in. hole to accept the bolt intended for the autopilot’s mounting socket.
Choose the Right Stick Length
The length of the stick required for your boat will depend on your boat and the model and positioning of your electronic tiller pilot. The pin-to-pin length for properly installed and centered Raymarine Tiller Pilot is 24.5 inches, while the same dimension for Simrad Tillerpilots is 23.5 inches, according to Practical Sailor, so a stick at least six to eight inches past this center point (30 to 32 inches) should do, while allowing for an extra inch past the bolt hole on the other end of the stick.
After drilling the required holes, I spent a little extra time sanding the surfaces smooth, beveling the edges (by sanding) and spraying on a few coats of varnish. The next morning I added the bolt, washers and nut, making sure to keep it a little loose, so I could easily raise and lower the stick over the tiller pin.
Testing
With 12 tiller positions to choose from on my new device, I was eager to test it out. How much hands-free time could I expect without too much fiddling? Could the Teaky Tiller Pilot even fill in for the electronic model on long passages, avoiding a power drain on my house battery during long passages?
My first experience with the Teaky Tiller Pilot prototype was promising. After setting a course, tweaking the sails to balance the helm, and placing the stick on the tiller pin using the closest hole, I managed between two and five minutes of hands-free time. With variations in winds and waves, the boat would stray about 10 degrees to one side or the other of my starting course, but I was effectively holding a steady course, overall, for line-of-sight distances. With plenty of holes/rudder positions to choose from, I could hold steady for these short stretches at almost any point of sail. Predictably, close-hauled courses were hardest to hold while close reaches and beam reaches held steady the longest.
Design Improvements
My first test revealed that I was using only the first few holes on each side of the rudder’s centered position. I also found that one hole might be a bit too long or a bit too short to hold the rudder in what seemed the best position to hold a given course. To improve on the design, I prepared a second stick with the ¼-in. holes drilled closer together at ¾ inches on center. The holes at the port and starboard extremes of my first design were also too far off center to be of use, so I made the second stick an inch shorter to provide a bit more clearance around the end of the stick on the port side of the cockpit.
I had even better success with the second prototype, holding courses for many minutes at a time with only occasional need of tweaking of sails or repositioning to the next tiller pin hole–not unlike the adjustments I’d normally make to an electronic tiller pilot. If this wooden version ever breaks, it occurred to me I could use an old fiberglass batten to create an indestructible (though less Teaky) replacement.
The best thing about a Teaky Tiller Pilot is that it offers absolutely silent operation, unlike the electronic pilots that seem to constantly grind in and out. Yes, you can adjust the sensitivity of electronic tiller pilots, but they are prone to over steering, particularly in rolling seas.
Results will vary with the shape of your hull, your sail-balancing skills and, of course, the variability of winds, currents and sea states. Owners of full-keel boats will have an easier time staying on course. Boats like my Albin Ballad 30, which has a fin keel and a skeg-mounted rudder, won’t hold courses as long as full-keel boats. Skippers of racing boats with slender spade keels and rudders will surely have to spend more time on the tiller.
Conclusion
So it seems there’s no replacement for an autopilot (or wind vane self-steering system) that constantly adjusts to keep you on course amid dynamic wind, wave and current conditions. At the very least, one of these simple sticks can serve as a tiller lock and emergency (temporary) course holder if and when your electronic tiller pilot craps out.
As long as you’re not in close quarters and there’s no traffic in your vicinity, a Teaky Tiller Pilot will give shorthanded crews more than enough time to go below to retrieve a lunch or bit of gear, grab a windbreaker, visit the head, or check on a sleeping child or pet before popping back up into the cockpit.


I would not recommend a threaded bolt into the brass socket. It will quickly wear and ruin the fit. Much better, install the bolt upside down, with a long, smooth shank going into the socket and a pair of nuts locking (use Locktite so they do not need to be tight) the threaded portion to the stick. Cut the head off, of course.
Another option is “The $15 Do-It-Yourself Tiller Lock,” March 2023. This one uses one leg of a thrift store tripod.
In four years of using a similar device as a tiller lock I had no perceptible wear. There’s little to no friction, as the bolt does not rotate or move, other than when you slip it into the socket (and it’s a smooth, not-too-tight fit). Perhaps now that I’m also using the device as a course holder, and thus slipping it in and out of the socket more frequently, it would be worth the effort to cut off and invert a smooth-shank bolt. So thanks for the suggestion!
BTW, if I had to start from scratch I’d use an old fiberglass batten and drill 1/4-inch holes every half inch to offer even more fine-tuned positioning options. Drilling holes that close together would make a wooden stick easy to break.
I’d add a hole close to the mounting socket for holding the tiller in a hove-to angle. Would only work for one of the two hove-to scenarios. Covering both would require a much longer stick, which might get unwieldy.
I’ve used an ole fashioned tiller comb for years. Why reinvent the wheel?
I had not heard of “tiller combs,” but a search turned up a few DIY designs (though no currently available commercial products that I could find). Thanks for mentioning, but the point of the article was offering a simple, low-cost design that takes advantage of the pin and socket already in place for a tiller pilot.