

Got a small sail or canvas repair? “Get a Speedy Stitcher!” is common advice, though rarely from someone experienced in sail repair.
Sure, it seems like a great solution. Every chandlery sells them. They can push through heavy cloth, doing work a common hand sewing needle and thread can’t touch. But sail making or sail repair texts generally neglect to mention stitching awls (the generic name for products like the Speedy Stitcher). Instead, they focus on hand work done with a sailmaker’s palm and needle. We have a stitching awl, which we scarcely ever use, but we use our leather palm frequently. Why is that?
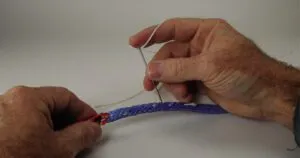
A stitching awl is comprised of a body containing a spool of heavy thread and a replaceable needle with a groove in one side to feed thread. To create a seam you push the needle through the material, pull a tail of thread through long enough to complete the underside of the section (about 1 1/2 times longer than the seam), and then withdraw the needle. For each subsequent stitch, push the needle through, pull it back ¼-inch to create a small loop, thread the tail through the loop, withdraw the needle, and pull both the tail and the needle-strand snug. Repeat. Don’t stitch too tight, or you will wrinkle the fabric.
A sailmaker’s palm is comprised of a concave needle pocket about the size of a penny, mounted on a strap of heavy leather that wraps across the palm of your dominant hand. This basically an industrial thimble. To sew, a length of twine is doubled through the eye, the needle is pinched between index finger and thumb, the eye end is placed in the needle cup, and the needle is forced though the fabric using the palm. The needle is passed back and forth through the fabric in one of many stitch patterns and secured by tucking or back-stitching at both the start and finish. A sewing awl (different from stitching awl), often held in the opposing hand, is useful when stitching leather. Curiously, it is not helpful when stitching sail reinforcements, which are more easily penetrated with a needle and sailmaker’s palm. Every sailor needs a sailmaker’s palm.
You can apply more pressure with a sailmaker’s palm, the needle is smaller and sharper, and you will break fewer needles because the force alignment is better. Sometimes you’ll need pliers to pull the needle through if it gets stuck. The needles have long recessed eyes, designed to pull smoothly through unyielding materials.
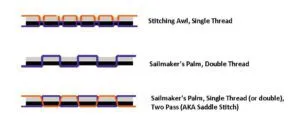
Either an awl or palm-and-needle can work with very heavy thread, up to about 100-pound test. The awl pulls a single strand, top and bottom, and a palm uses a doubled strand, but only passes once through each hole. The stitching awl creates a 47-percent larger hole with over double the area for a given thread size. Used in canvas, this will leak. Used in sail cloth, it cuts fibers and weakens the cloth unnecessarily. Used in heavy leather, the hole closes imperfectly around the thread. Where strength and superior chafe resistance is needed, a saddle stitch is preferable.
A few tips on fitting. WM Smith and Son is the big name in hand-stitching. Palms come both right handed and left handed. There are pro-quality and standard quality; standard works fine and will outlast any recreational sailor, and pro-quality outlasts sailmakers.
A seaming palm is the best choice for all-around use. Roping palms have a high collar around the thumb, useful for taking a wrap of twine and giving it a tug, but slightly awkward for seaming. There are less secure universal fit palms with a neutral socket angle and lacking the leather collar around the thumb—a poor choice.
A sailmaker’s palm requires years of occasional use to break in properly, but you can accelerate this by soaking in hot water and molding it to your hand. Smooth any rough edges with a file or Dremel tool. Trim the leather anywhere it cuts into your thumb when pinching a needle. Once adjusted, trim off the extra tail and tape it down.
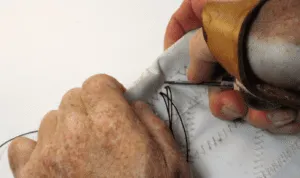
1. A sailmaker’s palm is essential for punching through several layers of cloth at the luff of a mainsail.
TESTING
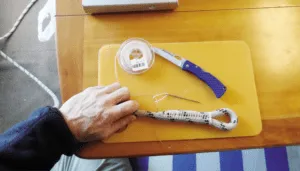
We took two 8” x 8” scraps of 6-ounce sail cloth and created a seam, one side using an Awl-for-All stitching awl, and the other with a needle and palm. We used the same thread for both.
Speed. The palm was about 2.5 times faster than the awl. We had better control over thread tension, often tough to control when machine stitching. If a sewing awl is used to open holes in thick leather the difference is less, but the palm is still faster, that is why pro sailmakers and pro leather workers use a sewing awl, not a stitching awl. Webbing is thick but sews easily with a palm. We would never sew rope with a stitching awl. It creates too much fiber damage.
Hole size. To use 0.8 mm twine, the needle used with a palm is 0.055 inches in diameter, vs. 0.081 inches for a stitching awl. The stitching awl hole is 47 percent greater diameter and 217 percent larger for the same size eye and thread diameter.
Stitch strength is similar, since both methods result in two threads per hole; the palm uses doubled thread and that is alternately stitched from opposing directions. But you can you actually hear the difference needle size in sail cloth as fibers tearing while sewing.
We remember reading about leather work in the “The Voyage of the Brendan,” a documentary about building a replica 18th century leather boat, and then sailing it from Ireland to Iceland, and then Iceland to Newfoundland. The builder’s paid close attention to the seams in the 1/4 oxhide, to ensure they were watertight. You might think this a perfect application for a stitching awl, but in fact, the holes were made one at a time with a sewing awl, followed immediately with a needle and heavy waxed flax thread. The hole closed up around the thread, making a water tight seal and a strong joint. A stitching awl would have created weaker seams that leaked like a colander.
Locking stitch myth. Neither method creates a running stitch, in which a single thread creates an interlocking daisy chain. Using the palm or stitcher, the thread needs to pull through many holes. The path of a stitching awl is more convoluted, and the holes are larger, resulting in more slippage.
Saddle stitching. If you want to truly reduce the risk of failure, sew the seam first one direction, using a sailmaker’s palm, and then retrace in the opposite direction using the same holes. The time required will be similar, since the palm is twice as fast and the existing holes make the reverse pass go faster. You can do this with doubled thread and it will be twice as strong, or you can pull a single thread. Either way, since there are two separate lines, there is no single point of failure and zippering is eliminated. In leather this is normally done simultaneously with twin needles, one in each hand, because the awl holes will close up again.
DYNEEMA TWINE
Waxed polyester twine is the gold standard for twine (see “Top Whipping Twines,” PS December 2014). Sewn doubled with the recommended sizes, it will be much stronger than machine stitching and stronger than the fabric. Dyneema twine is far stronger, but pulls easily, and also unravels more easily. The additional strength does not actually help, because in lab testing it just tears through the polyester fabric or rope.
Without any wax, Dyneema is more difficult to make seizings with; the wax on polyester twine holds twine in place while you work. Dyneema is more abrasion resistant, so we use it when sewing Dyneema webbing and on projects where chafe will be a problem. But most of the time we prefer polyester twine.
A stitching awl shines when you can’t reach both sides and you can’t flex the cloth enough to work from one side, as you would a sail. A multihull trampoline, when installed on a boat, is a classic case—you can’t reach both sides, but an unskilled helper can work the underside, threading the free end.
Additionally, with many trampoline fabrics, the material is usually mesh, so making some large holes is of little consequence. Awls will also work in a vinyl material that closes around the holes, like leather. The stitching awl can shine on boot, bag, and upholstery repair when access is a challenge. We’d not use it on Bimini tops or dodgers, because the awl makes big holes that leak
THE VERSATILE PALM
Quite simply, a palm can do more things. A stitching awl can’t sew a round stitch over an edge, add a bolt rope, work an eye, create a sewn eye, lockstitch a splice, make a whipping or seizing, or make a herringbone mend before adding a patch. You can’t run a seam working from one side (nearly all sailmaker’s palm work is done from one side—flopping the work back and forth is inefficient). The stitching awl, it seems, is a one-trick pony.
SAILING PALM ACCESSORIES
Needles. #16 and #18 with 0.8 mm whipping twine are good for seaming and most cloth repairs, but a #14 needle, used with #10 twine, is good for grommets and very heavy work.
Not all twine and needle makers follow the same standard. If you are unsure of twine size, wrap it tightly around a pencil 10 times, measure the length of the wrap in millimeters, and divide by 10; that is the diameter you need in mm.
Sewing Awl. Smaller than a carpenter’s scratch awl, you hold this tool in the opposing hand while sewing leather, so that you can make the holes in a rhythmic manner. Holes in leather close up (which is a good thing), so you want to get the needle in the hole immediately. Keep it needle-sharp with a fine taper.
Beeswax. You’ll want to wax any unwaxed thread. Pull it through the wax bar a few times, and then smooth it with your fingers a few times. Better yet, buy pre-waxed twine. Braided twine is easier to work with than laid twine. The wax improves handling and provides weather protection.
Block of wood. Using this for pushing the needle is sometimes handier than using a palm, particularly when stitching rope eyes. Place the block on your lap and press the work down over the needle.
• Pliers. You’ll need these pulling stuck needles through.
SEWING THIMBLES
A sailmaker’s palm is really just a heavy duty version of the common thimble, optimized for use on heavy fabric with heavy thread. It only works well with needles long enough to reach from pinched fingers to the heel of your hand (about 2 ¼ inches minimum) and thread heavier than #2 whipping twine (2 mm diameter). This will make holes in foul weather gear that will leak and look positively primitive on upholstery or clothing. But a common sewing needle is hard to push and rough on the fingers, so for clothing repairs you’ll want a thimble.
Snug Fit. If you are having trouble finding a thimble that fits, look for open tip versions, also known as a tailor’s thimble. A short piece of flexible hose can also work. Some find leather thimbles more comfortable. In a pinch, you could use a pinky finger cut from an old work glove. There are soft plastic thimbles, but we worry that a needle might poke through these.
We keep a sewing thimble in our kit, along with a selection of needles and light and moderate upholstery thread. It’s a light duty assistant to the sailmaker’s palm.
CONCLUSION
A stitching awl is the simple, beginner’s way to sew leather or heavy reinforcements, but not the fastest or best way. For sail cloth and canvas, the stitching awl is slow, makes large, damaging holes, and the result looks like Frankenstein’s forehead. But the stitching awl will work in places where backside access is limited or blocked, and for that reason alone, hang on to it if you have one.
Buy a palm and sewing awl and learn how they work. Your projects will be stronger, neater, more durable, and take less time.
TECH GUIDE: TWINE MEASUREMENT & STRENGTH
| TWINE DIAMETER (MM) | ROBLINE, NEW ENGLAND ROPES TWINE SIZE (METRIC) | MARLOW TWINE SIZE (TRADITIONAL) | THREAD SIZE (V-SIZE) | STRENGTH (POLYESTER TWINE) |
|---|---|---|---|---|
| 0.3 MM | 3 | 2 | V-69 | 6 lbs. |
| 0.4 MM | 4 | 2 | V-138 | 10 lbs. |
| 0.5 MM | 5 | 2 or 3 | V-277 | 18 lbs. |
| 0.6 MM | 6 | 3 or 4 | V-346 | 28 lbs. |
| 0.8 MM | 8* | 4 | 50 lbs. | |
| 1 MM | 10 | 6 | 75 lbs. | |
| 1.2 MM | 12** | 8 | 110 lbs. | |
| 1.5 MM | 15 | 12 | 175 lbs. | |
| *Most hand sewn repairs are done with #8 metric twine or V-346 thread. | ||||
| **Most hand sewn rope splices are done with #12 metric twine. |
TECH GUIDE: NEEDLE SIZE
| NEEDLE SIZE (BRITISH STANDARD WIRE GAUGE)* | 12 SWG | 14 SWG | 16 SWG | 18 SWG |
|---|---|---|---|---|
| LENGTH (INCHES) | 3.25 in. | 2.75 in. | 2.375 in. | 2.125 in. |
| DIAMETER (METRIC) | 2.64 mm | 2.03 mm | 1.63 mm | 1.22 mm |
| DIAMETER | 0.104 in. | 0.08 in. | 0.064 in. | 0.048 in. |
| EYE DIMENSIONS ~ | 1.8 x 3.1 mm | 1.4 x 2.5 mm | 1.1 x 1.9 mm | 0.8 x 1.4 mm |
| USE TWINE SIZE (METRIC) | 15 | 2022-10-12 00:00:00 | 8 | 4 or 6 |
| USE TWINE SIZE (TRADITIONAL) | 10 or 12 | 6 or 8 | 3 or 4 | 2 |
| *This can only be a rough guide, since not all twine makers follow the same standard and not all needle makers use the same standard. |


