

I like to think and believe that for most sailors, keeping an eye on our environmental footprint is somewhat important. It certainly is for me. To that end, I always consider any opportunity to reduce or control my own. Harvesting the free energy provided by the sun is certainly a big one, as a properly designed and installed solar charging system can practically eliminate the need to start the engine to simply recharge the batteries and power refrigeration systems on board. In my case, reducing engine use to only get in and out of the harbor, and motoring when moving under wind power, is not possible.
For smaller boats—rather than seriously equipped liveaboards that would require a more complex solar management system—a relatively basic system will do the job quite well. But here’s the issue. A basic solar charging system only charges one battery bank, normally the house battery. Once that battery is fully charged, the solar controller stops charging and switches to float or maintenance mode. So, any power produced by the solar panels is then wasted or lost.
The Trouble with the “Both” Setting
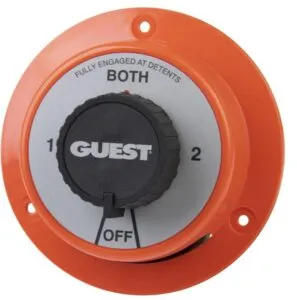
During the winter when the boat is stored, I put the battery switch selector to the “both” setting, which will charge and float both batteries evenly, thus, maintaining the batteries during the winter.
However, leaving the battery selector switch to “both” is not a desirable option during the summer when the fridge and/or other working accessories would be taking power from both batteries. During multiple cloudy days with little or no sun, both batteries would be drained, most likely making starting the engine impossible. And yes, this happened last year when for some unknown reason I had left the battery selector to “both.” I ended up having to plug the boat to shore power and wait until the batteries were recharged, losing a few hours of sailing time.
So, I needed a solution that would charge both batteries via the solar charging system, but also allow me to keep the battery selector to Battery 1 or OFF, saving the engine battery from draining.
Echo-Charge Device
There are many devices out there ranging from super complex and expensive—perfect for super yachts—to basic, simple and affordable. In my case, an echo charge device was the best choice.
An echo charge device allows you to charge one battery, typically the house battery, and when that battery is full, it will switch over to charge a second battery, typically the started battery. The echo charge device does this while keeping both batteries isolated from each other, therefore preventing the start battery from draining.
To be clear, an echo charge it is an intelligent electronic switch, not a charger. It must first receive power from a power source, either the shore power linked battery charger, a solar system controller, wind generator or a hydro-generator. It will then monitor the voltage of the house battery and charge it.
When it senses the house battery is full, it will switch over and start charging the second (starter) battery. Since the echo charger device is unidirectional, it is safe and there is no danger of current flowing backwards. Once the second battery is charged, the echo charge device will switch back and monitor to the first battery, while the solar controller will simply go into float mode as it would normally do.
Installation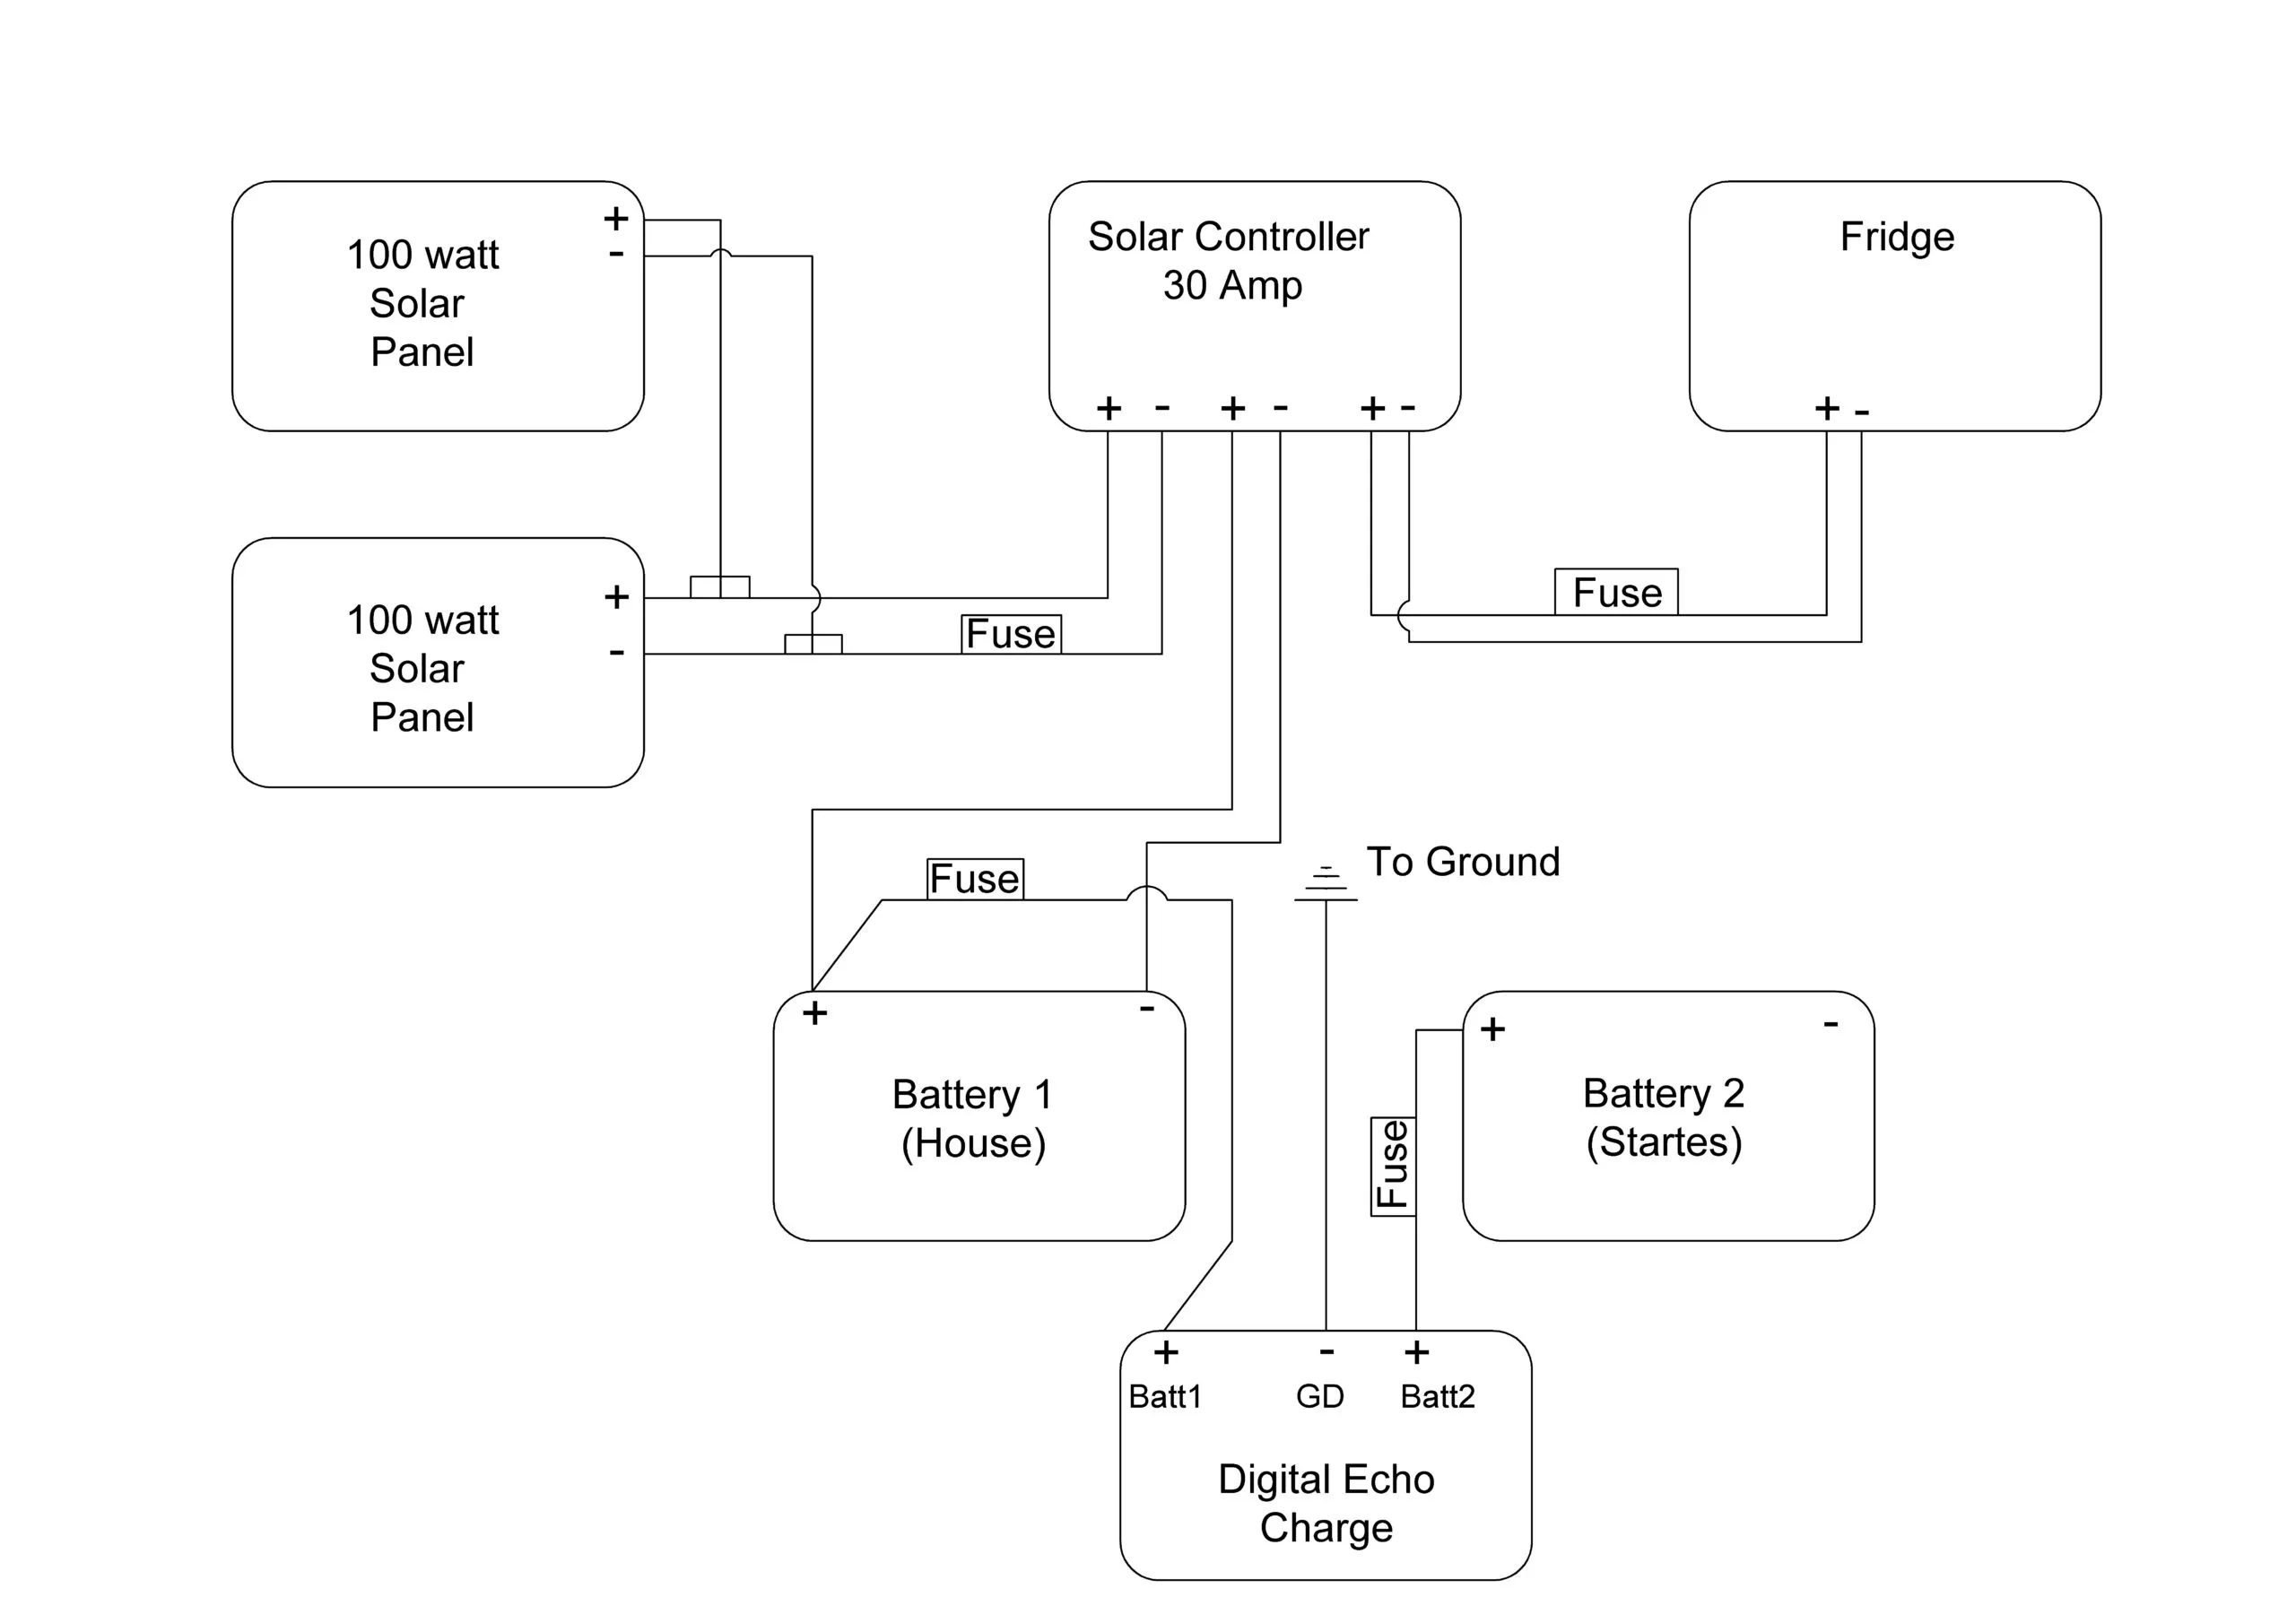
The installation could not be simpler.
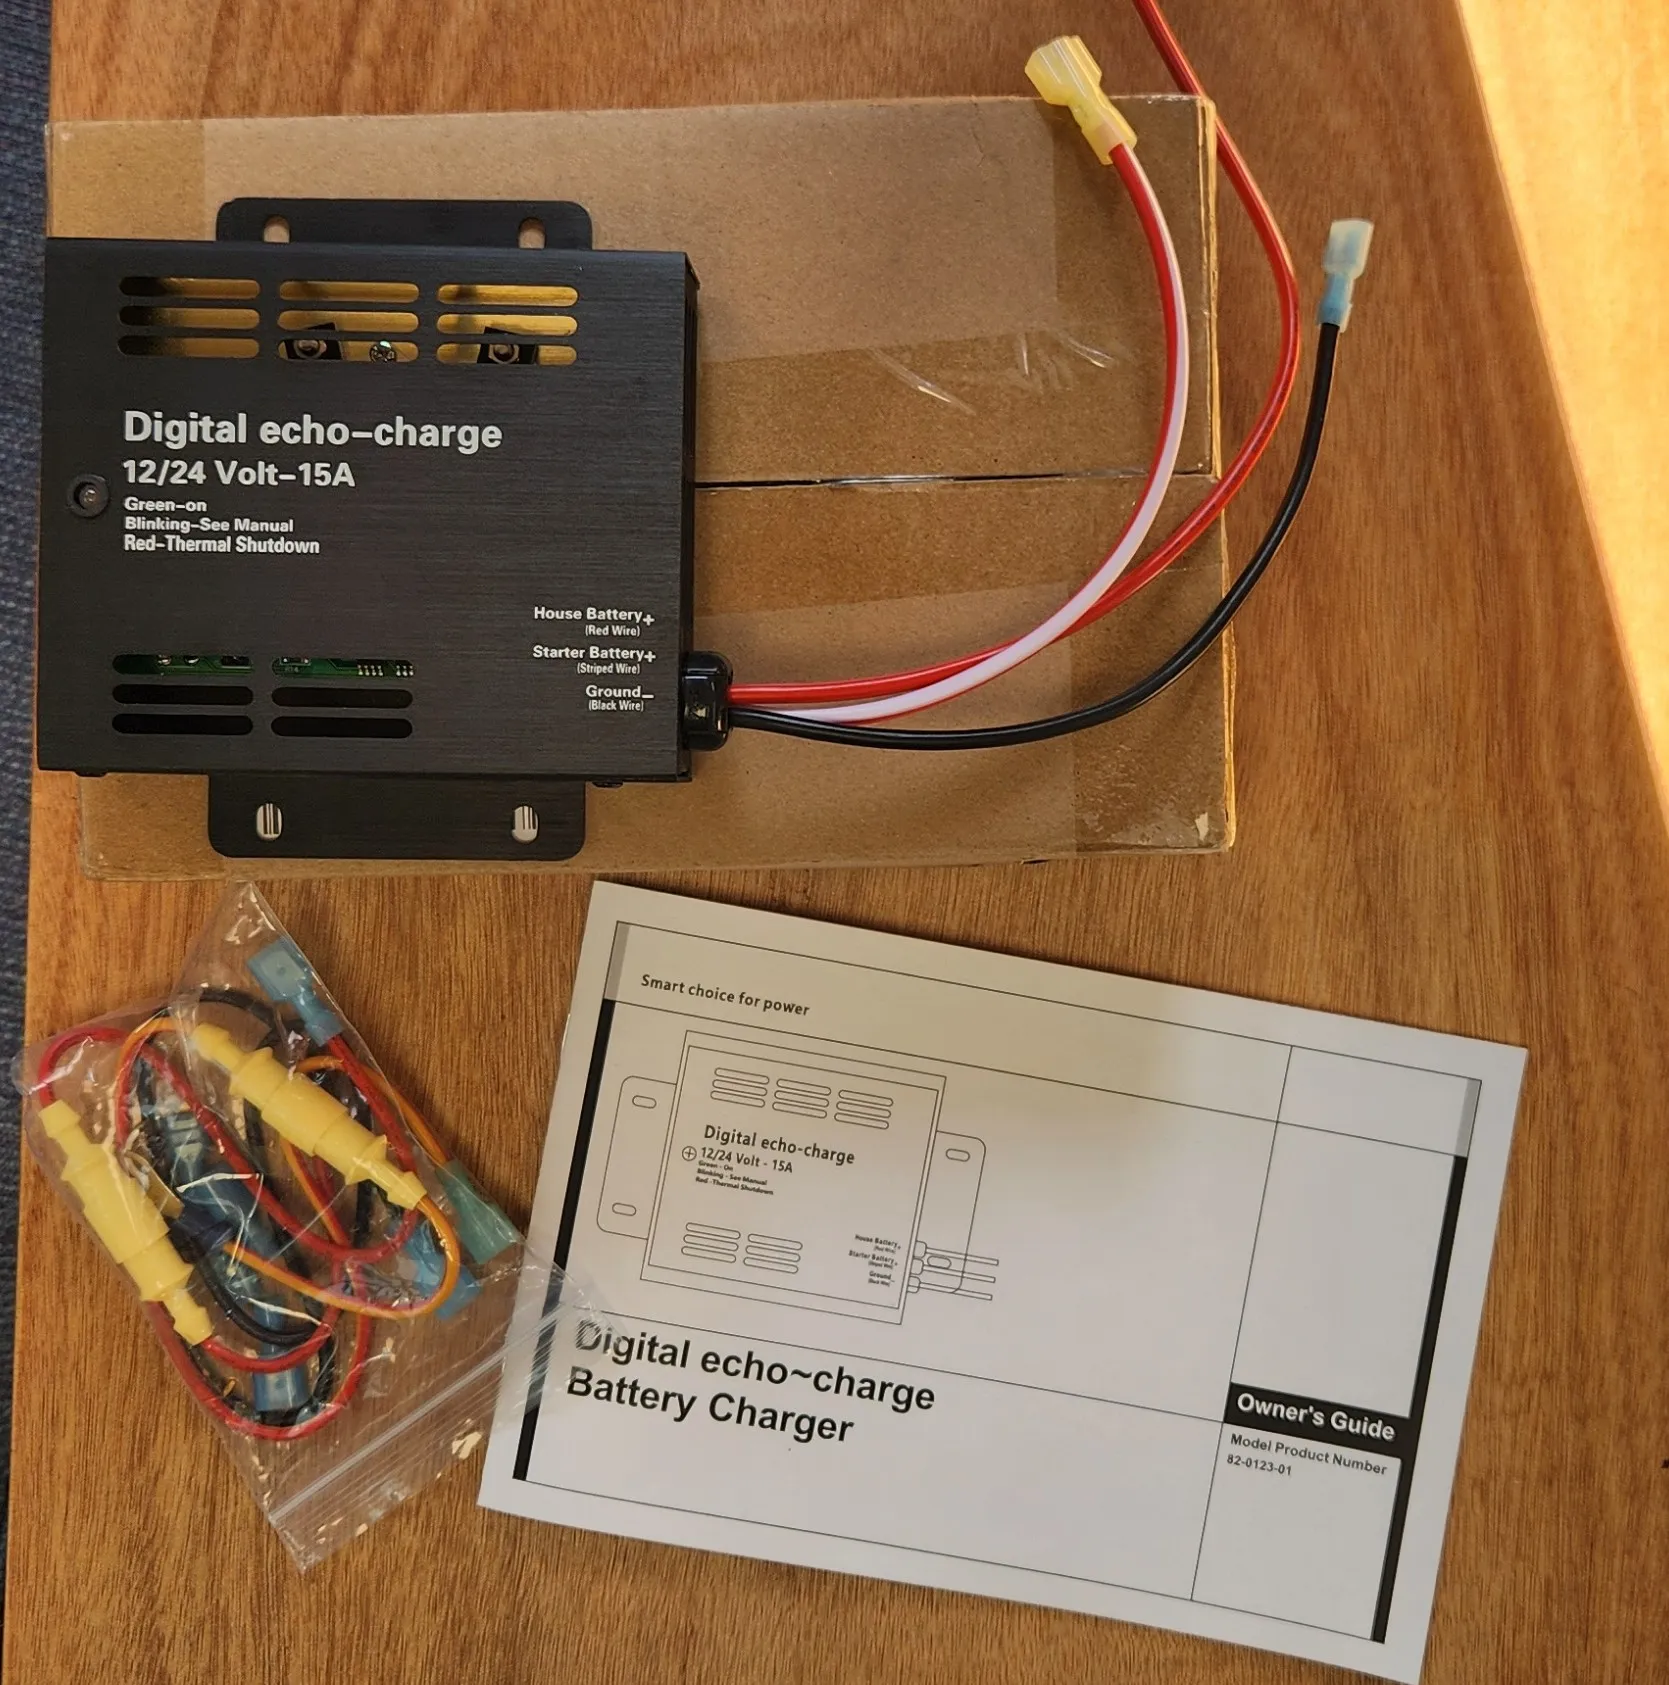
In my case, I purchased an Echo-Charge unit via Amazon. It came with excellent reviews and I felt the price ($146 CDN) was reasonable given the benefits and peace of mind provided.
Included with the device itself is an exceptionally well written instruction manual, two fused positive wires, one ground wire and extra wire connectors, making the installation simple. All I needed to add was about two feet of 12-gauge wires and a pack of 3M Command Velcro strips to mount the device without screws. Finding the perfect installation location was really the hardest part.
During installation, whatever power generating source you use must be turned off. In my case, I unplugged the solar panels.
Once installed and with the solar panels plugged back in, a green indicator light on the echo charge device will indicate it is on and correctly wired. After my installation, the light did not come on because both batteries were fully charged already. So, using Battery 1, I turned on a bunch of lights and electronics to create a demand. A few minutes later, the green light came on, hence confirming it was working properly. Once the house battery was fully charged, I did the same thing; turned on a bunch of lights and electronics to create a demand, this time on Battery 2.
Results
Keeping my battery selector to OFF, I left for the day. The next day, both batteries were fully charged thanks to the echo charge device.
This is inexpensive, easy and simple to install and to monitor—I think these types of device will become more and more popular for sailors and boaters, even RVers, who have limited space but want to take full advantage of their charging systems, such as solar.
Here is my YouTube installation video you might find interesting.
Resources


Blue Sea makes what I think is a similar product, the ACR. This is a voltage sensing relay used especially in combination with their 5011 switch. I installed this last spring. I agree – this an easy, effective way of keeping the batteries charged and mitigating forgetfulness with leaving g the A/B switch in the incorrect position.
Thanks for sharing that John. I was not familiar with ACR from Blue Sea.
Nice device, will the Echo Charger allow for 2 different battery chemistry? A gel AMG start battery and Lithium batteries for the house batteries?
Not likely as the charging profile is different between LiFePO4 and lead acid. You would need to switch the solar controller to one of the other profile. I use a “Victron Energy Orion-Tr Smart DC to DC Charger (Bluetooth) – 12/12-Volt 18 amp 220-Watt – Battery Charger for Dual Battery Systems – Isolated” to charge my house LiFePO4 from my start Lead Acid battery being charged from the engine alternator. Same issue the alternator only has the lead acid profile.
Hi Jay, I believe that the Echo-Charge should be used only with batteries that identical. For battery banks that have different types of batteries, DC to DC charge device should be used.
I have used this on two boats and am happy with it. Safe, effective, inexpensive and maintenance free. I don’t think it would function as a charger of a heavily drained battery; it’s more of a maintainer to offset day to day use.
100% true Monty. A poorly maintained and super weak battery probably would not fair well. But this is true of any device. My batteries, BTW, are now 7 years old, and still test perfectly. If I ever had a poor performing battery, I would start by removing it and bring home to check out it out and put it on a deep trickle charger over night. Then test it again. At that point, put it back in or replacing it will have to be decided.
I’ve had the Digital Echo Charger on my Catalina 400 for 15 years now and have been very happy with it. It’s a very simple device, though your description of its operation is a little inaccurate.
It only allows the unidirectional current when the “source” battery voltage is over 13.0v, such as when connected to a charging source like your alternator of solar. It also limits the charging voltage to the “target” battery to about 14.5v, even if your “source” battery has a slightly higher voltage. In this way, your “target” battery can be a slightly different chemistry than the “source.” Current flow to the “target” is a max of 15A.
It’s otherwise a “dumb” profile… the “target” voltage echoes the “source” voltage (hence the name “Echo Charger”). When your “source” battery goes to float voltage, the Echo Charger follows it to float voltage, too.
On my boat, my Trojan T125 house batteries charge with a fairly high 14.8v in absorption, but the sealed starter battery receives a more suitable 14.5v. You may run into problems if your “source” battery charger is set to a float voltage close to or below 13.0v, such as with some lithium profiles, but I don’t have lithium yet. Also, there is a slight parasitic load on the “source” battery, so it should be disconnected during long term layup.