

Sealing the holes in decks where Loran and VHF antenna cables penetrate is a fairly common problem on modern boats. If there were only the cable to be considered, a hole of the appropriate size plus a dab of sealant would do an adequate if tacky looking job. But these cables inevitably include sizable end connectors which require holes much larger than those required for the cable itself.
Solutions include removal and reinstallation of the connector each time the cable is removed during storage or servicing, and any number of commercially available through-deck fittings or plugs.
None of these solutions is simpler or better than the wood fitting shown here. It is attractive and can be made in a few minutes for a few cents. For use on the underside of the cabin overheads which lack a zippered headliner, the same style fitting makes an attractive masking or trimming device.
The first thing to be determined is the overall size of the fitting. Allow about twice the size of the connector. An average VHF or Loran connector measures about 11/16″ in diameter, so 1 1/2″ square would be a good size for the fitting.
The wood can be standard stock which actually measures between 3/4″ and 7 / 8″ thick. Choice of wood will depend on taste.
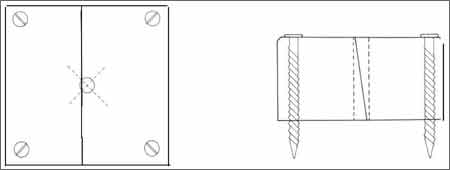
Cut the wood to size. In the center, drill a hole 1/32″ larger than the exterior diameter of the cable. The easiest way to locate the center of the block is by drawing lines from corners to diagonally opposite corners. Where the lines cross is the center. These lines also serve to later locate the fastener holes at the corners.
470
The next step is to cut the block in half with an angled cut which will make the fitting watertight. Start by marking pencil guide lines on the wood. The first line runs with the grain across one of the faces of the block. It should be square to the edges of the block and run over the center cable hole about 1/4 of its diameter out from the center. Then, on the opposite face of the block, draw a similar line, but this one diameter out toward the opposite side of the hole.
Connecting these two lines along the edges of the block will give the proper angle for your cut.
The actual cut is most easily made on a bandsaw with the bed set to the proper angle. Be careful when cutting small pieces on a bandsaw. A fine toothed blade is best.
Lacking a bandsaw, it will be but a minute’s work to clamp the block in a vise and carefully hand saw down the line with the saw held at the proper angle along the edge line. Again, a fine toothed tool like a back saw or dovetail saw is best.
The last step before finishing is drilling the holes for the four screws which will fasten the fitting to the deck. Stainless steel #10 pan head, self tapping screws are appropriate for use in decks.
To mount the fitting, hold the two halves togehter and center the unit over the connector hole already drilled in the deck. Use an awl through the screw holes to prick the deck, or, drill one hole first and screw the fitting in place with one screw, then drill the remaining holes through the holes already in the wood block.
Remember that you drilled the cable hole 1132 inch oversize, but also that you removed some wood and thus reduced the size of the hole in the sawing process. Assuming a fine toothed, thin bladed saw, the hole should now form a snug, squeeze fit on the cable. Check this by running the cable and screwing on the fitting. If the hole has become too small, (ie, if you can’t get the fitting snug down on the deck) redrill the cable hole with the cable removed but the fitting screwed firmly down.
In a vertical installation the downward angle of the center cut of the fitting will make it waterproof for all intents and purposes. For a horizontal installation, you may wish to apply a very thin film of silicon seal to the angled surface where the two halves of the fitting meet and the cable goes through. — J. Pazereskis


