

Although through-bolts may be the gold standard for strength and security, sometimes drilling a hole isn’t practical, or exposes foam or balsa core to water intrusion. Mounting a sump-pump to the side of the hull, attaching electrical components when the other side is either inaccessible or exposed, mounting an air conditioner on the bridge deck of a catamaran, or adding solar panels to a hard top are just a few examples of situations where a surface mounting is needed.
Photos by Drew Frye
Fortunately, for all but the most extreme loads there is a simple solution: glue-on studs. Theyve saved our bacon more than a few times over the years.
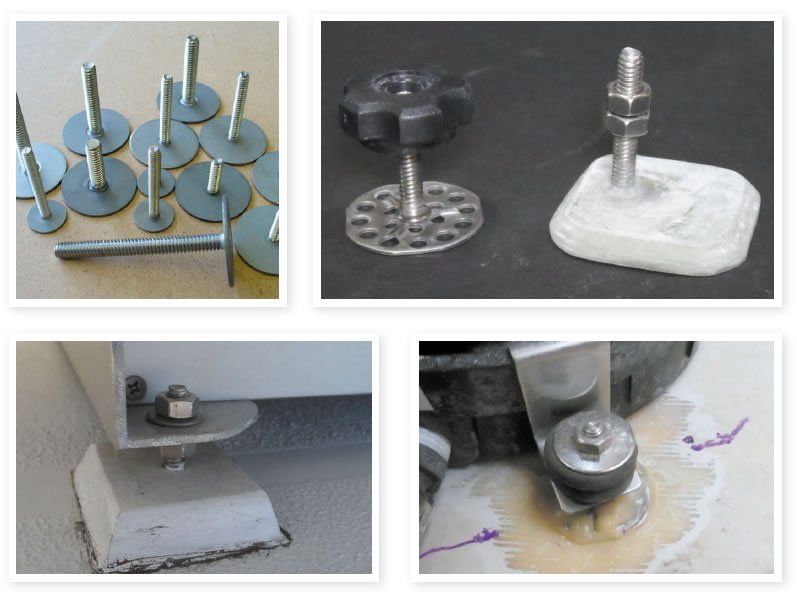
Stainless Steel Studs, Weld Mount Systems
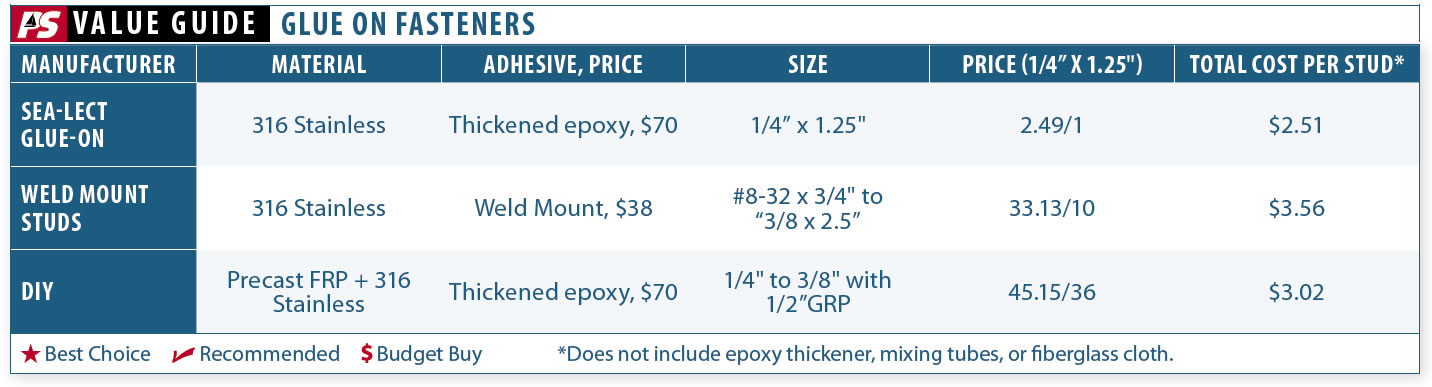
Best known among marine installers, Weld Mount has a complete system of studs and proprietary adhesives, covering a wide range of sizes and mounting surfaces. PS tester Drew Frye has installed hundreds of the -inch studs in industrial settings, generally to secure conduit and instruments to chemical process equipment.
On the boat he has used a few dozen, mostly for mounting electrical gear. Simply clean the surfaces of all grease (it is good to sand a little too), apply a – to -milliliter lump of glue from the applicator onto the center of the stud base, and press and twist a quarter-turn until a little comes out all around the outside. The glue is thick enough to hold the stud in place without support, and depending on the adhesive, within 10-20 minutes you can begin installing equipment (full strength in a few hours).
The only downside is that the studs are bought in packs of ten, the adhesive is pricey (Frye likes AT-2010 for general use) and does not keep more than a month even in the fridge, and you need a special gun and mixer. If you only need four fasteners, the set-up will still cost you over $150. Best for commercial users and big jobs.
Sea-Lect Designs Glue-on Studs
They only sell one size; 1/4-20 x 1 -inch long. They don’t sell a special adhesive; most will use thickened epoxy and sometimes a small square of fiberglass, but generally we already have that. Sand the stud and the mounting location, thicken the epoxy to a mayonnaise consistency (stiffer for vertical surfaces), and press the stud into the mound until it comes out the edges and through all of the holes.
On vertical surfaces they can be held in place either with tape or by laminating a 4-inch square of fiberglass cloth over the stud. Our experience mounting these with West Systems epoxy is that after it is cured, removal will tear out of a chunk of the bulkhead its attached to.
DIY alternatives
Once in a while, there may be a location where the industrial aesthetic of a glue-on stud is not what you want. Fryes solar panel mount is such a place. He made his own glue-on studs by threading and epoxying -inch stainless rod (bolts with heads cut off) into -inch G10 fiberglass scraps. Remember to degrease bolts before bonding into the threads-there will always be residual thread-cutting lubricant. Cut the blocks to a size sufficient to spread the load and a shape that pleases you, and epoxy in place.
Lacking the holes of the Sea-lect studs or the high-viscosity adhesive of the Weld Mount system, they tend to slide around as though on skates, so use tape or clamps to stabilize these until the epoxy kicks.
Alignment Tip: Sometimes it is simplest to hold the equipment in place and install the studs through the mounting holes while the glue is still wet. To position the hold-down clamps for an AC unit, Frye positioned the unit and then plopped the hold downs with the glue-on studs hanging from them around the perimeter of unit.
When the epoxy kicked, he tighten the nuts and had perfect alignment with no measuring. When mounting the solar panels he let the studs hang from the frames and gently placed the panels and frames on the hard top. Again, after the epoxy kicked, he adjusted the nuts for a perfect fit.
Conclusion
We don’t recommend these for rigging loads or equipment subject to high impact. But they can solve some vexing installation problems, and the result is light, compact, durable, corrosion-resistant, and professional-looking. Far better than screws that can work loose or wooden backing blocks that can rot, we have never had a failure. Something to keep in mind for your next equipment installation.
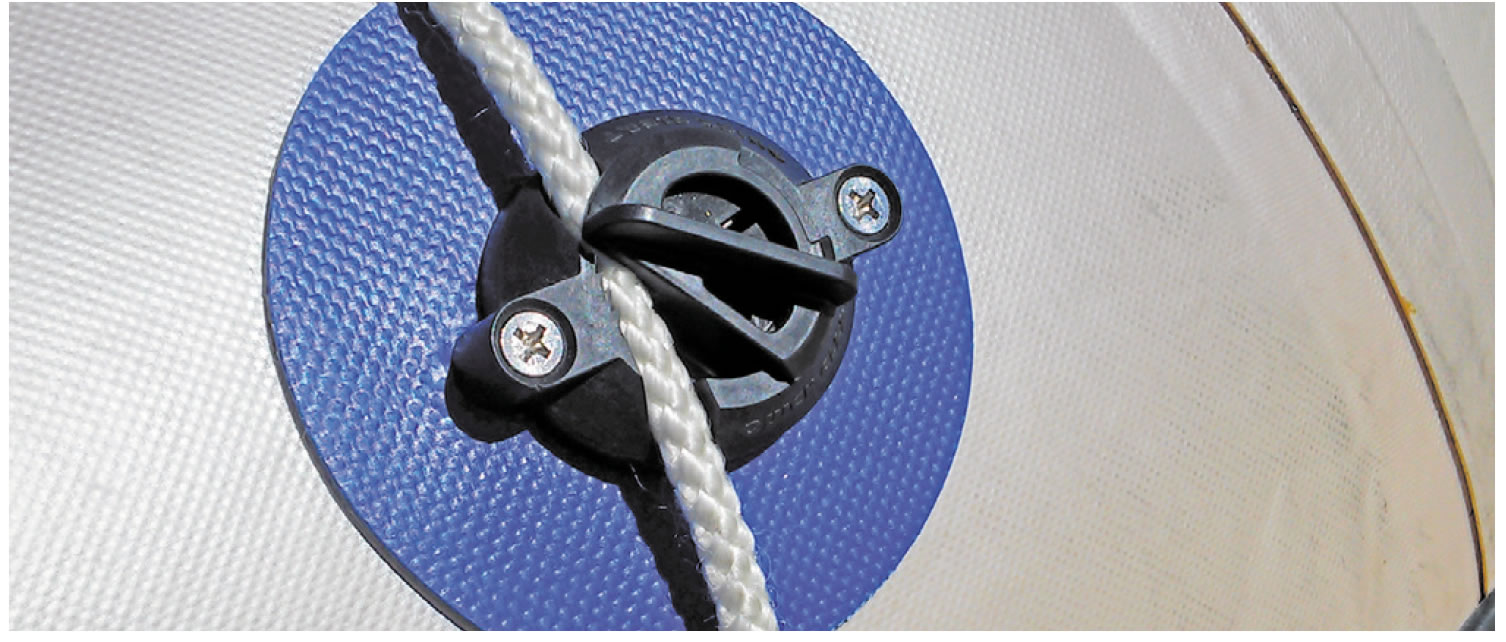
After having our dinghy bang up against barnacle- encrusted pilings too many times, we began looking for a way to attach a fender near the center of the boat.
Many dinghies have hand holds that could be used for this purpose, but ours did not. In the middle of our search we got word from Quick Cleat (www.quick-cleat.com) announcing its new Peel-n-Stick Quick Cleat. We haven’t tested it ourselves yet, but based on the information they provided (rich with exclamation points!!!) the $23 gizmo might be a quick fix.
The No-Knot Quick Cleat is mounted on a flexible vinyl laminate for easy positioning on a inflatable dinghy, kayak, paddle board. For PVC boats you’ll need to use the 3M primer pen (3M Primer 94, included), but with cleaning and sanding, the high-strength very high bonding (VHB) peel-and-stick tape should bond well to most other materials without primer. The tape is also available separately from 3M.
Of course, you could glue another D-ring onto the boat, using a fabric patch, but the Quick Cleat is handy for crew who haven’t yet mastered their knotswhich could also be regarded as a strike against it.


