
")
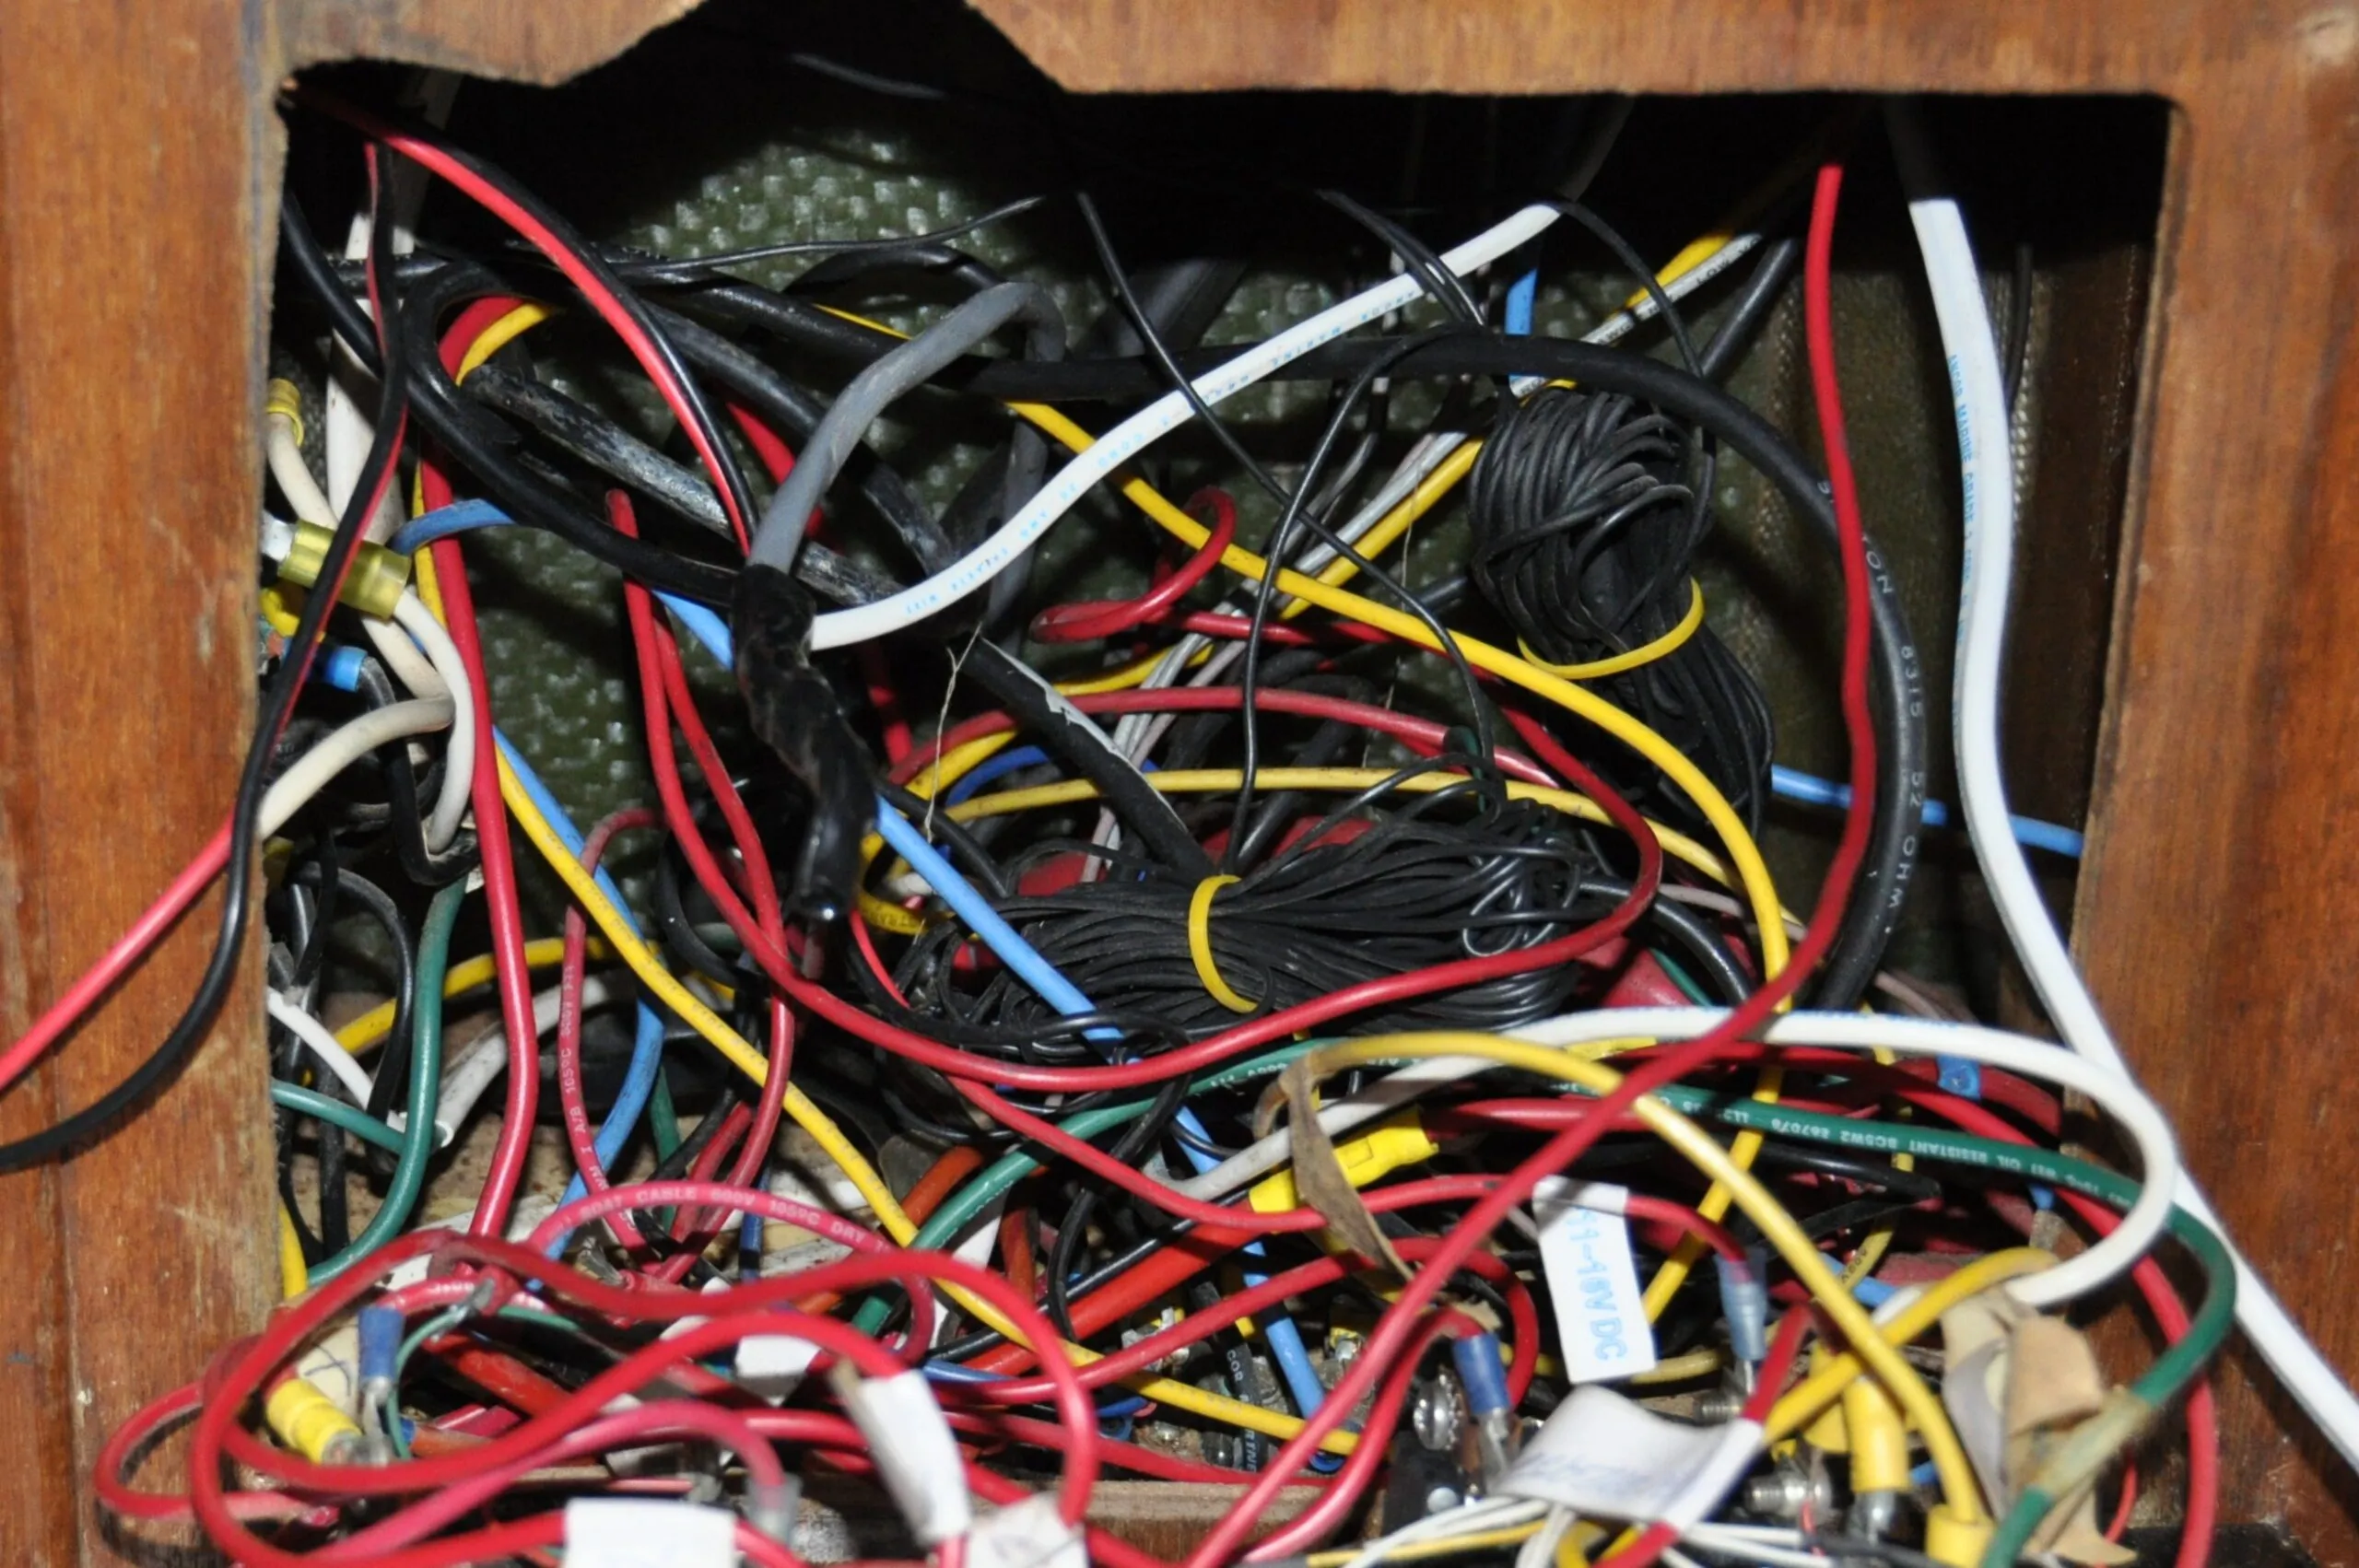
When repowering our 1978 Islander Bahama 30, I was well aware that part of the engine replacement would have to include a serious look at the original boat wiring that was approaching 40 years of age. As is common for production boats of this vintage, the wiring and connections were somewhat suspect due to the system’s age and years of “this-will-do” additions by various owners. There was a rat’s nest of wiring throughout the boat and particularly behind the outdated electrical panel. I surveyed this with trepidation. Electrical wiring was never my strong suit and the work looked daunting. I reviewed reputable marine publications as a guide to proper wiring before tackling this project.
A DIY Approach
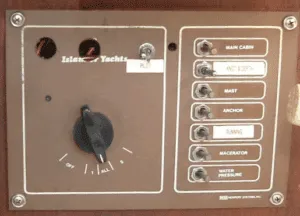
As is typical of older boats, many of the “circuit breakers” on the original panel were now serving double or triple duty to a variety of electrical additions. Everything from water pumps to GPS plotters to stereos had been added over the years. I was dubious that the circuit breakers even worked. It wasn’t a matter of fixing up the current panel as much as installing a completely new one.
There were very comprehensive panels available from such manufacturers as Blue Sea Systems and West Marine, but none maximized the limited space I had on the Islander. The larger panels with sufficient breakers were too large, the smaller ones didn’t have the capacity I wanted. The design and construction of a custom panel was the inevitable choice.
Source the Circuit Breakers
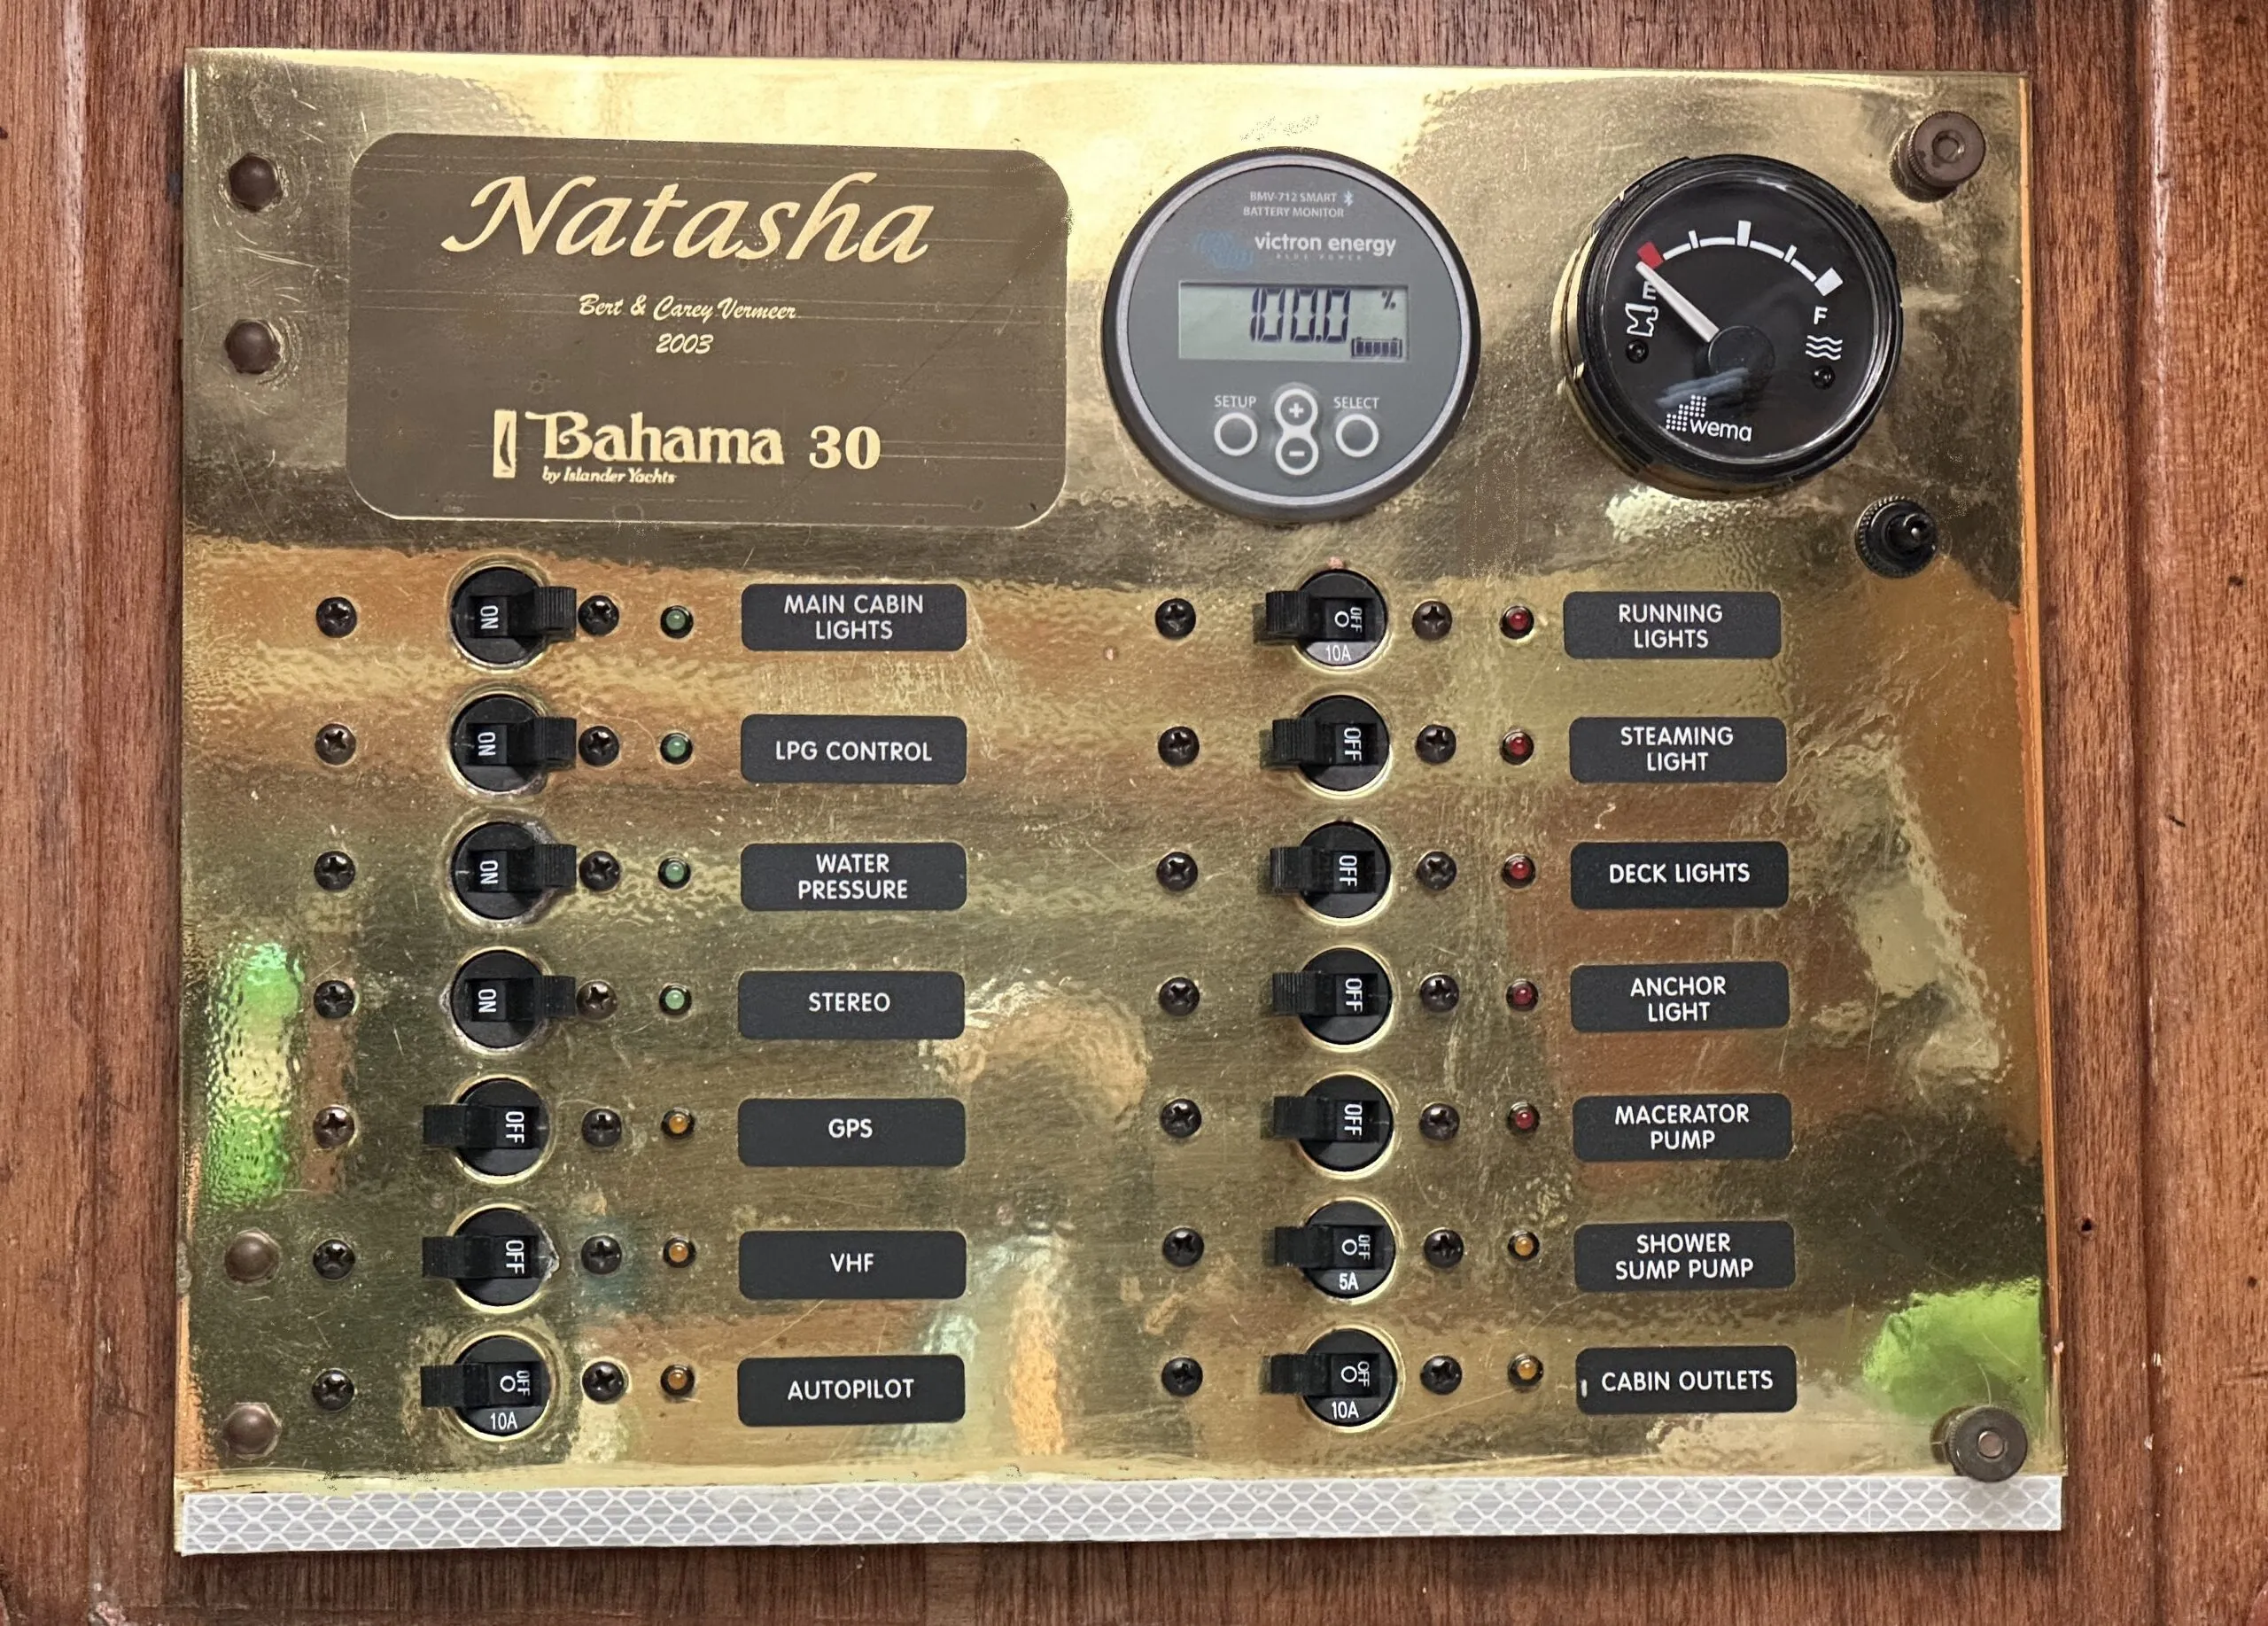
From a user perspective I wanted to isolate critical electrical functions to limit collateral damage should one circuit or piece of equipment fail. Separating the VHF radio from the GPS plotter from the propane control system seemed to be logical. Failure in one circuit would not affect others. On the panel, separating functions such as cabin needs from sailing needs into groups was also on the to-do list.
Although sensitive electronic components require a specific inline fuse, most electrical needs simply require a circuit breaker of the appropriate amperage to protect the wiring. I calculated amperage loads for each electrical device (water pumps, etc.) and purchased the appropriate number of Blue Sea Systems “C” series single pole circuit breakers. Although not necessary for the functioning of the panel, the addition of LED indicator lights allowed for a quick glance at the panel to see what was on and what wasn’t.
LED Setup, Battery Monitor and Tank Gauge
As an added reminder, I used green LEDs for breakers that should always be on when aboard (propane sniffer, cabin lights, etc.), amber LEDs for sailing instruments, and red LEDs that should only be on when actually in use (macerator pump, nav lights, etc.). I also wanted to include a battery monitoring system on the panel, selecting the Victron Smart BMV-712 Battery Monitor. With one space left in the design I installed a Wema two tank monitoring gauge. This gauge allows monitoring of the water and holding tanks, critical in any coastal cruising vessel.
Panel Material
The next decision was the material for the panel. I preferred black ABS plastic for its textured surface and ease of workability. It would be simple to cut and drill with a local engraving company able to laser engrave breaker titles. However, the material had to be 3/16-in. thick or less for the circuit breakers. ABS plastic of that thickness has very limited rigidity and the entire panel would flex unacceptably. The next option was metal, anything from stainless steel to brass to bronze sheets. To reflect the cabin decor, a polished brass panel was chosen.
Mock-up Layout, Punch Holes
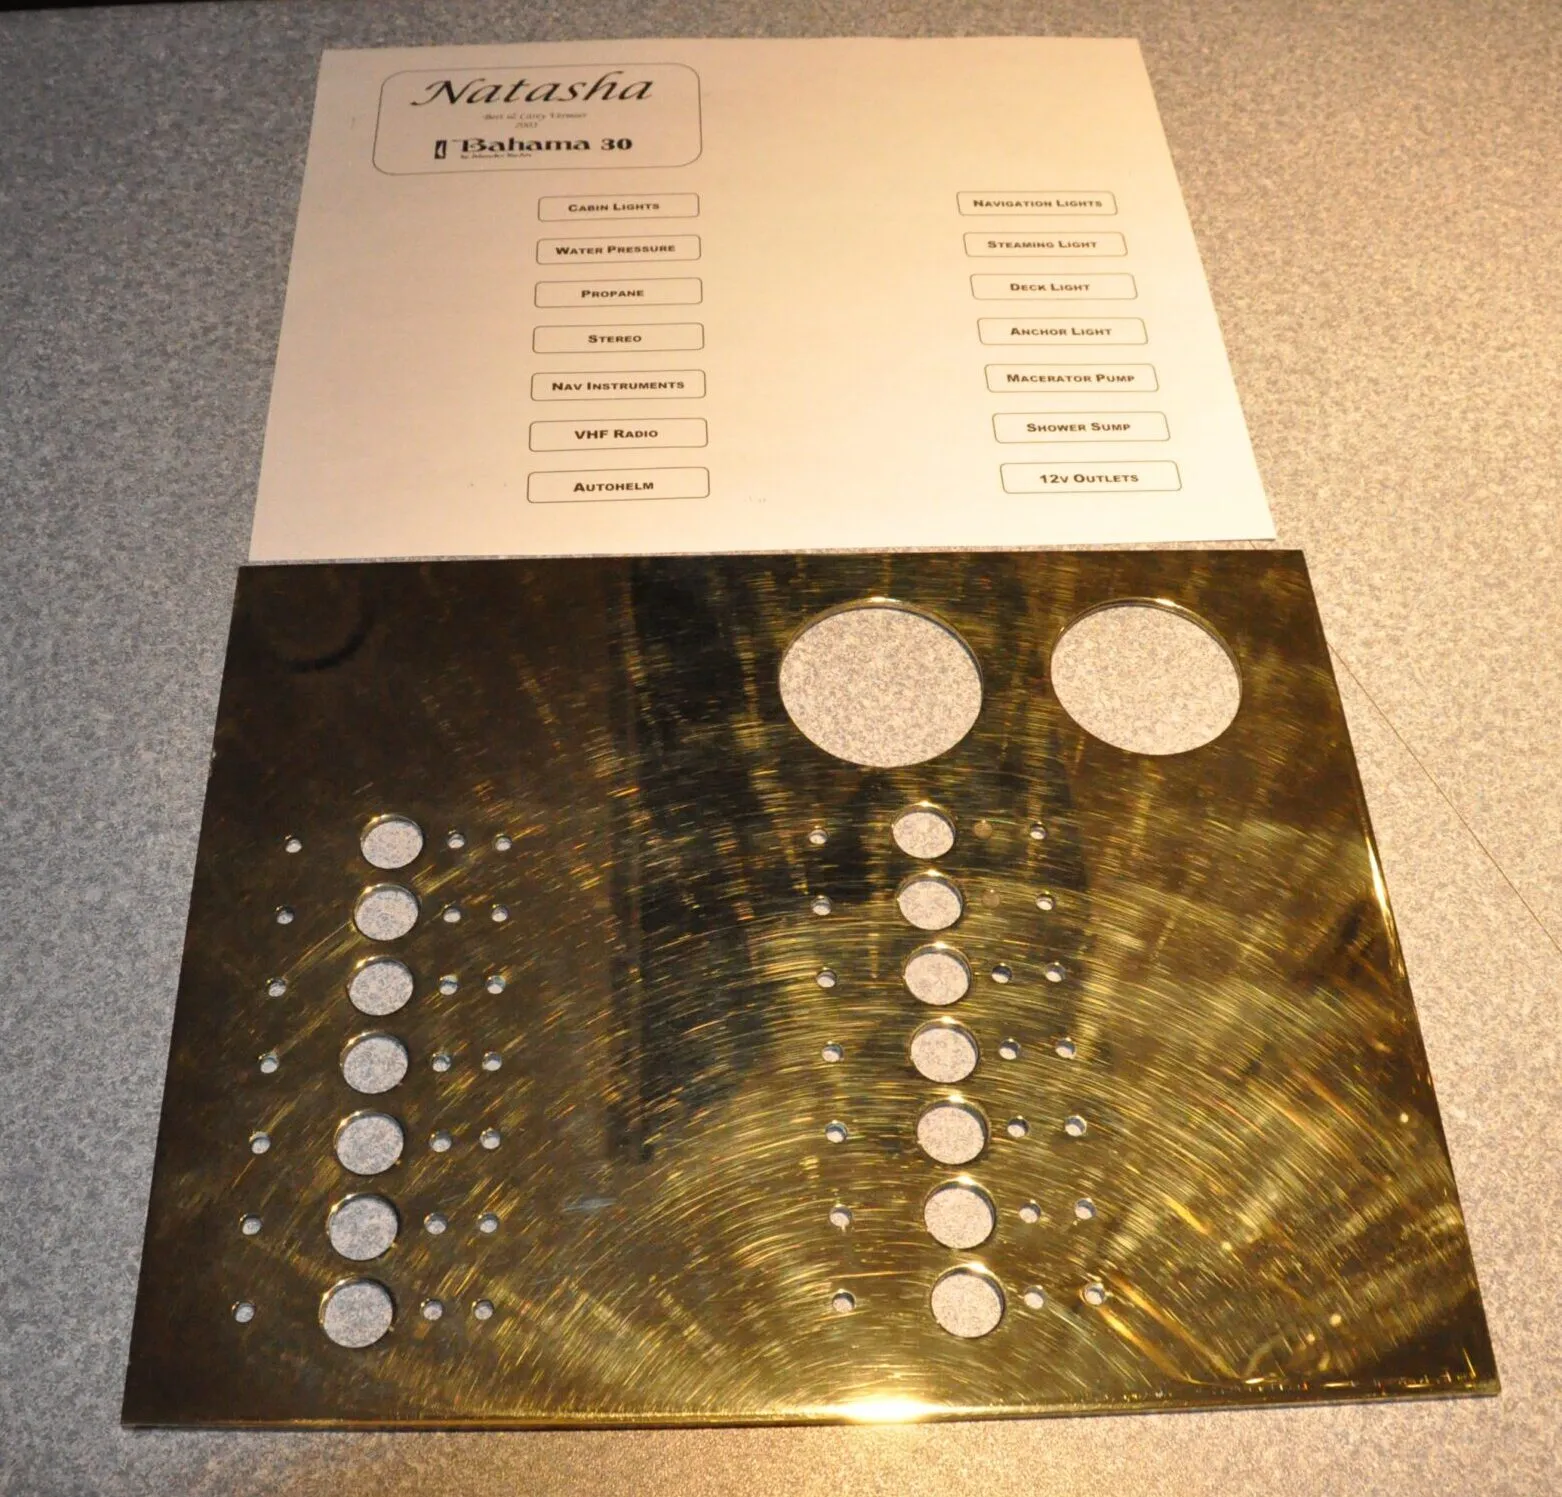
The layout of the gauges, breakers and indicator lights was laid out on multiple pieces of stiff cardboard. The dimensions were critical, and cardboard is easily replaceable when a design doesn’t work out in the fitting process. The hole centers were then scribed onto a raw 3/16th brass sheet of the dimensions to fit the space aboard the Islander. The marked panel was taken to a sheet metal facility. Brass is a very brittle metal and drilling anything other than very small holes has the potential of creating ragged edges. The holes were punched out professionally resulting in very accurate and smooth edges.
Polish and Label
Then polishing began. Starting with 200 grit and working up to 600 grit sandpaper on a random orbital sander the industrial finish of the brass was cleared of all fine scratches. A buffing pad with a metal polishing compound was used until the brass shone. A thorough wipe down with acetone before spaying with clear lacquer helps preserve the polished surface. Having already planned switch groups and positions on the panel, the Blue Seas labels were carefully applied to the dried lacquer.
Modify Panel Compartment
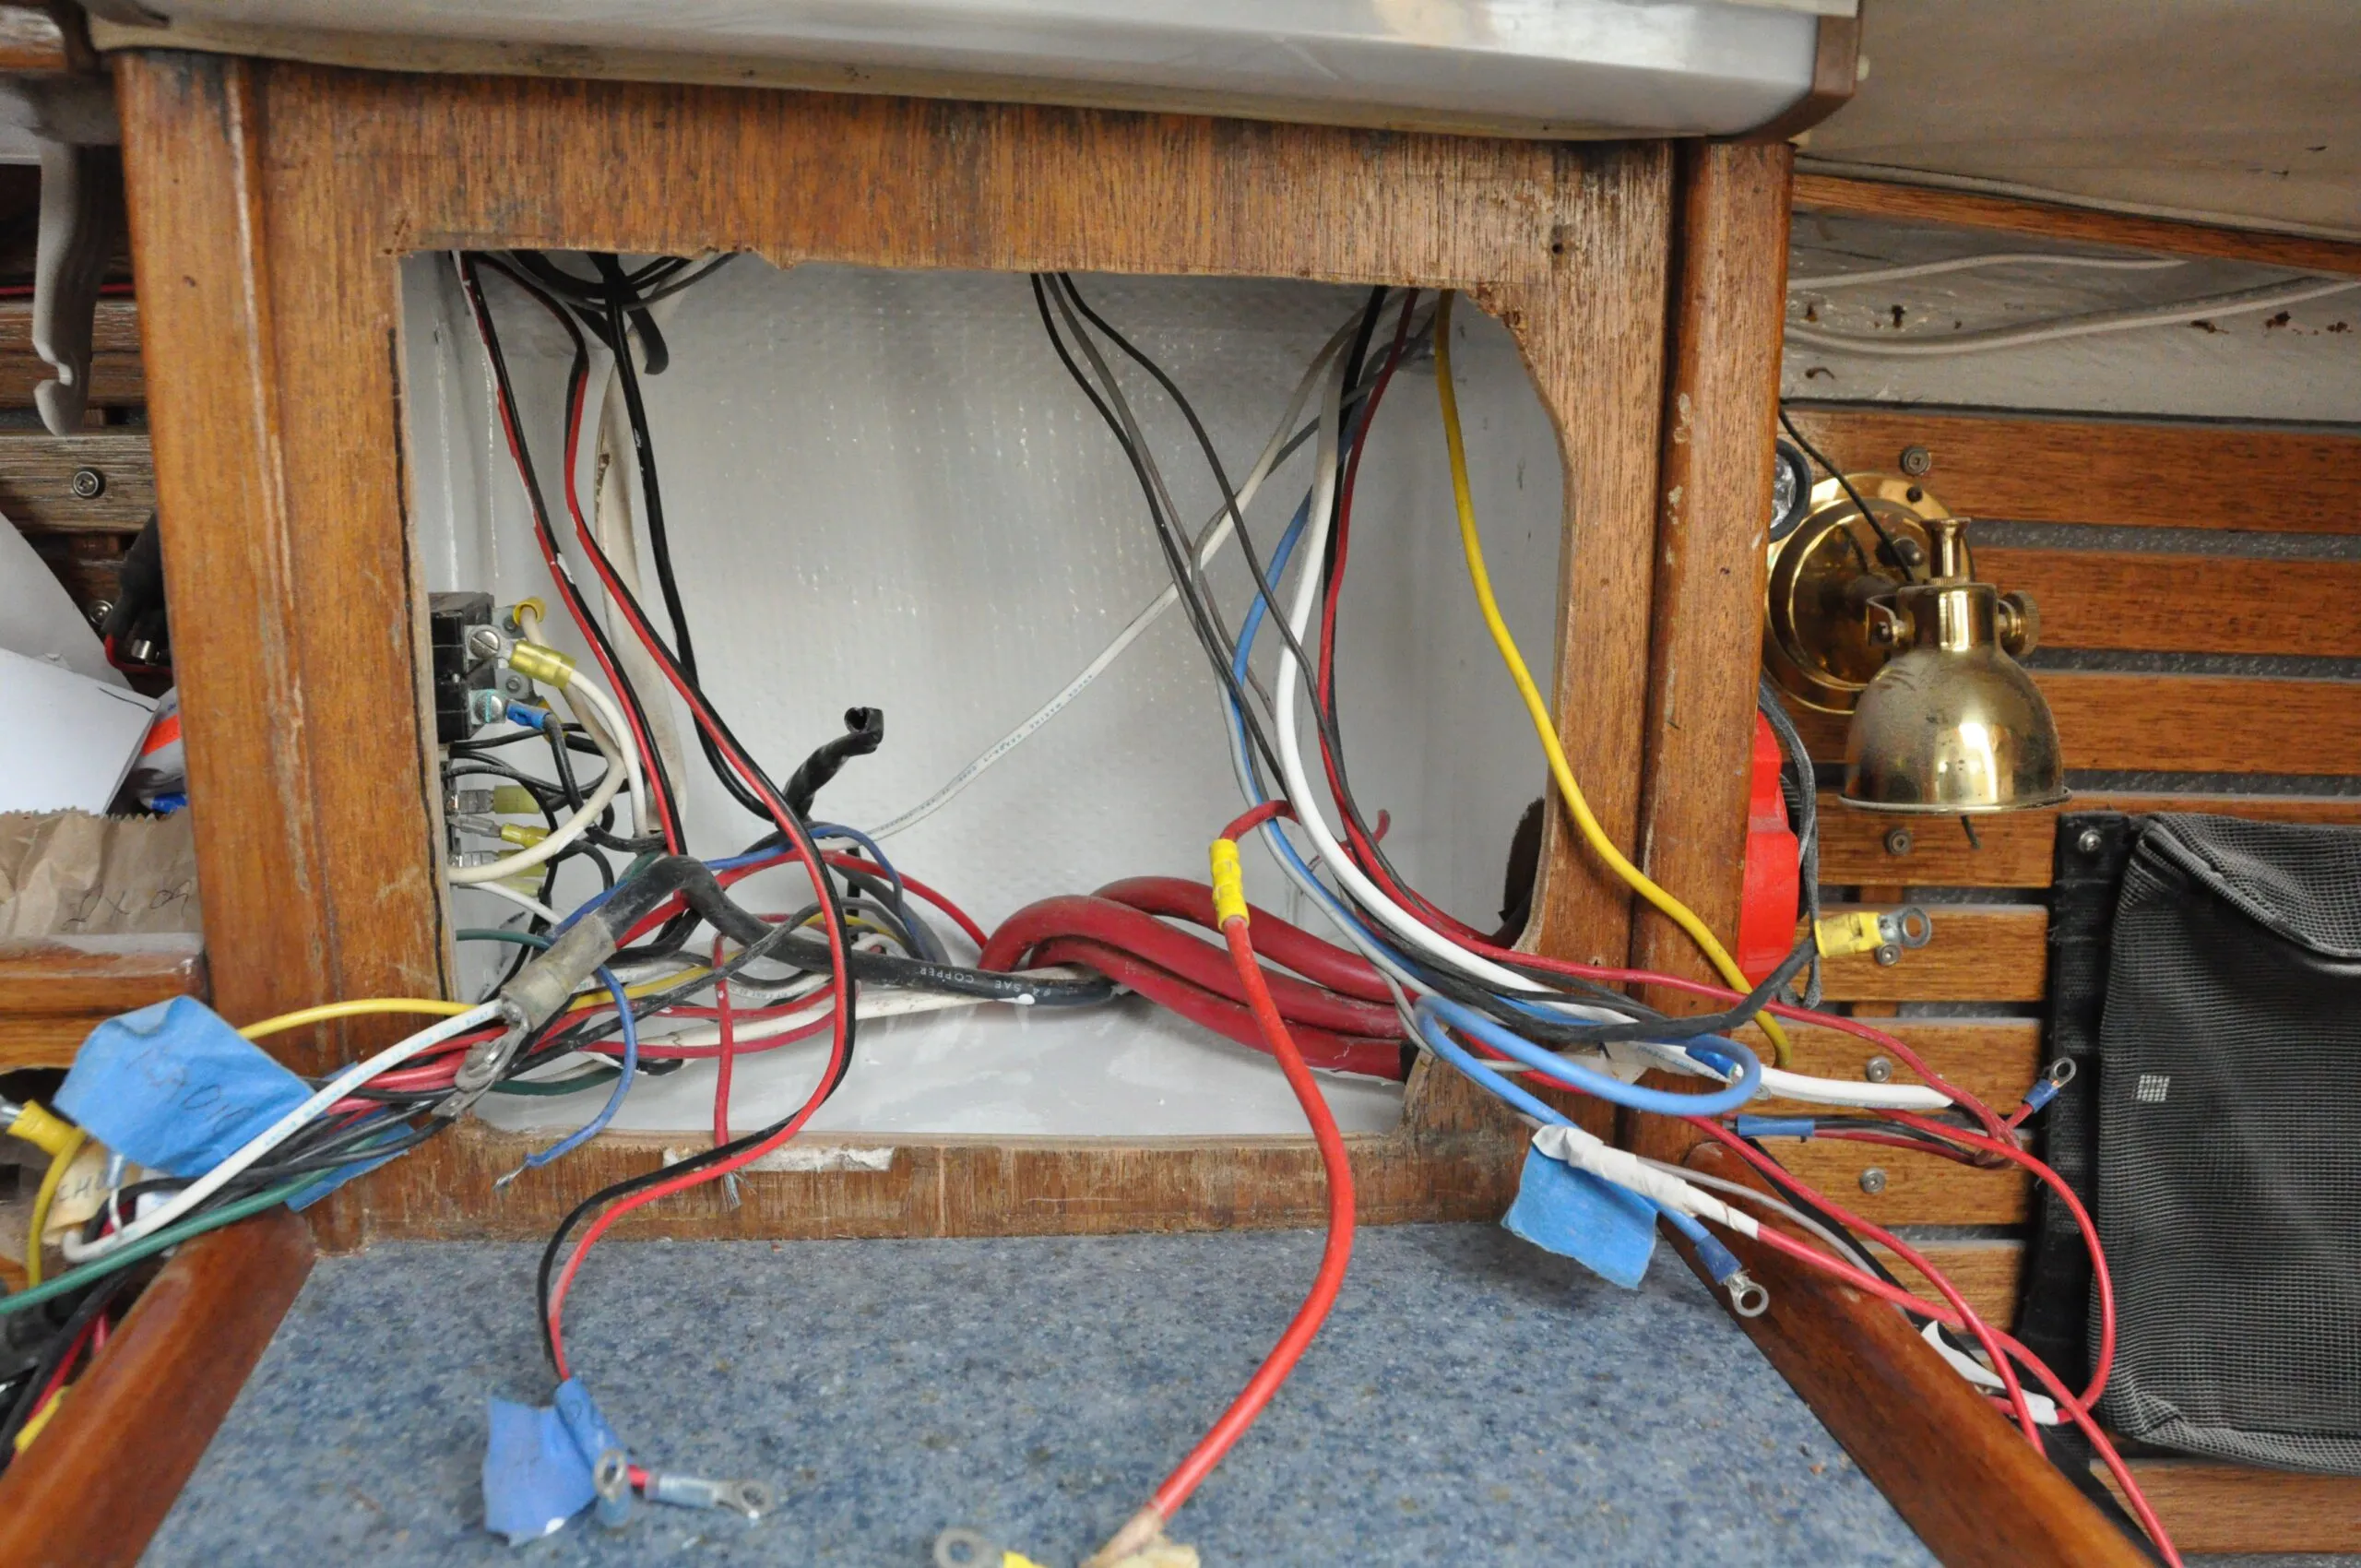
The compartment that housed all the wiring was also modified. The opening was enlarged to accommodate the new panel and the interior was painted white to make it easier to see with reflected light. All suspect wiring, including previous owner additions, was examined and removed or replaced as necessary.
Assemble Panel

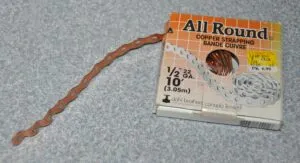
Finally, the assembly of the panel could begin. The breakers were installed with the correct amperage capacity to match the intended purpose. To connect the positive terminals for each circuit breaker I used a pre-drilled ½-in. wide 22-gauge copper plumbing strap manufactured by All Around, a product that is available in almost any hardware store. As the holes on the strap were not aligned perfectly to the position of the breakers, I simply kinked the strap until they did.
The color-coded outgoing load wires were labelled for intended purposes, crimped with heat shrink terminals of the correct size, and connected to the individual breakers with Dielectric Silicone Compound, a corrosion inhibitor. See “Small Wire Connections: Best Methods.”
Also, for more DIY electrical tips, check out “Fighting Off Marine Electrical System Corrosion.” The battery and fluid level monitors were installed in their individual holes. I printed up a boat logo on clear adhesive mailing label material and attached it to the panel. Oh, the vanity!
Install Buss Bar
A small buss bar to connect a limited number of ground wires at the panel was installed behind the panel with a connection to a much larger ground buss bar in the battery compartment. This removed a great deal of ground wiring from the actual panel compartment where it simply contributed to the wiring clutter. Being right-handed, I hinged the new panel on the left so that when it was open I could do most of the work with my right hand. The panel fasteners allowed a 1/8-in. gap between the panel and cabinet to allow airflow and drying of any moisture that may accumulate in the confined space.
A wiring diagram was prepared during construction and stays with the boat for quick reference.
Conclusion
The final product speaks for itself. The switches and gauges are in daily use whenever we are aboard. Easy to read, easy to reach and self explanatory, it complements the cabin nicely!


I really like the idea of color coding the LED indicators. Great.
For those not as creative or handy, Paneltronics offers excellent electrical panels of many different sizes and configurations. When ordering online you can specify position and amperage of each breaker and its label. I have no relationship to Paneltronics, just a happy customer.
Thanks for the information Randall. I wasn’t aware of Paneltronics when I did the panel all those years ago. You can see by the photos that I had a very limited space to work with and wanted to maximize what was there. I’m also a firm believer in supporting our local businesses (Victoria, British Columbia) in the marine industry and Paneltronics just never came up. Good information for anyone thinking of this type of project in the future.
We put in a new panel this year as well. Went a slightly different route. You can order a laser cut piece of metal at SendCutSend.com. We designed a panel in freecad that held 10 breakers and then ordered the laser cut metal plate which can be powder coated in house when ordered. We stacked 5 panels for 50 breakers in a tall cavity near the mast. We also designed a thick copper bus bar that got laser cut as well. This bus bar connects the 10 breakers together. The bus bar has one extra hole in it for a 1/4 20 bolt. this allowed the individual (10 breaker) panels to attach a terminal lug to wire to a big bus bar. One of the panels acted as a supply panel with a few batteries and solar charge controllers. They are working out very well and we are thinking about selling them.
Hello Andrew. One of the great things about Practical Sailor is the ability to share ideas. I had a look at SendCutSend.com. Very interesting concept and company that I didn’t know existed. I’m wondering if such companies are available north of the border. The dollar exchange and whatever tariffs apply would probably cause me to re-think any ideas I have. Thanks for putting this out!