

I never thought I would be motivated or feel the need to write an article, let alone a video, on how to properly cleat a line, aka a proper cleat hitch. That is until a few weeks ago, when during a particularly windy day where our yacht club harbor was in full active rock and roll movement. I was walking up my dock making sure my boat as well as fellow members’ boats were properly secured. To my dismay, I noticed that many boats were moving back and forth, some actually hitting the dock. And most were swaying side to side with only the fenders protecting theirs and neighboring boats.
So, as any good yacht club member should do, I proceeded to board many boats in order to properly secure them. What I noticed is how many did not have their lines properly tied to their cleats. I am certain that when first tied, the lines were nice and tight. But as the wind and swells caused more and more tug and pull movement, these improperly cleated lines slowly started to loosen, causing the boats to move around excessively.
Take Responsibility for Your Line (Mis)Management
I decided to take a series of pictures showing properly and improperly cleated lines and shared these pictures on our club’s Facebook page so members could be more aware of the importance of properly secured lines. Many posted comments replied, “My wife tied that one,” or “I was in a hurry that day.” Some did thank me for taking action to prevent damages.
To be clear, regardless of who ties any lines on board, it is ultimately the captain’s/owner’s responsibility to inspect each line before leaving the boat. Not only to prevent damage to your boat, but also damage to your neighbors’ boats as well as to club or marina infrastructures, such as docks, etc.
How the Super Yachts Do It
Even larger boats, such as super yachts, have a process to ensure properly secured cleated lines. In most cases, not leaving the safety of their ship to dock or marina personnel, they cast off the looped end of their lines to the dock hands so that the bitter end of the lines stays on board and are securely cleated by the crew on deck. Thus, not leaving to chance the safety of their boats.
Learning the Proper Method
For most of us however, we are frequently on our own or perhaps short handed when docking and handling all aspects of our lines. So, understanding what the correct and proper way to cleat our lines in critical. Doing so can make a big difference in resting easy when we hear of an approaching weather system and we are nowhere near our boat.
The first thing I always think of when cleating lines is staying in control. The first step in securing the boat is to understand that the lines and cleats are made to work together to provide full control of the boat under any condition. Once properly cleated with a cleat hitch, it should stay secure yet still provide quick release control without any risk of line entanglements that would prevent a safe and effective release or adjustment.
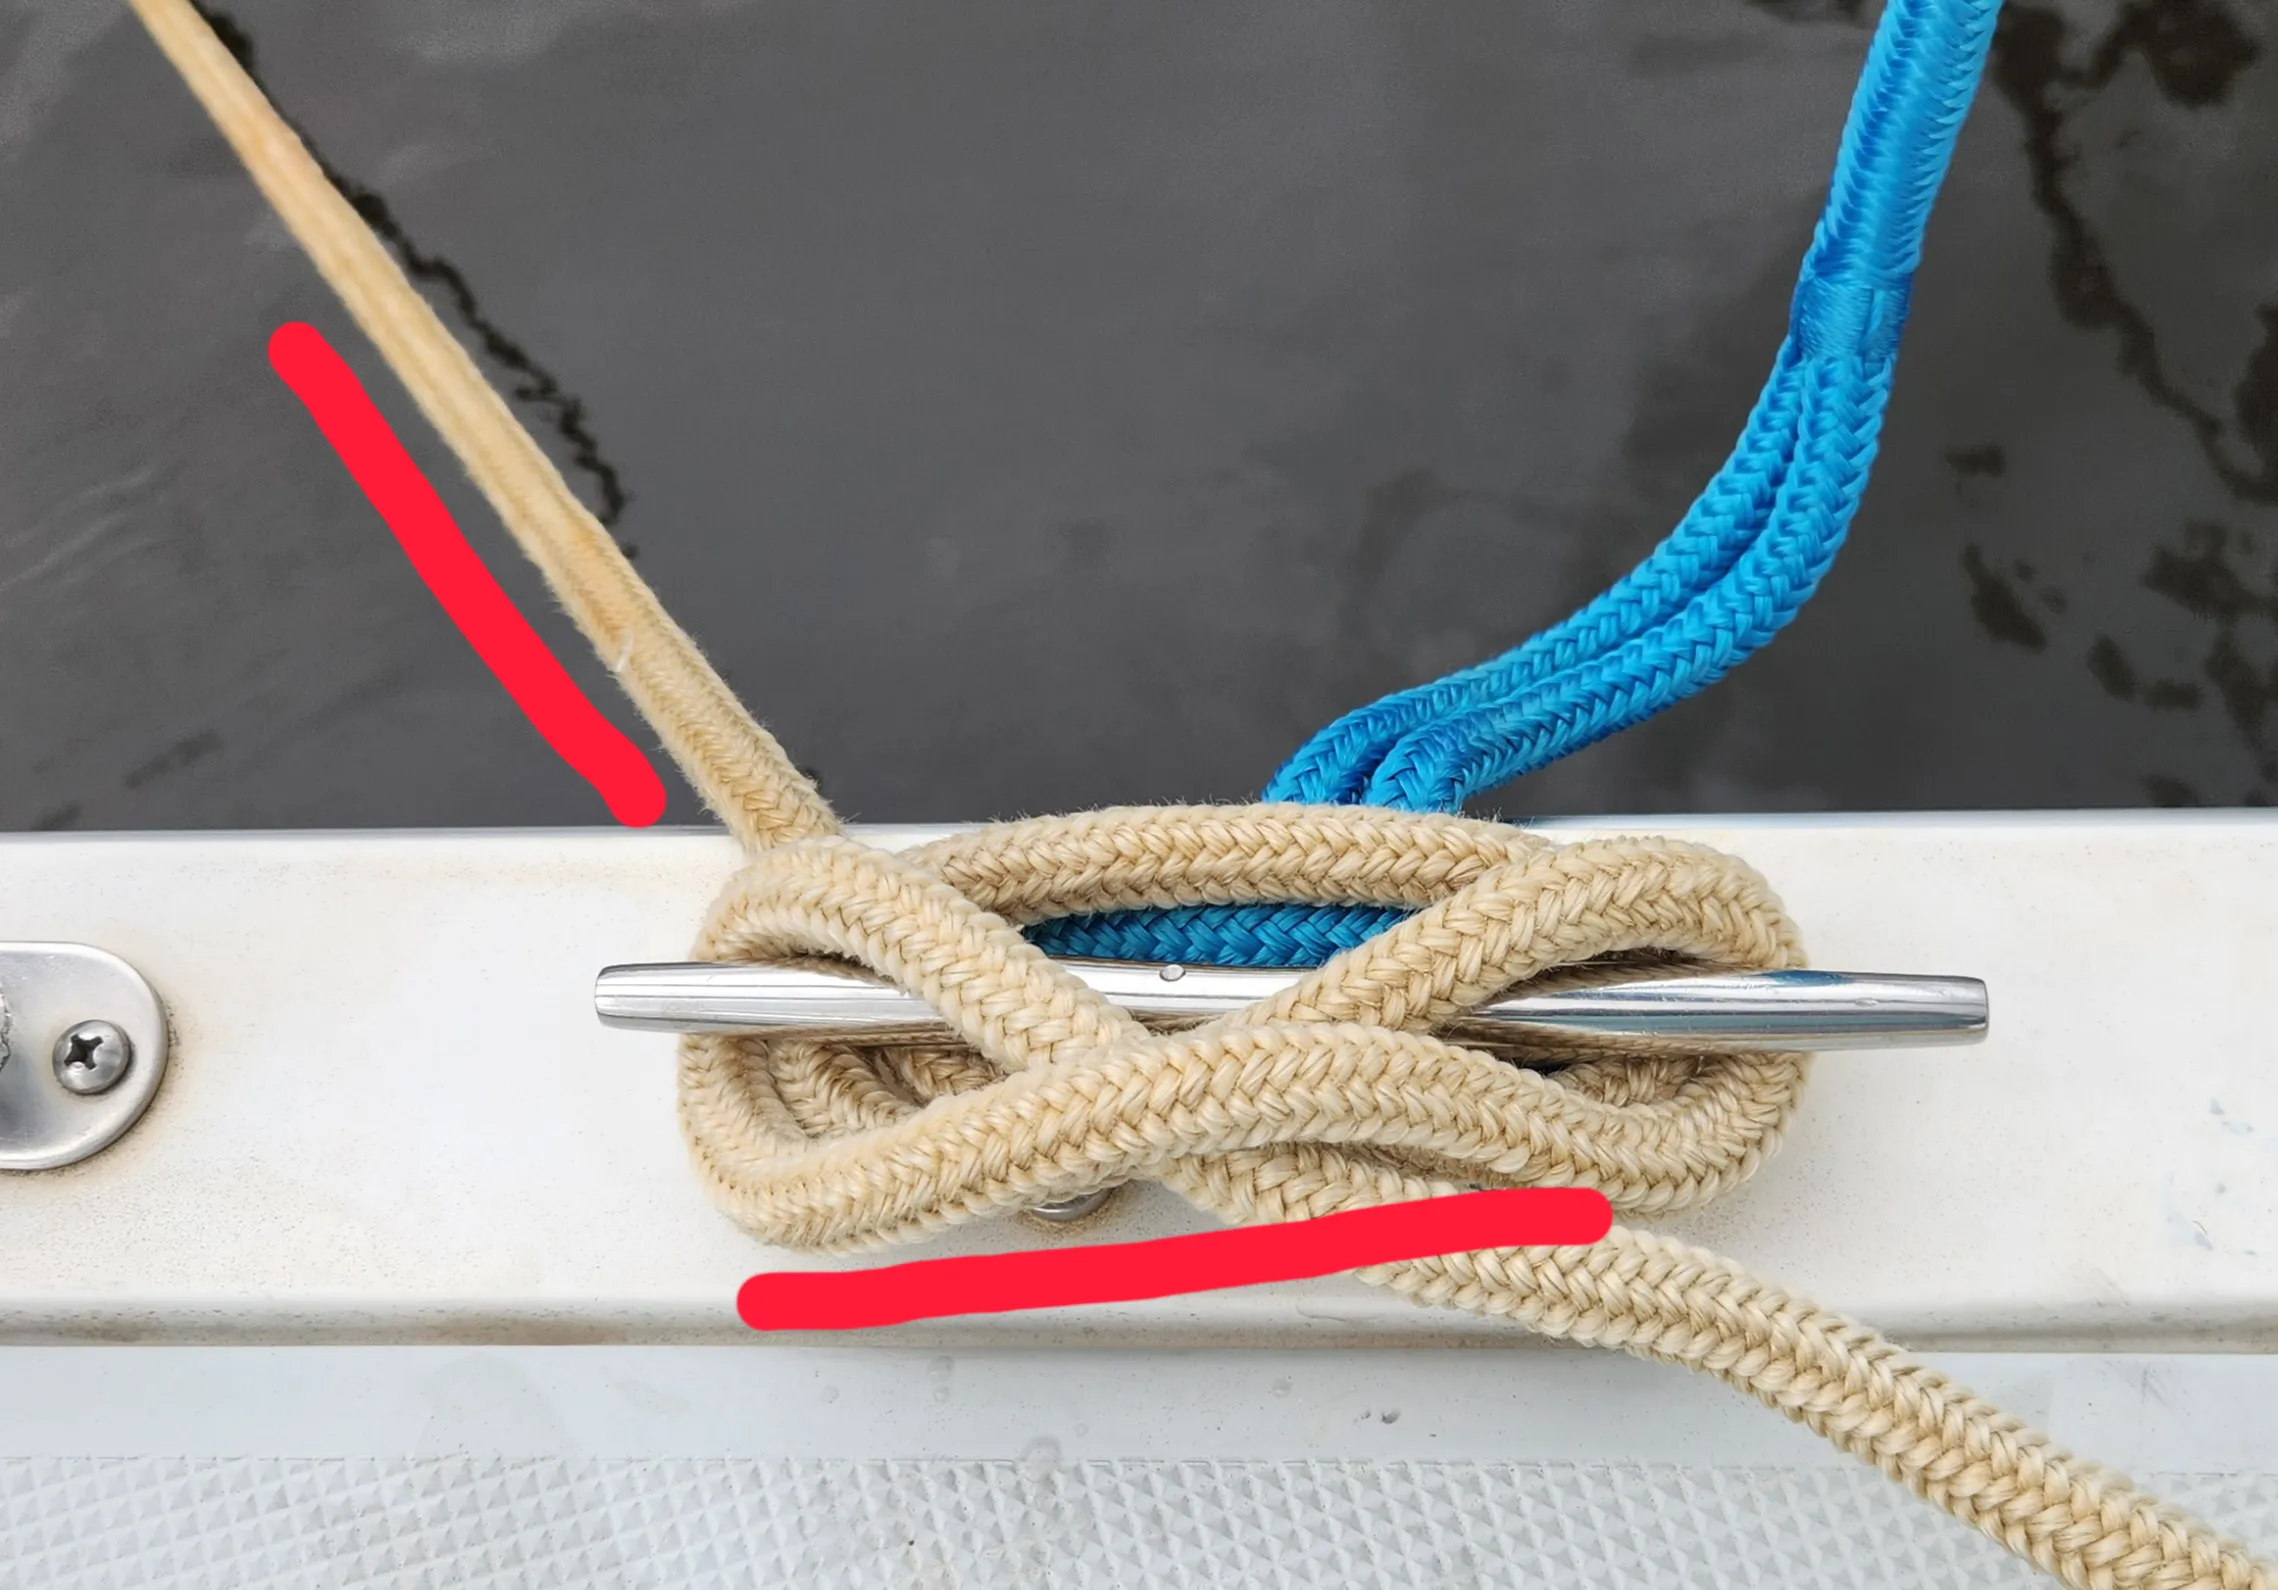
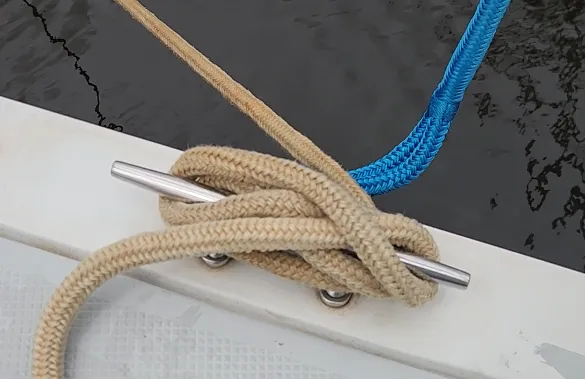
How To Properly Cleat a Line
- Step one is to recognize the point of origin where the line is coming from. From that point, the line is brought to the opposite side or end of the cleat and is bent towards the other end of the cleat. This will provide effortless control as the two initial bends will stop or minimize any pull.
- The line is then crossed over the top center of the cleat and bent around the cleat.
- The last step it to twist the line over itself and cleat it. In most circumstances, that is all that is needed. Some will add a second twisted over cleat.
This properly cleated line will not loosen—it will stay put. Yet, it will also provide very easy release, even when tight.
Loop-ended Lines
Other variations include using lines with a loop at one end. The loop can be pushed through the middle hole on the cleat and then wrapped over the entire cleat. The same steps as above apply when tying the bitter end on the dock cleat. In this case, the control belongs to the person on shore and therefore the captain or a qualified crew member should take care to inspect and adjust that end as needed.
Don’t Over Crisscross
Always resist the urge to overkill the crisscross and wrapping of the line on the cleat. This will simply cause issues and frustration if and when a quick release is required. Plus, it will not provide any extra hold.
Sharing Cleats
Line etiquette: If you must share a cleat or bollard with another boat, first safely remove their line, cleat yours, and then properly re-cleat their line over yours. Since you were the last one there, chances are they will leave before you do. This courtesy will make it easy for them and, more importantly, they will have no need to touch your line.
Examples of Improperly Cleated Lines:


Worked on a ferry boat during the winter in a cold climate harbor.
If you capsized the final hitch, then it rained, then froze, it could be nearly impossible to remove.
So we just made as many hitches as would fit on the cleat, and lay out the bitter end as far as length would allow.
Even a frozen hitch could be removed. Albeit with a bit of work.
Hi Lawrence, thanks so much for sharing that knowledge and experience! Sounds like it was hard work, especially in winter!
I know there is debate about this, even different terms (“European” cleat hitch vs. “American”), but I do a full loop around the cleat, THEN cross the cleat. It does mean a bit of binding, but with line stretch it does not loosen as much. The degree to which it makes a difference seems to depend mostly on the size of the cleat vs size of the line, a fat line obviously binds pretty tightly under the cleat. It means the tail end exits on the same side as the end that goes to the dock, rather than opposite, so it does not look as nice, but it works for me. Took me a few years of frustration to finally have the simple “lay parallel and twist a loop over” trick sink into my brain so that it is tied, as you do, in a second or less. Good instructional video, thanks.
Thanks for sharing thar Matt!
Having sailed and tied cleats for over 70 years, I was taught a different way. First a complete round turn; then a figure eight; than a final round turn. NEVER put a half hitch on a cleat. I was raised on an open cockpit 40′ Universal R class sloop with like 18″ of freeboard. Sailing in puffy conditions, it was occasionally necessary to quickly easy the mainsheet to keep from taking on water. The half hitch takes way to long to get off.
And, big tugboats never use half hitches – the “Tubboat Hitch” is just a long series of figure 8s, for the same safety reason.
I was once standing on Pier 40 in San Francisco’s South Beach harbor watching a big tour boat cast off. It was a typical summer day with westerly wind blowing about 20 right down the dock, with the boat tied bow into the wind. The harbor exit was astern, so she would have to pivot 180 degrees. With just the captain and a deck hand aboard, the captain called for the bow line to be cast off. Having done so, the hand walked aft to release the stern line. The wind started blowing the bow off the dock, and with high topside, it began to move faster and faster. The stern line was cleated exactly as described in the video, but by now the weight of the whole ship was pulling on the line and the deck hand could not get it off the cleat. We watched in dismay as the bow swung across the fairway, and the piling of a slip stove in one of the forward glass windows. No half hitches on cleats for me.
Rick Van Mell
All super excellent and detailed information Rick. Thanks taking the time. I hope other readers will also read the comments.
I agree wholeheartedly that one should never put a half hitch on a cleat for RUNNING GEAR (your main sheet example), two wraps and potentially a cross is plenty and easy to undo. But omitting the hitch when securing your vessel sounds downright dangerous, especially if you’ll be leaving the boat. That Pier 40 incident is squarely on the captain. He could have anticipated the effect of casting off the bow first in those conditions and cast off the stern first and held station with his engine; or removed the half hitch on the stern line before undocking if the bow really needed to go first. 20/20 hindsight…
100% agree
I share in the observation that walking around the dock there is evidence of an appalling number of wrong ways to tie up a boat. One thing not mentioned is if the boat is in a full slip with fingers on both sides, the dock lines should be set so the boat pulls on the windward slip and does not bear on the leeward side. In addition to avoiding abrasion from the fenders, this is so each finger dock only takes load from only one boat rather than one pulling and one pushing.
I agree with Matthew M that a full-wrap or European cleat hitch is more effective. The cleat hitch being advocated here is a half-wrap cleat hitch and is not as secure as a full-wrap cleat hitch. If tied with a small line diameter relative to the size of the cleat, it can slip. The better approach is to get into the habit of routinely using a full-wrap, which is 3 bends around the base before crossing rather than the 2 bends recommended in the article & video. One way to tell if a full-wrap is done right is when the line exits the cleat headed back in the same direction as it first came to the far horn of the cleat. There are those who argue full-wrap hitches pinch and get stuck. Slip or get stuck – take your choice. If I’m concerned about weather, I’ll take a stuck dock line every time.
The relationship between the size of the cleat and the proper size line is 1/8” of line size for each 2” of cleat. For example, a 6-inch cleat suggests a 3/8” line and an 8” cleat suggests a 1/2” line, etc. Tying a 3/8” dock line with a half-wrap on a 16” cleat meant for bigger boats is asking for trouble, especially if the line and/or the cleat is slippery.
If the line size is small relative to the cleat, the proper approach is to take more wraps around the base of the cleat rather than more crossings. Just like on a winch, the degree to which the line resists slipping is due to the number of turns around the cleat. This is analytically shown by the capstan equation. The crossings are there just to hold the bitter end, not to prevent slipping. The advice to put additional crossings is less effective than taking more turns around the base of the cleat and has the added disadvantage of being harder to undo.
Thanks for your great details James. I always hope readers will also read the comments as readers like you and the others, always add excellent information.
I was taught to cleat my (dock or rafting) lines the same way. When passing on the knowledge to others I’ve always said to “leave an acute angle” on the cleat from the load, which isn’t quickly understood. From now on I’ll start with “go to the far end of the clear first”! That sounds much more intuitive up front, I’m surprised I never thought to put it that way. Thank you.
I agree William, Keeping directions clear and simple is the way to go.
I’m going to echo comments about adding a half hitch (sometimes referred to as “rolling” the line or “locking” it). This may be acceptable for standard dock lines but should never be done on lines which will be under intense strain. Case in point I captain a large tour boat. We use a spring line to swing the stern from the dock. One day this spring we had extreme currents which caught my stern and I ended up perpendicular to the dock held by the spring line under several hundred tons of pressure. I told my deckhand to uncleat the spring but the line was locked down because someone had put a half hitch on the cleat. Luckily we got the boat parallel to the pier again and could cast off the line but if we hadn’t succeeded our only other option was to cut the line with the fire ax. Having also worked on tugs, I can tell you that putting that half hitch on the cleat can lead to a situation where you will be fired.
Hi David, I agree, especially when dealing with larger vessels such as the ones you’ve operated. We could write a bunch on separate articles based on individual vessel types and operational needs. Thanks for sharing these sound details.
Good article and video. As a long time sailing instructor, I always taught students to put a complete 360 degree wrap around the base of the cleat before finishing it off properly. This is especially true if the cleat is oversized and/or the line is undersized compared to the cleat.
Hi Michael! Agree 100%. Again circumstances may alter the cleat hitch one will need to use. I guess for me the objective is sound and safe tie up while maintaining control and the ability for a quick release if and when the situation may require does so effectively. Thanks for reading and commenting Michael.
All good instructions and debate. If you do the first cross of the cleat going from the side away from you and bringing it toward you, the final half hitch is easily done by flipping your hand from palm up to palm down thus twisting the line over itself to loop around the horn on the cleat.
Here in the Salish Sea we are always tying to a floating dock so my question is, how tight should your docking lines be? Should you lock the boat down or let it move a bit? The place where I moor my boat gets serious winds. We actually wear out docklines and are probably on our 3rd set over 20 years of ownership.
Hi Clyde,
Thanks for sharing. We too have floating docks and our boats go up and down on unison! If possible add spring lines. Also, add shocks to at least one line. We tie up stern to the dock and in front, two lines to buoys. So, two lines aft and two lines forward. Both my stern lines have shocks which will delay line wear. My lines are now 6 years old and lool safe. So even when big weather comes in, she is safe!
If your, or a neighboring boat, is on fire, if you can’t untie your cleat in less than 10 seconds you haven’t tied it correctly.
Absolutely. Hense the need to know how to properly set a proper cleat hitch. While it provides a perfect hold, it can be released quickly.
I have recently learned the OXO cleat hitch common in Europe. It a full round turn followed by a cross and another full round turn. I am not anti the classic Hershoff or Amercan cleat hitch. They have served me well forv50 + years in the marine trades.
I will say, we teach mariners to prepare their lines be for leaving the dock. Just like you over haul your lines before and after sail maneuvers, you need to make sure your dock departure plan includes setting the lines for fast and trouble free release. We often set “short stays”, lines looped around cleats or pilines and led back to the boat that can be easily and quickly released.
Thanks for sharing Carl. Teaching readiness for any contingency is indeed important. I’ve seen a few bad incidents that could have been avoided or minimized had the lines been easier to untie and release.
Using a loop through the cleat base makes it impossible to cast off under strain. In what situation is a dockline with a loop through a cleat preferable to using a hitch at both ends?
Hi Isaiah, thanks your comment and question. On my boat, I have lines at the ready on port and starboard both at the bow and stern. These are looped at on end and past through the eye of the cleat on board. Leaving the other end to tie up to docks or when rafting. When not is use, they are coiled and attached to the life lines. Ready for quick deployment.