

Although we resisted for years, we ultimately succumbed to the lure of the Internet and have become increasingly dependent on it to manage life in the modern world. Internet addiction is widespread in the cruising community, and marinas all over the world have responded by installing Wi-Fi access to remain competitive.
Originally, our chart table carried a somewhat obsolete laptop and a minimal USB Wi-Fi adapter, but through the years, we have added a second laptop, a high-
288
tech phone, plus a couple of PDAs. All of these want access to the Internet these days. The marina environment has always been a challenging one for short-range Wi-Fi systems that attempt to communicate through a forest of metal spars and compete with the ever-present sources of shore interference. Add increased competition for available bandwidth in marinas as boats install more Wi-Fi dependent devices, and it is easy to see why the search for a better Wi-Fi system has become a quest for many cruisers.
Several methods of making the wireless connection to the marina Wi-Fi system were in use in the various marinas we visited. The simplest and cheapest approach was frequently the first choice for most of us, but we would probably have been wiser if we had ignored our miserly tendencies and jumped ahead to something that really worked. Typical approaches included:
· a USB adapter connected to an older laptop—an inexpensive low-power device with frequently marginal results, depending on the proximity of the nearest wireless access point;
· a laptop with a built-in Wi-Fi adaptor—another low-power (usually) approach with the same marginal results in many locations;
· a USB Wi-Fi adapter hanging out a portlight on a long cable—still cheap, not all-weather, with little improvement in performance;
· a high-power PCMIA or USB adapter with an external antenna connection—a complex, pricier installation that offers significant improvement in performance, but the necessarily short antenna cable still limits range (longer runs to the antenna will require an amplifier mounted near the antenna);
· combining an amplifier with a high-power USB adapter using a moderately long cable to a high-gain external antenna—an easy but expensive above-deck solution with the best results of any combination that uses a belowdecks Wi-Fi adapter. It still only connects to a single computer, and the amplifier isn’t mounted in the optimum location near the antenna;
· a high-power Wi-Fi adapter and high-gain antenna mounted high above deck—this can be expensive, but it offers the best performance with maximum range. Depending on the type, it can supply Internet to an onboard local network, which can share the Internet with more than one computer or device.
Wi-Fi experiments onboard
Following the well-worn path of others, it soon became obvious that we needed an outside antenna, so we experimented with a high-power PCMCIA Wi-Fi card with an external antenna connection, a USB adapter with 15-feet of USB cable to get it outside through a port, and other approaches that were marginally successful. What we really needed was a permanent outside antenna so we could close the port when it rained.
In the end, we settled on a 5Mile USB Wi-Fi adapter with a built-in amplifier and
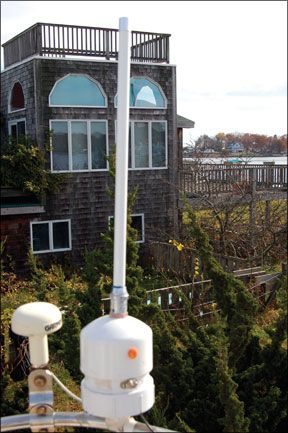
Photo Courtesy of Ed Mini
288
externally mounted antenna. (See Practical Sailor, January 2009.) It wasn’t cheap, but it provided a big improvement in performance. We used it quite successfully for a couple of years, but there were still limitations.
As good as it was, this system would only connect to a single computer via a USB port. Understandably, marinas are often reluctant to issue more than one password to access their Wi-Fi system, and these are frequently linked to the MAC address of a computer’s network adapter. This means that our other computers and onboard devices still couldn’t access the Internet. Also, the antenna cable was too short to allow mounting it at the top of the mast—something we had always coveted.
A longer cable seems like an easy answer, but maximizing Wi-Fi range is an elusive goal made complicated by the limitations of emissions at frequencies measured in gigahertz (GHz). The power output of Wi-Fi transmitters is restricted by government regulations, so any improvement in range must be accomplished by improving the antenna installation.
We experimented with various ways to improve antenna performance. A few worked well, but the installation was often complex, and we could still provide Internet access to only a single computer. We tried setting up a peer-to-peer network between two computers using their internal Wi-Fi adapters and sharing the Internet connection supplied by a third Wi-Fi adapter connected to the outside antenna. This was so tricky to setup that we soon gave up on it. It also required both computers to be running to share the Internet, and turned out to be quite slow even when it was working properly.
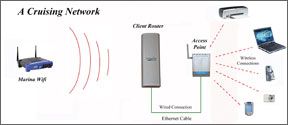
We still needed a better solution that met our criteria: an external antenna, mounted at the top of the mast with a minimum of installation difficulties, and a reasonably priced way to provide wireless Internet access to any device on the boat. Our research led to the combination of a high-power Wi-Fi adapter and router that could be remotely mounted, preferably with an external antenna, and provide an Ethernet connection for use belowdecks.
By definition, these devices are routers operating in the client mode, or client routers. In network speak, a client is a computer or other device communicating with a host server on a network, in this case through the marina Wi-Fi system. A Wi-Fi adaptor provides the interface with the PC, and it’s managed with Window’s Wireless Zero Configuration (WZC) service or other software provided by the manufacturer of the Wi-Fi adaptor. This is the software you typically use to establish links with a nearby wireless access point (WAP).
By definition, a router operating in client mode becomes the onboard client and takes over the job of connecting to the marina Wi-Fi or access point, but it only shares the Internet connection to an Ethernet port. It can’t be seen or used as an access point by other computers scanning for a Wi-Fi connection and doesn’t accept wireless connections from other client devices.
When the client router has established a connection with the marina’s Wi-Fi WAP, it provides Internet access to a computer’s Ethernet port, bypassing the Wi-Fi adapter and its management software. A router operating in client mode must include a DHCP (Dynamic Hosting Control Protocol) server to provide IP addresses and Gateway/DNS information to devices connected to its Ethernet port. (See “Tech Talk,” page 18 for help deciphering the lingo.) This allows almost any device with Ethernet capability to access the Internet when connected to a client router. Software to configure and manage the client router is usually installed in the client router itself and accessed with an Internet browser by entering the router’s IP address.
In short, a router operating in client mode can be connected to another router or wireless access point to provide wireless Internet access to any compatible device in range. One company in our previous Wi-Fi test, Bitstorm, tackled this with its “Unleashed” products.
Past PS Testing
While we were grappling with our real-life Wi-Fi issues, PS was bench-testing various options. During the last 18 months, PS testers have evaluated three other wireless products aimed primarily at the marine market, the Bitstorm Badboy Xtreme, the Wave Wi-Fi Rogue Wave, and The Wirie (PS April 2010). The Wirie (like the 5MileWiFi) incorporates a high-power amplifier mated with a USB Wi-Fi adapter that’s managed with computer-based software. The Bitstorm (recently upgraded) and the Rogue Wave both use the Bullet2 wireless access point to
288
provide wireless Internet access to one or more computers.
While getting ready for another season in the Med, we decided on a client router for our next attempt to create the ultimate Wi-Fi System. The Bitstorm Badboy Xtreme and the Wave Rogue Wave looked good, but we settled on the lower-priced EnGenius EOC2610 from Keenan Systems.
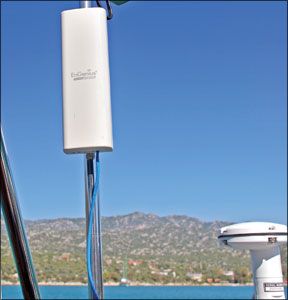
The EnGenius is listed as an outdoor access point/client router/client bridge in a weatherproof enclosure that can be remotely mounted and deliver Internet access via an Ethernet cable. Contents include a 600-milliwatt Wi-Fi transceiver, a built-in antenna with a connection for an external antenna, and client router circuitry. It is powered by POE (Power Over Ethernet) with a small power injector module installed belowdecks that connects to the Ethernet cable from the EOC2610. The injector can be powered using 12 volts DC for Ethernet cable lengths up to 60 feet. Longer lengths require 24 volts, which will require a 12- to 24- volt DC converter for most of us. Although the EOC2610 does come with a 24-volt wall transformer, this would need shore power or the equivalent.
The EOC2610 can be mounted on the side of the mast just below the mast head and has a short cable connected to a vertical antenna on top of the mast. The Ethernet cable must be led down the mast and connected to the power injector while a second Ethernet cable carries the signal from the power injector to a computer LAN port or other device.
Once the Ethernet cable is connected directly to a computer, the Internet is available via the LAN port, and the user can configure and operate the EOC2610 by entering the predetermined IP address for the router in an Internet browser. To setup the client router mode, we followed the instructions in a short but concise tutorial that can be downloaded from Keenan Systems.
During our initial testing, we found the EOC2610 to be surprisingly sensitive using just the internal antenna. We could easily connect to the marina system with it lying on a shelf belowdecks and when we clamped it on about three feet above the deck, we could see several Wi-Fi access points in nearby hotels.
With an external antenna mounted high above the deck, performance was even better. To make connections at the top of the mast, we recommend using Cat5 Ethernet cable. Losses over long distances are low and typically devices like the EOC2610 can operate with up to 300 feet of Ethernet cable. Supplying power over the cable simplifies the installation, and it’s inexpensive compared to low-loss antenna cable. Fifty feet of Cat5 cable costs $12-$15. We did have some concerns about the waterproof integrity of the connections on the bottom of the EOC2610 and used silicone caulk to seal the cable connections. Evidently, the EnGenius folks agreed because the EOC2610 was recently replaced with the EOC2611P, which has improved weatherproofing around the connections and a switch that allows the user to select the polarity of the internal antenna. It’s listed as a direct replacement with a list price of $80. For a bit more, you can purchase a Marine Wi-Fi Bridge kit, which includes an 8.5-dBi vertical antenna and a two-foot-long cable for the EOC2610/11. Unfortunately, this antenna does not attach to a standard marine antenna mount, but it’s fine for masthead mounting where a small bracket is customarily fabricated for the installation.
Now we had much better range but only a single computer could be connected to the Internet when using the EOC2610. To eliminate this restriction, we installed a D-link DWL G700AP access point belowdecks. Almost any router or access point could be used for this task, but the G700AP is small, inexpensive and does the job. With the G700AP in place, we had a local network that could be used to provide Internet access to any onboard device that could connect to a wireless network.
The G700AP requires some minor tweaks to its default configuration to make it work. Start by following the manufacturer’s instructions and connect the G700AP to a computer with an Ethernet cable to complete the initial configuration. Besides the usual settings for username, password, and network name, you will need to make two additional changes to its configuration. First, set the access point to use Dynamic IP addressing, and then disable DHCP, since this function will be handled by the EOC2610 (see screen shots page 20). When configured, connect the Ethernet cable from the EnGenius client router to the single port on the G700AP to complete the setup. If the EOC2610/11 is connected to a shoreside Wi-Fi access point, any computer or device making a wireless connection to the G700AP network should now have Internet access.
Day-to-day use remains the same with the client router connected to the G700AP. Selecting a Wi-Fi network to connect to is still done via a menu accessed by entering the IP address of the EOC2610 in any Internet browser. Since the EOC2610 is now charged with assigning IP addresses to connecting devices (DHCP), your local network won’t function without the EOC2610. The EOC2610 thus acts as the network router, even when you are no longer connected to the Internet.
Users can still access the G700AP configuration menu by connecting it directly to a computer with an Ethernet cable, but an easier way is to connect directly through the local network. The EOC2610 will assign an IP address to the G700AP menu. It’s usually one number higher than the address used to access the Engenius menu—for example, 192.123.0.2 instead of 192.123.0.1. On some installations, you may have to increase the last number of the address one digit at a time until it is found. We found it on an address four numbers higher than the EOC2610 menu address in one case.
The D-link G700AP operates on 5 volts DC and ships with a 110 VAC plug-in wall transformer. We currently power this with a PST-DCZ0505 12V to 5V DC/DC converter from Powerstream Technologies. Although we normally have shore power available whenever we are using the network, marina power isn’t always reliable, and we have had problems with surges damaging electronics powered by wall transformers.
Conclusion


