

Being out in the ocean means you are going to have to deal with whatever the weather sends your way. It also means you will be out of range of rescue services. The boat must be self-reliant and, as near as possible, unstoppable. So how will she fare when thing get gnarly? In order to survive, a boat must do a few things. She needs to keep as much water out as possible and pump out what does get in. She needs to be able to steer a course, she needs to stay upright and she needs to support a crew. So how do we make sure she does that?
Keeping the Water on the Outside
This means solid hatches and washboards, ideally also a bridge deck so that if the cockpit fills it does not flood below. She needs some ventilation when shut up to make life tolerable below but that has to be arranged so that it lets air in but keeps water out even when severely heeled over. The most effective way of doing that is dorade vents close to the center line.
The down-flooding angle is the point of heel where openings are submerged and water can flood in. For a bluewater boat that should be high. It is acceptable, or possibly inevitable, that in a knock-down some water will get in but even in the worst case it should not be enough to jeopardize her stability.
Bilge Pumps
However well set up a boat is, some water will get below and it needs pumping out. Ideally, a bluewater boat will have a bilge sump that collects water at any likely heel angle and prevents it from getting into any lockers. If the bottom is flat, any waters that gets below will slosh across and be difficult to pump. It is also likely to get into the settee lockers and soak stores. How are you going to deal with this? Pumps that clear water that gets in through openings are de-watering pumps. They can be small and need to keep the bilge as dry as possible. They are small and relatively inexpensive so you can fit as many as you need.
For example, I have a 500 gal/hour pump in a small well below the shaft stuffing box. In addition, she will need some bigger pumps to cope with a serious influx of water. This could be due to damage or the result of a knock-down. These pumps need to be large enough to keep the bilge clear enough for the crew to find and fix a leak from damage and that means as big as you can fit! 50 gal of water weighs 500 lb. and will affect the boat’s stability, you need to get rid of it fast. A further issue for ocean-crossing boats is that we mostly rely on electric submersible pumps that are not rated for continuous duty.
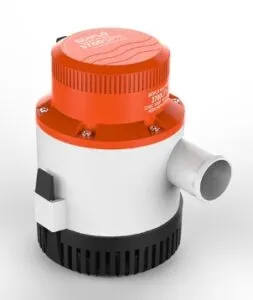
A decent high-capacity pump that will clear water fast in an emergency is essential. This one is made by Seaflo but several companies make similar pumps, It will shift 3,700 gallons per hours, that’s 14 tons! But it is only rated for intermittent duty. There is no standard definition of what this means, but basically if it is run for too long the motor will overheat and burn out. Even for the best quality high capacity pumps the run time is in minutes per hour. Also check the float switches and wiring will take the amperage. These pumps can draw 20 A plus which will burn out 16 g wiring and standard float switches.
Leaks
What do you do about water that gets below under normal conditions and, more importantly, how to handle a moderate but continuous leak?
This can happen for any number of reasons and could be a simple as someone getting thrown against a stanchion, breaking it’s seal with the deck. Now you have a persistent leak which could easily be a few hundred gallons per day. These are called de-watering pumps. They don’t need to be high-capacity but they may need to be running almost continuously.

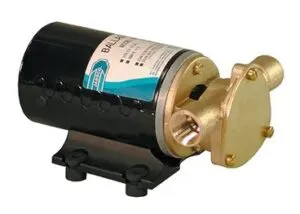
The pumps shown above are from Rule and Jabsco and are continuous duty pumps. Impeller and diaphragm pumps are also able to suck water up rather than be immersed, so they can be mounted where they are not in a wet environment which adds to their reliability.
Continuous duty pumps are heavier, more expensive and pump lower volumes. Note, the Rule 2000 is available in a standard duty or continuous duty version but the continuous duty version will be heavier and more expensive. They complement the high-volume emergency pumps. In the event the boat springs a leak, the big pump’s job is to clear as much water as fast as possible so that you can see the leak and make a repair. That should slow the flooding rate to a level where the continuous duty pumps can cope, and they should be able to keep going for as long as they have power.
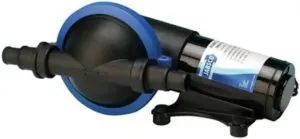
There are many ways of achieving this, for example using a diaphragm pump, but the point to take away is that in an emergency offshore you need a way of shifting water continuously, not just for an hour or so.
Cockpit Flooding
The other area where flooding can be a problem is the cockpit. A cockpit well 6-ft. x 4-ft. x 1.5-ft deep will hold 36 cubic feet of water. That weighs about 1 ton! Enough to significantly reduce stern free board on most boats. If it is not cleared by the time the next wave arrives, the chances of getting swamped are significant.
Cockpits should not be overly large and absolutely must have adequate drains. We increasingly see boats with open backs to give easy access to the swim platform and this may seem an ideal way of ensuring the cockpit drains fast. Think about what could happen in a big following sea. There is nothing to stop a wave from coming on board, the cockpit area may drain fast but I would recommend that the helmsperson wear an immersion suit and is solidly tied to the steering pedestal, and also fit a submarine door on the companion way.
Steering
All bluewater boats need a bomb-proof steering setup and an emergency means of steering if something fails. The classic way of doing this is to support the rudder at the bottom as well as the top. That means either a full keel or a skeg. A number of modern boats have twin rudder systems and there is an argument that says this give redundancy to the steering. That argument only works if each rudder can be operated independently. Normally twin rudders are linked so there needs to be a means of separating them. For single rudders there should be a means of attaching an emergency tiller directly to the rudder stock.
Spade Rudder
Any boat with a spade rudder is potentially vulnerable to a collision with floating debris. With a spade rudder, the force on the hull bearing is enormous and in a collision with something like a semi-submerged container, the damage could result in a major leak, enough to sink the boat. Ideally, a spade rudder should be separated from the rest of the interior by a bulkhead. In most boats this is not fitted as standard so should be added.
Hull Clearance
Another failure point with some spade rudders is the hull clearance. Even in a minor collision that does not cause a leak, would a small bend in the rudder shaft cause it to jam against the hull? In that case you are not going to be able to steer a course with the rudder jammed 20 degrees to port.
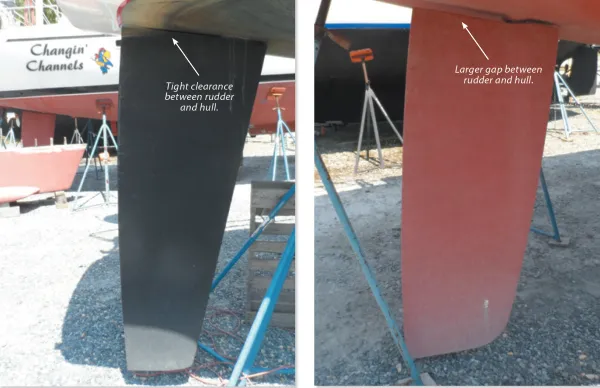
Even if these rudders pictured are well built and protected inside to prevent flooding, in the event of damage look at the gap between the rudder and the hull. A minor knock such as bumping the ground when entering an atoll could jam the rudder against the hull. Even a rope washed overboard could jam in the gap and immobilize the steering. No emergency tiller is going to help if the rudder is jammed.
Autopilots
In most cases, a bluewater boat will have a self-steering system. This needs to be powerful. Often the advice given by manufacturers for the size and weight of boat a system will handle is based on coastal conditions and a more powerful one will need to be selected for ocean sailing. Ideally, this will be a below deck system directly linked to the rudder quadrant. This means that if the hand steering control fails it can act as a backup. Wind vane-steering will often offer the same level of backup and can have a completely independent rudder for even greater redundancy.
Mechanical versus Hydraulic
I have sailed many miles on coastal passages with mechanical autopilot types (tiller and wheel) and they work great, but they are simply not up to the job when it comes to an ocean crossing. They are generally low powered and vulnerable to damage.
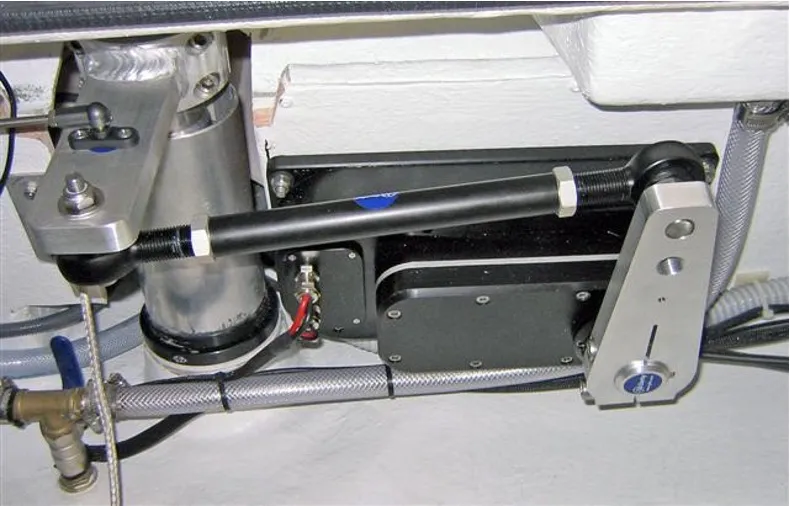
Offshore the autopilot needs to be solidly engineered from hefty components and attached directly to the rudder stock or quadrant. This means that even if there is a problem with the wheel mechanism the autopilot can still work. Hydraulic or electric drive is fine but in a big following sea you need lots of power and a fast action to keep the boat from yawing. The biggest difference is that for coastal sailing the autopilot is generally used when you want a break from helming. Offshore, the autopilot will be your primary steering and needs to run 24/7 in all weather conditions.
Now that we have sorted out how to keep the boat on course and keep the water out what else should we be looking at?
Preparing for Knockdowns
There are two main areas where a well-prepared bluewater boat will differ from most coastal boats and they both relate to keeping things in place. When crossing an ocean, the boat is likely to be rolled, heeled or even knocked down to some pretty extreme angles that most coastal boats will hope never to see. Also, the boat will be subject to lots of vibration and general shaking around for much of the voyage. What we need to avoid is for either of these to become major issues.
Most sailors have never experienced anything like a knockdown and unless you sail blue water, you probably never will. So what happens if you get knocked down. The boat will probably be fine, you may get some water through the vents but other than that she should be fine. What may be far from fine is the chaos below decks.
In a knockdown anything loose will fly around and become a danger to anyone below. Some things may be pretty obvious, such as strapping the batteries and any other heavy objects down. It is usually the smaller items people miss. Think about the following check list:
- Life raft. Is it lashed or in a cradle, can you lift it out of its cradle? Then so can the sea!
- Anchors. Ideally, they would not be on the roller on a long passage but in chocks on deck, but wherever they are they need firmly lashing in place. Do you have a spare anchor? Where is it and can it come loose?
- Cabin sole. For coastal sailing, many boats have loose sections on the cabin sole to make access easier. For blue water, they need to be firmly fixed—either bomb proof catches or screwed down.
- Galley, cooker, draws, pots and pans, crockery. Can you lift the stove off its gimbals? If you can it could jump off them at sea and chase you around the galley! Imagine if the drawer with the knives burst open. Could your pots and pans start flying around? Even a tin of beans can give someone concussion if it flies off its shelf. Double check everything in the galley. It must stay put at a 90 degree heel and preferably for a full roll.
- Bunk/settee locker lids. This one is often missed. Most of us have a load of stuff stored under bunks and settees all of which will be thrown against the locker lid in a knockdown, will the catches hold? I don’t mind being thrown out of my bunk by a big sea but if the toolbox that was under my bunk then smacks me in the face, it is going to really ruin my day.
- Chart table instruments. Do you have one of those nice wooden racks to keep your nav instruments in? Can the dividers come out and fly across the cabin?
You get the picture, I think. If you read accounts from offshore sailors, you have probable heard some of the tales of people waking to find a kitchen knife stuck in the woodwork above their bunk or just talking about it taking hours to clean up after a knock down. I am not saying you can stop everything but if is well worth the time to ensure everything has a secure stowing place as part of offshore preparations to at least minimize the chaos.
Securing Above Decks
I once had the alarming experience of doing a morning round of the deck to find the pin connecting the lee shroud to the chain plate was missing. It was there the day before and secured by a cotter pin. I assume the split pin had been snagged by a line and pulled out and then the pin had simply been shaken. Since then, I have always wired pins and shackles that are not normally undone while sailing.
Stuff at deck level is the most vulnerable as it will get green water trying to tear it loose as well as vibration shacking it apart. So if it doesn’t need to move make sure it can’t.
Checking the Rig
Before heading “out there” the entire rig needs a thorough check. Rigging has a finite life but what that life is is debated, a lot. Your insurance may insist on replacement after 10 years but in reality it depends on a multitude of things.
How Heavy is the Rigging?
At one end, race boats and high-performance cruisers want to keep rigging light to improve performance but this means it is highly stressed and will need replacing more often. A traditional heavyweight may go up one or two sizes for the wire and all the other rigging components which can more than double its working life. Increasing wire size by 1mm will add over 1,000 kg to its strength.
The important specification for rigging, however, is not the ultimate tensile strength but the working load. Boat rigging does not fail because it reaches its load limit, it fails due to damage, corrosion and repeated cycling. Every time the boat rolls, gets hit by a wave, gybes, tacks etc. the rigging is unloaded and then loaded back up again. This cycling is what ages the rig. One month at sea will probably subject the rig to more load cycles than a year of coastal sailing would, which is why the rig check is important.
Rig Load
The other key factor in this equation is how much the rig is loaded. If you take a piece of metal and repeatedly bend it back and forward it will eventually break. That is an example of fatigue stress. Your rigging may not be being visibly bent but loading cycles have a similar effect. The standard safety factor for wire rope used for critical rigging is ten, that means that a 6 mm 1×19 rigging wire has a maximum working load of 300 kg. If you increase the wire size by 1mm but the load stays the same, we have now increased the safety factor from 10 to 13.6. Go up 2 mm and you put the safety factor up to 18!
While it is impossible to calculate exactly how long a rig will last, I think it should be evident that the greater the safety factor, the longer it should last. But hang on, you can’t just go change the wire size. For one thing there is no point in upping the wire size but still attaching it to the same mast tangs. Remember the saying, “A chain is only as strong as its weakest link.”
Rig Upgrading
If you are going to upgrade the rig, you need to ensure all the components match. Mast tangs and the rivets that secure them, bottle screws, chain plates also need at least checking. Add to that the effect the extra weight may have on stability. One the plus side it can increase roll resistance but the extra weight could also make the boat more tender. My advice would be to talk to the boat’s designer or a rigging specialist before making any changes. On the other hand, if you sail something like the Hallberg-Rassy, there’s no problem, they already fitted an ocean spec rig.
Running Rigging
Once the standing rig is sorted, it is time to move onto the running rigging. All the same things apply. All the ropes will be subject to more wear offshore than they ever get sailing coastal. As an example, changing from a 60 mm block to 80 mm will double its load capacity and also reduce the bend radius the rope takes so it will also put less stress on the rope. Swapping a 6 mm line for an 8 mm is similar, it will almost double the strength. This also means it will stand up to more chafe and sun exposure.
While you are checking the running rigging, check the ends as well. Make sure all the ends have been well sealed. The best way I find to do this is to always cut rope with a hot knife and then slip a length of heat shrink over it as well. If you want to go for the gold standard, take some white heat shrink and write a label on it with its purpose, date and length “spinnaker halyard, 2015, 32 m” then add some clear heat shrink over it.
Lifelines
The final, and possibly most important thing to check are the lifelines. Rigging lifelines properly is important to keep crew onboard. Sailing offshore, I can nearly guarantee that at some point you will need to go forward when its rough to sort something. Even if you lead all lines back to the cockpit, and in theory you can do any sail adjustments from there, at some point a rope will jam, a lashing will come undone or you just need to walk round the deck to check everything is okay.
The traditional way of rigging safety lines along the side deck not only creates a trip hazard but almost always leaves enough slack for someone to go over the rail. You may still be attached to the boat but being dragged alongside at several knots is not only terrifying, it has led to crew being drowned before the boat can be stopped. In most boats you will not be able to climb back on board. Believe me, I have been there! Move the lines inboard so that they will check you while still inside the rails. Don’t forget the cockpit. There should be strong points that you can clip into when leaving the cockpit, working winches or helming.
Conclusion
Once you have done all your preparation, a final check is to get someone else to look at it, we can all miss things. In some areas people like the SAR team or coast guard will have a boat safety scheme set up that will do this, or just get another experienced skipper to come on board and take a look. You may even want to engage a marine surveyor for the job, but it is more a second pair of eyes that anything else. You would be surprised how often someone launches a boat only to find they forgot to secure the hose from the cockpit drains!


What – not even a mention of wind vanes in lieu of or as a complement to autopilots that require electrical/hydraulic systems (added failure points)? Many smaller sailboats can’t afford the power consumption nor the space consumption of a robust autopilot system.
I can’t cover everything. I agree that wind vanes still have a place on smaller boats. The average cruising boat is now about 40ft and has enough power to run an autopilot. They also don’t do well downwind, are expensive, and require quite a bit of skill to get them to work well. I think this puts them in the ‘specialist’ realm. To do the topic justice, it would need its own article. I am including a chapter on windvanes in my book which will hopefully be out later this year.
I am looking forward to your book, Roland. Thanks for these informative articles.
The requisite skill to use a wind vane well should be considered an advantage, not an impediment, for long distance offshore sailing. That skill is really about how to sail the boat well: Balancing the boat, sail trim, optimum sailing angles in present conditions of wind, wave, and swell. Setting up the vane is the lesser challenge.
“a cockpit well 6-ft. x 4-ft. x 1.5-ft deep will hold 36 cubic feet of water. That weighs about 3 tons!”
No, that much water would weigh a little over 1 ton.
Oops, you are right, I made a mistake in the maths. The principle is the same even 1ton of water on the stern will do horrible things to the boats trim
Which doesn’t negate the author’s point…