

In Part 1 of this series, we discussed how to size your new lithium battery system, choose a battery, and assess the components and tools you’ll need to complete the install. Now, we’re ready to detail the standards and the installation process itself. At the end, I’ll tally the costs of my own lithium conversion and answer the crucial question: Was it all worth it?
Marine Electrical, By The Book
If you’ve followed Part 1 up to this point, you’ll already know the importance of following relevant ABYC standards during the design, build and testing phases of your lithium conversion. Marine electrical standards are important for any boater (after all, fire and water definitely do not mix), but especially when dealing with lithium.
Lithium iron phosphate batteries, while among the more stable lithium chemistries out there, still possess a considerable energy density and should be treated with due respect. Beyond the obvious safety concerns around fire and electrocution, a boat’s electrical system is also critical to less obvious safety features like your VHF radio and navigation lights. So it’s essential our system is safe and reliable.
To this end, we’ll be carrying out our battery conversion with reference to two standards:
E-11 covers most of what you need to know about marine electrical systems, while E-13 adds specific information for safely using lithium batteries. Other standards such as ABYC E-10 and A-31 can also be of use, although these deal with general (i.e. non-marine specific) battery and charging information.
Here’s where you may want to take some of that money you’re saving with a DIY conversion and fork over the cash to purchase E-11 and/or E-13 in digital form. E-11 has an MSRP of $195 and E-13 is $130, which I’d consider money well spent. If you could buy only one, E-11 is the more important of the two, and it actually contains a good deal of lithium-specific information on its own. Alternatively, you can also purchase a paid ABYC membership to gain access to all of their standards. They offer a free trial membership.
Note: If you want detailed guidance on E-13 requirements before purchasing the full standard, see Burnage’s article, which covers specific E-13 compliance requirements, including BMS specifications, alternative power for critical loads, battery switches, fusing requirements and installation specifications.
Besides improving the safety and reliability of our boats, completing our electrical work “by the book” can positively influence future marine surveys and resale values. More on marine surveys below. And as I mentioned in Part 1, compliance with standards like E-11 and E-13 may even be a requirement for insuring our boats now or in the near future (E-13 only entered effect in July 2023).
Important Safety Precautions
There are a few things to keep in mind when working with lithium batteries.
Handling lithium batteries is generally safer than lead-acid since there is no liquid electrolyte and they can be carried and mounted in any orientation. LFP batteries also do not off-gas under normal conditions.
That said, care should be taken to avoid exposing batteries to direct sunlight and any other conditions in which they may overheat, e.g. a hot engine room compartment. Your BMS should be equipped with an overtemperature trip to help prevent thermal runaway.
Cable retention/strain relief is very important to avoid connections becoming loose over time—this is especially important on a boat, where rocking and pitching is a fact of life. Loose connections become hot connections, which can quickly turn into a fire condition.
Do not under any circumstances connect your alternator directly to an LFP battery! The low internal impedance of lithium batteries may draw an excess of current from your alternator and potentially shut down your battery, or even burn wiring and insulation. A bi-directional DC-DC converter is the required solution for safe alternator integration. See Stephen Burnage’s article for more information.
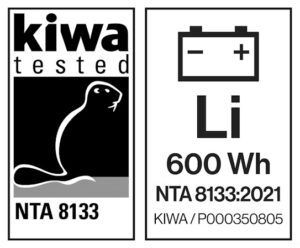
While lithium iron phosphate chemistry is among the most stable of lithium ion chemistries, be aware that your typical class ABC or even class D fire extinguisher (you do have a class ABC on your boat, right?) will not extinguish lithium ion fires. While the National Fire Protection Association (NFPA) has yet to define a class L for lithium ion appropriate fire extinguishers, you can now find some models that are compliant to kiwa’s NTA8133 standard. This is the type of extinguisher I recommend when working with lithium ion batteries.
Preparing Your Components
Now let’s put some of this knowledge into practice. While it’s impossible to cover every aspect of the relevant ABYC standards in an article of this nature, allow me to provide you with some of the most important considerations for your conversion.
Disclaimer: Working with electricity is dangerous. I strongly encourage you to consult the standards on your own and have your completed work checked by a certified marine surveyor before setting sail.
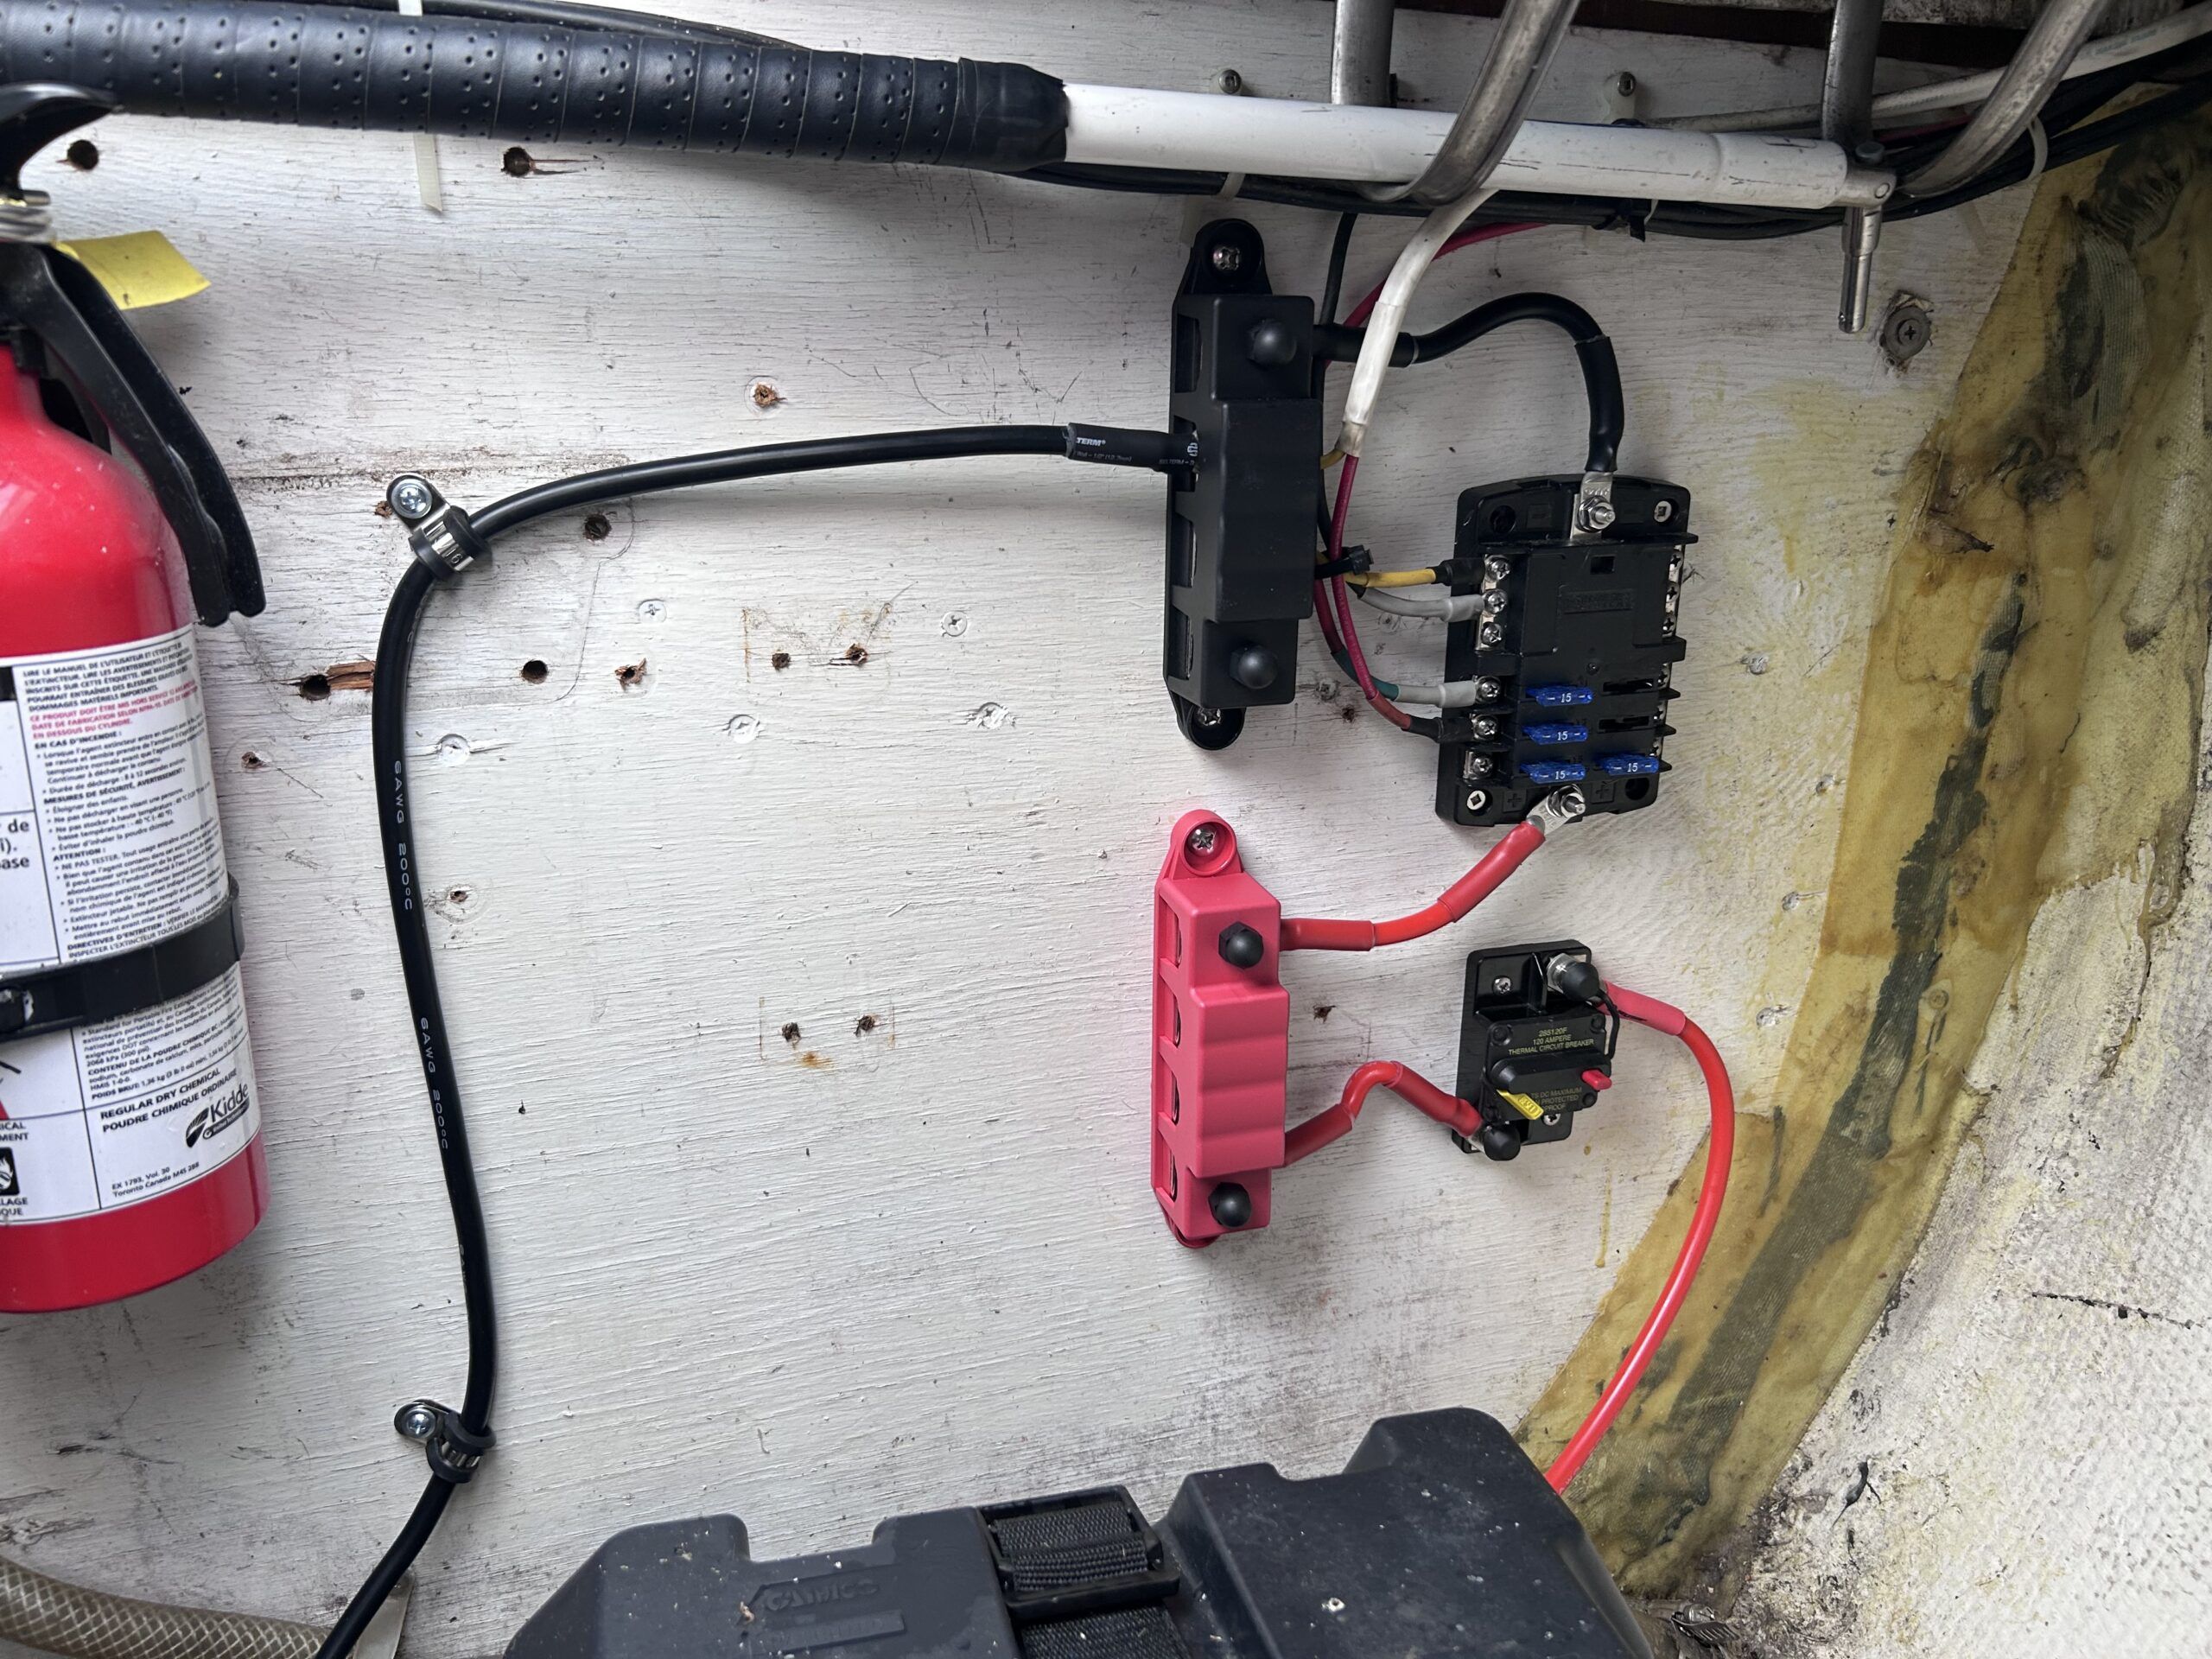
After choosing an appropriately sized and certified battery, our next steps are to correctly size and prepare our conductors, size our overcurrent protection devices (e.g. fuses and/or breakers), and equip our system with the necessary switches and protective measures. Let’s get started.
Sizing, Lugging, and Shrinktubing Conductors
If you look at the technical specifications of your battery (or external BMS, if your battery does not have one), you will find a maximum continuous discharge current rating. This number is how much current the battery will allow to be drawn when fully loaded, so we must spec our system’s conductor sizes to match. In my case, my battery’s integrated BMS is capable of continuously supplying 100 A at its nominal 12.8 V.
Source: Watt Cycle
Specification Value
BMS 100 A
Max. Continuous Output Power 1280 W
Max. Continuous Charge Current 100 A
Max. Continuous Discharge Current 100 A
Max. Discharge Current 300±50 A (≤5s)
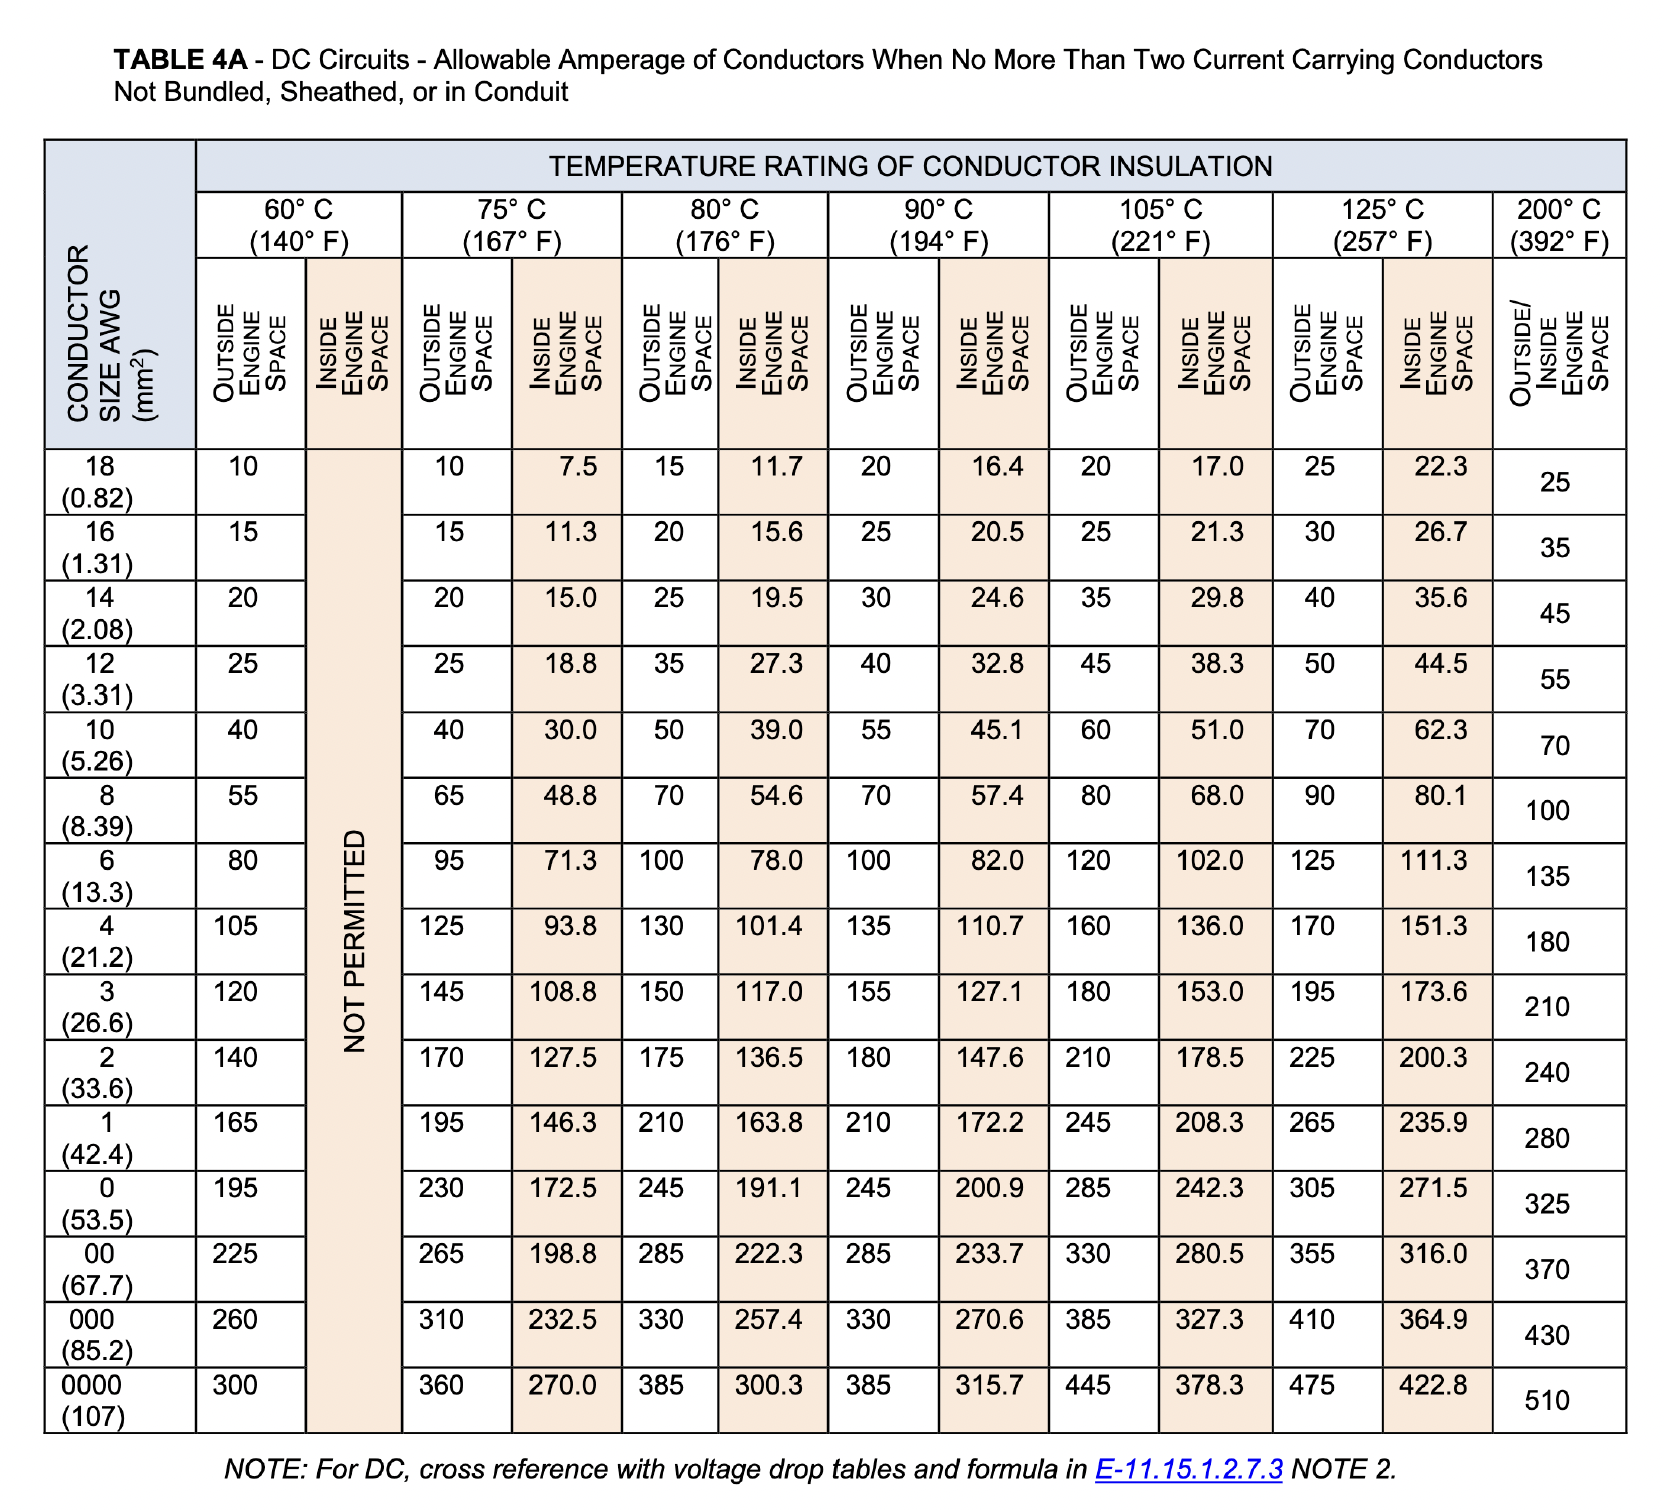
Once we have this value, we can consult Table 4A in ABYC E-11 to determine the appropriate gauge wire. The standard dictates any wire used be stranded copper, and I suggest it is also tinned in order to resist corrosion from the damp and/or salty air of marine environments. The variable here is the insulation rating of your conductor. Most conductors have a 75 C or 90 C rating, but check yours to be sure. If we assume a 90 C rating on our stranded copper wire, we can see from Table 4A that we need size 6 AWG to carry 100 A. Anything larger is fine, but not smaller than 6 AWG. Note that AWG wire sizes can be confusing, because larger numbers are actually smaller cross-sections.
I recommend referencing the sizing tables even if you plan to reuse the existing wire in your system, just to confirm its size is compliant.
In order to determine how much wire to use, I first had to map out my system. Nothing fancy is required here, a rough back-of-the-napkin schematic will do. In my system, the major components are:
- Battery
- Circuit breaker
- Bus terminals (for big loads)
- Blade terminals (for small loads)
The breaker doubles as an isolation switch (as it is a type III “switching” breaker) and the BMS is integrated into the battery, so this system represents just about the simplest configuration you can have. Not listed are the battery box, conductors, and strain relief, as they aren’t relevant to the layout. More on those below.
First on paper and then on my mounting board, I arranged my four major components to minimize the amount of wire required. This both saves money and minimizes the voltage drop due to the resistance of a long conductor. I then used a piece of string to trace the shortest path connecting my load (the terminal block) to the battery on both the positive and negative sides, and chose the longer side to determine my conductor lengths. Why? It is ideal to make the circuit path on both the positive and negative sides of the load equal length in order to avoid tricky-to-diagnose voltage drops or electrical noise.
Note that components such as breakers, switches, and bus bar count as part of the circuit path. I determined I needed about 3 ft. on each side of the load to connect everything up to the battery in the shortest path possible, and cut my conductors appropriately.
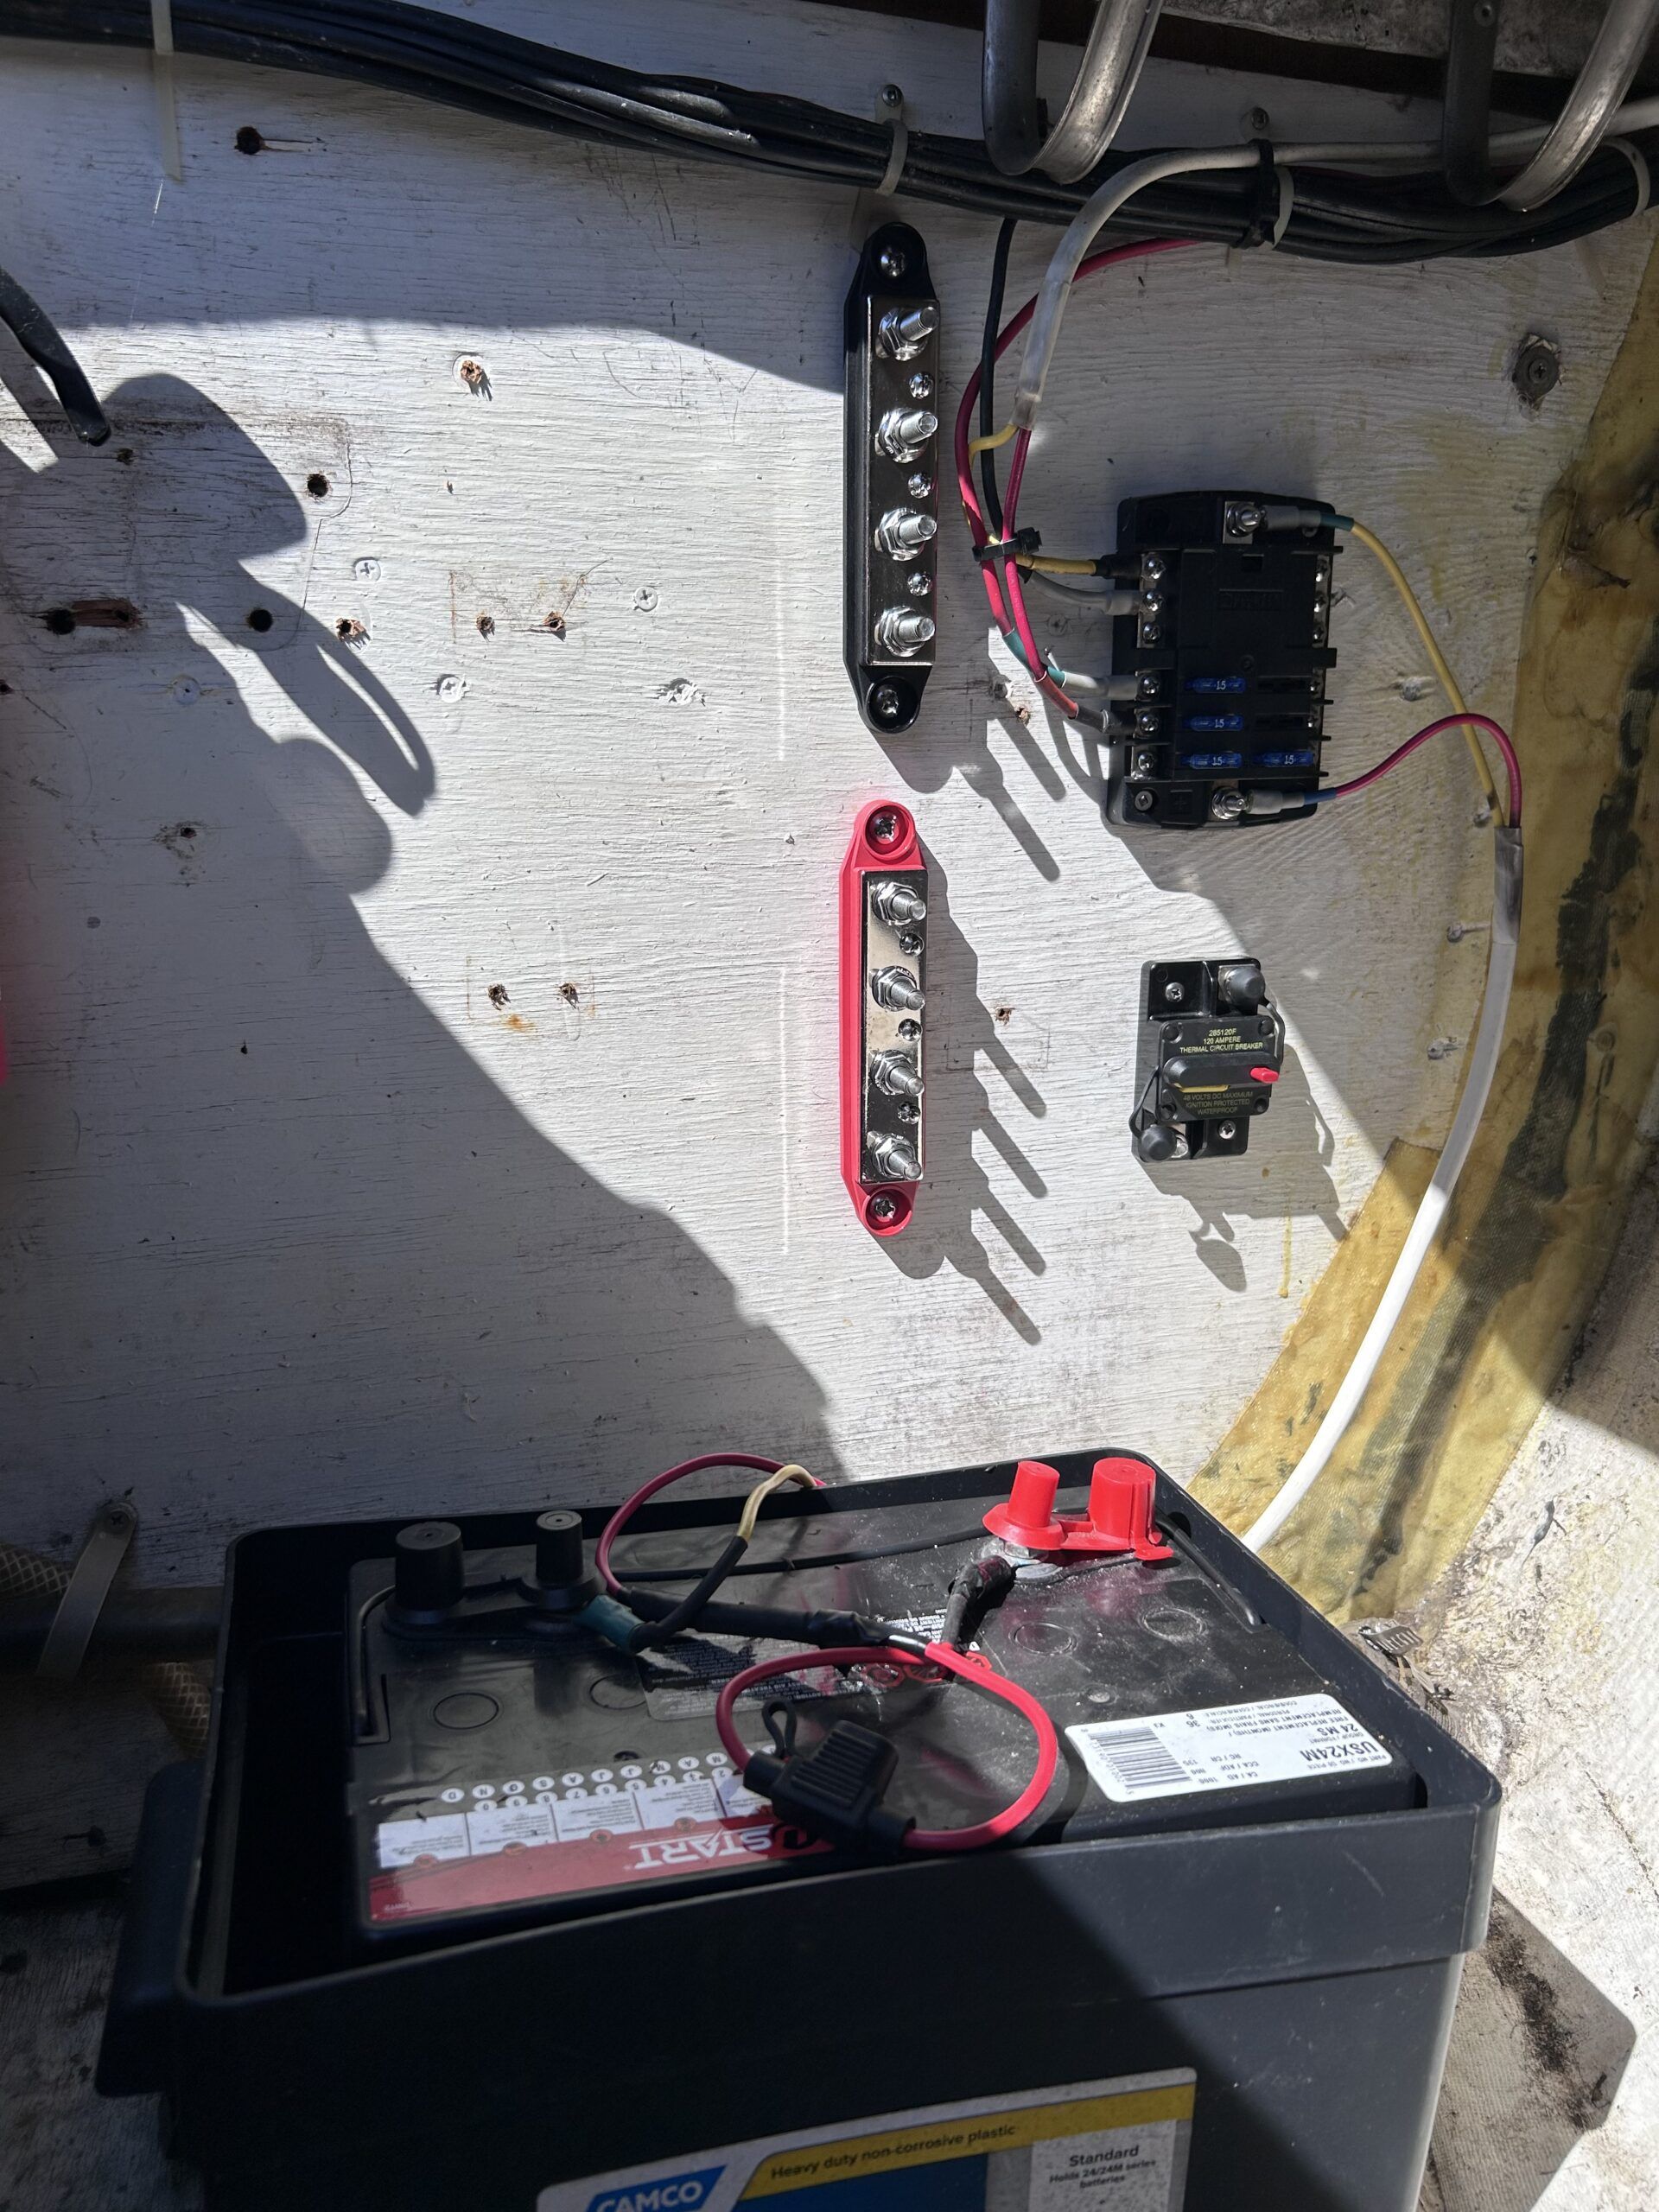
Once cut to length, we’re ready to lug. My battery and bus terminals both have size M8 bolts, so I purchased 6 AWG tinned copper lugs with the appropriately sized holes. 6 AWG is getting quite thick, so I needed to purchase a larger pair of crimpers to secure the lugs on.
Note: When stripping the ends of your conductors for lugging, do your best not to nick any of the conductor strands. And only strip off enough insulation to get the conductor strands fully inside the barrel of the lug.
Finally, slide your heat shrink tubing over the lugs so that half of the tube is on the barrel of the lug and half of it is on the conductor insulation. If the lugs are particularly large, you may need to slip the tubing on the conductors before you lug. 30 seconds with the heat gun will shrink the tubing to form a tight, waterproof seal between the lug and cable. It also looks professional.
Our system is mapped and our conductors are ready.
Sizing Overcurrent Protection Devices
Every energized system needs some sort of overcurrent protection to guard against short circuits and accidental discharges. While your battery’s BMS should do this, it’s prudent to include your own external protection in the form of a fuse or circuit breaker—depending on the size of your setup. A device rated to 125 percent of your maximum continuous discharge current gives you a good safety buffer and will protect your circuit adequately.
ABYC E-11 Table 3C indicates that the short circuit current of a lithium battery shall be assumed to be 5 kA for each 100 amp hour (Ah) of capacity. Many battery manufacturers do not provide this data, but this is a good rule of thumb. Therefore, your fuse or breaker should be sized according to your battery’s capacity.
In my case, my 100 Ah lithium battery necessitates a fuse or breaker with a 5 kA (5000 A) interrupt rating. However, if I were doubling the capacity to 200Ah, I’d switch to Class T fuses. They’re the industry standard for good reason, especially in larger systems. Fuses are always preferable due to their faster interrupt capability, particularly the class T fuses.
For more info on Class T fuses, see Burnage’s overview. These aren’t cheap, which as stated before is one of the reasons I recommend avoiding a parallel setup and opting instead for a single-battery setup if you’re on a budget. Whichever you choose, per our standard, the protective device should be fitted within 7 in. of the positive terminal of the battery.
I will include here a note about sizing your isolation switch. Per ABYC, an isolation switch is required to be installed as close to the positive terminal of the battery as practically possible. It should be sized according to the nominal voltage and maximum continuous discharge current of your battery. As I mentioned in Part 1, if you choose a type III “switching” breaker, your breaker can double as an isolation switch and simplify your system.
Enclosures and Strain Relief
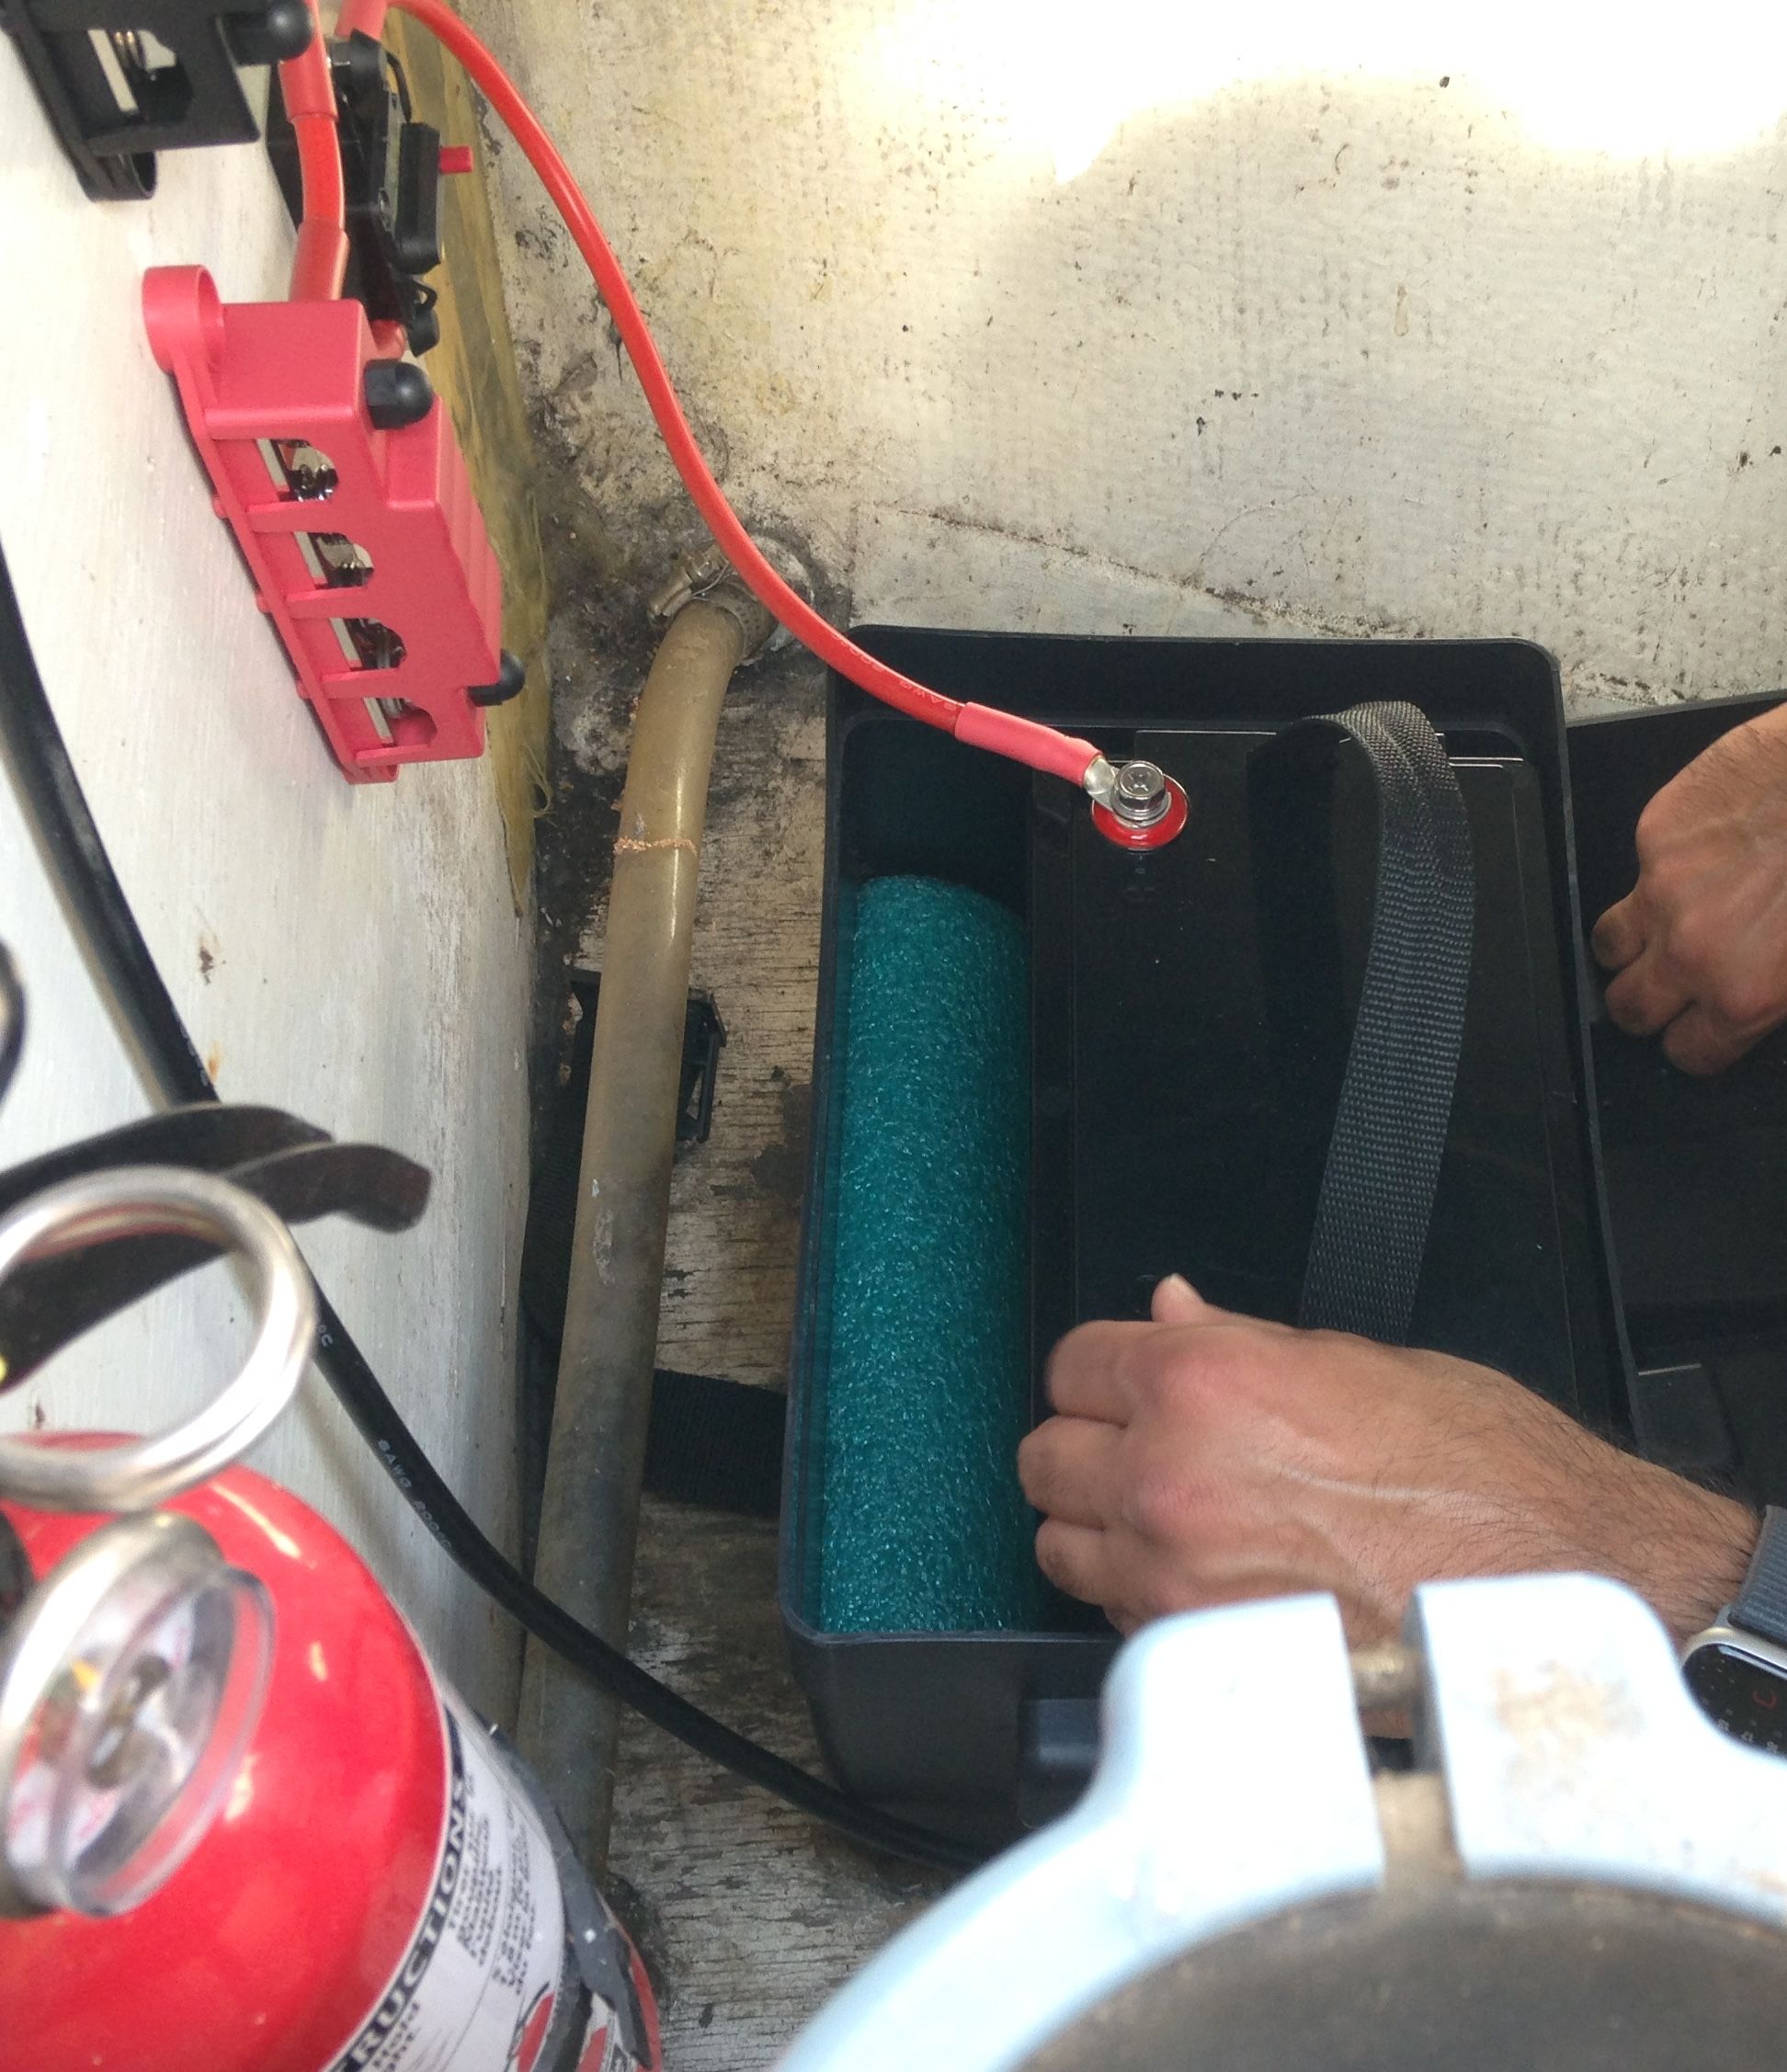
Per ABYC, your battery must be secured with little to no movement. As I mentioned in Part 1, I used an appropriately sized battery box (in my case, group 24) with a cut up foam pool noodle to wedge it in place and soak up vibrations. While my battery is IP65 rated (which is the minimum I recommend), the battery box also protects the battery from water ingress.
Finally, note that once connected, your conductors must be secured with strain relief at least every 18 inches per ABYC E-11. I purchased some simple screw-in conductor clips for this purpose.
Putting It All Together
Now for the fun part. We’re ready to connect everything together. The following steps will assume you are installing a single lithium battery.
Safety first: Don’t forget your safety glasses, gloves and fire extinguisher. It’s also prudent to wear cotton clothing or some other natural fiber in the case of a fire or arc flash incident.
- Remove the old lead-acid battery. Note there is a proper order of connection for batteries. The positive (red) terminal is first on and last off. Therefore, remove your old battery by disconnecting the negative (black) terminal first.
- Install overcurrent protection. Choose a spot to mount your fuse or breaker that places it within 7 in. of the positive battery terminal. Note your device may have indicated positive and negative terminals.
- Install isolation switch. If applicable, install the isolation switch immediately downstream of the overcurrent protection device.
- Install terminal blocks and/or bus terminals. Be mindful to put these in an easily accessible spot that will both minimize circuit path length and ensure the positive and negative sides of the circuit are balanced. If applicable, place the bus terminals upstream of the terminal blocks (closer to the battery) as it will connect larger loads and draw larger currents.
- Install battery box. If you don’t already have one, now is the time to secure your battery box in place.
- Install lithium battery. Now for the big one! Drop your battery into the box and ensure it cannot freely move around. Add baffles such as foam padding to the box if necessary. Tip: Keep your new battery at half charge during the install to limit the amount of energy released if something goes wrong.
- Connect prepared conductors. There is a torque spec for each size terminal bolt. Be sure to use your torque wrench here to avoid over- or undertightening. For instance, the M8 bolts on my battery require approximately 15 ft.-lb. of torque. Consider covering important connections, such as the positive and negative terminals of the battery, with a marine dielectric grease.
- Install strain relief. Add a clip or ziptie to secure all wires at least every 18 in.
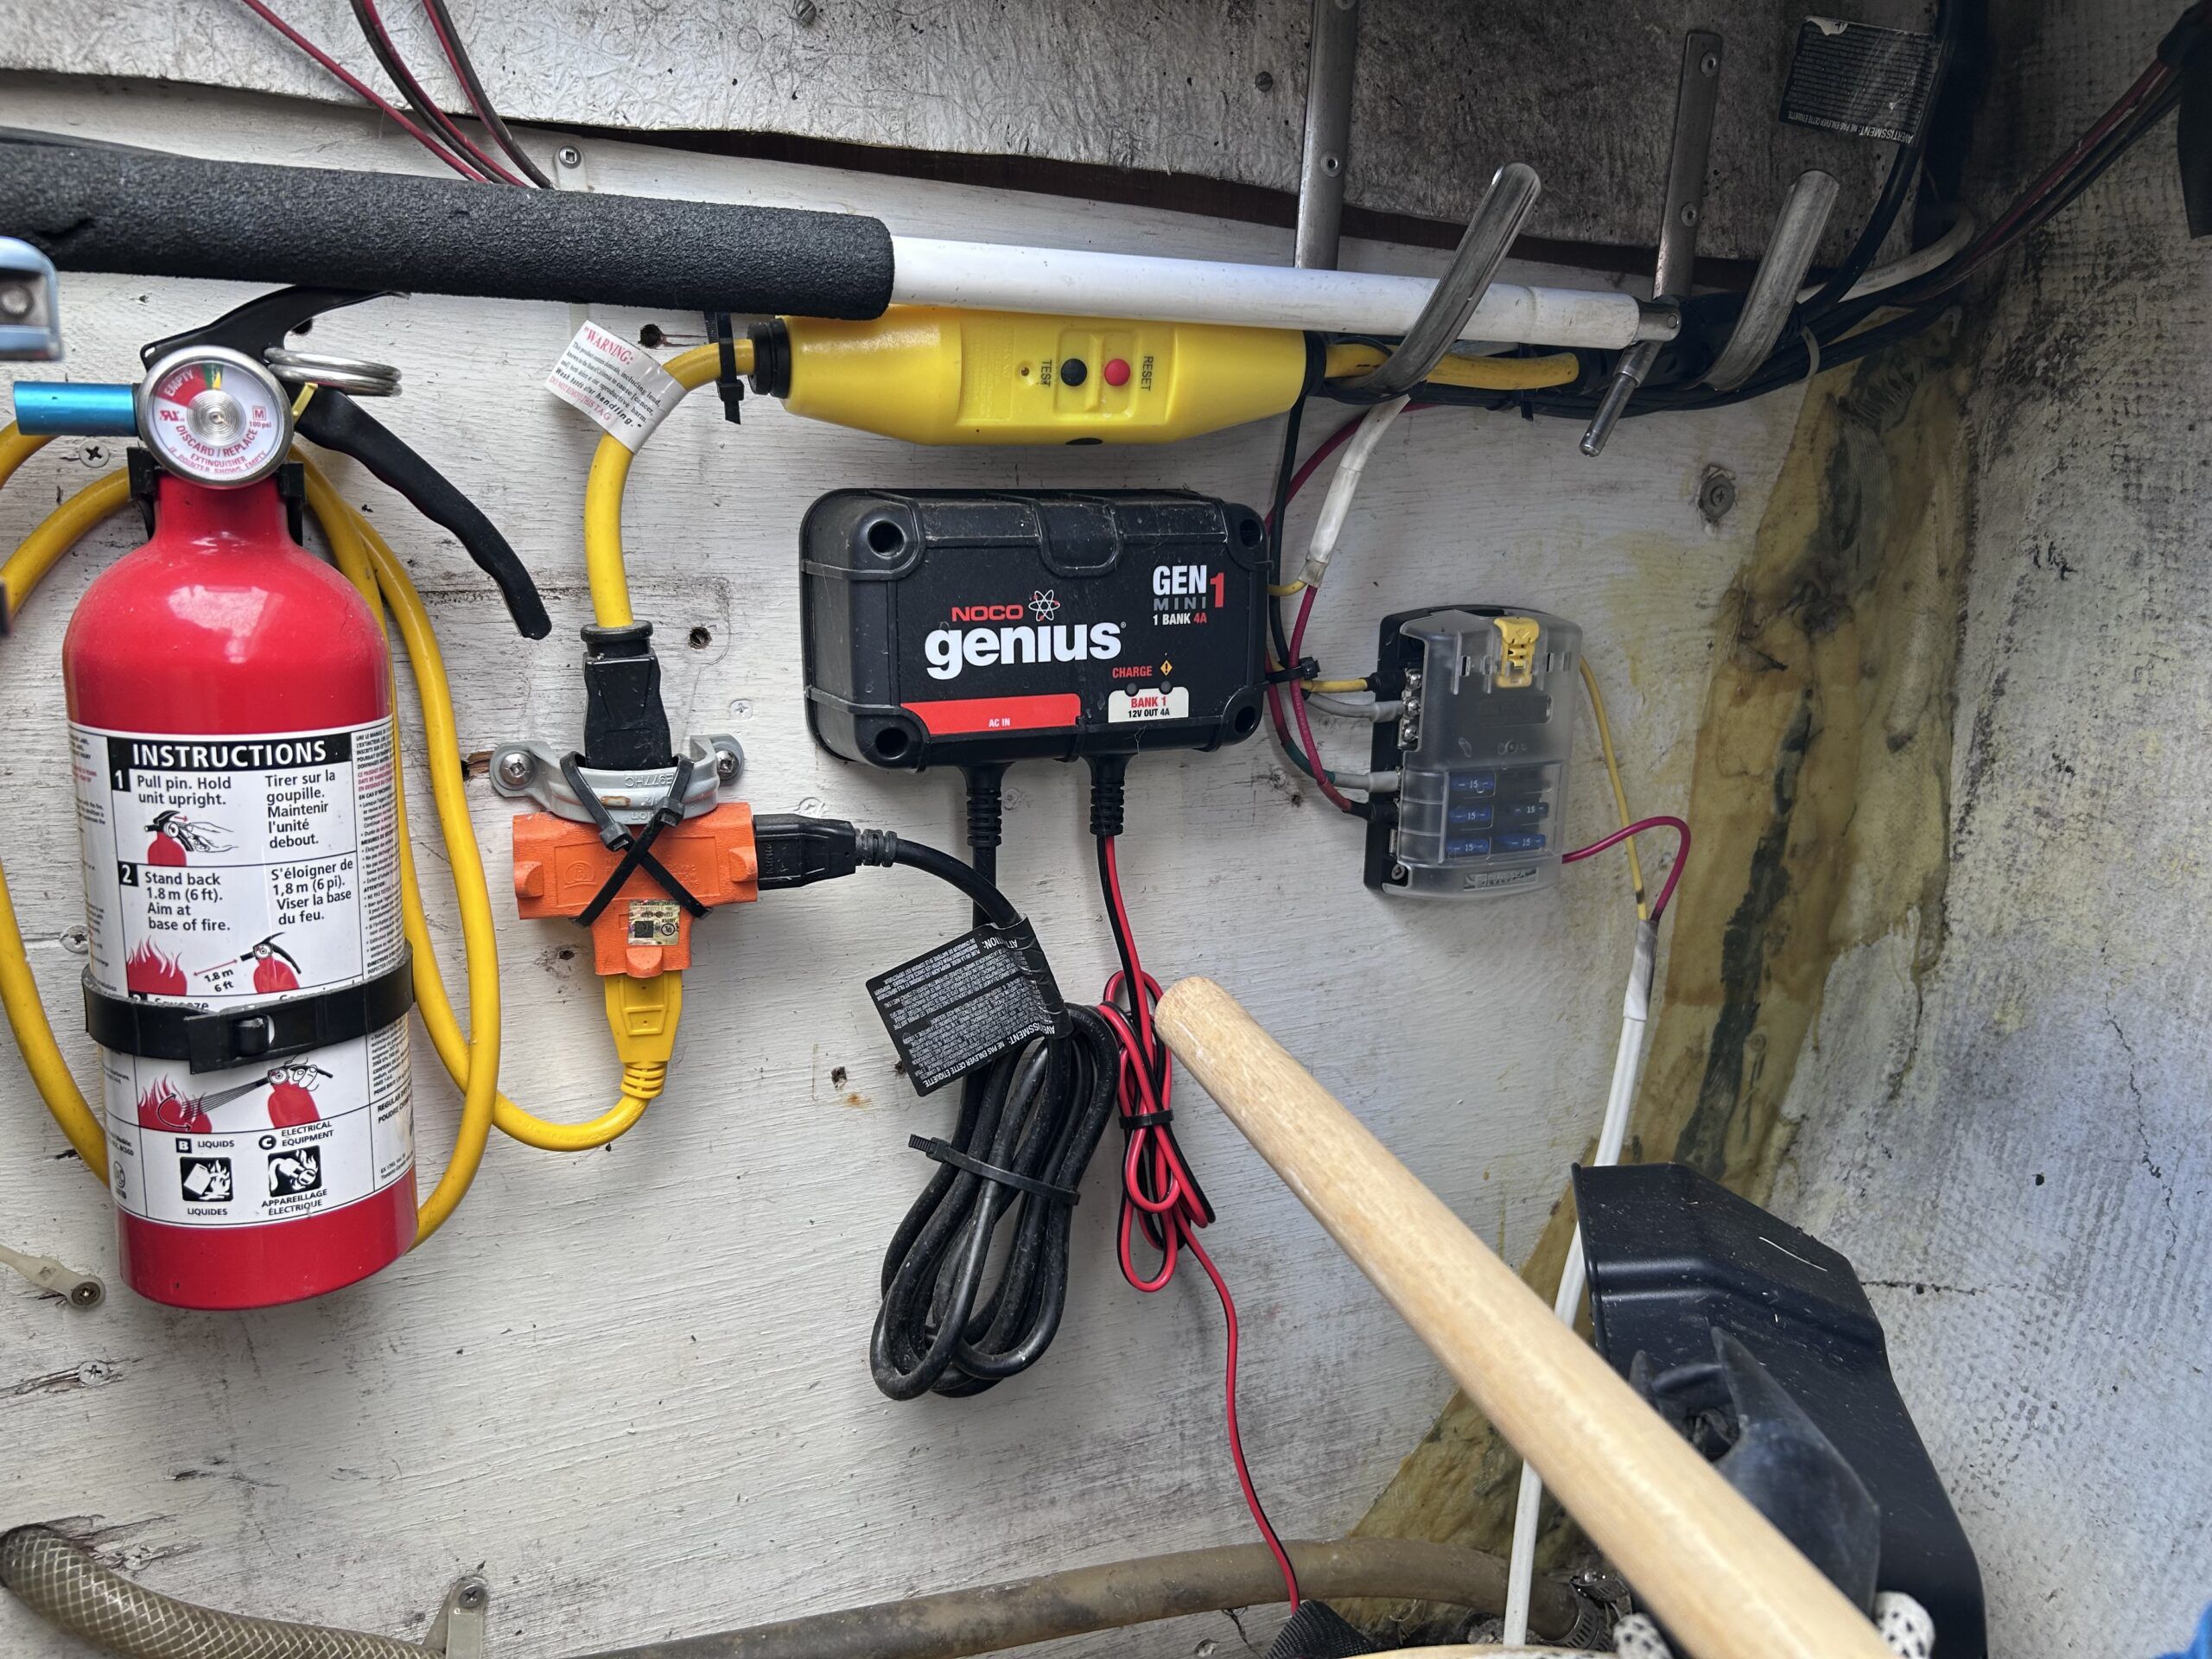
- Install external BMS or monitor. In most cases, this should be connected directly to the battery terminals. As mentioned in Part 1, the monitor should be equipped with a visible or audible alarm to warn you of a critically low charge/impending shutdown.
At this point, you have a “minimum viable product.” Before proceeding to connect your loads, grab your digital multimeter and run a quick few checks.
- Voltage check across the battery terminals.
- Resistance/continuity check between the positive battery terminal and end of the positive conductor. Likewise on the negative side. This ensures there are no faulty connections or gaps in the circuit.
- Breaker trip test (if applicable). If you have a breaker, manually trip it and verify with a continuity test that it opens the circuit (O.L. on your meter).
If all is well, continue on to connecting the charger and loads.
Note: If you have an alternator in your system, you must incorporate a bi-directional DC-DC converter before connecting your LFP house bank. Please consult this article on how to safely incorporate it into your system using a DC-DC converter.
- Install charger. This should be connected directly to the battery terminals, or, to the bus bar terminals.
- Install inverter. Same as above.
- Connect loads. Keep in mind you should never have more than four connections on one terminal (i.e. don’t overload the battery terminals—spread the load out with bus bar). Last but not least, connect your branch circuit terminal blocks or panelbox.
Re-run your checks and test each load in turn, starting with something small like the lights. At this point, if everything is working, your new system is up and running! Congratulations, you’ve just gone lithium.
If something seems off, consult our guide here on troubleshooting your new install.
As I mentioned at the outset, I highly recommend that you contract a licensed ABYC marine surveyor to look over your work. Aside from peace of mind, you might just find you’ve increased the appraised value of your boat. A successful survey will also keep your insurance company happy.
The Typical Cost of Upgrading to Lithium
We must assess the overall cost of a typical lithium battery conversion with respect to two factors: the upfront costs and the long-term savings.
Upfront Costs
Lithium batteries are more expensive up front, full stop. If you are increasing the capacity of your system, the beefier components will drive the initial cost up further. But even if you are keeping the same capacity, speciality components like the LFP charger or perhaps that new fuse you need to buy will also serve to inflate the bill.
Beyond the battery and system components, the tools you’ll need for a DIY conversion aren’t cheap. If you choose to have your system installed professionally, you’ll save on tools, but typically the labor will outweigh this savings by multiples.
Winner: Lead-Acid
Long-Term Savings
Where lithium really shines is over the long run. Just take a look at this comparison between your average lead-acid and LFP battery.
LFP and Lead-Acid Compared
| Cost Factor | Lead-Acid Batteries | LFP Batteries |
| Lifespan | 3–5 years | 10+ years |
| Cycle Life | 300–500 cycles | 2,000–5,000 cycles |
| Efficiency | ~70–80% | ~95–98% |
| Maintenance | Regular (water levels, corrosion) | Minimal |
| Replacement Frequency | Every 3–5 years | Every 10+ years |
Lithium wins on every front: lifespan and cycle life (longevity), efficiency, maintenance, and replacement frequency. Just remember that tropical and salt water environments will be rougher on both lithium and lead-acid systems, so take the replacement frequencies above with a grain of salt (so to speak). Finally, you can take LFP batteries to 100 percent depth of discharge (DoD), which increases their usable capacity compared to lead-acid and somewhat ameliorates the upfront price difference.
Winner: Lithium
Overall Winner: Lithium
The Actual Cost: My Conversion
My 1976 Paceship PY26 now has a shiny new 100 Ah LFP battery, a 20 A LFP charger, a new marine-rated circuit breaker, and new power cable. Since I did the labor myself, that cost is $0. So how much did the parts set me back?
| Item | Cost (CAD) | Cost (USD) |
| 100 Ah WattCycle LiFePO₄ Battery with 20 A charger | $460.00 | $326.60 |
| Blue Sea 120 A circuit breaker | $69.90 | $49.63 |
| Assorted ATO fuses | $7.90 | $5.61 |
| Digital clamp multimeter | $82.48 | $58.56 |
| 2×5 ft. Silicone 6AWG tinned-copper power cable | $40.67 | $28.88 |
| 4 terminal tinned-copper bus bar | $36.14 | $25.66 |
| Crimper and wire cutter | $53.10 | $37.70 |
| Wire stripper | $29.59 | $21.01 |
| Heat gun | $39.54 | $28.07 |
| Marine dielectric grease | $16.94 | |
| Cable retention clips | $26.83 | $19.05 |
| Cable lugs and shrink tubing | $48.03 | $34.10 |
| Total | $911.12 | $634.87 |
Under $1,000—not bad. I estimate that I spent about six hours actually doing the work. In fact, it’s taken me longer to write this article than to install my system! Of course, the work proceeded in fits and starts, and with all the browsing and online ordering and shipping, the timeline was more like two months from start to finish.
So how does it perform? As I mentioned in Part 1, I now have so much capacity and my electricity needs are so meagre that I have yet to recharge my battery once—and it’s been two months. Not bad. And as a nice little bonus, I have even noticed that due to the higher nominal voltage of LFP batteries, the lights in my cabin shine a little brighter. Overall, I’m very happy with the system.
Budgeting Tips
By doing your lithium conversion yourself, you’ll already be saving a lot of money, but here are a few more tips to stretch your dollar:
- Borrow tools or join a tool library. You might never use a big 2 AWG crimper again, so why not just borrow one instead of buy?
- Consider phased upgrades. While it’s best to buy all the battery capacity you need at once, it’s easier to add components like solar panels and inverters piecemeal.
- Buy bundled components or kits. Deals can be had, especially when bundling a battery and a charger.
- Buying used or refurbished components—but be careful! The lithium market probably isn’t mature enough to have a robust second-hand market, but it’s worth seeing if someone is upgrading early and looking to off load a relatively new battery.
So… Is Lithium Worth It?
In a word: Yes!
I’m very happy with my lithium conversion. Not only is the battery much smaller and lighter, but the amount of energy I can fit into my old battery box is simply astounding. It’s like having four of my old lead-acid batteries in a smaller package than even one of them. With my modest energy needs, I rarely need to recharge, and I can keep my lights on all night if I want, without a worry.
Ultimately, I think lithium is the way to go if you identify with any of the following scenarios:
- You are a frequent cruiser or live aboard your boat.
- You have high power requirements.
- You have limited space or weight capacity.
- You need to upgrade an aging or defective lead-acid system.
- You simply love to tinker and upgrade your boat.
I hope this article has been helpful, and I wish you all the best in your electric adventure. Be safe and thank you for reading.


