Practical Sailor

  • Subscribe
  • Free Waypoints e-letter
  • Customer Service


Forgot Your Password?

  • Home
  • Sailboat Reviews

    Articles

    Boat Review: Marshall 22 Catboat

    Funding the Dream

    New Boat Review: Beneteau Oceanis 41

    Building a New Beneteau

    Sailboat Reviews

    Unbiased, detailed reports on dinghies, daysailers, racer-cruisers, cruising sailboats, and multihulls. Insights into boat construction and design. Solid advice on buying a sailboat.

    Sailboat Reviews - Index

  • Marine Electronics

    Articles

    Lighting the Way

    Useful and Fun Nautical Apps for iPad

    PS Reviews Cheap and Free iPad Nav Apps

    PS Sea-trials the iPad and Nav Apps

    Practical Sailor Reviews Iridium and Inmarsat Satphones

    Marine Electronics

    Extensive tests of GPS chartplotters, fishfinders, VHF radios, radar, AIS, navigation software, and handheld gadgets. Professional guidance on installing and operating high-tech sailing gear.

  • Sails, Rigging & Deck Gear

    Articles

    Of Safety Tethers and Comfy Cockpits

    Anchor Testing and Rode Loads

    DIY Trysail Track Retrofit

    Adding Some Zing To Anchor Testing

    A Practical Look at Sailboat Cockpit Design

    Sails, Rigging & Deck Gear

    Independent tests of halyards, sheets, furlers, anchors, snatch blocks, shackles, ropes, winches, vangs, cleats, booms, masts, and standing rigging. Expert guidance on choosing a mainsail, jib, or spinnaker.

  • Systems & Propulsion

    Articles

    Worthwhile Advice from Hose Manufacturers

    Y-valve Installation Advice and Troubleshooting

    Y-valves Under Pressure

    Marine Sanitation Hose Test

    Installing Hoses Highlights Their Differences

    Systems & Propulsion

    Comprehensive comparisons of pumps, batteries, solar panels, wind generators, inverter-chargers, watermakers, propellers, toilets, engines, and other marine systems. Tips on ship-shape installations.

  • Boat Maintenance

    Articles

    Mailport: April 2012

    Antifouling for Aluminum Boats

    Mailport: May 2012

    Product Updates

    Where Credit is Due: May 2012

    Boat Maintenance

    Bottom paints, topside paints, varnishes, waxes, protectants, cleaners, metal polishes. If it comes in a bottle or can, PS has tested it. Proven methods to protecting your floating investment.

  • Belowdecks & Amenities

    Articles

    Clean Bottom, Fast Bottom

    Grill Griddle Faceoff

    What’s Cooking Now?

    Mailport: March 2012

    Showers

    Belowdecks & Amenities

    Our top picks in galley stoves, cookware, cabin lights, refrigeration, and entertainment systems can help turn your cruising boat into a home. Creative solutions to the challenges of living aboard.

  • Personal Gear & Apparel

    Articles

    PS Tests Padded Sailing Shorts

    Testers Search for an All-star LED Spotlight

    Testers Check Beam Patterns and Illumination

    Personal Gear & Apparel

    Thorough test reports on binoculars, boat shoes, foul weather gear, hand-bearing compasses, sailing knives, flashlights, headlamps, sunglasses boots, and anything else that belongs in a skipper's seabag.

  • Safety & Seamanship

    Articles

    PS Analysis: The 2011 WingNuts Capsize

    Safety at Sea Part III: Rambler 100 capsize

    US Sailing Investigator’s Recommendations

    Lessons learned

    Rambler 100 Recommendations

    Safety & Seamanship

    Our testers evaluate life jackets, flares, life rafts, harnesses, man-overboard strobes, medical kits, seasickness aids, and emergency devices. Tips on marine safety gear, boat-handling, and emergency procedures.

  • Mailport & PS Advisor

    Mailport & PS Advisor

    Insightful letters from sophisticated sailors. Do-it-yourself projects and reader feedback on a wide range of boats, marine manufacturers, and sailing products.

  • Inside Practical
    Sailor Blog

Features

Story Tools

  • Share |
  • E-Mail to a friend
  • E-Mail to the editor
  • Post a Reader comment
  • Printer Friendly

Design For: Cockpit Foot Brace

Modern yachts are frequently adver­tised as having spacious cockpits: and, indeed, they do. But it doesn't take many afternoons of sailing to discover that the cockpit which seemed so splendidly roomy in the showroom or at the boatyard is too damned wide: it's impossible to brace your legs across the footwell without sliding down so that your body only contacts the boat at shoulders and tailbone. If you want to sit on the cockpit coaming while steering there's no place at all to brace your feet.

The answer to these problems is not to narrow the cockpit, but to in­stall wood foot braces at strategic locations. The project is truly simple, but very satisfying because the results really add to your sailing comfort, en­joyment, and efficiency.

The first step is to decide on the location of the braces. To begin with, you've got to have enough ex­perience with sailing the boat to know where the helmsman normally sits, and where passengers/crew will need to have foot braces. When determining the location for the braces, keep the clutter to a minimum. Think about how to retain a clear cockpit for use in harbor. You don't want to ruin one aspect of the boat to improve another.

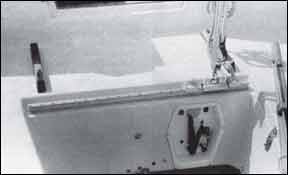
The photograph shows the way the problem was solved on our Scampi. The two normal steering positions are on the cockpit seats at the forward end of the well and on the cockpit coarnings right up next to the cabin's aft bulkhead. For the cockpit position, a strip of wood was bolted down the centerline of the wood cockpit liner. For the coaming steering position, strips of wood were bolted to the bridgedeck on either side of the companionway.

The positions of the bridgedeck strips were arrived at by the simple process of having the regular helmsmen (a short one and a tall one) sit normally to see where our feet naturally fall . . . high tech stuff! We compromised on a position which suits us both and which still leaves enough room between the braces and the cockpit coaming so that most lux­urious of activities — sitting reading with your back against the cabin bulkhead, legs up on the cockpit seats and the anchorage spread out before you — can still be enjoyed.

The brace on the cockpit floor runs right down the centerline and serves us well, but a wider well or a crew with shorter legs might be better served by parallel braces set at whatever is the appropriate distance from the centerline.

As to size, the bridgedeck braces are 2" high and have vertical sides. For the sake of appearance and to diminish bruises and trapped sheets, the ends are angled down and the top edges slightly rounded.

The cockpit sole brace is 1 114" high and has a rounded cross section.

I'd say the best material for the braces would be teak, oiled or left bare. The mahoganies and woods like oak, fir, or pine will blacken in an ap­plication like this where constant abrasion will inevitably wear away paint or varnish.

As to installation, through bolting is the best — perhaps the only good — approach. Because most of you will be bolting through unreinforced areas of foam or balsa cored fiberglass, backing blocks about 3" square should be used under the nuts to distribute the strain. Also, use a good bedding compound. As this is permanent installation, one of the silicone compounds should serve well, but be sure to clean up carefully before the compound sets or you'll have later to go to work with buffing compound.

If you don't want the installation to be permanent, it's possible to make the braces removable. Many good hardware stores carry threaded inserts which are normally meant to be screwed into wood parts that require frequent disassembly. These inserts are tapped for machine screw threads.

To install, a hole is drilled in the deck or cockpit sole of the ap­propriate size for the insert. If the deck is cored with balsa at that point, it will be necessary to dig out the core about 1/2" around the hole and fill it with an epoxy filler such as Marinetex. Fill the hole with the epoxy and press the insert in. The trick here is keeping the filler out of the threads.

Alternatively, you could fill the hole completely, allow the filler to harden, then drill out for the insert. The footrests are then secured with bolts, and are easily removed at any time.

Before buying the inserts, make sure they are not just plated steel. Most are, but brass ones are also available.. A quick check with a magnet will tell you if you're looking at solid brass or brass-plated steel.

Only an hour or two of work total, and you improve your boat and your pleasure enormously.

-JP

Read More on These Topics
  • DIY Projects

Comments (0)

Be the first to comment on this post using the section below.


Add your comments ...

New to Practical Sailor? Register for Free!

Already Registered? Log in

Forgot your password? Click Here.

Advanced Search

Current Issue

Cover Image

May 2012

  • Y-valves Under Pressure
  • Anchor Testing and Rode Loads
  • Funding the Dream
  • Safety at Sea Part III: Rambler 100 capsize

Subscribe Today

Back Issue Archive

Resources

  • Practical Sailor Dinghy Survey Results
  • DIY Boatyard Survey
  • Sailboat Reviews - Index
  • DIY Projects
  • Bookstore
  • Issue Archives
  • Other Resources
  • Customer Service
  • About Us
  • Home
  • Subscribe
  • Give a Gift
  • Renew
  • Products
  • Customer Service
  • Privacy Policy
  • About Us
  • FAQs
  • Contact Us
Practical Sailor

© 2012 Belvoir Media Group, LLC. All rights reserved.