
")
In the old Star Trek TV series Captain Kirk would press a button on a machine called a replicator and request banana cream pie, and with a few sparkles and futuristic sound effects a perfectly formed slice of pie with whipped cream on top would twinkle into existence. Could the Star Trek replicator make boat parts? We’re not quite there yet, but we’re getting close.
In the past, if I wanted a spacer under a cheek block or a bracket to hold something up I would get out the power tools and butcher some poor innocent piece of wood into something resembling the part I had in mind. Now I take a few measurements, draw the part I need up in CAD, and export it to my 3D printer. After a few minutes (or sometimes hours, depending on the size of the part) I have a fully formed part to the exact dimensions I entered into the design. For the do-it-yourself boat owner, 3D printing is a game changer.
CAD (Computer Aided Design)
The key to successful 3D printed part creation is mastering the basics of CAD. I should note that I am a career design engineer and have been using CAD software since I was designing parts for the space shuttle back in the early 1980s, and I have always had access to high-end CAD software. However, for this beginner’s guide I have taken a dive into the world of free and low-cost entry-level CAD and can report that there are plenty of options for getting started, albeit with varying degrees of learning curve. See the table below for a list of entry-level CAD packages, their cost, features and benefits.
I am going to assume that if you are reading this article, you are at least to some degree a do-it-yourselfer, and as such you have at some point wanted a specialized widget to mount some hardware or organize some lines that does not exist in the West Marine catalog. In fact, you can picture in your mind exactly what you need. If you can sketch what you want on a bar napkin, you can create it in CAD.
3D parametric CAD is, after all, just addition and subtraction of basic shapes. A design always starts with a sketch plane; an imaginary surface to draw upon. Draw a rectangle. Stretch it upward and you have a block. Subtract a cylinder and you have a block with a hole in it, and so on. All of the entry level CAD packages I checked out include instructional tutorials for getting started.
Part Design
Once you get the hang of it, you will find CAD will let you do amazing things that can’t be done with woodworking, metal fabrication or plastic molding, like hollow cavities, curved holes, and impossible under-cuts. There are, however, limitations to what can be 3D printed. Wall thicknesses should be appropriate for the type of printer you are using, a minimum of two to three times the nozzle width for FDM printers. Overhangs will require support material to keep from collapsing into a gooey mess on the printer bed. Sharp corners tend to crack or de-laminate and should be avoided. Tolerances and accuracy, while good, are not perfect, and parts that fit together should have generous clearances. If some of this terminology is unfamiliar, fear not—we will go deeper when we get into printer types.
The printer software will allow you to make choices about surface finish, tolerance accuracy and “infill” percentage. Typically, a solid part will have a cosmetic outer layer, but thicker sections will be printed as a lattice that is maybe 25 percent plastic and 75 percent air. This would be fine for a non-structural part, and it will print faster and use less material. For highly loaded parts you can set infill as high as 100 percent to get a solid plastic part.
Software Cost (approx.) Performance (Ease of Use/Learning Curve) 3D Printing File Export (Primary Format) Notes
TinkerCAD Free (web-based) Very easy for beginners, drag-and-drop shapes STL, OBJ, SVG Ideal for younger users and simple designs. Excellent starting point for learning fundamentals.
FreeCAD Free (open-source) Intermediate learning curve, parametric modeling. STL, OBJ, and more Open-source versatility, robust tools, good for mechanical engineering, product design, architecture, and 3D printing.
Fusion 360 (Personal Use) Free (for personal/hobby use) Moderate learning curve, comprehensive features. STL, OBJ, and more Powerful CAD/CAM/CAE tool, suitable for product design, engineering, manufacturing. Non-commercial license restrictions.
Blender Free (open-source) Steep learning curve STL, OBJ, and more Primarily for 3D modeling and animation, but suitable for creating and refining 3D printable models.
OpenSCAD Free (open-source) Programming-style approach, ideal for coders/programmers STL Geared towards precise machine parts and parametrically defined objects.
DesignSpark Mechanical Free Easy to use, good for basic to intermediate designs STL Similar to SketchUp in terms of ease of use but with more features.
BlocksCAD Free (web-based) Intuitive block-based interface, focuses on STEM education STL, OpenSCAD Excellent for introducing STEM concepts to middle/high school students.
3D Printers
Most of the printers available to the casual user are FDM (Fused Deposition Modeling) type. These operate by feeding a polymer filament into a heated nozzle that squirts out a thin string of molten plastic onto a surface called the printer bed. The nozzle (or sometimes the bed) moves in the x-y plane such that the molten string gets laid down in a 2D layer, or “slice” of the part being printed.
As successive layers of molten string are deposited on top of each other the slices fuse together and stack up to form a solid part. Resin 3D printers (printers where liquid light curing polymer is solidified in layers using a UV laser) are starting to show up in the hobbyist price range, however while more accurate and not as dependent on support material for complex and overhanging shapes, they are more difficult to setup and maintain, and the material choices are extremely limited and generally not as durable and UV stable as FDM filament. For this reason we will focus on FDM printers.
Printers have come a long way since I bought my first generation machine 10 years ago. My old printer was clunky, slow, and struggled with any material more demanding than PLA. I once printed a mold for a fiberglass battery box I was making. Granted, it was a pretty big part, but it took 36 hours to print! It also used open source software that expected the user to get into the weeds of calibration, layer height nozzle temperature head travel speed, etc. It was a long learning curve with a lot of scrap plastic.
My new printer, a Bambu X-1 Carbon, on the other hand, uses LIDAR sensors to self-calibrate, reads the material type off the spool, auto-loads filament and recommends reliable settings based on the material and your specific part, and the print speed is lightning-fast owing to sophisticated motion and acceleration control of the print head. Truly a Wright Brothers to F-35 comparison.
Factors to consider when purchasing an FDM 3D printer:
- Price: Entry level printers have come way down in price. Naturally, more features will cost more money.
- Print volume: The height, width and depth of the largest object you can print.
- Nozzle and bed temperature range: High tech materials generally require higher temps for both.
- Enclosed or open frame design: Enclosed printers generally have better layer adhesion than open printers in drafty environments. Also, stinky or toxic off-gassy materials can be vented away from people.

3D printed stern rail VHF holder. (Photo/ Charlie Garrad) - Proprietary or generic open-source filament: This is the old razor/blades business model, and you will generally pay more for a printer company’s proprietary filament, however proprietary filament means a company’s recommended print settings were tested with that material.
- Filament handling systems: Systems like Bambu Labs’ Automatic Material System (AMS) and others will read a QR code on the spool of filament and automatically adjust the printer settings, as well as providing a dry environment for filament (important!) and allow multiple materials to be used in a single print by switching filaments on the fly.
- Built-in printer software: The program that reads your CAD file, usually in .stl or .step format, and figures out how best to print the part is called a “Slicer”. Some have an easier user interface than others. Many online reviews can help guide this decision.
The list of top rated entry level 3D printers is changing constantly, with new models coming out every week. The following list are some well known safe bets.
Printer Name Approximate Price (USD) Features Benefits
Anycubic Kobra S1 Combo $449 - $749.99 - High-speed printing (up to 600mm/s)
- Multicolor capabilities (up to 4 colors)
- CoreXY construction for stability and precision
- Automatic bed leveling
- Supports a wide range of filaments (PLA, PETG, TPU, ABS, ASA)
- Built-in webcam for print monitoring
- App control for easy use- Easy to use for beginners
- Excellent for multi-color printing
- Produces appealing quality 3D objects
- Affordable price for its features
Bambu Lab P1S $849 - All-around performance out of the box
- Automatic bed leveling and vibration compensation
- Multi-color capability with AMS combo (up to 16 colors)
- Easy and trouble-free printing for users of all levels
- Wide range of color options for creative projects
Bambu Lab X1-Carbon $1199 - $1449 - CoreXY motion system for high speed and precision
- 5-inch color LCD touchscreen
- Hardened steel nozzle and drive gear for advanced materials like carbon fiber and glass fiber reinforced polymers
- Dual auto bed leveling with Lidar sensor for first layer inspection and flow calibration
- AI-powered spaghetti detection
- Built-in camera for monitoring and timelapse videos
- Compatible with Automatic Material System (AMS) for multi-color and multi-material printing (up to 16 colors with AMS Hub)
- Enclosed build chamber with activated carbon filter
- MatterHackers states that the X1 Carbon's build chamber is more advanced, with metal sides and a glass top- Ideal for advanced users and professionals
- Offers high print quality, speed, and reliability
- Advanced material compatibility, including composites
- Automated features improve print success rates and ease of use
- Excellent user experience with intuitive software and mobile app control
Prusa Core One $949 - $1199 (kit), $1399 - $1649 (assembled) - Enclosed chamber with active temperature control (up to 55 C/131 F)
- High-quality printing across a wide range of materials (PLA, PETG, ASA, PC, Nylon)
- Made from premium materials for reliability and minimal maintenance- Studio-friendly operation with the enclosed chamber
- Exceptional reliability and durability
- Versatile material compatibility for diverse projects
Creality K2 Plus $1099 - $1499 - Large build volume
- Multi-color printing system (CFS)
- High-speed printing (up to 600mm/s)
- Suitable for large and intricate projects
- Offers multi-color printing capabilities
- Fast and efficient printing
Qidi Tech Plus 4 $769 - Fast, enclosed, Klipper 3D printer
- Active chamber heating
- Efficient and controlled printing environment
Bambu Lab A1 Mini $219 - $349 - Multi-color printing with AMS lite (optional)
- Active Flow Rate Compensation for accuracy
- Easy to assemble
- Fast and quiet operation
- Automatic bed leveling- Ideal for beginners exploring multicolor 3D printing
- Accurate and precise printing
- User-friendly and quick setup
- Quiet operation for comfortable use
Creality Ender 3 V3 SE $199 - $219 - Automatic bed leveling with CR Touch
- Sprite direct drive
- Max speed of 250 mm/s
- Easy assembly- Affordable option for beginners
- Excellent auto-bed leveling for ease of use
- Decent speed for most hobbyist projects
Flashforge Adventurer 5M / 5M Pro $419 (5M Pro) - Enclosed build area
- Auto bed leveling
- Can print in 4 colors out of the box (5M Pro)
- Excellent for educators
- Good for beginners who want to try color printing
Filament Materials
The six most common materials for 3D printing are PLA (Polylactic Acid), ABS (Acrylonitrile Butadiene Styrene), ASA (Acrylonitrile Styrene Acrylate), PETG (Polyethylene Terephthalate Glycol), TPU (Thermoplastic Polyurethane) and Nylon (Polyamide). Each has its uses in the marine environment.
PLA is theoretically biodegradable, and therefore not a great choice for on-deck sailboat hardware. It is, however, low warping very easy to print, making it ideal for things like fiberglass molds, positioning fixtures and single time use tools. I did once make a set of cockpit instrument covers out of white PLA just to see how biodegradable they were. The conclusion? They lasted a full season in the sun and weather with no visible degradation. Biodegradable? Maybe not so much.
ABS is the workhorse of the 3D printing world. Cheap, stable, available in many colors, and okay UV and temperature resistance. I use it below deck for low strength applications.
ASA is known for its toughness and UV resistance, making it an excellent choice for sailboat applications. Probably the best choice for white printed parts on deck, though the color is slightly off-white.
PETG has good strength, chemical resistance and UV stability. Spoiler alert: My number one go-to 3D printer material for boat parts is PETG-CF (carbon fiber added).
TPU is flexible and has rubber-like properties for things like grips, seals and flexible parts, though it has a reputation for being difficult to print and is fussy about printer settings.
Nylon, and particularly Nylon-CF (with carbon fiber) promises to be the toughest, strongest, most durable engineering polymer available for 3D printing—but, I have never been able to get a good usable part out of the stuff. Somebody is making it work, or they wouldn’t be selling it. The last time I tried it gummed up my machine so bad I had to get a new print head. I will keep trying, but in the meantime, PETG-CF is hard to beat.
A Very Incomplete List of Uses for 3D Printed Parts on a Sailboat
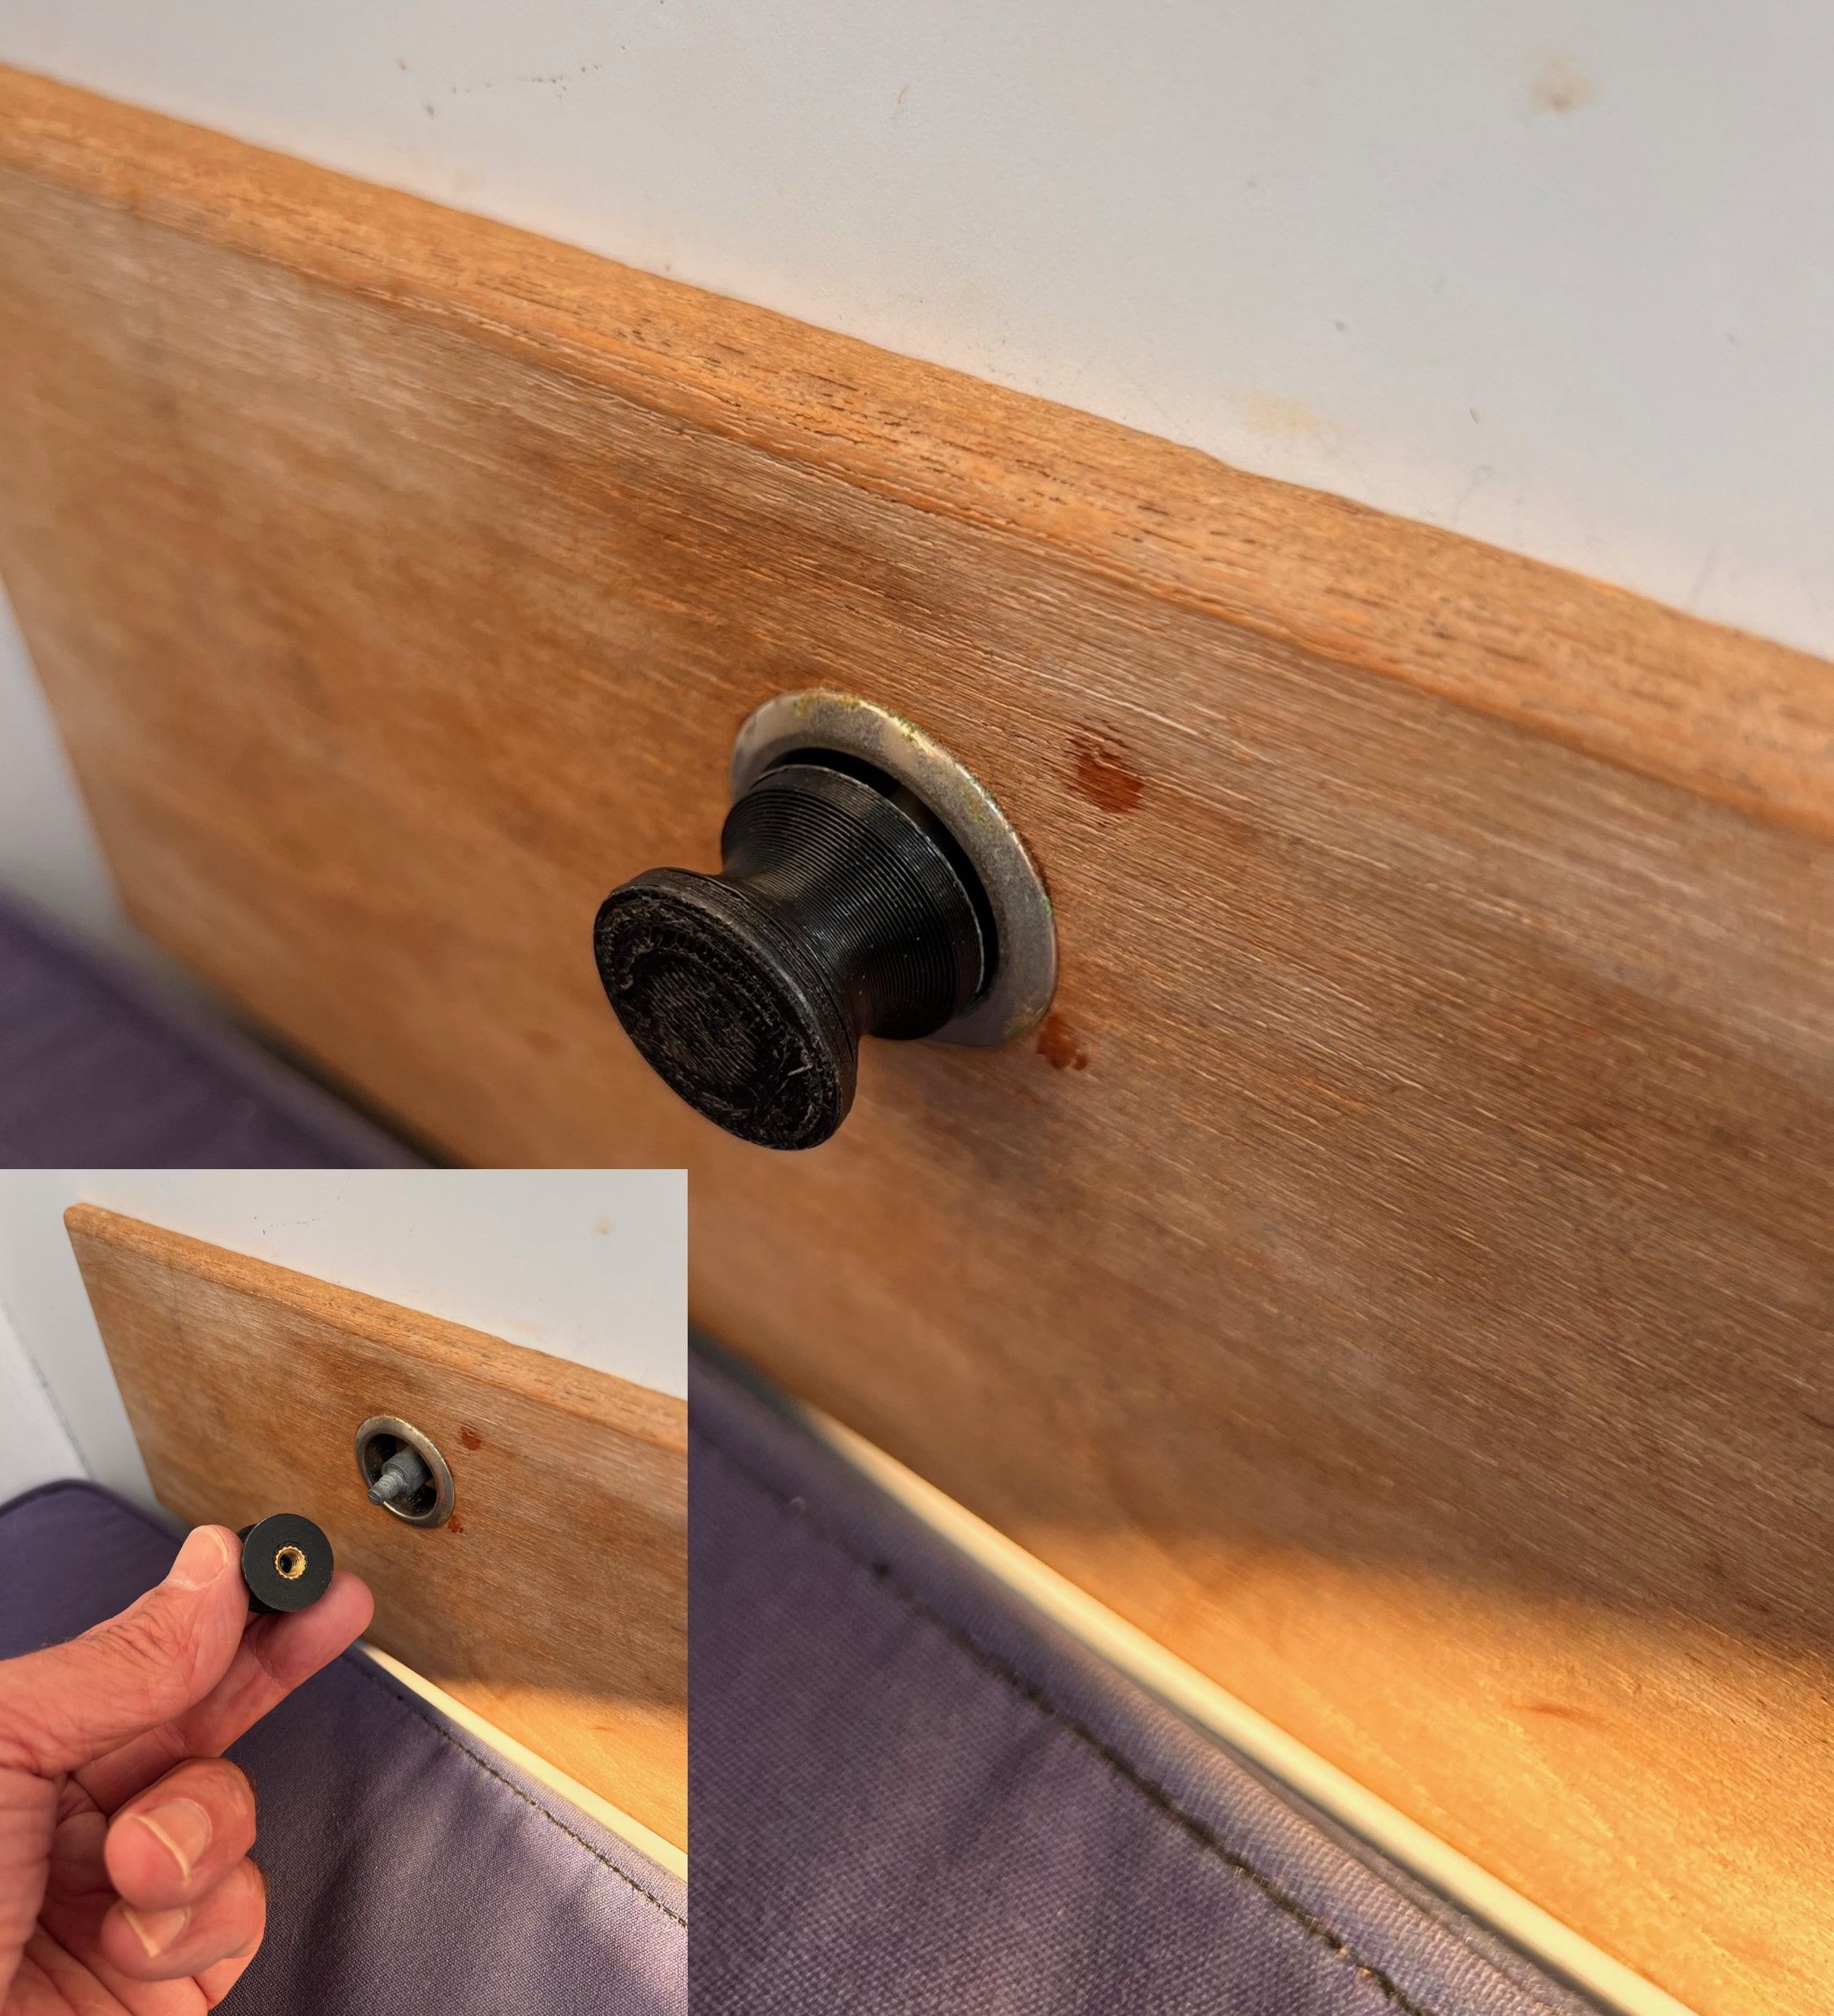
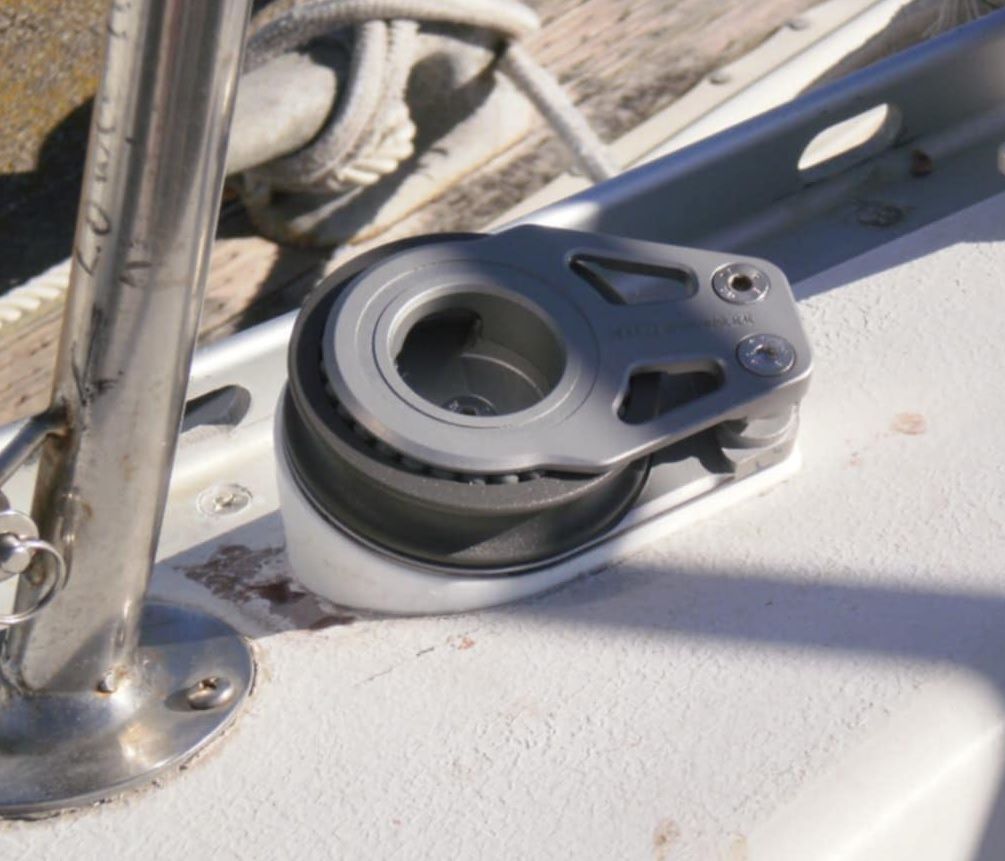
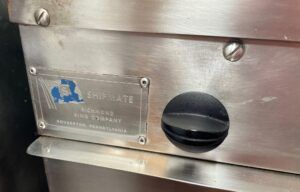
I asked some of my friends who occupy the Venn diagram overlap of boat-owning sailors and engineers what they have used 3D printing for on their boats and received lots of replies. Some of the best examples include a replacement control knob for a long-discontinued Shipmate stove, angled base for a cheek block, cockpit handheld VHF holder, replacement drawer pulls, turnbuckle length gauges for race boat rig tuning, stanchion spinnaker pole mount, adjustable mast chocks—the list goes on.
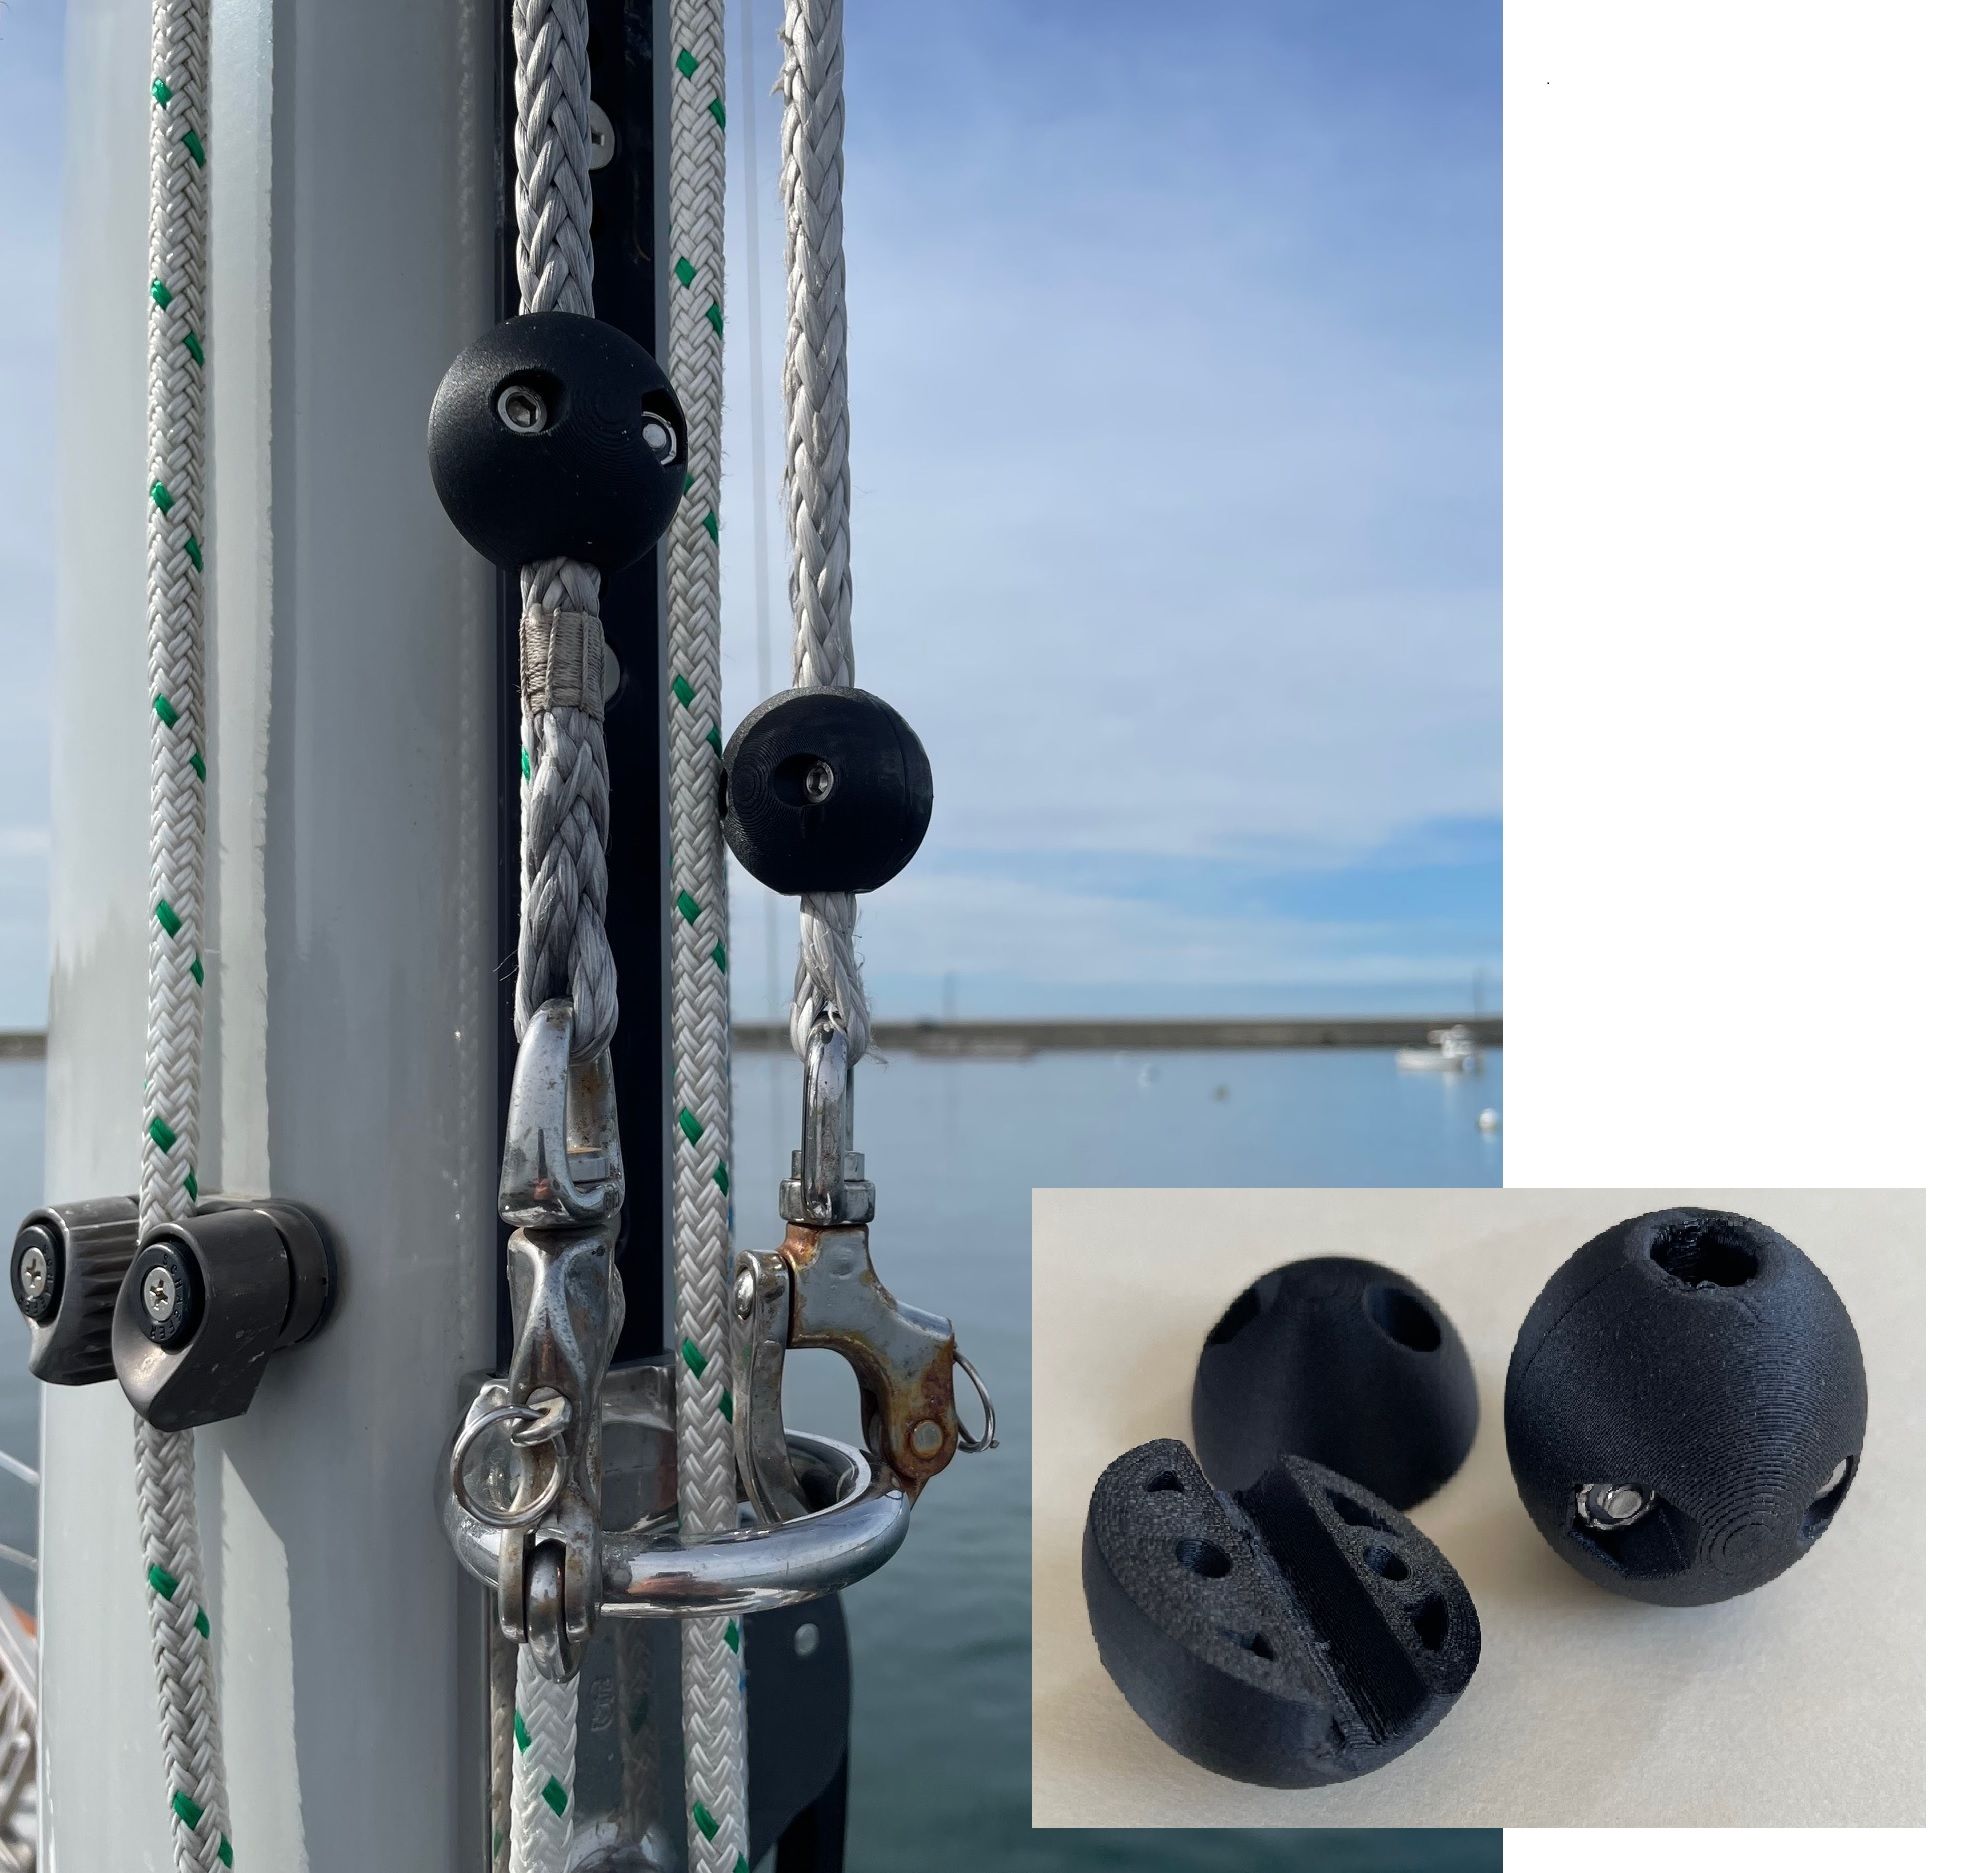
Halyard Balls
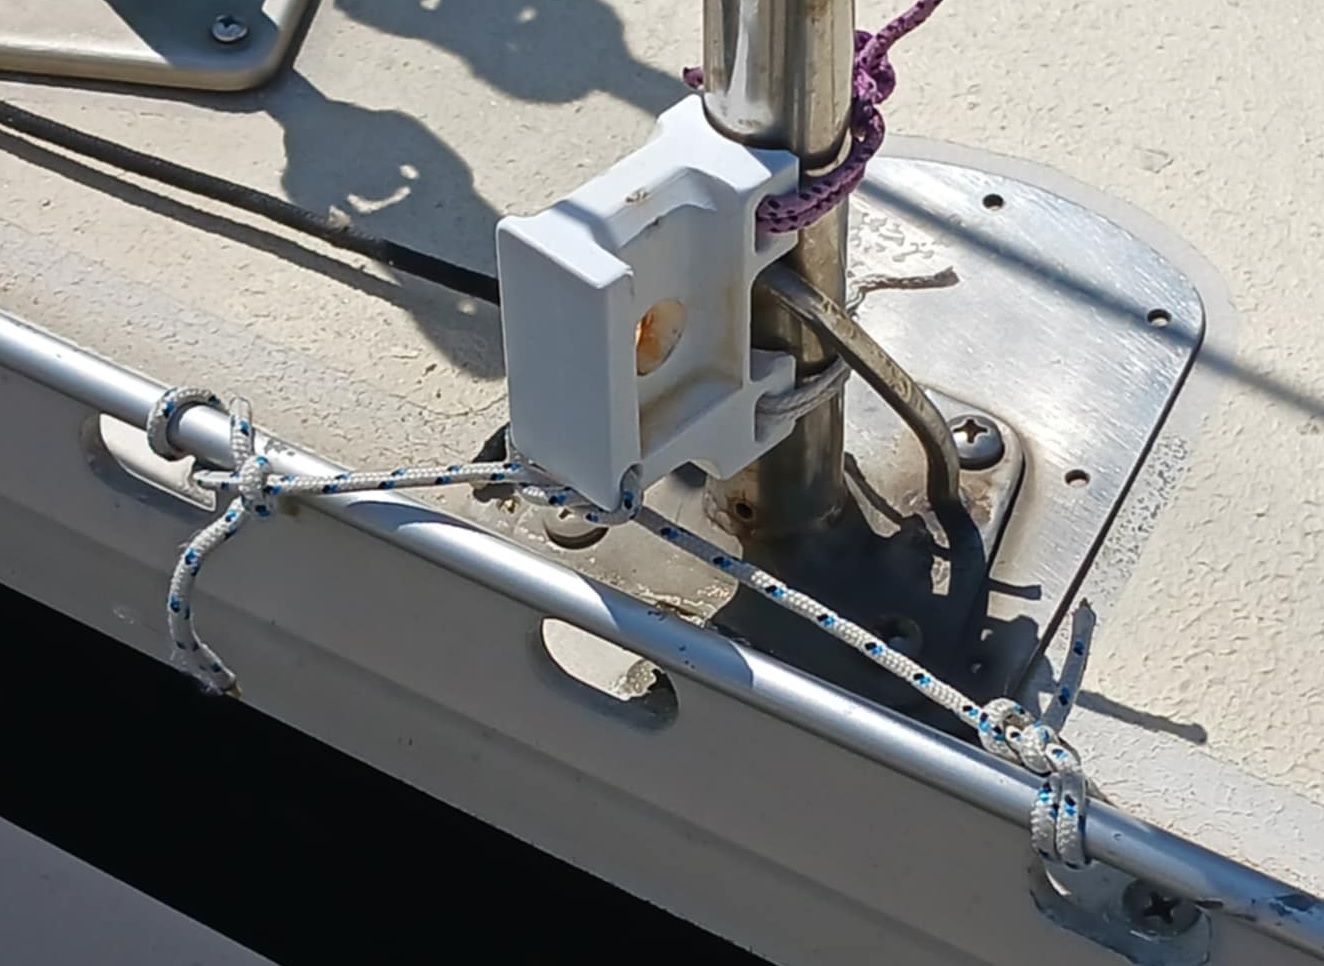
On Misirlou, a favorite example of where 3D printing saved the day was during a two day race series last year. On the first downwind leg on the first day the head of our spinnaker came floating down after the hoist. I had just installed new halyards and forgot to include the plastic ball behind the shackle that prevents the shackle from jamming or self-releasing in the masthead sheave. After a trip up the mast to retrieve the halyard it was too late to get to the chandlery, which probably didn’t stock “halyard balls” anyway, so that night I CADed up some split balls and printed them overnight to use for the next day’s race.
Bird Deterrent
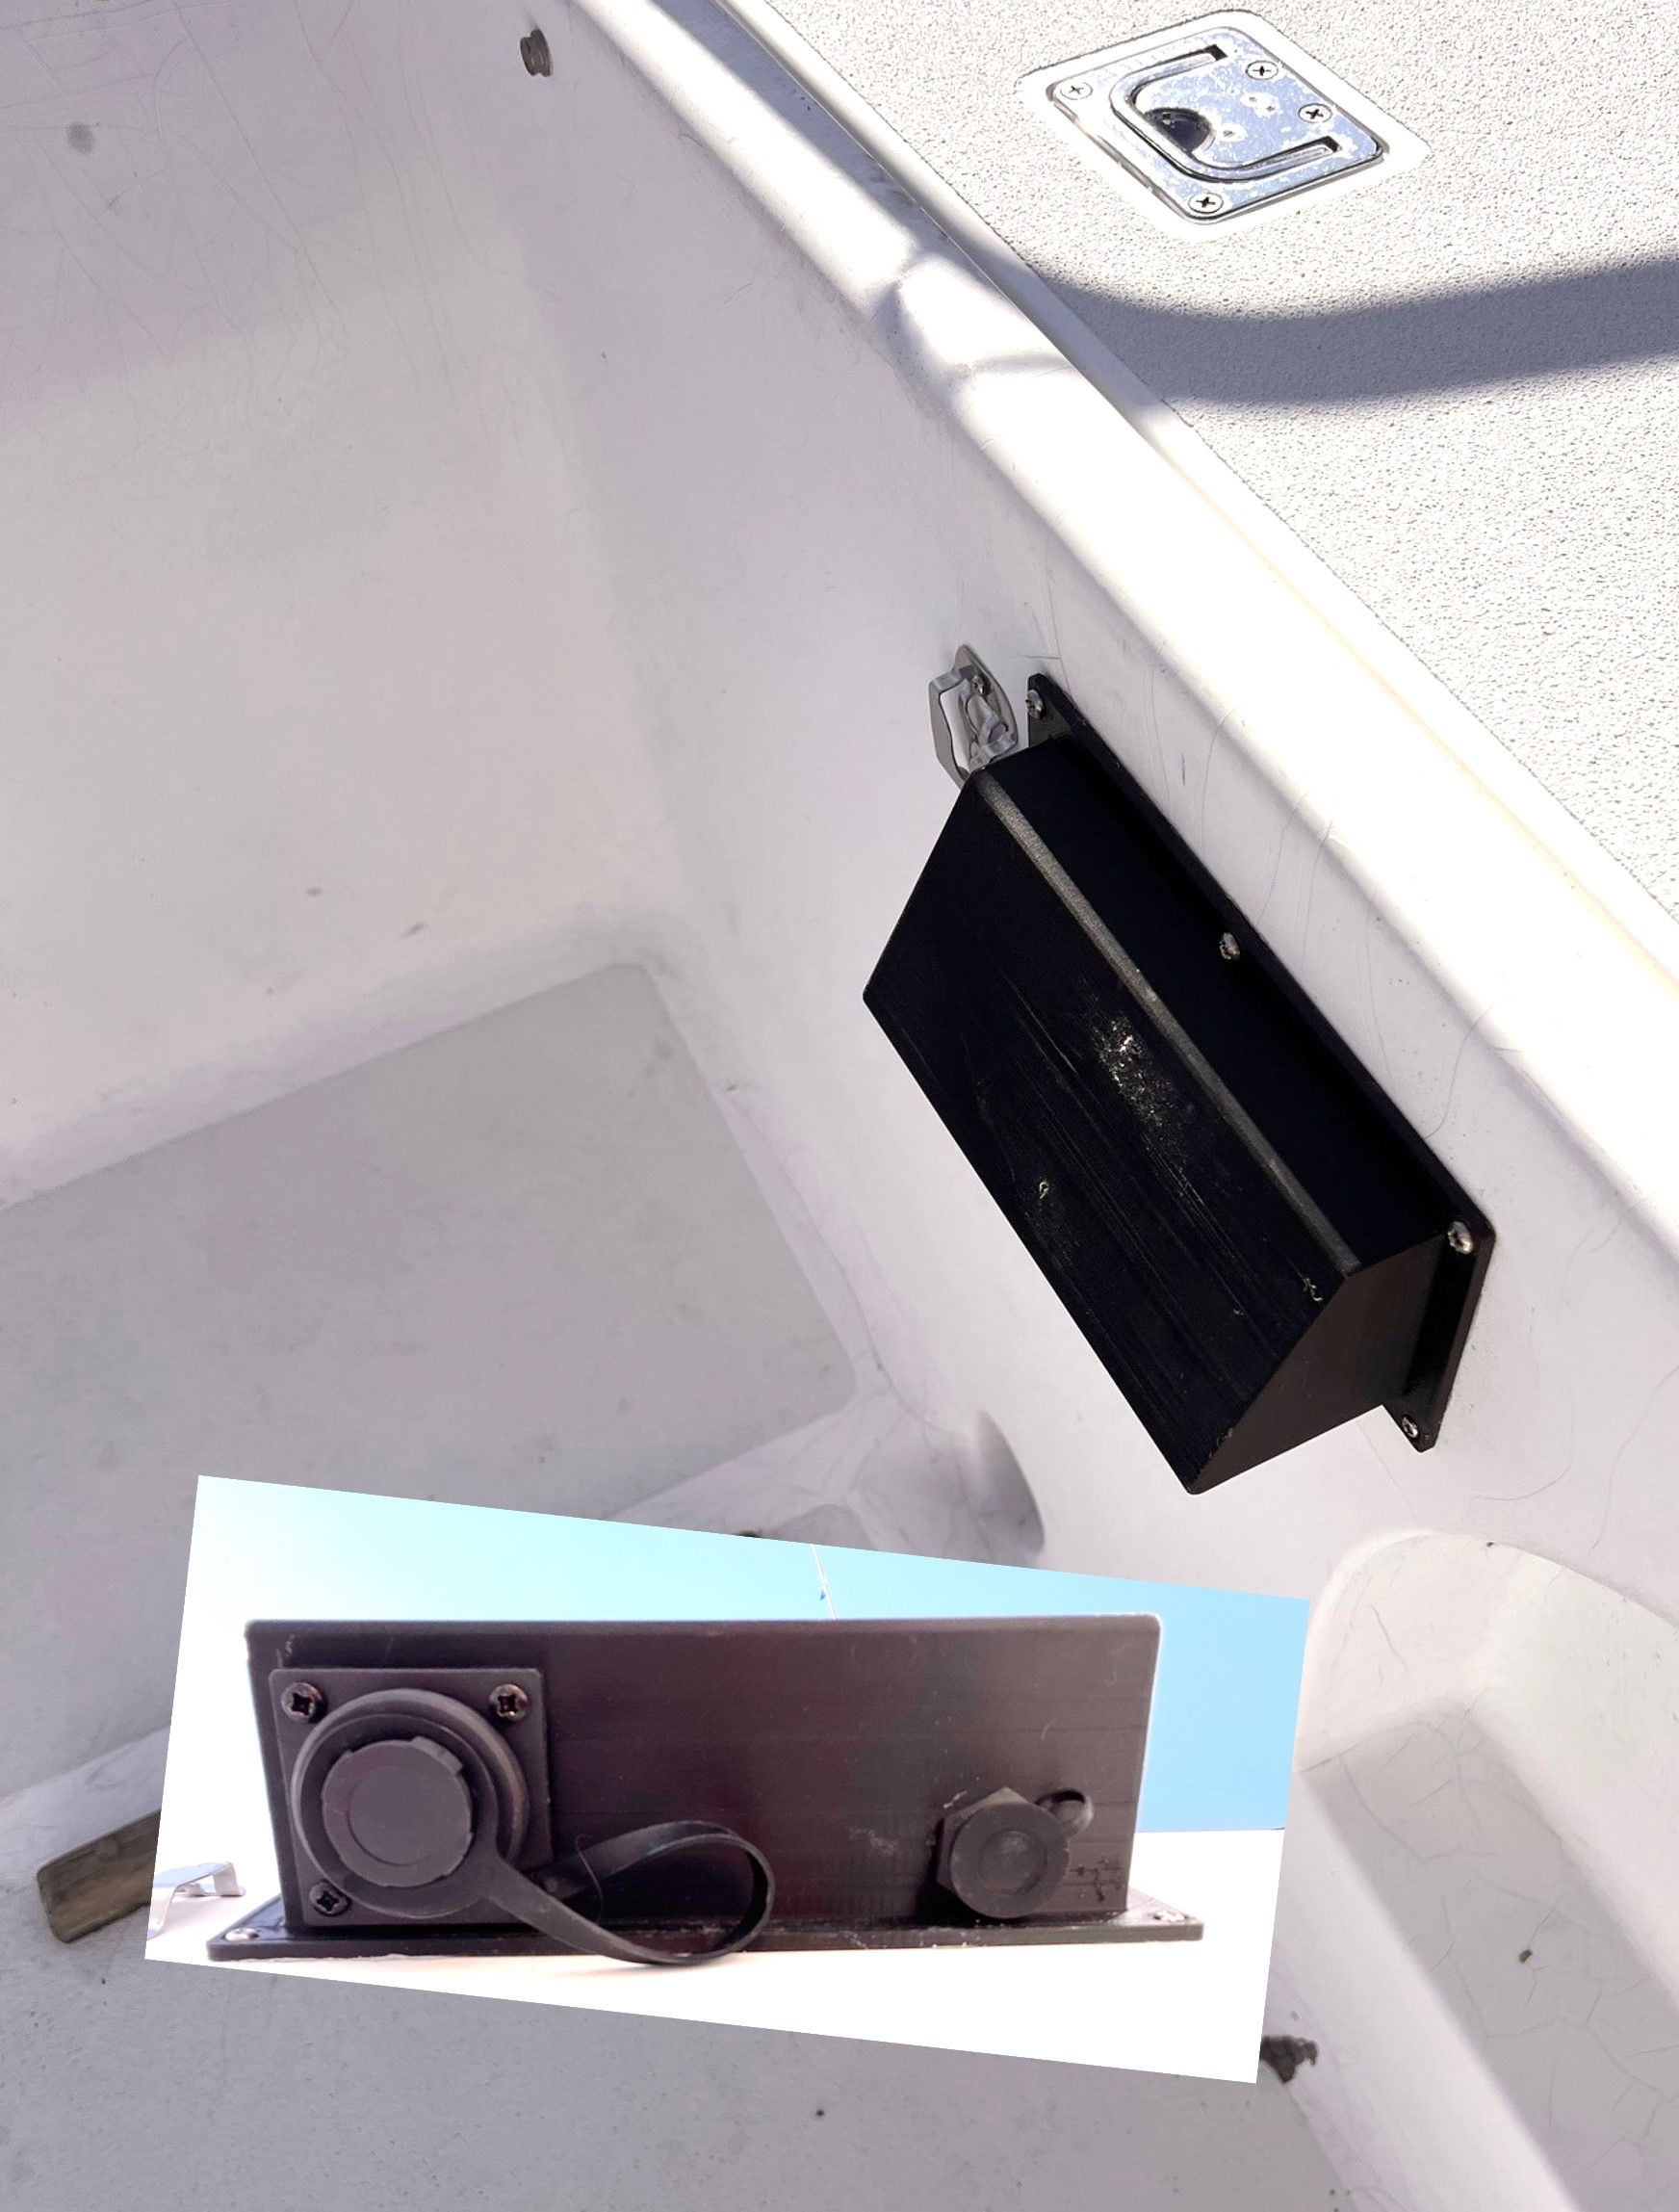
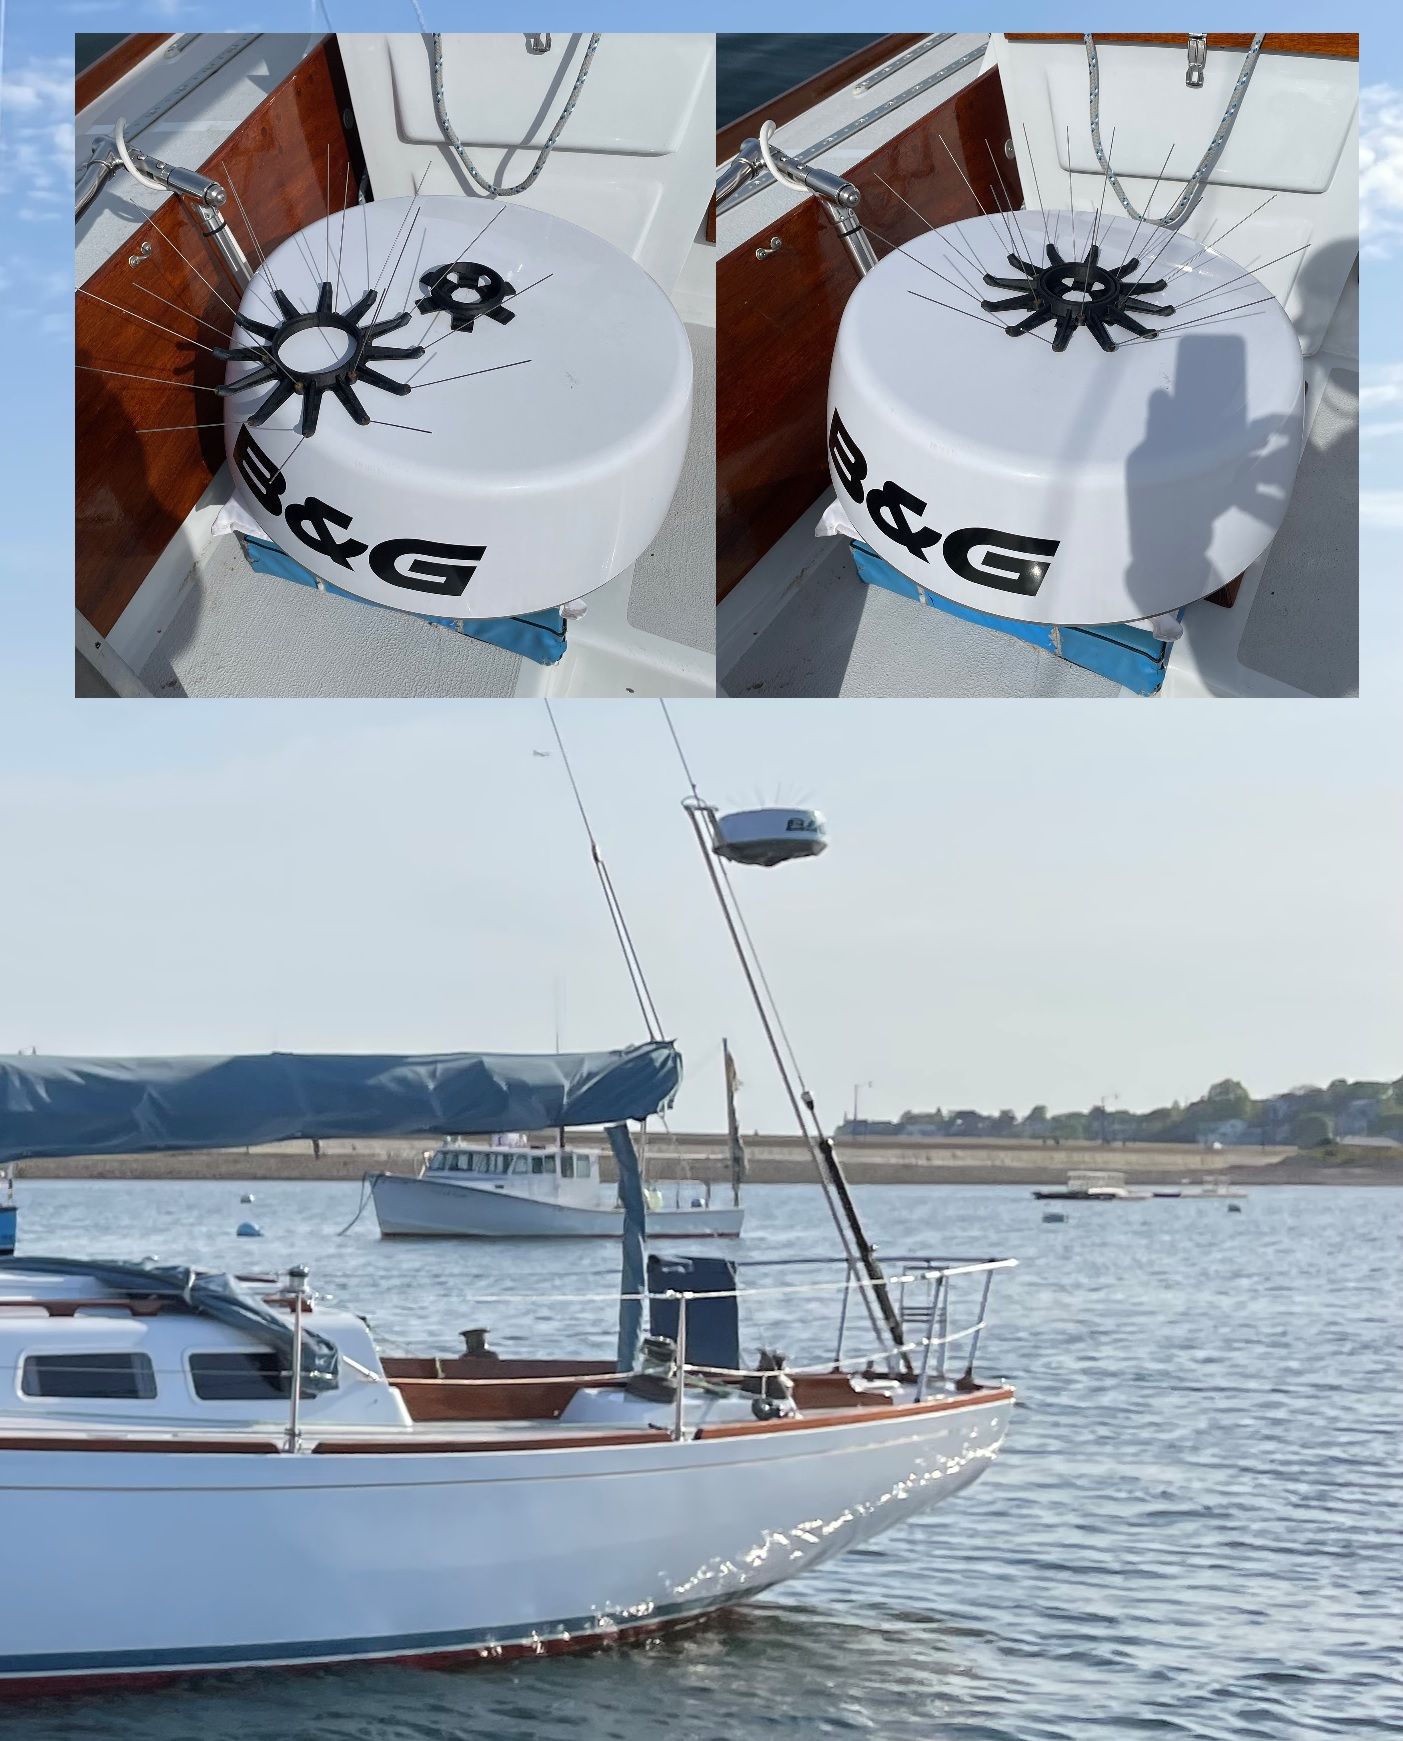
Another favorite is our radar antenna birdy deterrent. Our backstay-mounted radar antenna has proved to be a very popular place for cormorants to relax and digest fish. I wanted a little crown of spikes to discourage this activity, but I didn’t want to drill holes in the antenna dome that would inevitably leak or propagate cracks. I also wanted the crown to be removable to save the fingers and eyeballs of the boatyard guys who take the antenna down for winter storage every fall. The result was a threaded base that is stuck to the antenna dome with 3m VHB double-sided tape (amazing stuff) and a spiked “crown” part that screws on and off the base.
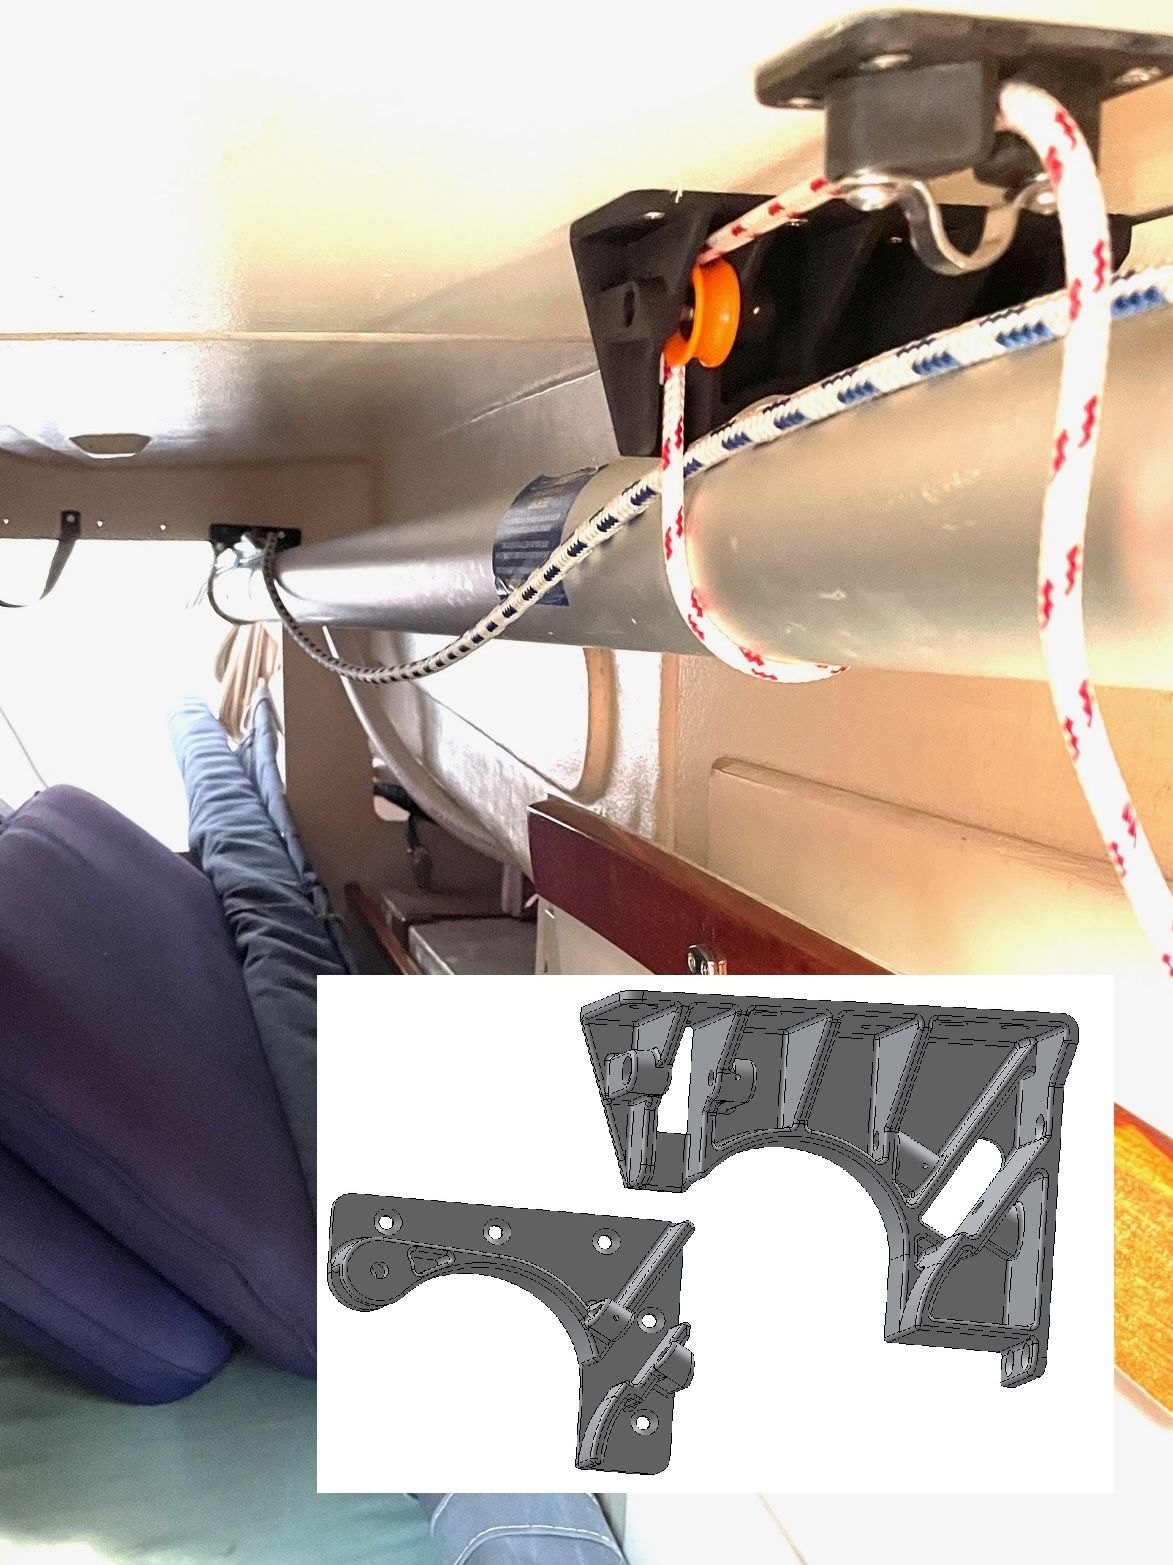
Whisker Pole Storage Brackets
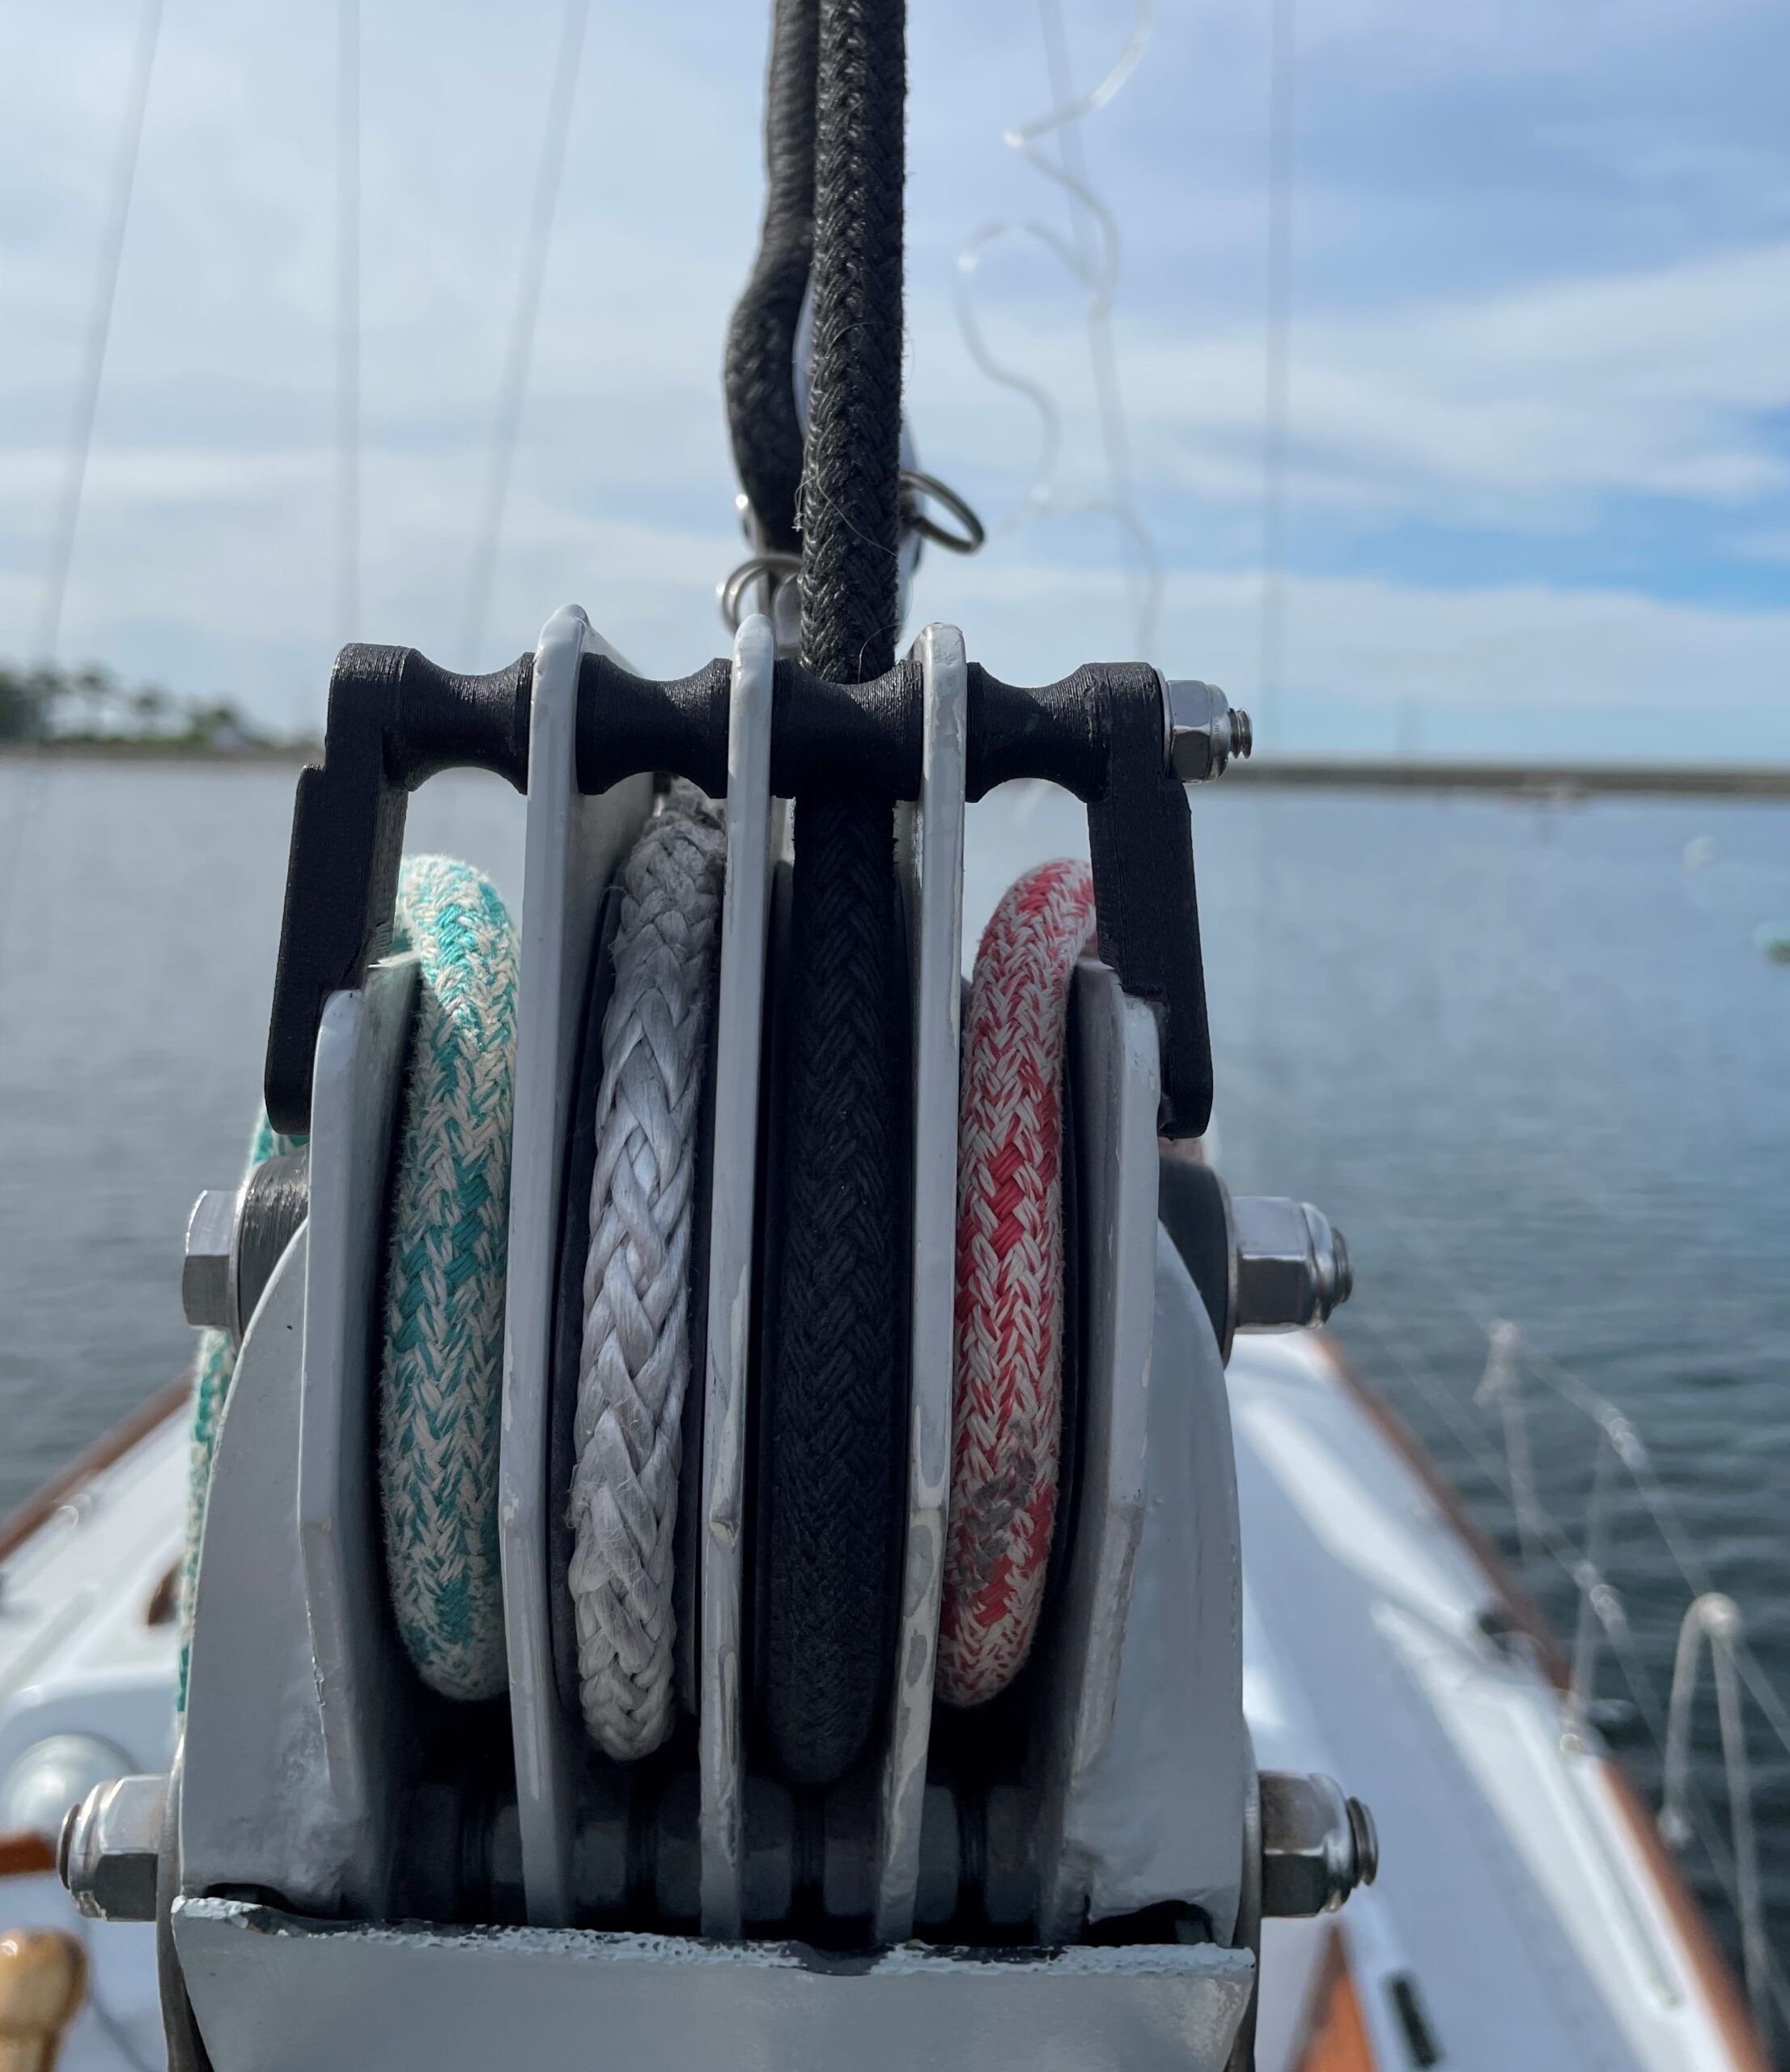
We have a 12-foot whisker pole that was proving difficult to store. We don’t use it enough to justify storing it on deck, and the only out-of-the-way space long enough to store it below was through the starboard quarter berth and into the aft lazarette, using the full length of both spaces. In order to keep the quarter berth usable, and keep the pole from banging around while underway, the pole had to be held tight against the top of the entrance to the quarter berth and the opening to the lazarette. A pair of brackets that conform to the pole and include a cinching line with pulleys and a cam cleat ended up fitting the requirements.
Single-Use Tools
3D printed single-use tools have proven especially useful. Things like drill guides for mounting hardware in awkward or oddly angles spaces, and a knuckle saving tool I made for aligning a screw, washer and part on a particularly inaccessible part of the engine that I could never have gotten my hand into saved a lot of grief.
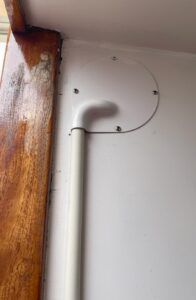
The list of 3D printed parts that have found a home on Misirlou is too long to cover in detail. By far the most common usage are mundane items like shims, mounting blocks, and brackets for getting things that don’t line-up properly into the right place. Think cabinet latches, water filter holders, line and electrical cable organizers and the like. I am guessing some of our readers are already 3D printing boat parts. Let us know what you are making in the comments!
Places Not to Use 3D Printed Boat Parts
My basic rule of thumb is I don’t use printed parts for anything that holds the rig up or keeps water out of the boat. The FDM printing process is prone to unseen voids and flaws, and any part whose breakage could injure a person or damage the boat in a significant way is off limits in my book. The temptation to replicate highly loaded running rigging blocks and cleats to save a few bucks is real, but quality marine hardware companies have a team of engineers designing and testing their products to assure safety.
A word on aesthetics. Most of the 3D printed parts on our boat are tucked away in places where they are not seen. Part of the reason for this is my dislike of clutter. The other reason is because my preferred material, PETG-CF is jet black and stands out like an ugly sore thumb against our white cockpit and deck. White (actually off-white) ASA would be a better choice for visible components. Of course, printer filament is available in a huge variety of bright colors, if you’re into that, though I personally wouldn’t want to look like Barbie’s Dream Sailboat.
Conclusion
3D printing for sailboat projects has gotten easier and cheaper, and is now well within the reach of the average do-it-yourselfer. The biggest barrier to entry is learning CAD, but that too is getting easier. There are even a companies (Zoo Design Studio, and others) that let you describe the part you want to an AI agent and the agent will design the part for you.
I wonder if it will make banana cream pie?


Great post with great ideas.
Have you uploaded the templates to thingiverse.com?
Thanks, Carlos
Great article, Tom! Thorough, detailed, and enjoyable to read. I appreciated the photos of finished products. You definitely whet my appetite to try 3D printing.
I tried uploading some files to makerworld.com but ran into some sort of glitch. I’ll give it another try and maybe try thingiverse also/instead and post a link in the comments. Any part in particular you would like?
Great article. Although I don’t have a 3D printer or great CAD skills, I know people who do!
Are any of these printers suitable to keep on a cruising sailboat?
I’m thinking resistance to salt environment, banging into weather, ability to work on a boat at anchor…
None that I have seen up close could be considered suitable for a marine environment. Most printers are delicate precision instruments. I doubt the lead screws that move the head around are stainless steel and any rust would bring things to a crashing halt. Electronics are mostly open PC boards with no enclosure. That said, YouTuber Mads on SailLife keeps one on his boat.
Thanks for such an interesting and educational article.
Oh, and a couple of questions: where could I go for information on breaking strengths of the materials, compared to each other and alternative materials? How do the different materials, esp., ASA, PETG, and PETG-CF, do with different adhesives?
For example, one thing it interests me to consider printing might be toggles for soft shackles, instead of wood dowel or metal rod as has been suggested elsewhere in PS.
Another is the bases and holders for various textile blocks, also suggested elsewhere in PS.
In both cases, are there places to go for information that’d help decide how thick to print a replacement part. If I was trying to replace, say, a 0.125″ 316 stainless pin, what diameter would I need to print using the different available materials?
I forget the YouTube channel, but some in the “maker” world did an excellent and exhaustive series of strength tests on various materials. If I recall correctly, the orientation of the printed part made a big difference: vertical parts where layer-to-layer strength is loaded were weaker than horizontal parts, and none of the materials were as strong as their injection molded equivalents. I’m sure you could find the video if you searched “3D printed material strength” or some variation.
I would note that a soft shackle toggle and a replacement for a clevis pin are both what I would consider highly loaded parts, and not great candidates for 3D printing in my book. Please proceed cautiously.
Nice articles, gave me a few ideas. Seems like there is a lack of a good index or repository for boat related 3d models. There are a lot of things out there but as always finding the good stuff is the tough bit. Yeggi and the likes help, but it’s frustrating spending time on a thing and then find out someone already made one.
I share on makerworld under MatF but my needs feel so odd that I’m surprised when someone else ends up printing my stuff. So much so that much of what I do I don’t bother uploading.
Fusion’s parametric design does allow to design something that could be a one-of and that can end up being useful to others.
I print mostly custom openplotter/RPI building bits but I’ve had success with shims in “white” ASA to mount things on the mast and a maretron wind instrument bracket for the mast head I should publish this one now that it survived a summer… Everything that I didn’t design like an idiot is still in place. You do need to spend a bit of time thinking about print orientation when designing something to get the strength in the right places.
I’m not sure I’ll be bold enough to print a long discontinued version of my whisker pole mast mount. The specs on nylon CF seem to be enough if done right,