


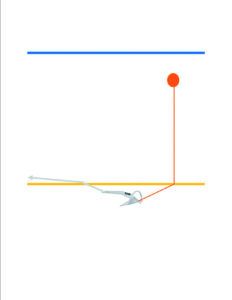
An anchor trip line is a stout line connected from the after end of the anchor fluke to a marker buoy so that the anchor can later be retrieved. The length of the line is adjusted to be straight up and down at high tide level so that the float marks the approximate position of the anchor.
If the anchor snags on a rock or harbor debris, you have a fair chance of pulling it out backwards by hauling on the trip line. Additionally, others can see where you anchor is, estimate how much rode you have out, and stay clear of your rode and berth. In some areas a marker is considered a courtesy. In others, you risk vilification for taking up too much space and creating a fouling hazard for boats passing by. How do we decide whether a anchor buoy is worth the trouble?
First, let’s make it clear that this is a rare practice in most anchorages where cruisers frequent. The risk of serious anchor fouling in most popular anchorages in the United States is remote. Probably the biggest risk any cruiser will face is in big cities and urban areas where junk litters the bottom. The one time my anchor fouled in a popular anchorage it hooked on a shopping cart. The risk of hanging up on bottom trash will increase in areas that have recently suffered a hurricane or severe flooding event. Flooded reservoirs also hold their share of surprises.
TRIP LINE DOWNSIDES
There are downsides. Another boat could snag your float, trip your anchor and tangle the two of you together. In slack wind or places with reversing tidal currents, you might float up over the buoy and snag it on your prop or rudder. Some worry that some idiot will tie to it, thinking it is a mooring ball, but this is not likely unless you paint it to look like one. Some sailors argue that using a trip line reduces the number of boats that can fit into a crowded harbor.
There are times, however, when it’s a good idea. You suspect the bottom is foul and it’s too deep, cold, or risky to dive down and free the anchor. It’s a remote area, so the risk of fouling another boat or monopolizing space is moot. Or perhaps you are just learning to set two anchors in a V and could use a visual reference (see “Doubling Up: Full-size Tandem Anchoring,” PS September 2016.)
 Sometimes the anchor you retrieve is permanently damaged. We explored the consequences of a jammed anchor in our in-depth report on anchor shank strength. The report explored the weak links in various types of anchors (see PS April 2013). Commonly, the anchor shank bends under extreme loads, rendering the anchor useless.
1. This deeply buried Rocna anchor bent under side loads.
We’ve used all of these methods. When testing anchors in brown water areas we often rig floats to make it easier to dive on anchors to investigate. We use them in areas littered with submerged trees, and they’ve saved a scary swim a few times. (Free diving around submerged trees and branches in a strong tide is a good way to get trapped and drown.) Rocky areas with tilted slabs are notorious for grabbing anchors. Let’s look at the pluses and minuses of using a trip line, and what works and what doesn’t.

RISK OF ENTANGLEMENT
Eventually, you will drift over your buoy. Late arrivals will run over it. Someone will swing over it. Like a crab pot marker, most of the time it will slide by, but sometimes it’s going to catch on the rudder, prop, or keel.
A break-away “fuse” link between the float and trip line can help resolve keel and rudder snags, but the link must be strong enough handle the expected loads before connecting the trip line to your boat for retrieval. About a foot of 40-pound-test fishing line can work. This won’t help with a turning prop, which will started reeling in the “fuse.” And there is always the chance that the fuse won’t break, and the prop (possibly your own) will suck up the retrieval line. Next thing you know, you are dragging across the anchorage with a fouled prop.
Another option is that the floating line can end 5-8 feet below the surface. Entanglement is prevented, and though the line does not reach the surface, but in warm clear waters you can swim down and clip on an extension for retrieval.
When using the sub-surface approach, some skip the float and just use a floating polypropylene line, but if there is any current, it usually pulls the line to the bottom. We’ve tested this and just 0.2 knots will pull polypropylene line close to the bottom.
Obviously, the float used for this sub-surface approach must not have so much buoyancy that it will pull up the anchor. Small net floats will typically have less than 1/2–pound flotation and come in bright colors.
For retrieval, you’ll need to go for a swim, so the water must be clear, the conditions safe, and you’ll want to have a wet suit or dry suit if the water temperature is chilly. This no float approach might be good idea for potential snag areas with clear water and regular boat traffic
HOW BIG A FLOAT?
If the float is too small, you increase the chance another boater will snag it. It should not look like local lobster pot, crab pot marker, or trot line marker. Don’t paint it like mooring ball (white with blue stripe) or pick-up float (often white with red stripe), or someone might tie to it. Labeling it “Anchor Trip Line” can’t hurt.
MARKING AN ANCHOR FOR LATER RECOVERY
One reason some people justify using a trip line is to mark the anchor’s location after they’ve cast off their rode to make a hasty departure. For example, if there’s a boat dragging down on you in a sudden squall. We don’t think this is a good reason to routinely use a trip line. If you find yourself in such a situation, you can just tie a big fender to the end of the rode when you cast it off.
HOW LONG A TRIP LINE?
Obviously, you need to be able to snag the trip line with a boat hook, pull it on deck, and attach an extension. The line must be the depth of the water at high tide, plus freeboard, plus some allowance for recovery angle (you may not be right over the anchor). And you must allow for a working length on deck.
If the anchor buries deeply in soft mud or pulls under an obstruction, it will be pulled down, requiring a additional 5 to 10 feet. Assuming 6 feet of tide, you probably need 15-20 feet of excess line vs. low tide. If the water is 6 feet deep at low tide, that places the float 22 feet away from the anchor. In 20 feet if water the float will be 31 feet off station.
In the above scenario, the marker may be closer to your boat, blown by the wind—a good thing. But if there is tide, it is just as likely to be farther away, suggesting to any passerby that you have way too much scope out. In an isolated cove, the only places we have used tripping lines while cruising, these details don’t really matter. The trick is to avoid floating over the marker.
The trip line can be made to be self adjusting. Place a small block under the float and thread the tail of the trip line through it. Then tie a 4- to 8-ounce fishing weight to the end of the trip line. The weight will pull the tail down and keep the float nearly vertical over the anchor. The float must be large enough to support the weight, and a stopper knot will keep the trip line from pulling out back through the block.
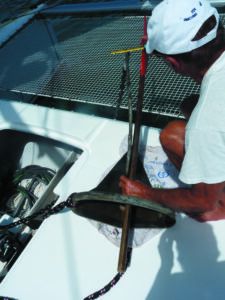
CHOOSING TRIP LINE MATERIAL
Polyester works well. There is no need for the trip line to float and polyester holds up far better than polypropylene. We like 3/16-inch (5 mm) Dyneema. It is more compact, runs well through the self adjusting block,—if that is your choice—and is strong enough to recover any anchor. It is harder to handle, but that’s what the extension is for, and you only need to break the anchor out, not haul it aboard. Of course, if it snags or winds up in a prop, it is that much harder to cut. Your call.
LIFTING CHAIN OR TREE BRANCH
Most of the times we have snagged, we were able to winch the obstruction to near the surface. Large limbs that drift over the anchor with the tide are our nemesis.
Tripping the Anchor. Often we can fish a dockline around the roll bar, slack the rode a few feet, and dump the limb. If the snag looked complicated, or if the anchor didn’t have a roll bar, we would take the extra time to attach the tripping line to the tripping eye instead of the roll bar; that way the anchor will turn upside down and drop the snag every time.
Saw. Sometimes there are just too many branches to get a clean drop, and cutting a few away is simpler. A hacksaw works. A wood saw or onehand pruning saw works better, and both have other uses on a cruising boat.
AVOID CABLES AREAS
In principle the cable is deeply buried in the mud, but cruisers have hooked them. These areas are easily identified by signs on shore, markings on maps, and the obvious lack of anchored boats. If you pull up a cable, and we know people who have, put the anchor back down and cut the rode. It’s an expensive lesson to learn the hard way.
CONCLUSIONS
We very seldom rig an anchor marker or trip line. When we do, we keep it simple but strong, knowing there is little chance we will actually use it, but knowing that when we need it, half measures won’t do. A 3/16-inch Dyneema line of fixed length (12 feet) to a small float works for us, since we anchor in less than 8 feet of water 98 percent of the time. Simple. If we frequented deeper water we might try the self-adjusting type, but probably not, because we know we would very seldom use it and we like simplicity. Slide retrieval “descender” rings? When we really need a trip line, the rode always seems to be under a slab or surrounded by branches. We don’t want to fool with a less robust system.
We always keep snorkeling gear and clothing (wet suit or dry suit) appropriate to the water temperature on board for the full range of possibilities; a rope around the prop, bad weather, and MOB. Anything. We consider this basic boat gear.
But the usefulness of such equipment for retrieving an anchor depends on being an experienced free diver. Don’t dive on a fouled anchor unless you are experienced, fit, properly equipped, and have fully evaluated the situation; it can range from a pleasant dip in tropical waters to a dark nightmare with entrapment hazards.
Leaving the anchor for later pickup may be the smart move. You gave it a good effort and it’s stuck. A change in weather may dictate that it’s time to go, or perhaps it’s simply time to go home. If you think you may recover it later, tie a large fender to the end of the rode and let it go. But if it’s really fouled and you’re far from home, is it worth the money to hire a diver at the time to come back? Probably not. Pull the rode vertically, cut the chain with bolt cutters (another essential piece of gear), and use your kedge until you can buy a replacement. It’s only an anchor, and the shackle and first 10-20 feet of rode were probably worn anyway. Better than a dangerous dive.


I’ve created and have been using a “hidden trip line” as a full time cruiser who anchors most of the time in the PNW for 3 years now and am happy with this strategy. Here’s how it works-
Materials needed-
– Dyneema line (because it’s strong and floats) with eye splices on each end. I have two lengths, 30′ and 60′ that covers almost all of the depths I anticipate anchoring in.
– Two carabiners- large to attach to anchor, smaller to attach to chain
Deployment-
Step one- attach the large carabiner to the head of the anchor. Most anchors have a hole for a trip line or tandem anchoring. You can use the roll bar or cross bar or drill a hole if needed.
Step two- attach the dyneema line to the anchor-side carabiner that is 5 feet or more longer than the depth at high tide. You don’t want it too long so the bight floats high enough to get snagged by passing boaters. My 30′ line gets the most use.
Step three- Attach the smaller carabiner to the other end.
Step four- drop anchor/chain, paying out the line at the same time and stop to attach the boat-side end a couple of feet short of the length of the line. For my 30′ line I stop when the 30′ marker reaches the windlass and attach at 27′ or so.
Step five- deploy the rest of the rode and set as normal.
And that’s it. Takes longer to explain than to actually do it. The “hidden trip line” will float above the chain and anchor and I have yet to see it get fouled under normal conditions.
Raising Anchor-
Raise as normal and stop when the boat-side carabiner reaches the roller and detach. Continue raising as normal. You may need to unwind the line from the chain as the anchor spins to untwist on the way up. When the anchor is home the hidden trip line makes a handy safety line to secure the anchor while under way.
Using the hidden trip line-
If the anchor is stuck simply unhook the boat-side carabiner, attach a strong line, and use a halyard, the windlass, a winch, cleat and motor, or any other method to raise the anchor as you would with any trip line.
The only limitation of the hidden trip line that I can think of is that if the anchor rode itself is fouled you may not be able to reach the boat-side carabiner. This happened to me once so far, and I spent a couple of hours to finally raise and unhook my anchor and unwrap my chain from a huge fisherman’s anchor that looked like it had been abandoned 100 years ago.
Other than that, this strategy is easy to deploy and doesn’t interfere with other boats attempting to anchor nearby, a common reason for not using a bouyed trip line. While you can attach a full length trip line to the rode leading back to the boat, I don’t know anyone who has actually done that and resist doing so myself because of the hassle factor. Here in the PNW with all the logging. fishing and crabbing that creates pervasive risks of fouling our anchor, I’ve found an easy to deploy trip line to be a necessity, which after all, is the “mother of invention,” right? Happy anchoring folks.
I use a trip line in most places where I anchor as the areas have a history of abandoned nets and ‘stuff’. One morning when I got up I couldn’t see my anchor bouy, after some concern that it may have snagged the rudder or prop the tide changed and it appeared from under the swim grid and all was well. I didn’t like that feeling at all. You have come up with perfect solution which I will be using next time I’m at anchor.
Thank you for sharing.
That is very much how an in-line tandem recovery line is deployed. In-line tandems can be very difficult to recover, even when not fouled, if one is still on the bottom when the other reaches the rollers; the force from the second anchor, often from the side, keeps it from coming aboard straight. I’ve never had one snag.