

DIY Hatch Covers
The hatch cover project you reported on in the March 2016 review of the Outland Hatch Covers offered a right nifty approach to making your own covers. Could we see more details on the cover backside and buttons? Also, how did you keep the holesaw from dancing around without the center bit to pilot off of?
David and Sandra Brunk
Via www.practical-sailor.com
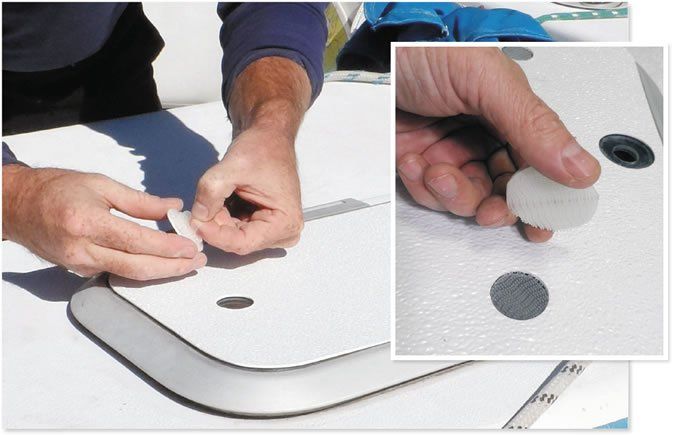
There is nothing on the backside of the hatch cover, but the backside of the button is completely covered with Scotch Extreme re-closeable fastener tape (also known as 3M Dual Lock; see related article in this issue). This mates with the Velcro that is adhered to the hatchs lens. The accompanying photos (right) show this in detail.
To steady the holesaw when not using the center bit, we suggest using it with a drill press. If a drill press is not available, simply cut the buttons out as squares rather than circles, and then, round them using a hand grinder; it should go very quickly.
Hatch Covers and Hubs
I wanted to offer a few field reports. First: I have had Outland Hatch Cover covers (see PS, March 2016 online) on my hatches for a year and a half, and they work great. The only problem has been remembering to remove them from the outer hull hatches of my trimaran while sailing, because going through waves eventually destroys them. The buttons have never failed.
Secondly, another idea that I have found useful is using a non-contact infrared, digital thermometer (Harbor Freight, $40) to check trailer-wheel hubs for overheating. I start with a baseline temperature reading when I leave for a trip, and monitor intermittently; all you have to do is aim the thermometer at the hub.
David Lannik
Ariella, Corsair Dash 750 Mk ll
Norfolk, Va.
Synthetic teak
If you are looking to replace real teak with synthetic teak (see PS, December 2015 online), one factor to strongly consider is the thickness of the synthetic products you are comparing. You may find the synthetic teak too thin compared to the original teak and that may cause problems. For example, a few years ago, I considered replacing the original teak on my Tayana 42 cockpit seats and had a dealer come look at the area with sample material. The original teak was much thicker and also structured around the edges of the lazarette, which he was not too thrilled about tackling. Additionally, the original thickness allowed water on the seats to drain from the cockpit through the drain holes; the synthetic material would not allow this as it was too thin.
Mike Hirko
Destiny, Tayana Vancouver 42
Gig Harbor, Wash.
Louvers Are Not Steps
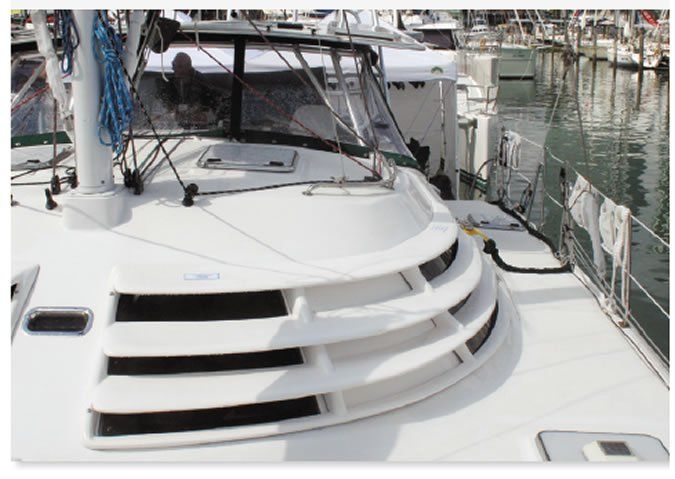
On page 21 of the February 2016 issue, picture No. 2 shows a Manta 42 catamaran and its louvered ports (see below photo); the caption describes them as easy steps to the mast. These louvers are not steps. I own a Manta 42 (hull No. 82), and if you step on my louvers, it will get very expensive for you very quickly. If you break them, new ones would have to be custom built because they are no longer available-so please do not step on the louvers; they will break.
There are steps located at the aft end of the louvers on both sides of the cabintop. Also, there is plenty of room on the cabintop to work on either side of the mast or to get on the hard cover over the cockpit. The picture is deceiving because of its vantage point.
Bill White
Irish Gift II, Manta 42
Via email
Ooops. Our spritely editor, upon the advice of a broker showing the boat at the Miami Boat Show, stepped all over them-but then again, he is built just like a kobold.
More DIY Passerelles
This is in response to your article Art of the Passerelle in the February 2016 issue of Practical Sailor and your request for readers own passerelle designs.
Because we cruise on our boat-a Bristol 43-3 currently in Copenhagen but headed to the Mediterranean this fall-we developed an arrangement that can be easily attached to a simple, locally procured wooden plank, so all we have to carry with us is the pipe fittings. The accompanying photographs show the assembled unit and the pipe fittings required for the mounting. It is not elegant, but it is practical and works well. The passerelle and its mounting comprise the following components, all of which can be purchased for under $100:
In the accompanying pictures, the plank is made from white oak and is much fancier than it needs to be; a simple wooden plank with transverse cleats would do as well.
Two substantial padeyes are bolted to the inside of the toerails; the holes in the padeyes are 1 inches in diameter and are aligned on an axis transverse to the boat centerline; the axis is above the top of the toerails.
A length of 1-inch, schedule 40 galvanized pipe (threaded on both ends) has a threaded tee (1 x 1 x 1 inch) on one end and a screw-on cap on the other. When the pipe is inserted through the padeyes and the end cap is screwed on, it is free to rotate but is restrained from moving laterally.
One end of the tee has a 1-inch, plastic male pipe fitting screwed into it, and the fitting is cut off flush.
A short length of -inch, schedule 40 galvanized pipe is screwed into a 1 inch by -inch bushing, which in turn is screwed into a galvanized pipe flange.The flange is attached by wood screws to one end of the plank.
When the -inch, galvanized pipe is inserted into the top of the tee, the plank is then attached to the bow so that it can rotate from side to side and at the same time can rotate vertically (the 1-inch pipe is a loose fit in the padeyes).
A lifting bridle with a spreader bar is attached two-thirds of the way down the plank and also attached to the spinnaker halyard.
We choose to go bow in when Med-moored for several reasons: Its easier as the boat does not back well; we have a dinghy in davits that takes up the whole of the stern; and we really appreciate the cockpit privacy with the stern away from the dock.
Charles Springett
Ariel, Bristol 43-3
Annapolis, Md.
Garmin Digital Charts
After quite a few years using a handheld Garmin GPSMap 76cX, I recently installed a Garmin GPSMAP 741 with radar on my boat. I find the Garmin software quite intuitive, and both units have performed pretty much flawlessly on bay daysails and exploring coastal islands in Maine. I like that the handheld uses the same micro SD card for charts as the fixed unit, so that it can operate as a backup to the fixed unit wherever I go. Moreover, I like that I can insert a Garmin topographical map card into the handheld unit for exploring the coast on foot when I arrive at my destination.
Last summer, I went on an extendedcruise to Nova Scotia and Newfoundland, so I purchased the Garmin g2 digital chart card for Eastern Canada (HXCA015R, August 2014 edition). I found the charts to be exceptionally complete. Although I had purchased over $500 worth of Canadian paper chartsfor the trip, it is difficult to anticipate fully all the harbor and other large scale charts that you might need. As far as I could tell,the card included a digitized version of every Canadian chart available for the area of my cruise, so we felt we could navigate safely, even if we did not have paper chart coverage of harbor details. (By the way, the Canadian paper charts are wonderful and, when folded in quarters, fit into readily available clear plastic envelopes, making it convenient to keep a paper chart in the cockpit.)
The Garmin charts also seemed to be properly referenced to the relevant charting datum. Although the cruising guides for this area note a number of places where there arediscrepancies between charted features and the readout one gets on a GPS, we found the charts to be accurate enough for safe navigation, even in fog.
However, the digital charts were not without their issues. The Garmin charts are vector charts composed from the Canadian paper charts, and Garmin has chosen to eliminatemost shore-based information that is on the originals.Thus, if you are attempting tocreate a routeto a particular small outport in Newfoundland, for example, you could find it very difficult to figure out where that outport is on the digital charts since neither its name nor features (like steeples) will appear. You would need to work from a paper chart that has those details and compare shore outlines or the like, or plug in the destinations lat/lon coordinates.
There is a similar issue relating to the layering of the digital information. While the names of most marine features-islands, bays, rivers, or capes-appear somewhere in the digital charts, they do not appear at all zoom levels, and there often does not seem to be any logic as to why Garmin selected the name of a particular feature to appear at zoomed-out levels. Thus, if you are navigating to a particular prominent cape that happens to have a small island nearby, you might only seethe name of the island.This can be very confusing.
These digital charts also share a layering issue with, I believe, most other vector digital chart products. If you are navigating to a destination that is, say, 30 miles away and zoom out so that you can see that destination on the screen, many of the details of hazards and buoysenroute disappear from the screen. If you zoom in to see those details, you lose the big picture of your destination or next waypoint. This issue makes it difficult to plan routes on the screen and, particularly, to make route changes on the fly while underway. It is critical to safe navigation with digital charts that every stretch of a planned route be checked for hazards at a high zoom level and that the navigator regularly scan through the different zoomlevels while underway.
All these issues point to the continued desirability of using paper charts as an important part of your navigation plan.
Bill Wiegmann
Wanderer, Morris 34 yawl
Deer Isle, Maine
CORRECTIONS
The Imar product discussed in the January 2016 article on protecting clear vinyl was Imar 301 Strataglass Protective Cleaner.
The text of the March 2016 article on sizing snubbers gave an incorrect formula for calculating snubber diameter. The correct formula is: Snubber diameter = Displacement0.4 x 0.00832, where diameter is in inches and displacement is in pounds. Multiply this by 1.6 for catamarans to compensate for added windage. For two-leg bridles, multiply the final diameter by 70 percent. (One leg will occasionally carry the load, but this is offset by reduced yawing.) The data table was accurate, and the online text has been corrected.


