

“Yay! Another article about blackwater holding tanks!” Said no one ever. This is nobody’s favorite subject, but like it or not, responsible waste management is a part of boating and is here to stay. If you are just sitting down to read this with a sandwich on your lunch break, you may want to put this article aside until later. I’m sure there is a nice non-gross review of mop handles elsewhere in this publication.
For older boats, like our 1964 Cal 40, holding tanks were never even considered in the original design. “Newer” boats from the 1980s to the early 2000s have first generation holding tank systems that were more of an afterthought. They are not easy to use and struggle to keep odors under control. In my too many years of boat ownership I have installed three holding tank systems on my own boats and experienced the good, the bad, and the truly ugly on the boats of others, and I’ve formed some definite opinions on what works and what, well, stinks.
Some hard-won, and sometimes revolting, experiences along the way have informed our own holding tank system design that we have now been happy with for about nine seasons. In this article I will attempt to capture some of the experiences that led to this design and some of the lessons learned along the way. Hopefully some aspects of that experience will be helpful for anyone considering a holding tank upgrade.
Disasters at Sea, Holding Tank Edition
Since ancient times, old salts would retell cautionary yarns of disasters at sea so their shipmates might benefit from their experience. So, gather round shipmates as I share tales of that most feared of non-fatal mishaps, the dreaded blackwater holding tank disaster.
A Family Cruise Cut Short
Consider if you will the experience of a friend and his young family setting out for their first cruise in their new-to-them 1981 C&C 38. The first leg of their cruise was a pounding sail to windward in 35 kn of wind and four to six foot seas, but the young crew and the new boat handled it admirably and everyone went to bed that night feeling good about their first day’s passage. About two hours after hitting the sack, however, my friend’s wife woke him up saying something smelled bad. When they went to check on their six- and seven-year-old kids sleeping in the forward cabin they were greeted with an eye watering reek emanating from under the V-berth where the kids were sleeping.
After evacuating the crew to the cockpit, our brave skipper inspected the offending compartment and found a plastic welded fitting in the C&C original equipment polyethylene holding tank had broken free and dumped the entire contents of the tank into the bilge. Needless to say, the cruise was over. After a sleepless night huddling for warmth in the cockpit our young family turned tail and headed home to begin the weeks long process of cleaning and decontaminating the boat and replacing the holding tank.
What Did We Learn From This?
To begin with, let’s talk about tank material. In the case of our young family, the failed tank in question was a slab-sided, welded seam polyethylene (PE) fabrication. Given the age, I believe there is a good chance it was Low Density PE (LDPE) rather than the much stronger High Density PE (HDPE) more commonly used today. Fabricated tanks have the advantage of being custom made to maximize the volumetric efficiency of the space available. However, in my experience (and I’m sure I’ll see some rebuttals in the comments) fabricated LDPE/HDPE tanks are too fragile to hold anything dangerous (fuel) or obnoxious (blackwater waste).
Fitting breakout seems to be a common problem, not just with our young family, but on boating and RV forums, and in my own experience. While installing a fabricated HDPE tank on a previous boat I cracked a fitting connection to the sidewall of the tank while tightening. Yes, I overtightened the fitting (one should use Teflon tape and not tighten more than one turn past finger tight) but the material is so soft, it “felt like” it needed to be tightened further, and I suspect that new guy at the boatyard will have the same instinct. If you are a fan of Sampson Boat Co. on YouTube (aka The Tally Ho Project) you should watch the episode titled Diesel Tank Disaster before ordering a welded plastic tank for any application.
Best Holding Tank Material: Rotomolded HDPE
For my way of thinking, there is only one material for blackwater holding tanks, and it is rotomolded HDPE. They are tough, odor free, seamless and won’t crack under negative pressure during pump-out if bugs have made a nest in your tank vent. You will have to live with the shapes available, but a multitude of shapes from many manufacturers will cover most applications.
Plumbing and Tie-Downs
In the case of our young family’s aborted cruise, the tank shifting in pounding, heavy seas likely put stress on the spin-welded fitting on the sidewall of the tank, causing it to fail. This highlights two important aspects of holding tank installation.

Fixing the Tank in Place
First, the tank should be chocked, strapped or otherwise fixed in place so it cannot move in rough weather. No one likes to think about it, but this includes inversion. Ninety-nine percent of us will never experience a rollover (hopefully) but I like to think if I did, the contents of the holding tank would not be painted across the overhead.
No Hard Corners
Second, connections to the tank should not put bending loads on the tank fittings. If you are using high quality sanitation hose (and you should be) it is very stiff, and if you had to wrestle a hose to get it to meet the fitting, all that spring loaded force in the hose is trying to break the fitting off the tank. In a perfect world, all hoses would have straight runs with no more than gentle bends. In the real world where space is at a premium, it is better to use elbow fittings than a tight hose bend that loads up the fittings, though this is a compromise since fewer hose connections is better.
Rigid PVC Pipe
Another controversial topic is the use of rigid PVC pipe as part of the holding tank plumbing. If there is any movement at all in the system plumbing it will put even greater loads on fittings than stiff hose, and if you live in a cold climate like I do, any residual liquid in the pipes could freeze and crack the pipe. I do have some PVC in my system, but it is self-draining, soft mounted (hose at each end) and never, never below the waterline.
Anti-Gravity, Disaster in the Caribbean
A popular holding tank arrangement among Caribbean charter boats is the gravity drain system. In Tortola, for example, there are no pump-out facilities at the charter base in Road Town. Prior to returning their boats, charterers are instructed open the seacocks for each tank on the boat outside the harbor in the Drake Channel where the swift westward current whisks the effluent away from the British Virgin Islands toward, well, the U.S. Virgin Islands.
I am a big fan of the simplicity of the gravity drain arrangement, but it has a fatal flaw. Sediment settles to the bottom of the tank and the hose leading to the seacock. Since the bottom of the tank is only a foot or two above the waterline, the differential pressure between the tank and the ocean is very small, about 0.5 PSI (0.03 Bar) and occasionally not enough to push the sediment sludge out of the tank.
Overflowing Holding Tank
I had the misfortune to experience this phenomenon firsthand when some friends and I chartered a boat to race in the BVI Spring Regatta and Sailing Festival, a terrific event for anyone who loves sailing and racing in one of the most beautiful places on earth. Regrettably, on this occasion that beauty was marred by a gawdawful stench on certain points of sail. The discovery of a nasty brown streak emanating from the starboard holding tank vent told us the tank was overflowing, and exercising the seacock did nothing to drain the tank.
As the starboard head was next to the bunk I was using, my shipmates were quick to accuse me of single handedly clogging and overflowing the 60 liter tank in one day. (They are a bunch of jerks! But I still love them.) A more likely scenario was that the previous charter, or perhaps a series of previous charters, dutifully opened the seacock before returning the boat but a clog prevented draining.
Doing the Dirty Work
Unfortunately, the only way to unclog the tank was to go over the side with a toilet plunger and plunge the through-hull opening below the waterline, a task for which I was duly elected by the crew. (Again, JERKS!) The operation was a success, but no number of showers can wash away the memory of that jet of excrement rushing toward my facemask as I attempted to swim away at full speed.
The “Perfect” Holding Tank Design?
Perfect? Hardly, just as I am sure there is no perfect dental root canal procedure, I will attempt to describe what to me is the best version of a necessary thing I wish I didn’t have to think about. Everybody’s needs and cruising style are different, and this set-up is just what has worked well for us. Feel free to consider aspects of this system a la carte, rather than an integrated system, if it suits your needs.
Tank Design
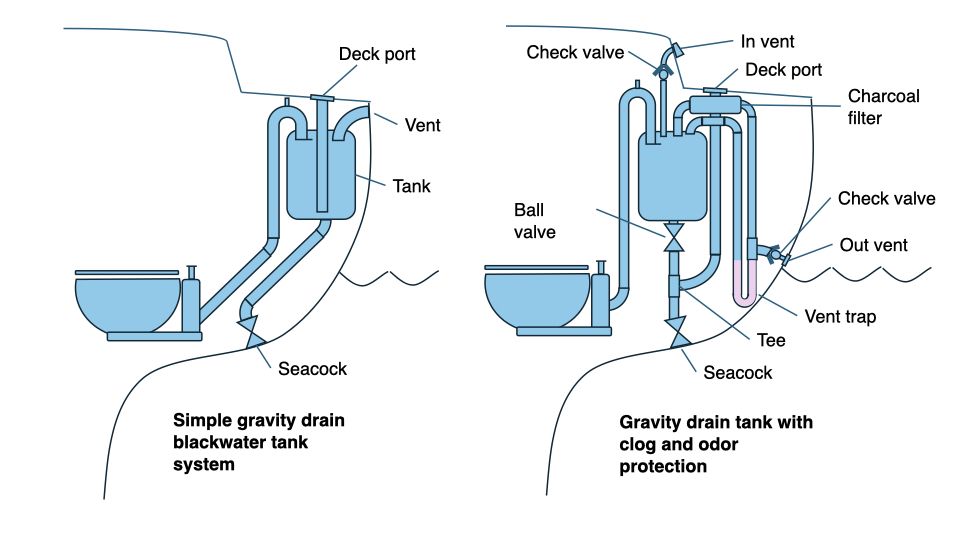
As I mentioned earlier, I am a big fan of the simplicity of the gravity drain holding tank arrangement common on the Jeanneau- and Beneteau-built charter boats in service in the Caribbean. In the accompanying illustration of a simple gravity drain arrangement you can see waste is pumped up through a vented loop into a tank mounted above the waterline. A vent at deck level allows air to move in and out of the tank and provides a path for overflow if the tank is over filled. A deck fitting and downtube allow the tank to be pumped out the conventional way, or, if you are offshore in an appropriate area, the seacock may be opened to drain the tank.
When making long passages offshore the seacock may be left open and discharge goes directly overboard. The best tank for this arrangement would be rotomolded HDPE with a funnel shaped bottom with a large (1-½ inch plus) outlet, and provision for vent and fill connections at the top. In 2016 when I built my system, no tanks of this type were available in the U.S., but I was able to have a 40-liter Nuova Rade Zefiro waste water tank shipped from France. (Side note, they also make a 60 liter version, which in hindsight would have been a better choice.) I now see that Vetus and perhaps others make rotomolded tanks designed for gravity drain that are available in the U.S.
Anti-Clog Valve Arrangement
Having vowed never to repeat my traumatizing in-the-water plunger experience, I chose to have two valves on the tank discharge line with the deck pump-out T-ed between them. To pump the tank out from the deck port, close the seacock and open the ball valve at the tank outlet. An added benefit is that unlike a tank where the pump-out tube enters from above where an inch or more effluvium remains in the bottom of the tank, the bottom drain completely empties the tank.
If a clog occurs, either at the bottom of the tank or upstream of the seacock, a toilet plunger mated with the waste port on deck breaks up the clog without the need for a swim and a round of antibiotics. To facilitate this, we made a special plunger that screws into the deck fitting. I made the threaded part on a 3D printer, but you could sacrifice a pump-out adaptor fitting for the same effect.

Venting
I strive for simplicity in all my boat systems, but this ain’t it. Hear me out, though, as each component has its purpose. The basic idea is three aspects of venting each have their own path: air-in, air-out and overflow liquid out.
Air In
Air is drawn into the tank when gravity draining at sea or pumping out at the dock. The vent scoop faces downward to keep the rain out and has a screen to keep insects from keeping house in this otherwise inviting space. The scoop is located on the side of the cabin house to keep it out of the water when heeled over, and since this location is also where the people are, a flapper type check valve (spring loaded check valves require too much pressure to open) keeps exiting air, and stink, from escaping.
Air Out
Air-out happens when the toilet is flushed and air is displaced from the tank. Our goal was to eliminate that little whiff we used to get every time someone flushes. Guests would smile politely, but you could tell from the crinkled-up noses, they smelled it too. Awkward. The first step was to put the air-out vent down by the waterline, away from folks in the cockpit. The second line of defense is a homemade activated charcoal filter. Together these out-vent features keep the cockpit smelling rosy.

Overflow Liquid Out
The third venting function is the one you hope you never need, but if you do, you’d better be prepared. We use a SCAD Solo tank monitor to keep track of the level in the tank, but if you have kids or grandkids, or even a particularly clueless adult on board, and they keep pumping when the tank is full, you need a place for the nasty stuff to go. If you eliminated the activated charcoal filter, the air-out vent and overflow could be the same hose. However, with the charcoal filter media being a porous sponge-like material, our thinking is it would immediately clog with solids in an overflow situation, potentially leading to over pressure and tank rupture. Eww.
Our solution is a separate direct path overboard for overflow with a dip in the hose that acts like the U-shaped trap pipe under a sink, which we fill with pink non-toxic antifreeze. This keeps exiting air going through the filter unless there is enough pressure to displace the pink stuff. The absence of pink in the clear hose is an indicator that the tank has overflowed. Both the filtered air and overflow line share the same through hull outlet at the waterline with another flapper check valve to allow free flow out but no water in.
Odor Killer
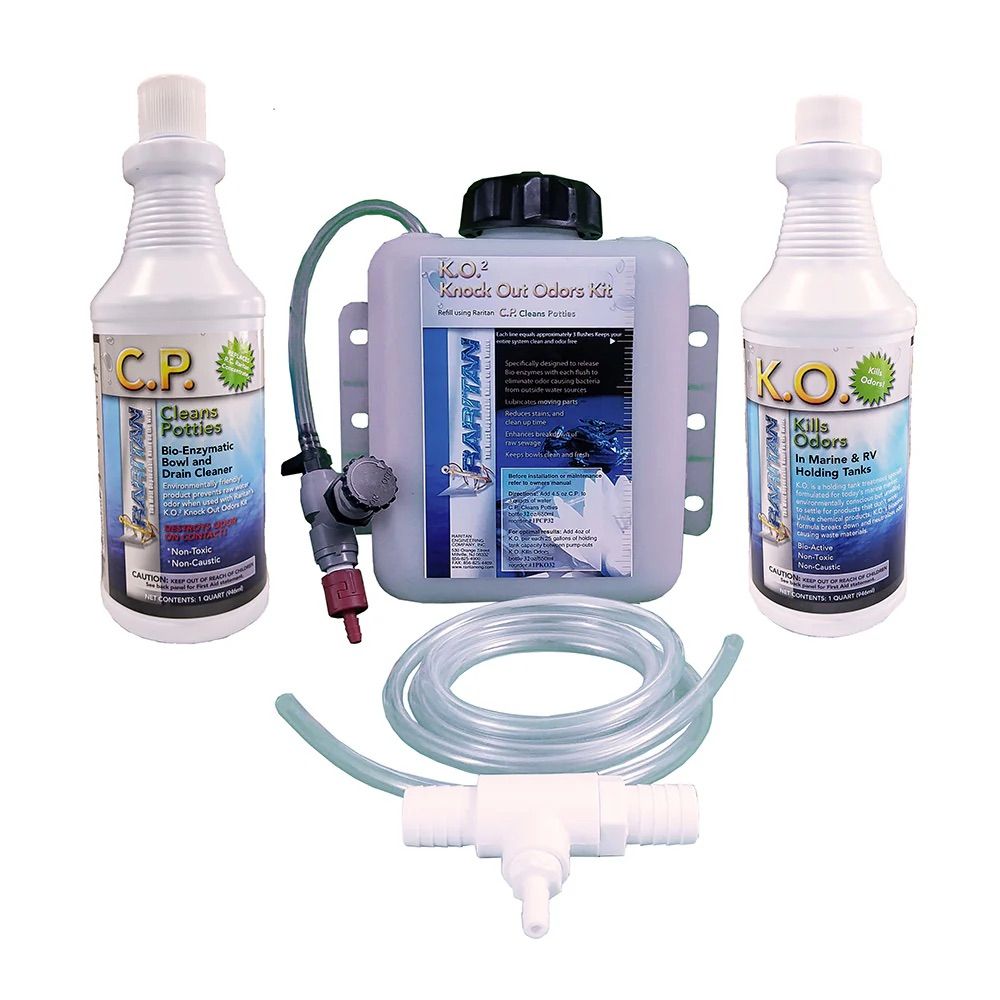
A final component of the system is a Raritan K.O.2 Knock Out Odors kit that puts a tiny amount of bio-active odor killer in the flush seawater inlet line with each flush. Flushing with fresh water will also fix this odor source, but we travel light, without much fresh water to spare. The small amount of bio-active treatment in the line also supports aerobic activity in the tank which further suppress odors. To understand this process there is no better source than Peggie Hall’s (the Head Mistress’) essential book “Get Rid of Boat Odors”—a must read for anyone considering a blackwater system upgrade.
Conclusion
I hope some aspect of my experience will help the reader in their quest for a perfect, err, I mean better holding tank system. I think it is safe to get back to your lunch now, and I didn’t even have to say “poop” once! (Until now.)


I have gravity fed discharge overboard but after the first time it clogged I went with an electric head and have never had another problem with it plugging.
Does the electric head still discharge into the gravity drain tank? I’m unclear how this would prevent clogging. Most electric heads just motorize the pumping action.
I had a 88 Pearson 27 with a macerator. I’m not sure if it was original or someone put in in. I loved it. When I was out to sea and wanted to drain the tank, I would use the macerator and it would pump the tank out. Even if you have a tank which would allow for gravity to drain the waste, the pump speeds up the process and helps get rid of sediment. Usually, if I was running the macerator I would get into the head and pump in saltwater like a mad man. This would reduce the sediment. I would finally add some kill odor. I would fill the tank with the kill odor fluid and pump a cup or two into the now empty tank. I just aquired a Sabre 38 MK II which doesn’t have a macerator and uses only gravity to empty into the ocean. Is there a reason I wouldn’t add a pump to really make sure the tank was empty?
It would depend how you plumbed the macerator. If you put the pump in the gravity discharge line between the tank and the seacock, it would no longer be a gravity drain system as the pump would block the discharge. I would also worry that the pump, being at the low point of the system, would load up with sediment and do bad things to the diaphragm. I don’t think the inside of the pump should be “wet” in its idle state. You could plumb the macerator pump so it sucks out of a down-tube from the top of the tank, essentially putting it in parallel with the gravity drain, but keeping the diaphragm dry. However this would leave you with no way to clear clogs in the gravity side (other than the disgusting swim of death) and down-tube discharge always leaves an inch or so of liquid in the tank. For my money, once you have a way to clear the occasional clog, the gravity system is pretty foolproof.
Two vents, port and starboard. Big, say at least 5/8″. No need for screens. This allows air flow either way, depending on wind pressure. Totally passive, just be sure there are not loops and water traps in hose. This keeps enough oxygen in the tank to eliminate, or reduce, the anaerobic decay – which causes the smell. Aerobic decay is not so smelly. Worked for us for decades. Also, used macerator pump out at sea. Worked fine and kept tank low in boat. Next boat may have a composting head to eliminate all the space lost to tanks, plumbing, pumps, three thru-hulls.
I was hoping someone would bring up composting toilets. They may well be the future, but I have zero experience with them. YouTubers Acorn to Arabella felt the need to install a powered vent fan in the head to deal with odors from their composting bog. I’d be interested to hear people’s experience with them. You are absolutely correct about keeping air moving through the tank to promote aerobic decay. I worried that the flapper-check-valves in my system would shut down airflow, but rocking motion seems to keep enough air moving to keep the microbes happy.
There are now five or more composting heads on boats in our small yacht club. I asked one owner of his assessment after a few years. I summarize: If you like older British sports cars with manual shift, you’ll be fine with a composting head. If you like modern German cars with paddle shifters, not so much.
Composting heads require a vent to deck. Most have installed solar vent fans, or 12v computer pancake fans, to assist the aerobic composting.