If you own an older sailboat, you’ve most likely had the dubious joy of working on the bottom. Perhaps multiple coats of bottom paint have started to peel and need attention. Or damage to the keel due to an inadvertent grounding. Or possibly the big one—blister repair. If you’re really unlucky, all three need attention. After all, it is an old boat.
When I hauled out Natasha, our 1978 Islander Bahama 30, for engine replacement, I thought it would be a good time to address the hull below the water line at the same time. Blisters were apparent through a very rough bottom paint. Years of adding hard (and abrading) bottom paints had started to peel in spots. The old paint would have to be peeled off and the blisters repaired. However, I’m not in my 30s anymore and was never a weightlifter. Holding heavy tools over my head to repair the gelcoat was not something that was going to happen! Boat yard prices were well beyond my boat budget. I had to come up with a better idea.
ORBITAL SANDER WEIGHT SUPPORT
An inventory of available weaponry showed a Makita 4-in. grinder, a Milwaukee 4-in. belt sander and a Bosch 6-in. orbital sander. I suspected the grinder and belt sander would rapidly remove more material than I wanted. There was potential for leaving surface damage. The lighter Bosch had speed control, would be less aggressive and, although slower, would leave a better finish. The Bosch would be the tool of choice, working from 60 to 120 grit paper. However, even the lighter Bosch was more than I could hold over my head hour after hour. It’s amazing how much area is involved in a 30 ft hull!

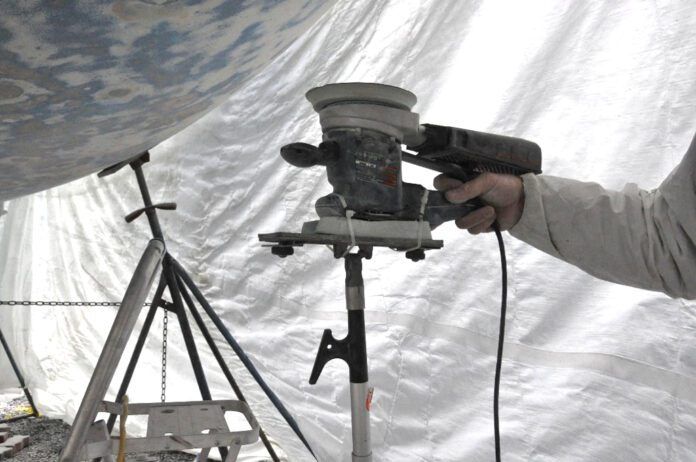
The requirement was quite simple, a method of supporting the weight of the sander without using my own strength. A little thought and a list of equipment included a 3-ft. expandable boat hook pole with a threaded end, a heavy-duty metal pole sanding head, a small block of ridged foam, and long nylon ties. The boat hook (or an adjustable sanding or painting pole) needed to be short enough to fit under the hull. The pole sanding head with universal swivel needed to be strong enough (metal instead of the more common plastic) to support the sander. I wanted to push the sander against the hull with the pole.
ADAPTING THE SANDER TOP WITH A FOAM BLOCK

The Bosch sander, unfortunately, had a rounded top, impossible to attach with any security to the flat surface of the sanding head. The ridged foam block was shaped to match the top of the sander, the opposite side of the foam remaining flat. This allowed the sander to be inverted in the foam block, holding it level. The sander/foam block combination was secured to the sanding head using the nylon ties. Once firmly in place, it formed a solid unit with very little movement between the parts. The boat hook was attached to the sanding head. Once placed under the boat with the heal of the pole on the ground and the sander against the bottom of the boat, all I had to do was drive the sander around, not hold it up.
ADJUSTING POLE LENGTH THROUGHOUT THE JOB

Adjusting the pole length allowed for the various heights under the hull. Playing with the angle between the pole and the hull allowed for differing pressure on the sandpaper. To get even more sophisticated a 2 x 8-in. wood plank was set up between two cinder blocks for the base of the pole. The flexibility of the middle of the 2 x 8-in. pushed the sander against the hull without having to worry about the angle. Pressure against the hull could be adjusted by the length of the plank between the cinder blocks. Using a kitchen-type step stool, I could sit in quite a relaxed position while driving the sander along the bottom above my head.
CONCLUSION

Although still a considerable amount of work, this setup allowed me to prepare and finish the bottom myself. Boatyard prices are enough to frighten any owner. Supplying your own labor is a great way to save money for the real essentials, like sails, electronics and libations!
Obviously, personal protection is paramount when sanding antifouling paint and fiberglass. Good breathing apparatus, eye protection and gloves are necessary. The boat yard may very well require tarping off the bottom to contain dust as well.


How about this idea: get a harness that marking bands use to carry flags for holding your pole concept.
And how about a half sheet random sander
My back and arms to be honest are worth the price of a soda blast!
The harness isn’t a bad idea, certainly more flexibility. But the weight of the sander would still need to be supported by your legs and lower back, particularly when crouching down under the hull. And yes, I did look at soda blasting as well as sand blasting with a water pick-up, but the costs were more than I was willing to bear. I had the time and patience and it worked out well in my circumstances. It’s also the second time I’ve done it on the same size hull (same model boat) so I knew what I was getting into.
I can’t think of a reason why the sander is not attached to a vacuum. Link the hose to the poer cord and it does not get in the way. Yes, it is tented and yes the operator is wearing a mask, but the sander-mounted filter is not that good (I have the same sander) and he is going to get dust in his eyes. Use a vacuum with either perforated paper or mesh pads made for this purpose, and wear googles or at least glasses.
Thank you for the Tips. Excellent hull sanding tips by all. I’m planning to sand, prepare and reapply Anti fouling Ablative paint on our 2006 41 DS when the weather gets a bit warmer here in RI.
I agree with the comment on eye and breathing protection and have ordered a full face dust and particle mask from Amazon, relatively inexpensive when it will be used every season. The Zip tie tip is a great idea thank you.
I also agree the sander should be hooked up by hose to a vacuum cleaner to greatly prevent the Anti fouling particles from entering the ground water, even if the area is tented and base tarp is used and this is a requirement at our Marina.
I have a modification that makes the height setting adjustment automatic as you sand.
Drill a hole in the center of a board 2½ in x 3ft.
Place a washer over the end of the pole and into the hole in the board.
Attach the sander to one end of the board.
Notch other end of board.
Tie both ends of a Bunge cord to center of pole.
Slip the middle of the Bunge into the notch.