

Plastic holding tanks and water tanks have the advantage of not corroding, but they are hardly failure proof. Plastic holding tanks can crack and fail under extreme vacuum pressure if the vent is clogged. An errant drill or saw used to make adjacent repairs can puncture a tank. Or a poorly secured tank can be hurled across a cabin and crack.
The most common cause of cracks is from over-tightening fittings. Pipe threads are tapered, and the more they are twisted, the greater the expansion force they apply to the tank. Polyethylene tanks are relatively soft and the fittings are designed to seal dry and hand tight only. If needed, you can use a wrench, but no more than -turn after light hand tightening. No Teflon tape, paste, or adhesive sealant is recommended.
The most important step is to make certain the threads on the male fitting are clean and well-formed so that excessive tightening and sealants are not required. Often the cracks appear years later.
The challenge with repairing polyethylene (PE) is that nothing sticks to it. It has what chemists refer to as a low-energy surface. It does not pull materials to it; water beads up and even paint beads up if the surface is smooth and given time. If you mix epoxy in a polyethylene cup, you can pop out the cured leftovers out by flexing the cup-not much bond strength for the sailors go-to boat repair adhesive.
Manufacturers Advice
Tank manufacturers don’t recommend repairing PE. We talked to the factory engineers and we have worked with PE tanks in industry. Repairs are tricky and not always reliable. But sometimes a tank will need to be repaired immediately, and replacement isn’t an option. In those cases, a few manufacturers offered possible remedies. Keep in mind that these recommendations are for water and waste tanks; certified PE fuel and gasoline tanks can’t be repaired. Their suggestions included:
Drill a hole in the tank to install an access cap, or some other type of bulkhead fitting. Once you install the new bulkhead fitting, you can then close it.
For gouges that don’t fully penetrate the tank you can weld strips over the thin area, without melting clear through. Basically, you are filling a cosmetic gash.
For a fitting that is cracked by overtightening, you can cut a hole one size larger and either spin or weld in a new fitting if practical, or install a bolted bulkhead fitting.
Bulkhead Fittings
A bolted-in bulkhead fitting isn’t cheap, particularly in the larger sizes, but it offers a permanent fix. They are available in sizes from 1/4-inch through 6-inch pipe threads. These inlet/outlets are durable and occasionally come factory-supplied for chemical tanks. They cost between $35 and $200, depending size and materials, but they are a permanent fix. You do need to fit the inner ring inside the tank, so it better not be the biggest opening. Tightening the inside ring can be tricky to nearly impossible, depending on the location. Listed as thick-walled threaded PVC pipe fittings for water, they are available from McMaster/Carr and other industrial piping supply houses.
Uniseal
If you can’t access the inside, and the damaged area is on the top of the tank, you can use a Uniseal to open a new access hole that can later be plugged or used to attach a new fitting. Simply cut a true hole with a hole saw, clean it up, lube it with dish soap, and pop it in. Were not sure we trust them on the side of a tank, but for vents and fill lines, they are well proven on both potable water and waste tanks. They are available in many sizes, from -inch to 4-inch. Cost is about $6 for 1-inch and $10 for 2-inch (www.aussieglobe.com/uniseal1.htm).
Unfortunately most cracks can’t be resolved by simply adding a new hardware fitting. And what about holes in your PE kayak or one of your jerry cans for water? In search of a durable repair for polyethylene tanks and boats, we tracked down several products that showed promise.
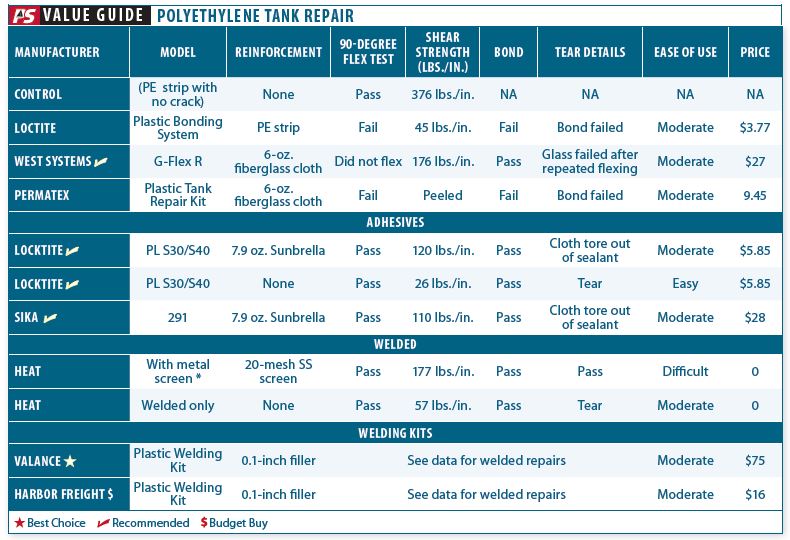
What We Tested
We tested polyurethane sealants Sika 291 and Locktite PL S40. Both performed well in prior testing with polyethylene. We tried our hand at plastic welding, reported to be the preferred method for permanent repairs. We also tested several plastic-specific systems, including the Permatex Plastic Repair Kit, the Loctite plastic Bonding System, and 3Ms DP8005, an acrylic adhesive optimized for polyethylene.
How We Tested
We bonded 3-inch long by 2.5-inch wide strips of 0.1-inch thick high-density polyethylene (HPDE) in a butt seam, simulating a crack. Reinforcements and surface preparations varied according to the material. We generally followed manufacturers recommendation, and when this was not available, we relied on previous experience and past tests to guide us. We tested each bond by flexing the joined area several times to roughly 90 degrees. We then pulled apart each sample to failure on a test rig with a calibrated load cell. The force and failure mode were noted.
General Observations
Welding is considered the gold standard for PE tank repair, welding is the method by which many tanks are constructed and by which most fittings are installed. Fittings are actually installed using spin welding, in which the fitting is rapidly spun to create enough friction to melt the fitting to the tank. With conventional plastic welding, controlled heat is applied until the plastic softens, and then additional filler material is added to fill the gap and reinforce the area.
Welding. Before attempting this approach you need to take certain precautions. Although PE is low in toxicity, the fumes are strong-similar to that of poor-running diesel or a smoky candle, with similar chemistry. Provide adequate ventilation. Wear knit gloves; there are many ways to burn yourself, since hot metal looks just like cold metal. It can get tricky, working close to the long, hot nose of a welding tool in a tight spaces.
Drip Welding. Commonly used to repair rock gouges in snow skis, a polyethylene P-Tex candle (effectively just a strip of PE) is lit with a match and dripped into the gouge until overfull. The repair is then scraped off level with the metal edges and the ski is waxed. The problem with this approach is that the heat of the flame badly damages the PE polymer, and the resulting repair is brittle and weak. Every time we used this method on a tank repair, the repair would crack and pop-off when the tank flexed. We don’t recommend drip welding for tank repair.
Welding Irons. You can weld plastic with a heated screwdriver or a broad soldering iron, but a purpose-built plastic welding iron will result in a much better job. The welding tool is low power, about 85-200 watts, and will be less likely to overheat the plastic and melt a hole clear through- although this will occur if you are careless or if the tank is thin. We tried two different types for this test.
Thin Material. Welding anything thinner than a heavy jerry can is a fools errand. A jerry can is tough, but it is simply too easy to burn through a jerry can, and thus it is very difficult to get good fusion. When heated, the plastic melts and falls away from the crack. Adhesives work better with thin materials.
Support. It can be very helpful to support the work from behind, so that the plastic does not distort or fall through and make a bigger hole. Aluminum duct tape works well because it will not melt. Use long pieces, so that the adhesive on the back of the tape is far from the heated work area.
PE Welding Step-by-Step
The first step for all cracks is to drill a stop hole (3/16-inch is usually adequate) at each end of the crack to prevent it from spreading. If your hole is more than superficial, you’ll usually need a filler strip.
One source suggested trying a milk jug for filler, as it had been used by others. Although the milk jug approach might work in some cases, in our experience, the thin strips tend to fall down through the crack instead of building a bridge. The repeated heating required to lay down enough material often made the crack wider.
It was easier to work with the thicker strips that came with the supplied repair kits. We used these for our test.
Prep work. Clean and prepare the area around the crack with 60-grit sandpaper. If the hole or crack is very small, use the plastic welding iron to melt plastic around the hole and fill it in, being careful not to melt through the tank. Melt only a thin layer and work it into the crack.
Heating. Next, use the welding iron to soften the area around the repair to insure good adhesion, soften one side of the filler strips, and stick them on, apply 1-2 layers, building up until you match the thickness of the tank material, tapering for five tank thicknesses wide on every side (at least 5/8-inch past the crack).
Blending. Smooth the layers of plastic together, but do not linger too long in one area, or the heated plastic will begin to sag into the tank. Keep in mind that your aim is not a true fusion weld, as in steel welding when the filler and base material are well mixed. This simply does not work. If you tried to apply enough heat to fully liquefy the PE, it would shrink away from the crack, and fall into the tank before you finish. In addition, the melting points of the filler and the base material, even if both PE, are probably somewhat different.
Reinforcing. Incorporating reinforcing material makes the repair stronger and tougher. We recommend this for both adhesive and welded repair, but the materials are different. We tried using fiberglass cloth with melted polyethylene, but it was hard to keep in place during welding.
We settled on stainless steel mesh. This is included in welding kits, and you can also get small pieces in the plumbing department, sold as lint screens. Cut a piece about 1-inch wide and 1-inch longer than the crack. Soften the tank surface with the welding iron and then press the mesh into the plastic. Do not press too hard; wait for the plastic to get soft and it will settle right in.
If the surface is curved, cover a small area, let it harden, and then work the mesh into the plastic in stages, bit by bit, as if fitting a replacement plank or bending a steel hull plate. Once the mesh is set, lay filler material on top of it. Pre-soften one side of the filler material with the iron, press it onto the screen, and use the iron to melt and smooth it down. Cover the mesh with several layers of filler, continue building up to about 1/8-inch. There is an excellent how-to video by Polyvance, the makers of one of the tested kits.
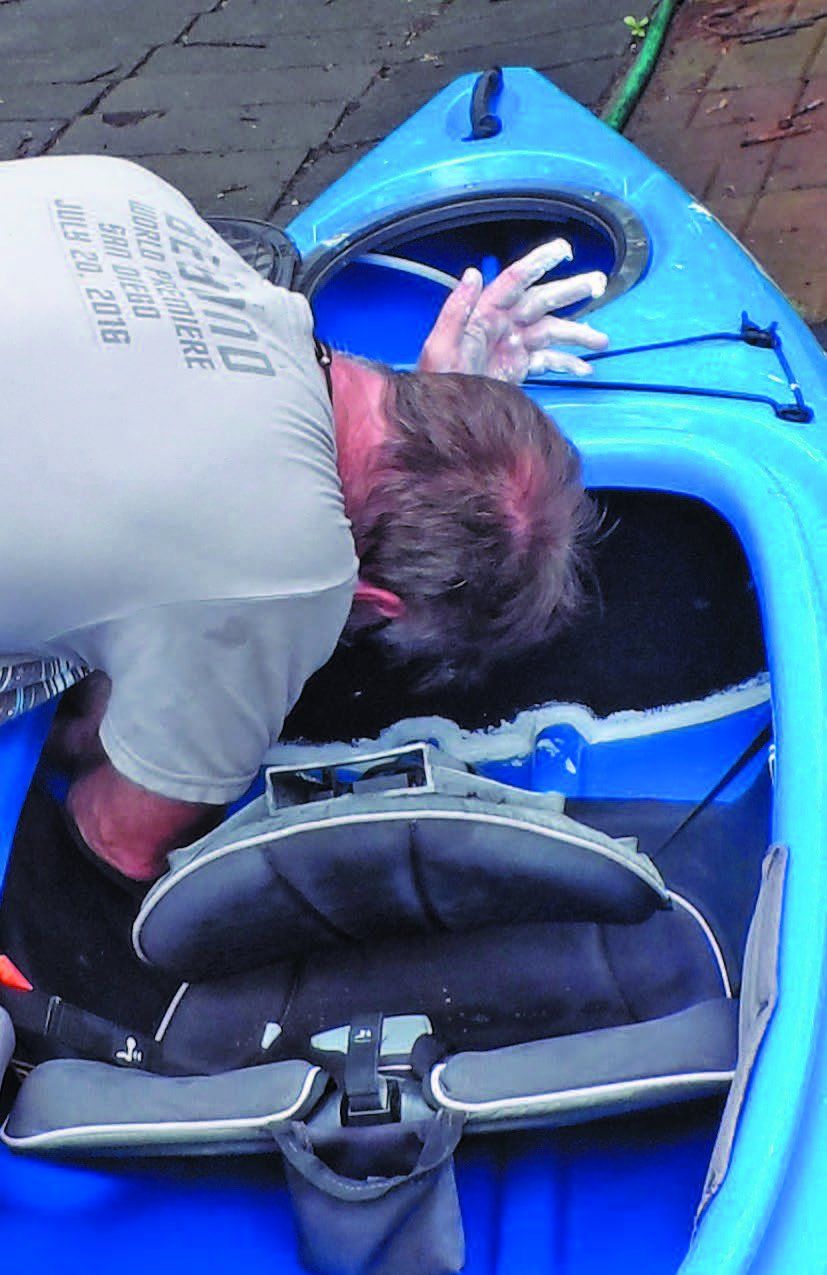
Sanding. After the filler and tank cools, you can sand it smooth if you have added enough filler material. The sanding will leave it dull and fuzzy, but a light flaming with a torch, similar to how you prepped the area, will restore some of the gloss. If you need to match color, use strips of matching PE. The color worked well with our kayak repair, but for a tank repair you can skip these cosmetic steps.
Practice. It is possible to make things worse. If you watch enough YouTube repair videos, you will see people make small cracks into big holes by applying too much heat or using filler material with too high a melting point. We made the same mistakes during practice, before making the welds we used for testing. A 5-gallon bucket, a kids playhouse, or a food storage container makes for a good test bed. Try to find something similar in thickness to your tank.
Using Polyurethane Sealants
In PS December 2016, we studied the bond strength of a number of common sealants. Locktite PL S40 and Sika 291 demonstrated particular ability with polyethylene, with reliable shear strengths of over 100 PSI if the plastic is properly prepared. These sealants are durable in submerged environments; in fact, we’ve been testing some of these in repairs to pond liners for over 15 years. They have the advantage of considerable flexibility, moving with the tank.
Look for a sealant that is non-toxic. Sika 291 is National Sanitation Foundation approved for potable water tanks and approved by the U.S. Food and Drug Administration for incidental food contact. Many polyurethane sealants are FDA-approved for food contact and potable water tanks, but not all have applied. Same with epoxies; if properly measured, mixed, and fully cured, they are generally safe. When repairing cracks, the contact area will be very small.
The challenge is that the stress in the cracked area can easily exceed 2,000 PSI (the tensile strength of HDPE). This is greater than any of the structural adhesives we tested. The only way around this is to produce a fiber-reinforced repair that distributes the stress over a larger area, like this:
Clean. Scrub with soap and water and sand 50-80 grit about two inches beyond the repair in all directions.
Denaturing, or Heat Treating. Other than welding, in which heat is intrinsic, any adhesive bond to PE is aided by roughening the surface by sanding. This is followed by denaturing the surface with heat. Put simply, the application of a flame slightly scorches the surface, increasing porosity and changing the surface chemistry just enough to promote adhesion.
To do this, you play a propane torch across the surface of the repair area and the patch (if used) just enough to cause a slight blush or change in appearance, but not enough to melt it. When you do this properly the surface will no longer bead water, clear evidence that something has fundamentally changed.
Laminating. To further strengthen the repair, reinforce with cloth. Apply a thin coat of polyurethane sealant. Cover with 2-3 layers of overlapping patches of acrylic canvas (Sunbrella is good), saturating each with sealant. Cover the surface with sealant.
Note that lightly used fabric is best, with the water repellent treatments weathered away. New Sunbrella, for example, does not saturate and does not bond as well. Fiberglass cloth works, but we found that more flexible fabrics are a better match for the sealant.
Do not use alcohol to clean the surface-this stops polyurethane from curing and will prevent bonding. Water is the curing agent for polyurethanes, so humid but not wet conditions are best. Curing time for Locktite PL S40 and Sika 291 depends on thickness, temperature, and humidity; allow at least 5 days in warm humid weather for a full cure. In dry or cool conditions, loosely covering the repaired area with a tarp along with a bowl of water can help. A light misting of water can help.
Welded Repairs
Heat has long been used to make repairs, but our testers were curious as to how practical this was for the average do-it-yourselfer. Would the benefits of repair outweigh the risk of doing more harm?
Straight Welding
Requiring only some filler material and a welding tool, simple heat welding was the quickest approach. This will make a reliable repair of limited strength and toughness. It is easy, fast, but not as strong as other repairs we tested.
Bottom line: Save this for tiny repairs. For all others, add screen.
Welded with Mesh
Although more time consuming, the result of welding with stainless steel mesh is strong and permanent. We couldn’t break the repair, tear it or delaminate it, other than by flexing it until the wire fatigued.
Bottom line: This is our Best Choice in polyethylene repair.
PE Repair Kits
Repair kits have the advantage in that you can use them for various repairs and projects, and most include a welding tool that can simplify welded repairs.
Polyvance Professional KC Welder
We’ve used this one in an industrial setting to repair chemical tanks. Although more expensive than other tools available through discount retail stores, this 200-watt welder tool heats faster than the Harbor Freight tool we also used.
Bottom line: This is the Best Choice if you like good tools.
Harbor Freight Plastic Welding Kit
Although we harbor no illusion that this is a lifetime tool, it lived through our testing, a rigorous project that entailed more PE repairs than most sailors can expect to face in a lifetime. Used gently, it heated and spread the plastic repair material and surrounding area. At just 85 watts, Harbor Freight welding tool is considerably lower in power than commercial welders. This was occasionally frustrating for our testers, who were used to the speed and efficiency of professional tools.
It was difficult to achieve full fusion between the materials, and the operation was very slow when incorporating stainless steel mesh (the mesh conducts the heat away). On the other hand, the resulting repairs were strong, and the low power means you are less likely to melt a hole clear through the tank and really mess things up.
One caution: Dont press down hard with the tip. Ours bent when hot, although it still worked fine bent.
Bottom line: This is our Best Buy for a few small repairs.
Adhesives
Adhesives yielded some surprising results, with an epoxy adhesive-generally not recommended for PE-faring surprisingly well.
Permatex Plastic Tank Repair Kit
Available through local auto parts stores, this is a small epoxy/fiberglass kit intended to repair leaks on radiator caps, and the expansion tank. It is not recommended for PE, because like all epoxies, it is stiff and does not bond well to PE. Sure enough, it popped right off when we tentatively flexed the sample, before even getting to the shear test or 90-degree bend test. A complete failure.
Bottom Line: We don’t recommended this kit or standard laminating epoxies for polyethylene repair.
West Systems G-Flex Epoxy
After the glaring failures of all other epoxies, we didn’t expect much from G-flex. But we dutifully sanded and flamed the surface, laminated in a layer of glass cloth, and low and behold it was strong. It did not fail in flexing until the glass fatigued after being repeatedly forced, which will not happen in the real world. In shear testing the bond did not fail-the strip failed at the attachment bolts. That said, we would not trust it without the fiberglass reinforcement.
Bottom line: To our surprise, we are Recommending fiberglass reinforced G-Flex for polyethylene repairs.
Loctite Plastic Bonding System
A cyanoacrylate in the same category as Super Glue, Loctites bonding system is supplied with a special primer that increases bonding. Like Superglue, it has poor gap filling properties, making it a poor sealer. We tried using it to attach a PE strip over the crack, but we never achieved a watertight seal (there were visible gaps) and it pealed if flexed.
Bottom line: Not recommended.
3M DP 8005
3Ms product is an acrylic adhesive optimized for low energy plastics like PE, in optimum conditions it has a bond strength nearly 1/3 that of PE. However, that is not enough to hold a crack that has developed due to stress, and so it would normally be used to attach a patch. However, we have found it difficult to apply and clamp patches onto irregular geometries and a leak often resulted. Expensive, at $75 for a small single-use kit.
Bottom Line: Although very strong, repairing leaks is not its best application.
Sika 291
Sikas 291 is approved by the National Sanitation Foundation for potable water tanks and approved by the Food and Drug Administration for incidental food contact. It is also rated by the American Society for Testing and Materials for continuous immersion. Our lab and field-testing show reliable long-term and consistent bonding to polyethylene, if the surface is properly prepared. Like all polyurethanes, its messy to work with, but the process is simple and gap-filling properties are excellent. Though Sika 291 is not very strong on its own, by incorporating Sunbrella cloth, we were able to spread the load and prevent tearing, making the repair strong. It was the most flexible repair, recommending it for repairs where motion is unavoidable, but it was not as strong as reinforced G-Flex or reinforced welded repairs.
Bottom line: Recommended for making flexible repairs.
Loctite PL S40
Interestingly, this product is not recommended by the maker for continuous immersion. On the other hand, it passed the continuous immersion tests with flying colors and we have used it for fish pond repairs for as long as 15 years with no deterioration or loss of bonding. It is also not rated for potable water or food contact, presumably because Loctite never applied for that application. Test results were identical to Sika 291. Also available in black (PL S30).
Bottom line: Recommended for flexible repairs but not for potable water.
Conclusions
As often happens, there is no single right answer. If movement seems inevitable, the plastic is thin, and the damaged area is large, reinforced polyurethane is the recommended repair. If the crack is tight together and the plastic is relatively thick, welding reinforced with stainless steel mesh is a sturdy method that should stabilize the crack and last as long as the boat. Practice welding on a scrap first, because things can go badly wrong. Plastic-specific adhesives either pealed or did not reliably produce watertight repairs. As for that old sunburned jerry can, this is probably too much trouble for most, but the old kayak might be worth the effort. And in either case, you’re keeping more plastic out of the waste stream for a little longer.
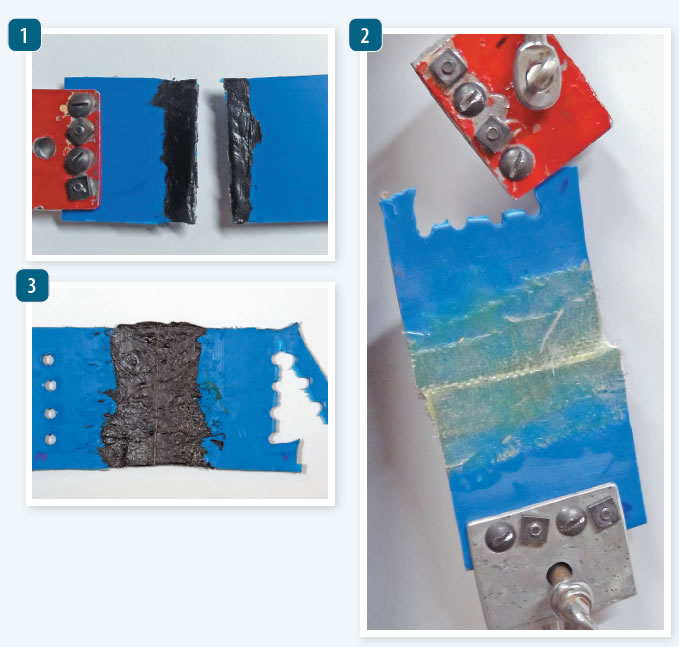
Finding a repair that is strong, flexible, and easy to carry out required several rounds of trial and error. The most successful approaches combined welding or an adhesive with reinforcing material a reinforcing material. In the end, a combination of steel mesh and welded plastic filler yielded the best results.
1. The welded sample, without any reinforcement, snapped cleanly as strain was applied. This approach will work for tiny repairs, like a small drilled hole, but not long cracks.
2. G-flex held up to 177 pounds of load before the plastic failed.
3. The welded and filled sample survived bending and flexing and held more than 150 pounds before finally breaking.
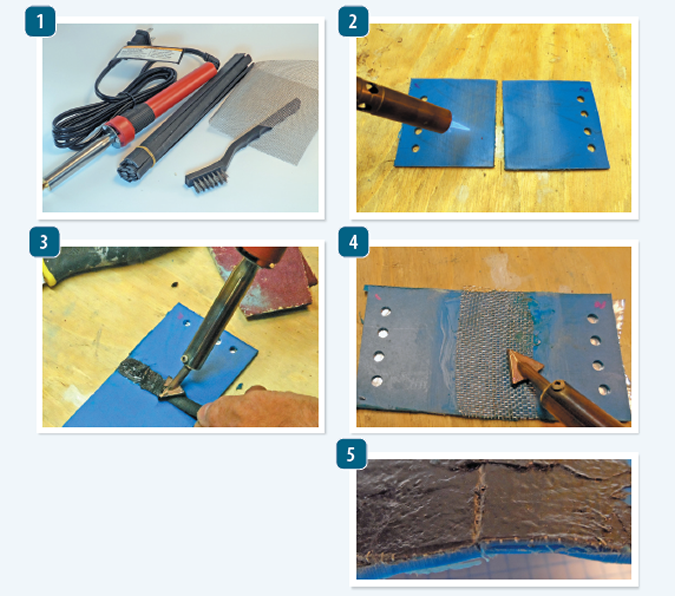
Practice is more important when welding plastic with many other repairs, not because of the difficulty, but because overheating the repair area can lead to a bigger crack or hole.
- It is very important to heat treat the repair area to ensure a strong, consistent bond.
- Melting the filler material with the 85-watt Harbor Freight tool welder took longer that it would with the stronger (200 W) professional model.
- Heating the mesh stainless steel and the surrounding plastic helps the metal settle into the material.
- Stainless mesh makes for a much tougher repair.
- Repeated flexing caused some cracks to appear in the reinforced weld, but testers could not break the bond.


