
")
Are you having trouble with your boat’s critically important seacocks? Maybe the handle is frozen and attempts to free it using penetrating oil, a breaker bar or heat failed to loosen the sea’s vicious corrosive grip. Or maybe you can open and close the valve, but it leaks. Perhaps you’ve thought about replacing the half dozen or more seacocks on your boat but gasped when you checked the prices of traditional bronze seacocks. What to do?
During the rebuilding of my Cape Dory 36 Far Reach (“Rebuilding a Cape Dory 36”) I faced a similar problem. After conducting a lot of research, I installed a new style multi-component bronze seacock system called the Groco IBVF which saved me significant money and more than met my needs for a robust reliable offshore capable seacock. It’s also less expensive to purchase and easier to maintain than traditional seacocks. Finally, the IBVF seacock exceeds the American Boat and Yacht Council (ABYC) recommendations for strength.
This article describes the IBVF system; the building of new backing plates from G-10 composite; and the installation of the IBVF through-hull, flange base, and ball valve system.
Seacock: A valve (usually bronze) on the inside of the boat, which screws onto the through-hull. The seacock controls flow through boat’s raw-water inlets (engine cooling system, saltwater wash-down pump, etc.) and outlets (scuppers, sink drains, etc.). You can close the seacock to prevent flooding if a hose fails, protect vulnerable components during freezing temperatures, or to allow maintenance to the connected plumbing. Pipe to Hose (PTH) Fitting: A fitting (usually bronze) often threaded on one end and with hose barbs on the other end. The PTH screws into the seacock unless it’s part of the seacock casting. The hose barb allows an appropriately sized hose to be connected to an engine, generator, head, sink or other systems on the boat. Traditionally, all of these components are made of high-quality bronze which is very resistant to saltwater corrosion. However, on aluminum boats Marelon (fiberglass reinforced nylon) fittings are often used, since bronze and aluminum in saltwater can create a galvanic cell that will degrade the aluminum. Some through-hulls are made of stainless steel. Cheap plastic through hulls are available, but should be avoided.
Through-hull: A threaded pipe fitting, usually bronze, with a mushroom shaped head (or flat-top head for recessed through-hulls) that passes through a hole in the hull of the boat.
Removing Old Through-hull Fittings and Seacocks
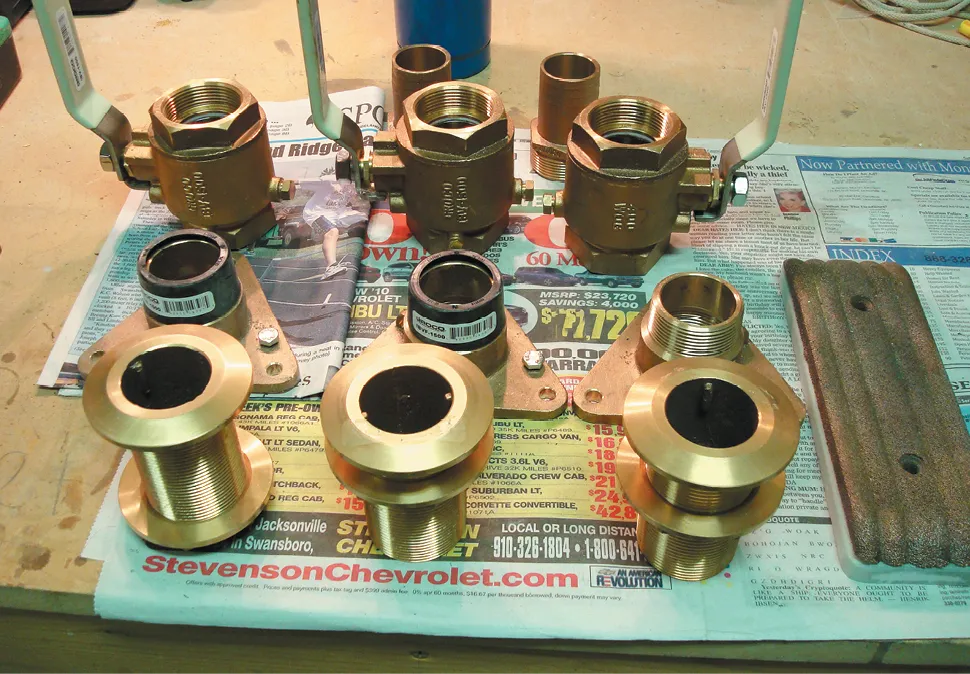
The first step in my project was to remove all 10 through-hulls, nine of which were connected to traditional bronze seacocks. The seacocks were made of high-quality bronze alloy by Spartan Marine and regarded by many sailors as top of the line. They were, however, 25 years old with at least 20 years spent in the water. While all the handles rotated, several required significant force to turn. Most of the seacocks were weeping when the boat was last in the water. Part of my plan was to reduce the number of through-hulls from ten to three, reusing the best Spartan seacocks and coupling them to new through-hull fittings.
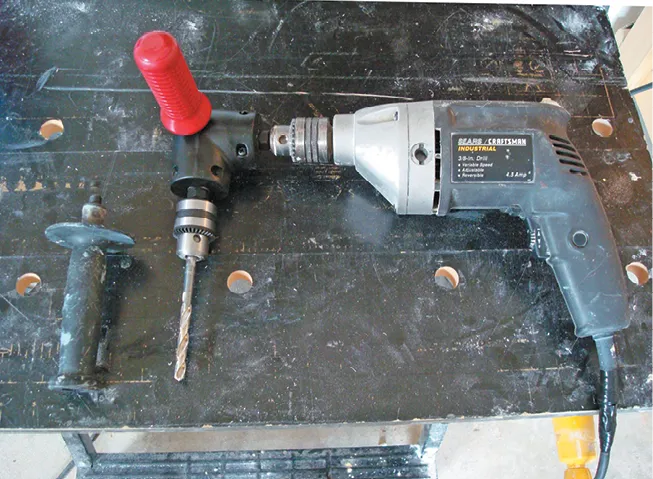
DIY Tool
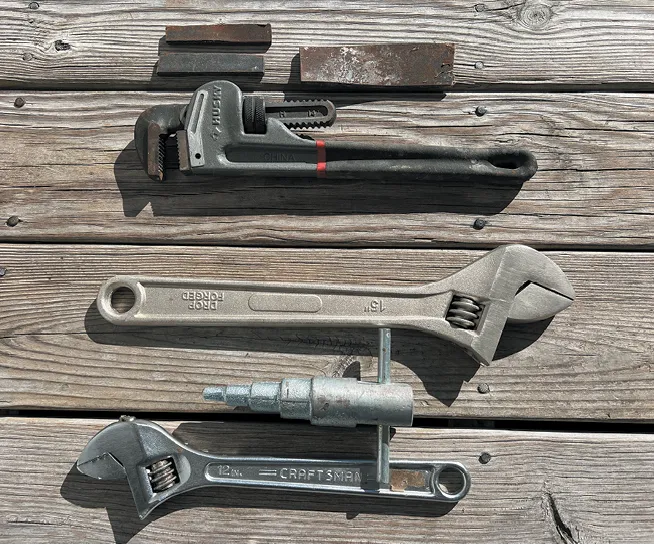
Depending on the bedding compound used to install through-hull fittings, the difficulty of removal varies. (One trick to breaking the external bond between the mushroom-shaped through-hull flange and the outside of the hull is to use piano wire, guitar string or fishing leader wire to saw away the bedding compound beneath the flange.) I did not have a step tool, which functions like a hex-socket designed to fit inside a variety of through-hull sizes. Instead, I bought a 1-foot section of steel bar from Lowes hardware about ¼-inch thick and 1.5-inch wide. I cut off about 4-inches and ground its width so it would fit snugly inside the through-hull fitting.
Step 1. Unscrew the Through-hull from the Seacock
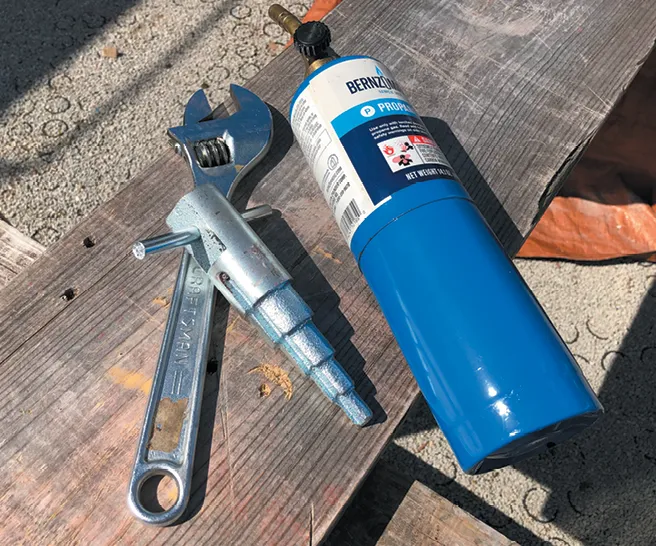
I inserted my DIY step tool into the through-hull and turned counterclockwise until it engaged with two tabs that prevented it from spinning further. I then gripped the flat bar with a large pipe wrench and unscrewed the through-hull from the seacock. If your seacock is not fixed inside the hull to prevent turning, you may need someone on the inside of the boat with a wrench to carefully grip the valve body while you turn. A seized through-hull can usually be persuaded with a longer breaker bar or with a careful application of heat from a propane torch, or both. Be careful not to overheat the fitting and damage the surrounding fiberglass.
Step 2. Remove the Fastener Bolts
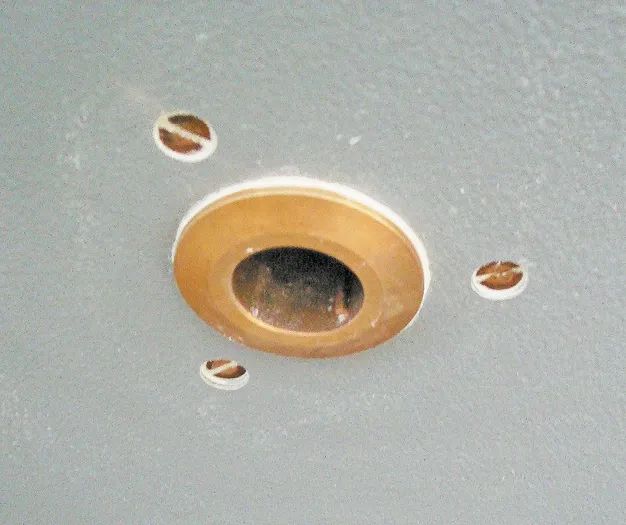
Next, I lightly sanded and probed on the outside of the hull adjacent to the hole to locate the heads of three bronze flat-head fastener bolts, buried under putty and bottom paint. These bolts passed through the hull, backing plate and into holes in the flange base of the seacock located on the inside of the boat’s hull where they are secured by nuts.
The purpose of the bolts is two-fold: First, they secure the seacock to the inside of the hull should the through-hull be compromised and second, they prevent the seacock from rotating when the threaded through-hull is installed or removed. Once the bolts were removed it was simple to remove the seacock from the plywood backing plate. [Editor’s note: Many installations on thinner hulls secure the seacock flange to the internal backing plate without passing through the hull itself. See “Seacocks for Thin Hulls.”]
Reducing the Number of Through-hulls
With careful planning, I was able to reduce the number of through-hulls I needed from ten to three: one for each of the two cockpit scuppers and one for the galley sink drain. I didn’t need one for the engine since I didn’t have an inboard engine. I wanted to reduce the number for three reasons. First, I wanted to eliminate as many holes in the boat as possible. Second, seacocks require yearly maintenance, or they will eventually leak and seize up. Fewer seacocks means less maintenance. Third, seacocks are expensive and a smaller number of them equates to smaller outlay of funds which can be used for something else.

Confident in my plan, I filled in the remaining seven holes using biaxial and West Systems Epoxy as described in their “Fiberglass Boat Repair and Maintenance, Annex D How to Fill Machined Holes in Fiberglass Laminate.” This useful manual can be downloaded as a PDF for free from their website.
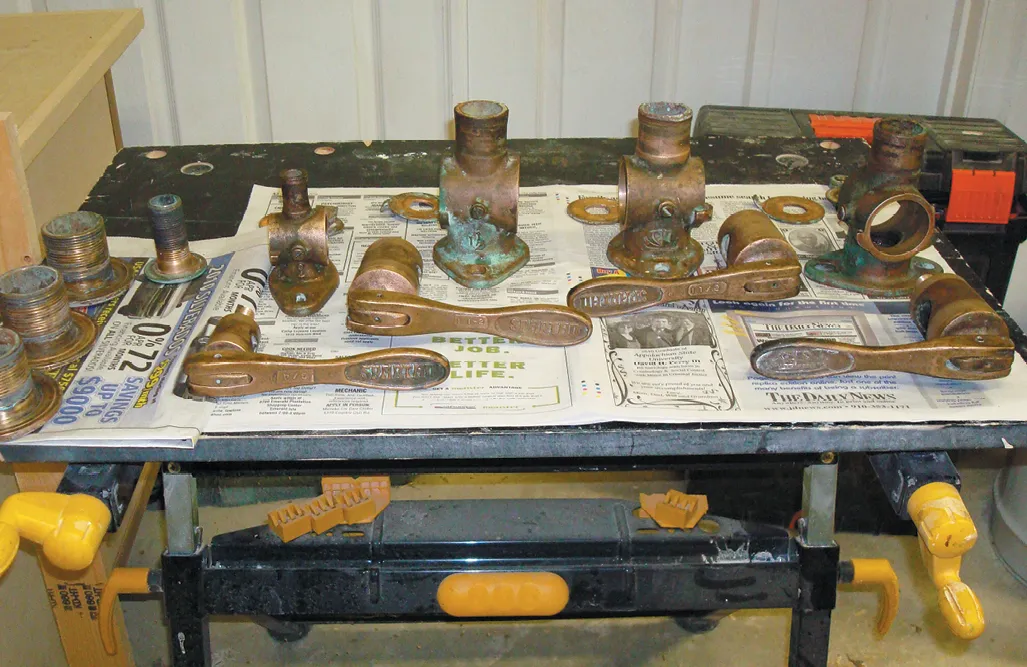
I cleaned up the seacocks and took them apart. For a tight seal, it’s important to keep the tapered bronze cone and the body of used seacocks as matched pair. I chose what I considered the three best 1.5-inch seacocks and cleaned them further with mineral spirits.
Deciding to Refurbish or Buy New Seacocks
Cast by New England foundry out of high-quality bronze, Spartan seacocks can last for decades if properly maintained. I’d intended to apply Spartan’s fine abrasive valve lapping compound and lap (mate two flat surfaces using an abrasive compound between them) the tapered cones with the seacock body. By adding the abrasive and rotating the cone a full 360 degrees inside the body (not just back-and-forth partial rotations), I could create a smooth, tight connection between the two parts. Further inspection, however, revealed significant wear on both parts, convincing me to invest in new seacocks. The seacocks might have been rehabilitated, but I did not want to launch Far Reach only to find out I had leaky seacocks.
Spartan, Groco, and Apollo all make seacocks with a flange base and integrated valve, but only Spartan makes a traditional seacock entirely out of quality bronze. Even some new boats today use inexpensive in-line ball valves instead of flanged fittings, but these hybrid combinations introduce risks (mis-matched threads, galvanic corrosion, etc.) that I wanted to avoid. If your boat has an inline ball valve screwed directly onto a through-hull, you should replace it with a proper seacock as soon as possible.
As I considered my options, a trusted friend suggested I consider a relatively new design made by Groco called the IBVF.
In-Line Ball Valve Flange Adapter (IBVF)
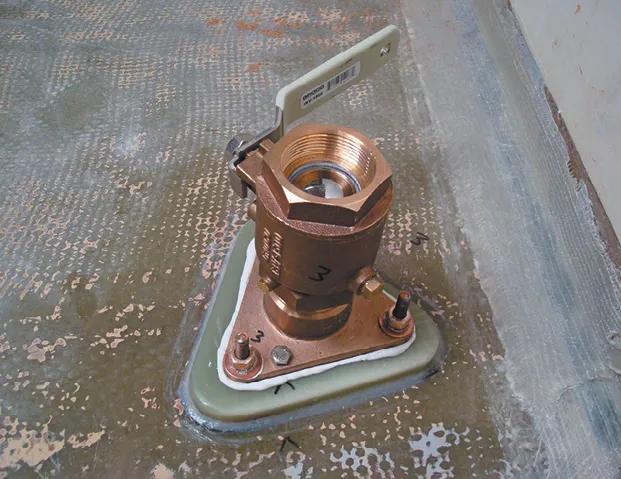
Introduced by Groco Engineering, the IBVF system became available around 2007. It has two components that combine the strength of a bronze flange base with the advantages of a replaceable screw-on ball valve. The bronze flange base adapter has NPS female threads on the bottom to match the through-hull and NPT male threads on top to fit a standard marine UL approved bronze in-line ball valve. Three bolts fix the flange base in place. Once the base and valve are installed, you can fit your chosen NPT pipe-to-hose fitting to the valve’s threads.
According to the ABYC, an installed seacock must be able to withstand a 500 pounds of static force applied for 30 seconds to the inboard end of the assembly (tip of the PTH fitting), and still be capable of closing to stop the ingress of water. Groco’s testing shows that the IBVF system far exceeds this performance standard.
Through-hull fittings are relatively thin, but the threaded flange in the IBVF system is thick, providing reinforcement when the two parts are threaded together. Groco conducted a series of static tests to the ABYC standard on three 1.5-inch seacock systems: a ball valve screwed onto a through-hull; a Groco flanged ball valve, and the IBVF system.
The ball valve/through-hull combinations in the test broke below the ball valve or just above the nut on the through-hull when testers applied 190 pounds of force. The Groco traditional style flanged ball valve (FBV) assembly did not deform or break after testers applied 1,000 pounds of force. The IBVF combo (through-hull, flange base, and ball valve) deformed, but did not break or leak, at 992 pounds of static force.
In short, the IBVF combination is UL approved for underwater seacocks and exceeds the standards for seacocks recommended by the ABYC Pipes and Fittings Committee.
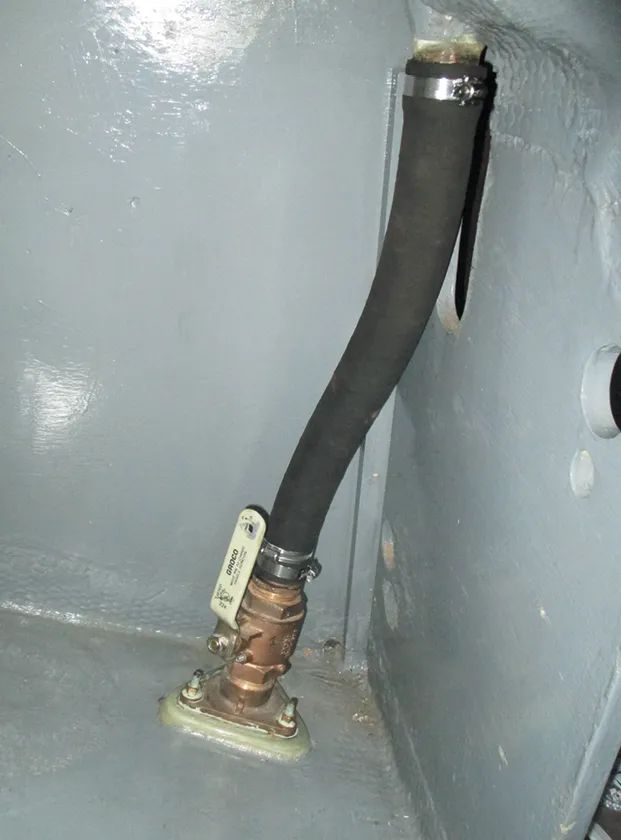
A key advantage of the IBVF system is you don’t have to remove the flange base or through-hull to service or replace the valve assembly. Carry a spare valve (or two) and you’ll be able to tackle most seacock problems with your boat still in the water.
Groco Ball Valves
Groco ball valves with inside diameters 1¼-inch and larger come with a stainless steel zerk (grease) fitting to improve sealing and promote smooth operation. The zerk can be screwed into the threaded drain port to grease the valve assembly. Groco suggests you can leave the zerk in the ball-valve if it’s well-greased, but I remove it after greasing and reinstall the drain bolt.
When I asked Dan Phelan, vice president at Groco, about the quality control at the Chinese foundry used to make the IBVF, he explained that the company works with only one foundry and that Groco has a very long relationship with the company and its owner. Every component is cast to Groco specification, UL approved and hand inspected before shipping to vendors. With this information, I decided to replace my Spartan Marine seacocks with the Groco IBVF seacock system.
Backing Plates
This was a good time to replace the original plywood backing plates with ½-inch G-10 I purchased from McMaster-Carr. G-10 is a flame-retardant epoxy resin with fiberglass fabric reinforcement. Sometimes it is referred to as epoxy-grade industrial laminate and phenolic. [Editor’s note: PS tech editor Drew Frye considers 5/8-inch thick fiberglass laminate to be a good low budget alternative to ½-inch G-10 for through-hull backing plates].
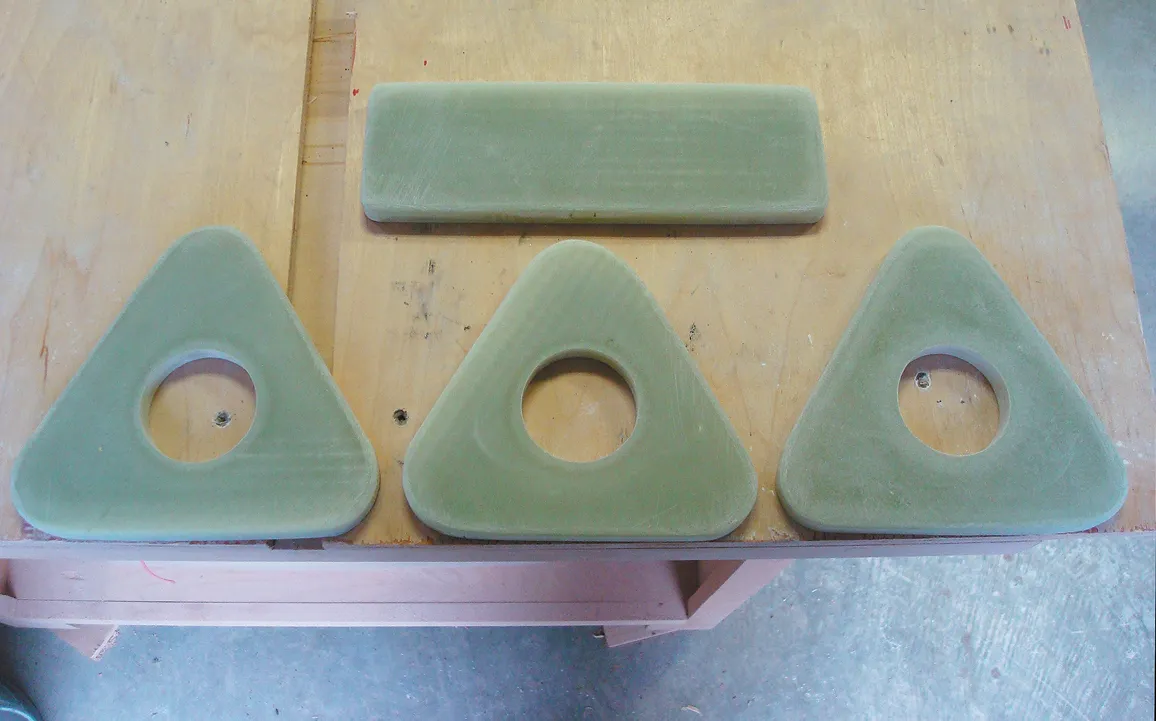
Step 1. Cut the G-10
I cut the G-10 with a Bosch jig saw using carbide tipped blades. G-10 is ridiculously hard on blades. To save costs, I tried using less expensive metal cutting blades I purchased from Lowe’s, but these just needed to be replaced sooner. I cleaned up the rough edges of the backing plates on a bench top sander. [Editor’s note: A multi-tool with a fine carbide cutting blade will cut G-10, as will an angle-grinder with a cut-off blade. Cooling the blade with sprayed water will prolong its useful life.]
Step 2. Cut a Hole in the Plate
Next, I located the center of each backing plate and cut a 2-inch diameter hole with a standard hole saw. I test fit them in the boat with an assembled seacock. I checked that the handle would be convenient to open and close, and also made sure the winter drain plug was facing downward. This meant the handle was not always exactly where I wanted it, but the drain plug is no good if it’s on the high-side. With a sharpie, I traced the center of the backing plate hole on the inside of the hull. I drilled a ¼-inch pilot hole from the inside. I went to the outside to confirm that it looked good, then used the hole-saw to cut the hole from the outside to the inside.
Step 3. Sand the Backing Plates, Then Mount Them
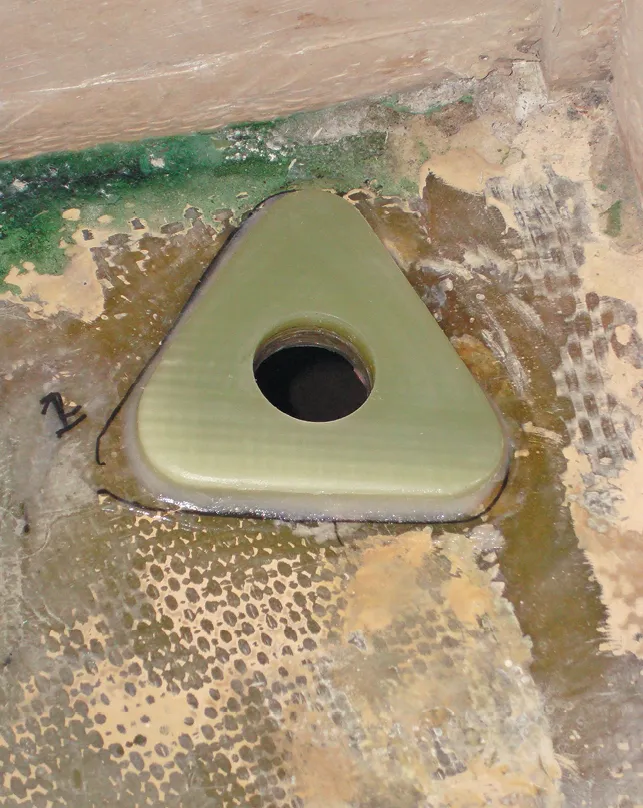
Next, I sanded the backing plates and the inside of the hull with 40-grit. Then I vacuumed the area and finished with an acetone wash. I retraced the outline for the location of the backing plates. I mixed up West System 406 thickened epoxy and glued the backing plates in place making sure the holes in the hull were lined up with the holes in the backing plate. Then, I cleaned the area around the base plate with an acetone-soaked rag so as not to leave any epoxy runs, drips, etc.
Final Assembly
I took my time during the final assembly, adhering to the woodworker’s mantra “measure twice, cut once,” and always dry-fitted before applying glue or sealant. It will be easier if you have a helper to work from the outside, but I managed by myself. Here’s an abbreviated step-by-step description of the process.
Step 1
I measured the through-hull for correct length by sticking it through the hull from the inside, and marking the threads where it exited the hull. I then measured the depth of the threads inside the flange base and subtracted ¼-inch. This measurement told me how far beyond my initial mark I should make my cut. (The ¼” adjustment would ensure the through-hull would not bottom out in the flange when fully tightened.)
Step 2
To guide the cut, I screwed on the bronze nut that came with the through-hull, marked the through-hull for the correct length, and taped the threads to protect them.
Step 3
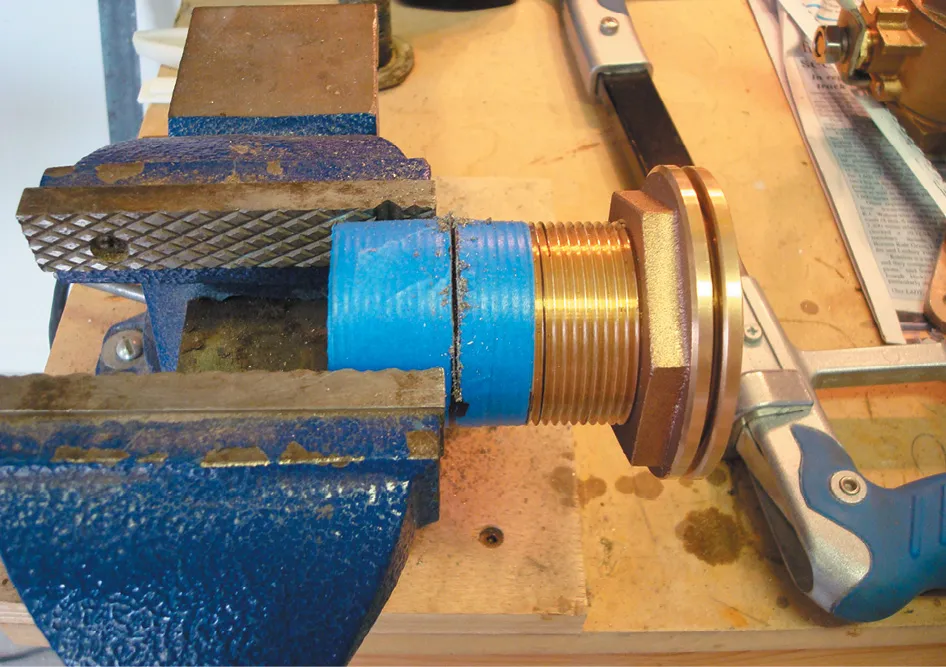
With the through-hull in a vise, I hack-sawed it to the proper length, stopping frequently to check the angle of the cut. If a hacksaw starts cutting off its lines, it’s hard to correct. I used a mill file to smooth the freshly cut edge. I cleaned up the threads by unscrewing the nut from the through-hull.
Step 4
I dry fitted all the flanges, through-hulls, and ball-valves and rechecked the alignment. It is important to number these components and keep them together. The length of each through-hull is matched to hull thickness at its location, and hull thickness can vary.
Step 5
I marked on the backing plate where I wanted the drain plug to be. Because I used a triangle-shaped backing plate, I would have fewer options to re-orientate the through-hull once the plate was bonded in place. (A round backing plate would give you more flexibility but requires an expensive large diameter metal cutting hole saw. The triangle shape is easier to cut neatly with a jig saw.) I was careful to check handle location for easy and complete opening and closing. If you don’t like the handle location, you have to rotate the whole flange/ball-valve assembly 120 degrees.
Step 6
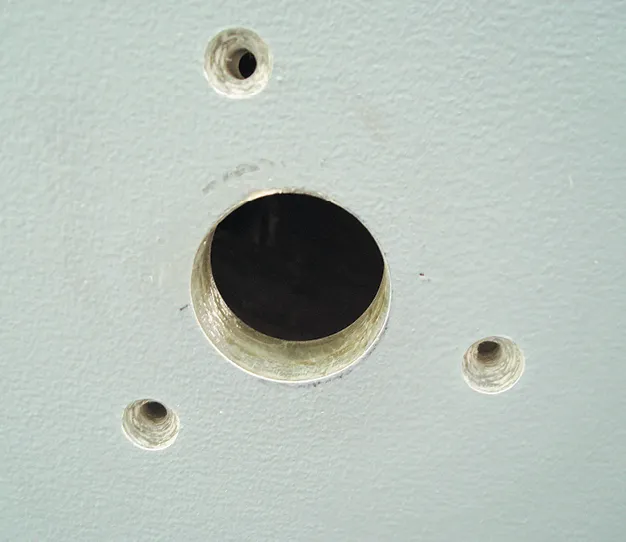
Once satisfied with the fit, I drilled the holes for the flange base bolts using the flange holes as the guide. Remember to drill a hole, then drop one of the bolts through from the inside to keep the flange in place to maintain the alignment for the second hole. After drilling the second hole, I dropped another bolt through it before drilling the last hole. Remove the hardware and counter sink the holes from the outside.
Step 7
I cleaned and washed with acetone the mounting area (inside and outside the hull) as well as the flange base and the through-hull.
Step 8
I applied bedding com-pound (3M 4200 adhesive sealant) to one bolt and inserted it from the outside of the boat; the 4200 held the bolt in place. Inside, I gooped up the flange base, making sure to fully encircle each bolt hole with sealant, and positioned it in place. I went back outside the hull, gooped up the remaining two bolts and inserted them through the holes.
Back inside the boat again, I placed the washers, lock washers and nuts over the bolts and tightened them by hand until I saw the smallest amount of sealant squeeze out from under the flange. Outside the boat again, I applied 4200 to the through-hull base and threads and screwed it into place.
Step 9
I used my homemade through-hull step tool to tighten the through-hull. I went back into the boat and tightened down the flange nuts and cleaned up any excess sealant. Although I used 3M 4200, there are many other sealants designated for below-the-waterline that have done well in our testing, including Sikaflex 291 LOT and West Marine’s 8200 (see “The Right Caulk for Your Boat”).
I carefully checked the alignment and clearances for all the components in the flange base assembly. However, I failed to test-fit the ball valve on the flange. To my surprise, I did not have enough clearance around the valve to screw them on without removing the handles. I was able to put the handles back on later, so all was well.
Step 10
For the ball valve’s final fit, I applied pipe dope to the ball valve threads and screwed it on to the flange base. I also used dope for the PTH fitting. [Editor’s note: Both Rector Seal and Oatey have done well in PS testing. See “Leak-proof Unions Get a Second Look.”]
The project was complete.
Conclusion
I have used the IBVF seacock system for nearly nine years. They have worked perfectly. There is no sign of corrosion and no trouble opening or closing them. In 2021, when I installed a small Beta diesel engine, I chose to use IBFV for the ¾-inch raw water through-hull/seacock (see “Repower From Scratch”).
The IBFV seacock system exceeds the ABYC standard for seacock installations by a factor of at least two. Depending on your application it may be a good alternative to the far more expensive traditional bronze seacocks that require more maintenance.
Contacts
GROCO, www.groco.net
SPARTAN, www.spartanmarine.com
BUCK ALGONQUIN, www.hydrasearch.com
FORESPAR, www.forespar.com
PERKO, www.perko.com

The term bronze is generally used to describe alloys made mostly with made copper and tin, but it is also applied to a variety of bronze alloys with other minerals added to improve performance in certain applications. Depending on the intended use, bronze alloys are dosed with everything from aluminum to lead to iron to manganese. The high tensile strength of silicon bronze (universal numbering system, UNS 65500) makes it a common choice for fasteners.
This article was originally published on 22 April 2024 and has been updated.


TruDesign fittings made in New Zealand are a great alternative to the Marelon route. They have many more options on fittings than Marelon line. The no corrosion path removes a whole set of headaches.
I installed a Groco 1″ IBVF when the Apollo ball valve seacock failed. The brass stem corroded inside the SS ball body. Turning the handle was too easy; the ball was not turning! Researching TruDesign revealed that the 1″ valves have a 3/4″ throat. A significant loss of water flow. Be careful to review the technical data.
It is critical to understand that the through-hull, or skin fitting, has straight threads (NPS) and that ball valves have tapered threads (NPT). Thus screwing ball valve (NPT) onto a through-hull (NPS), which is common practice, engages only a few threads and concentrates the breaking load. Very bad practice. Why straight threads? The photo in the vice is a clue: Through-hull fittings are longer than necessary to accommodate widely varying hull thicknesses. Cutting the excess threads to proper length is a necessary step in the installation process. Thus straight threads are required.
The IVBF is a great choice. Its female threads, into which the trimmed through-hull fasten, are straight (NPS). Its male threads, onto which the ball valve threads, are tapered (NPT).
When I replace the through-hulls and seacocks on our good old boat I want to follow the author’s lead and redesign systems to reduce the number (11!) and possibly convert to all TruDesign.
Another trick for removing those pesky corroded thru-hulls is to insert a tapered wooden plug into the outside opening and then use it to center a metal cutting hole saw to cut the inside perimeter of the flange which can be pried away from the hull. You can then drill the heads off the thru-bolts and drive the whole thing inward with a wooden block and mallet.
I’ve installed the Groco FTH flush face through hull numerous times. If you’re looking for eliminating drag wherever possible these will help . The shape cut into the hull can easily be accomplished with a small router and appropriate chamfer cutter. I’ve used a small wedge shape under the router base to tailor the cutter angle to match the through hull. Any protruding bit of the through hull can be sanded down by belt sander for zero material raised off the hull profile . Got to say I truly prefer the tapered cone seacocks.
I’ve had Trudesign for 11 years with zero problems. They are epoxied into the hull and they never leak or stick. I recently had to replace one with a larger one for a new engine and it was a piece of cake to cut out the old one with a hole saw.