


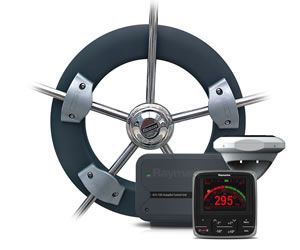
Photo courtesy of Raymarine
After the roller-furling jib, the most valued piece of gear aboard for many sailors is the autopilot. So fond of autopilots are skippers and first mates, many even name their units-Otto the autopilot, Joshua (after infamous sailor Joshua Slocum), Amelia (after historic female pilot Amelia Earhart), and WTF are a few that weve met during our cruises.
Having a mostly dependable electronic helmsman eases the burden of shorthanded sailing and relieves crew on those long stretches under power when cruising. An autopilot allows short-handed sailors to use the head, check the chart, or grab a bite to eat.
Electronic autopilots have been a staple of the cruising toolbox for nearly 40 years. An early option was the Tillermaster, which is now long gone. Testers remember taking it apart at one point, to discover that the built-in compass was housed in a modified aluminum Coors-beer can, complete with the original beer label. We had a Navico tillerpilot, then an Autohelm 4000 (two of them), then an Autohelm 4000 ST, and another Autohelm 4000 ST when the first ones LCD blacked out. They all worked quite well most of the time, generally failing only when the circuit board fried. We still carry two old Autohelm 4000s as backups-theyre nicely self-contained with the fluxgate compass and all the electronics in one small box. All this is just to say that the advancement in electronic autopilots is nothing like the big jumps that weve seen in most other electronic devices on board-incremental advances at best. (For an overview, see Autopilots 101 in the PS, April 2014 issue online).
In the spring of 2014, PS tester Ron Dwelle upgraded his system, installing and evaluating the latest offering from Raymarine, the Evolution EV-1 system.
Testers first hooked it up temporarily aboard Dwelles Florida-based Gulfstar 36 (nominally 14,000 pounds) to be sure it worked, and then installed it aboard his Niagara 35 (nominally 15,000 pounds) for an upcoming three-month test during a cruise of the Great Lakes. We say nominally since both boats are loaded down for cruising. Although, weve never weighed either, were pretty sure that the Gulfstar is heavier than the Niagara, when loaded.
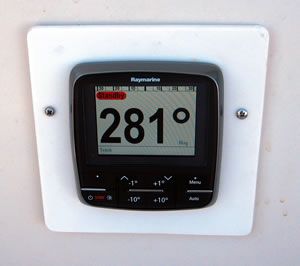
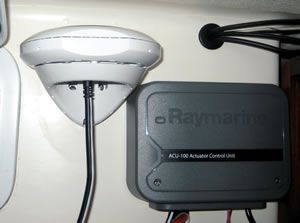
Photos by Ron Dwelle
What We Tested
Raymarine has a bewildering array of autopilot choices. You have to choose between two or three control heads-the p70 or p70R, or perhaps a wireless remote. Then you need to choose an Autopilot Control Unit (ACU)-model 100, 200, 300, or 400-the brains of the machine. The ACU must be suited to the drive unit mechanism that turns the rudder-cockpit wheel unit, tiller unit, hydraulic ram, rotary chain drive, electric linear ram, and so on.
In general, the model is related to the displacement of the boat as well as to the type of drive unit. For example, the ACU 100 is said to be suitable for small sailboats, up to 16,500 pounds displacement. Thats not what we think of as a small boat, but it does indicate where Raymarines market is. The ACU 200 and 400 models are designed for larger sailboats with three different mechanical under-deck rams to drive the rudder. Type 1 is for boats with a maximum displacement of 24,000 pounds. Type 2 comes in short or long rams for boats with maximum displacement of 33,000 and 44,000 pounds, respectively. Linear drives are generally the first under-
deck choice for sailboats with cable and quadrant steering. They use a ram that is attached directly to the steering quadrant or rudder post. The ACU 300 is designed only for continuously running hydraulic pumps for hydraulic steering-which are common in power boats but a rarity in sailboats.
In choosing an autopilot, its probably safest to use the manufacturers listed maximum displacement as your guide, even though there are many other possible variables that may be more important (hull shape, keel shape, center of effort, ballast/displacement, sail-area displacement, and waterline/displacement ratios, and so on.)
The most noticeable difference between the ACU models is how much power can be delivered to the drive unit-7 amps in the case of the ACU 100, 15 amps for the ACU 200, and 30 amps for the 400. Presumably, the 44,000-pound boat will have adequate banks of 8-D batteries to deliver the 30 amps.
But note that the amperage is the maximum output when the drive is operating, which is not constant. Autopilot makers estimate that the pilot will be working 25 to 50 percent of the time, but power consumption will vary greatly with conditions. Ideally, if the helm is well balanced, relatively little power is required for steering. Our preliminary trial (motoring in calm conditions) showed duty-cycle loads ranging from 2 to 5 amps, but this was variable.
We do know of sailors who have exceeded Raymarines recommendations regarding maximum boat size, with no severe problems. The difficulties almost always occur when the helm is overloaded-we have experienced it when doing foolish things such as beam reaching with a spinnaker in a singlehanded race-but reducing or balancing sails generally corrects the problem. Wed be hesitant to go much beyond the recommended max of 16,500 pounds for the ACU 100 unless we had a very well-mannered, under-rigged sailboat or were using the pilot primarily for motoring or as a backup to a wind vane in long-range cruising.
Of course, those who can afford to buy a 40-footer, can also probably spring for the extra cost of an ACU 200 or 400. The complete ACU 100 autopilot system for the smaller sailboat can be bought complete for around $1,500; the ACU 200 will cost an additional $1,400; and the full ACU 400 system will run up to $4,500 more than the 100, depending on the type of drive unit.
One component with fewer options is the EV Sensor Core. It comes in versions EV-1 and EV-2, with EV-1 being suitable to small wheel or tiller drives, and the EV-2 suitable for larger vessels. Its this sensor core that replaces the separate fluxgate compass of older units-you use it to set your course.
The heart of the EV-1 is a nine-axis sensor that calculates the boats heading, pitch, roll, and yaw. The sensor core feeds information to the ACU, so the autopilot can adapt its actions to the conditions (including deviation, heel, pitching, weather helm, etc.). Raymarine describes the sensor core as fully waterproof. It can be mounted almost anywhere-flush mount, bulkhead, left or right of centerline, above- or below-decks, even upside down. The primary requirements are that the unit be mounted level, arrow facing forward, and away from sources of extreme heat and magnetic interference.
We could have added a rudder sensor to the system, but decided that it was unnecessary for the test boat-and is generally unnecessary unless you have an under-deck drive unit.
In the end, Dwelle chose the wheelpilot model, with ACU 100 brains, EV-1 sensor core, and p70 control head for the Niagara 35.
The drive unit, which clamps onto the steering wheel, proved to be essentially identical to the wheel drive unit from the old Autohelm 4000 and Autohelm 4000 ST; in fact, testers were able to try out the entire Evolution (EVO) system without changing the wheel drive unit on our boat. When we installed the newer drive, we couldnt tell any difference in power between the older and the new wheel-drives. And now we have two backup wheel drives in case one fails. (The only failures weve ever had with a wheel drive were the plastic engagement cam breaking [now replaced with an aluminum clam] and the drive-belt fraying and breaking-an easy fix, though time-consuming.)
Installation
Whether youre replacing an older system or are new to current Raymarine autopilots, we found that installation is not terribly difficult; however, we did encounter a few glitches and concerns.
First is the cabling. The EV-1 system uses Raymarines relatively new SeaTalkng cables to connect the components. SeaTalkng is Raymarines version of NMEA 2000 (or NMEA 2K), the latest protocol for networking electronics. The basis of the cabling is a backbone cable into which all other things plug via spur cables (also called drop cables)-including the EV-1 sensor, the ACU, and any other devices you might want to connect (multi-function display, GPS, wind meter, speedo, AIS receiver, etc.). If youve never messed with NMEA 2000 or SeaTalkng, it would probably be best to go to Raymarines website to download and read the SeaTalkng Reference Manual, 81300-1.
Note that the connectors in SeaTalkng cables are different from standard NMEA 2000 connectors-if you want to connect NMEA 2000 instruments or the original SeaTalk instruments, you will need adapter cables. In our case, we had used a wireless remote with the old Autohelm 4000ST, so we unfortunately had to buy a Raymarine adapter for $90 in order to use it with the new system.
Cables for a basic system come with the unit, but if youre adding to the basic system, the cables are expensive. For example, a power cable lists for $20; a 3-foot section of backbone cable to extend the backbone is $30 plus a backbone connector socket for $15; a 3-foot spur cable is $30; a tee-connector is $20; and a blanking plug is $5. Costs can ramp up quickly. Youll be likely to need to extend the backbone cable or one of the spur cables.
The SeaTalkng cables are easy to work with. The plugs are small (micro), so you have to drill holes no larger than 7/16-inch to pass through bulkheads or the deck. However, the cables can’t be cut nor can new plugs be attached by a normal amateur-Raymarine says don’t even attempt it. Raymarine sells a variety of lengths, but if your cables are longer then necessary, theres nothing to do but coil them out of the way. The cables are color-coded.
The backbone and spur cables carry 12 volts through the system, providing power for other SeaTalkng instruments, but not for the ACU 100. The ACU 100, for some reason, needs a separate 12-volt supply, so youll have two power supplies-one to the ACU and the other to the backbone and cabling. The other ACU models get their power from the backbone cable.
The backbone cable must be terminated at both ends with a special resistor fitting. In between the ends, you can insert tee connectors to add a single spur/power cable or five-socket connectors to attach various spur cables and the power supply. Any unused cable sockets need to be capped with a blanking plug. The cable plugs are neat and mostly waterproof; you push the plug into a socket and twist a collar to secure it. The cable itself is relatively sturdy, though of course, youll want to protect it from chafing through bulkheads and the deck, and you don’t want the bends to be too sharp. Raymarine details this cabling information in its literature.
Its a good idea to thoroughly plan out your entire installation (from drive setup to mounting the control head) before starting. The sensor core, the ACU, and the cables connected to them must be kept at least 3 feet away from any equipment transmitting radio signals (VHF radios, cables, and antennas). In the case of single-sideband radios, the distance should be increased to 7 feet. The components also should be more than 7 feet from the path of a radar beam (normally spreading 20 degrees above and below the radar transmitter). Raymarine helpfully notes: Where constraints on the installation prevent any of the above recommendations, always allow the maximum separation possible between different items of electrical equipment.
All power-supply wiring needs to be conservatively sized, particularly the wiring from battery to the ACU 100 and from the ACU 100 to the drive unit, which is the most power-hungry part of the system. Raymarine provides a voltage-drop table, so you can estimate the amount of current loss through wire runs. In our case, the table said we could get by with 14 AWG wire for our run from the battery through the ACU to the drive unit, but we oversized a bit with 12 AWG, to be on the safe side.
One glitch we had in the installation was mostly due to a poor bit of technical writing in the Raymarine installation manual-the part about the EV-1 sensor core. The manual was clear that we could mount the sensor on the deck, on a shelf, or on a bulkhead. You just need to be sure that the arrow on top of the sensor is pointed straight ahead, in line with the centerline of the boat. Our sensor core came fully assembled, but we wanted to mount the unit inside the boat on the inside of the cockpit well. If we did that, the arrow would be pointing at right-angles to the centerline.
We studied and studied the unit but couldnt figure out how to take it apart or how to re-orient the arrow once we got it apart. The manual shows an exploded view of the EV-1, but no hint about how it comes apart. Finally, we found the answer in the section on dismantling the unit for repairs. It turns out that there are teeny-tiny, almost invisible, plastic clips holding the top on the unit. The manual tells you, push the end point of a pencil or similar tool into one of the clips located around the outside edge of the EV-1 or EV-2 enclosure. We took the lead out of our mechanical pencil and the tip worked perfectly.
Once we had the cover off, we were able to figure out how to re-orient the arrow and how to re-assemble the unit, though the installation manual provided no instructions. We did have some problem with the self-tapping screws that attached the enclosure to the mounting bracket; they don’t self-tap very well into the plastic, and you have to use a jewelers screwdriver to drive them.
A second glitch: Testers were replacing an Autohelm 4000 ST. Unfortunately, the new p70 control unit-the display through which you control the autopilot-requires a hole cut-out that is a half-inch bigger than the 4000ST (figures!). It also wasnt entirely clear how the p70 was to be fastened once we had a hole big enough for it. We eventually figured out how to fasten the unit (again, we had to discover the tiny plastic clips that held the bezel on-no help from the installation manual) and could use four No. 4 machine screws (hard to find in stainless). Eventually, we punted and made a new plate to cover the old hole, with a correct cut-out, from King Starboard, the fine white polyethylene plastic thats also a bit hard to find. The final result looks good, but it was a bit of unexpected hassle.
Otherwise, the installation instructions were straightforward and clear enough that we had no other problems, and we wouldnt hesitate to recommend DIY installation. Of course, if youre not comfortable installing the system yourself, at a minimum, you should ask to observe your technician install it. (Most technicians wont raise their hourly rate if you watch.) Its not rocket science, and everything you learn will help if you need to troubleshoot or repair the unit on your own in some remote locale.
SetUp
Setup on older autopilots, like our Autohelm 4000ST, was a bit complicated and included a dealer setup section as well as an owner on-the-water calibration, which included making big, slow circles. With the EVO system, most of that is eliminated.
On first power-up, you select the language you use, then select the type of boat (power, catamaran, sail, or sail-slow). We never found any explanation of what sail-slow meant, compared to sail. We chose just sail, and Raymarine suggests that you experiment, as it might be possible to improve the steering performance of your vessel by selecting a different vessel type. We plan to experiment during our coming three-month cruise.
After you feed in the basic info, a dockside wizard is activated. You select drive type, rudder limit, hard-over time, and do a rudder-drive check. If youre uncertain of any of this (as we were of rudder limit and hard-over time), you can use the default and add those in later after youre on the water and are able to do some experimenting.
The final step is to let the sensor do compass linearization once youre underway. This is basically to let the sensor determine deviation on board, caused by metal masses or electronic devices. The sensor does this automatically when you are travelling between 3 and 15 knots, typically for about 30 minutes. However, you can speed up the process by making a 360-degree turn.
Thats it for setup. While it may seem complicated when written out in detail, its a simpler procedure than was necessary for earlier autopilots.
The algorithms used by the EVO sensor core let the autopilot automatically adapt to both sea conditions and the vessels steering characteristics without any user adjustments. Users can also modify the system via three user-selectable modes (leisure, cruise, and performance). Leisure lets the boat wander a bit and uses the least power for correction. Cruise mode steers according to a mix of economy and performance, while the performance mode provides the tightest heading control but also creates the most work and electrical consumption for the drive.
Performance
So far, weve used the wheel autopilot minimally-a short trial in Florida, on delivery from our winter-storage launch to our home dock, and some short trial daysails in open water. We plan to use it extensively, in all conditions, under power and sail, during our upcoming three-month cruise in the Great Lakes North Channel and Georgian Bay.
On our trials, we set a course, then engaged the autopilot. We noticed the autopilot seeking a bit at first, undoubtedly learning our boats steering characteristics. Were fairly sure this will be reduced as we use it more. We adjusted our course, using the one-degree and 10-degree course change buttons, and found the autopilot quick and accurate when changing directions. We also learned that well want to adjust the tacking defaults by increasing the degree of turn, to compensate for our short-handed sail handling.
We tried each of the three modes (leisure, cruise, and performance) and found that the cruise mode seemed to steer adequately, with minimal electrical consumption. If were sailing in bright sunlight with our 300 watts of solar panels cranking out the amps, well probably switch to the performance mode. We also experienced only small wave action-1 to 3 feet-so well experiment more in varying seas as the season goes on and will have more definitive findings.
Preliminary Conclusions
So far, our experience with the EVO system is positive, although more testing will allow us to experience more positives and negatives. It appears that power-draw, one of our early concerns, will be easy to handle even on long sailing days, using our two banks of four 6-volt golf-cart batteries. Well experiment with the many other features of the unit and report back in the future.
Having a good autopilot will make any cruise or passage under sail better than one with 100 percent hand steering. However, we do have to add the old caveat-even the smartest autopilot can be pretty dumb, lacking the decision-making and seamanship judgements of the competent sailor. The prudent sailor will think of the autopilot as a blind crew member, capable of following instructions but unable to see that buoy you are about to hit or to examine the chart and note the rock youre about to run over. You still have to manage the boat at all times.
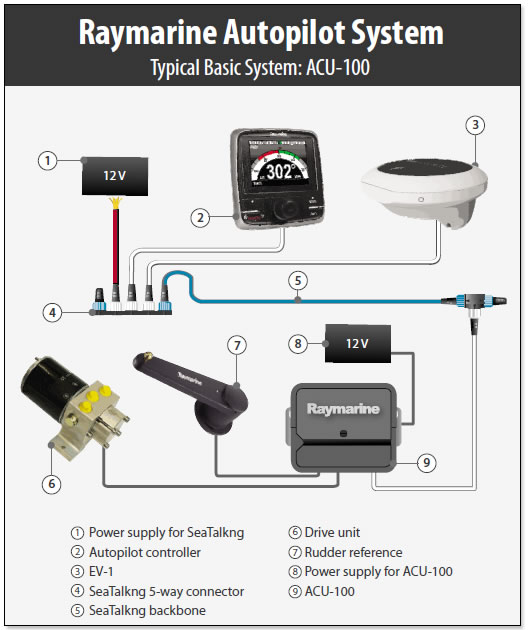
This diagram shows a typical belowdecks setup for the ACU-100. In a system with a wheel pilot (like the one we tested), the hydraulic drive unit (#6) is replaced by the electric motor and belt drive assembly in the wheel-mounted pilot.


