


Standing rigging has been evolving ever since natural fiber lines were lashed, knotted, or spliced to wooden spars, and led down to crudely fashioned, iron deck hardware. The challenge has always been the transition point where the straight-line pull (tension) changes direction, creating a stress riser in the rope, wire, or rod. Today, the materials have changed, but the challenge remains the same.
An ideal rigging material exhibits high tensile strength and dimensional stability, and at the same time resists rot, abrasion, oxidation, ultraviolet rays (UV), and air pollution. Stainless steel continues to be the first choice, and for decades, it has done a good job of keeping corrosion at bay while tenaciously withstanding the tug-of-war between a sailboats righting and heeling moments. Stainless steel has not been sidelined by stress, rot, or UV degradation, but there is a move toward high-modulus rope rigging thats lighter and offers promising low stretch and high tolerance to fatigue (see PS, September 2012 online); however, high-modulus ropes lifespan is still punctuated with a question mark.
The standard rule-of-thumb for stainless-steel rigging is that a properly sized set of rod or wire rigging will last about 10 years or one voyage around the world-not both. This is a very broad generalization, and exact rigging lifespan will be influenced by the designers safety margin (reflected by the wire or rod size and rig geometry) and the efficacy of other key hardware components. Metallurgy plays a big role, as does passivation, polishing, and the amount of exposure to the chloride ion (i.e. salt water). For example, a swage fitting attached to a deck-level chainplate will likely outlast a swage fitting on a bobstay fitting at the waterline. Material selection is an important variable, but so is how frequently and how hard a vessel will be sailed during a given period.
Photos by Ralph Naranjo
Most standing rigging failures occur in hardware components or where the wire and hardware meet, rather than in the span of the wire or rod rigging itself. (Wire, in particular, rarely fails without prior warning as individual strands fail before the entire diameter parts.) Swage fittings, toggles, turnbuckles, and tangs are frequently the culprit that causes a rig to go over the side.
One of the most egregious errors, still occasionally seen in new boats at boat shows around the world, is the misalignment of standing rigging. An unfair lead between a chainplate and a mast tang is more common than one might think. In many cases, mast attachments of tee- and ball-ended swages can wiggle out of alignment while under sail. In such cases, the leeward D-1 (also called the diagonal or lower shroud) will slacken and droop slightly, and the stemball or tee-fitting rotates a tiny bit in its socket; upon tacking, the tensioning of the shroud often causes the upper swage fitting to bind slightly out of alignment. The result is uneven stress on the fittings that can lead to premature failure of the swage. If your boat is rigged with such hardware, clean off the lenses on your 7 x 50 binoculars and take a close look at how these fittings align after each tack. As the cups that hold these fittings wear, alignment problems can worsen.
Because many rigging calamities result from a swage-fitting or cold-head failure at one end or the other of a section of standing rigging, we have decided to take a close look at what many veteran cruisers see as the ideal terminal for wire rigging.
Weve mentioned before how fatigue affects mechanical fittings and how bending moments on a highly tensioned shroud can induce accelerated fatigue, especially when close to a wire terminal or junction (see PS Advisor, January 2010 online). The fitting, which connects shrouds and a headstay on a multihulls rotating spar, is a classic case in point. Over the years, we have also voiced a preference for 1×19 wire over rod for cruising sailboats. For those looking for a logical compromise between the two, Dyform 1×19 wire makes sense.
Because so many failures occur at the terminals, the big question is why the industry settled on swage fittings for mainstream boaters. They are fast and easy to fabricate, which keeps cost down, and for most sailors, they can provide long, reliable service.
Swage vs. Mechanical Terminals
Day sailors and coastal cruisers do fine with wire rigging fitted with swage terminals. This is partially due to sound engineering, but it is also because of the typical profile of such sailors. The riggers rule of thumb is that a swaged shroud or stay can deliver a decade of reliable life. If a hairline crack shows up, the local rigger has quick access to a suitable replacement. However, those halfway across an ocean are better off with another approach. For the self-sufficient sailor, a better bet is a versatile mechanical terminal.
With these fittings on board, crew can replace a cracked swage with a mechanical terminal or even custom-fabricate a whole new shroud or stay. A rigging repair at sea can be achieved with a properly sized mechanical terminal and a coil of wire thats the same diameter as the largest shroud or stay on the boat. Other good options for temporary emergency shrouds are high-modulus fiber products like Colligos Emergency Shroud kit (see PS Chandlery, June 2011 online). While the shroud kit is easier to stow than wire, it is not a long-term solution.
In many cases, you might not even have to replace the wire. You can simply cut away the failing or failed swage fitting, and install a mechanical terminal with an elongated body to compensate for the few inches of wire that were amputated at the failed swage. Although such fittings are more expensive than ordinary terminals, they can pay off handsomely when youre stuck in the islands with a cracked swage and a length of wire that still has many years of life remaining.
Continuous vs. Discontinuous
There are two generic approaches to standing rigging. The most common is called continuous rigging and is defined by shrouds that run as a single piece from a chainplate, over spreader tips to a tang or cup fitting on the mast. The other type is discontinuous rigging, usually seen on larger more performance-oriented boats.
Discontinuous rigging is segmented with varying diameter spans terminating at spreader tips. Each vertical and diagonal section of wire or rod can be sized according to the load demands in each panel spanned. In either case, carrying appropriately sized compression fittings makes a world of sense when it comes to damage control alternatives or eliminating a cracked fitting before things get worse.
We frequently field questions regarding the reliability of rod rigging and fiber rigging. Rod rigging makes sense on race boats. And on a performance at-all-cost, ultralight displacement boat (ULDB) with carbon spars, fiber-rigging fits the bill. But for long-term, long-distance cruisers, conventional stainless-steel 1×19 wire or more costly Dyform wire are the most sensible choices, and fortunately for us, both are great candidates for mechanical end fittings.
Swages and mechanical terminals use friction to create a hold on the wire bundle they secure. The swage fitting is a sleeve that is pressure-molded to the wire bundle by being run through a die and squeezed to shrink its internal and external dimensions. There are two types of swage machines, roll and rotary. Roll swages are portable and more common than rotary. The swaging die will leave flash lines on the swage. Roller swaging is more desirable and results in a perfectly smooth swage. These machines are large and designed for high-volume, industrial-strength swages.
In both cases, the immense pressure on the stainless swage permanently reshapes the metal, but if overdone, it creates excess stress in the material that can lead to micro-cracking and premature failure. Skilled riggers use only high-quality wire, swages, and machinery; and they carefully measure the outside diameter of the finished swage to make sure it conforms to specifications. Swaging is used on both conventional 1×19 and Dyform wire. The fact that most swage failures occur on the lower (closer to the deck) swage has many cruisers using swages aloft and mechanical fittings at deck level.
What we tested
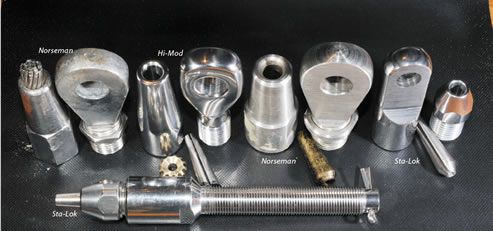
In this report, the first segment of a two-part look at mechanical fittings, we focus on how to properly install mechanical terminals. We look at each of the three major brands, Hi-Mod, Norseman, and Sta-Lok; although these are generically similar, the group still affords differing nuances that deserve a closer look. In the second part of this study, we will do some destructive testing to determine how the mechanical fittings handle tension and what failure modes evolve.
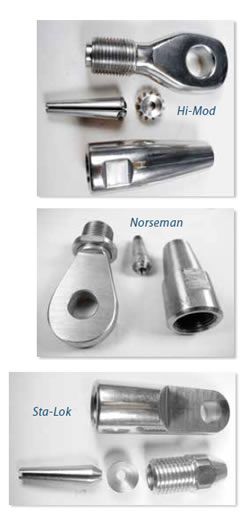
Hi-Mod
Hi-Mod terminals are made by Petersen Stainless Rigging Limited in the United Kingdom and imported into the United States by Hayn Industries. They are the newest of the big three mechanical terminal manufacturers, and although they don’t have as long of a track record as their competitors, the design and construction quality of these terminals is impressive. Each carefully machined, high-quality, 316 stainless-steel eye, fork, stud, or toggle fitting utilizes a user-friendly, wire-organizing crown.
The Petersen approach differs from Sta-Lok when it comes to socket and end fitting design. They prefer to use the body as the female-threaded fitting, and use the fork or eye-end as the male fitting. Their wedge is referred to as a cone, and the smaller insert is called a crown.
Notches in the crown capture one or two of the untwisted outer strands (depending upon wire diameter), and this helps to evenly distribute the outer wire bundle. The cone is less aggressively tapered, a feature that is meant to enhance surface contact. Like others in this grouping, the terminals work on either left or right lay wire rope. The manufacturer says that all components are reusable as long as there are no signs of damage, but they do advise that we do not over-tighten the fitting. Good advice for any of them. They also recommend the use of Loctite 262 both as an adhesive, and to lessen the chance of galling the stainless-to-stainless thread junction.
Norseman
Over the years, Norseman has refined the design, and for the most part, has maintained a commitment to top-quality 316 stainless steel. (A recent and unfortunate use of duplex alloy was discontinued.) The companys latest MK6 terminal assembly process is similar to that of the other two companies, but Norseman terminals continue to function without a crown.
The Norseman uses the socket itself to shape the carefully basketed outer strands surrounding the tapered cone. The Norseman design also utilizes a female-threaded cone and a male-threaded eye or other type of end fitting. Assembly instructions stress the importance of immobilizing the socket with a vise or wrench and implementing the twist and compression by turning the eye, fork, or other end fitting. The maker suggests using a non-corrosive marine sealant and also advises that care should be taken with terminals that come pre-coated with anti-friction material. Norseman coats only half of the male threads with this material, allowing a thread lock compound to be used on the rest. As with other products, its important to avoid damaging the terminal by over tightening. Three different types of cones cover 1×19, seven-strand, and Dyform wire.
Unfortunately, just after this test wrapped up, Norseman went out of business; however, there is a lot of stock in the retail pipeline, and except for the fact there will be no warranty service, the Norseman fitting is still a good product. The bonus: Youll likely be able to find it heavily discounted.
Sta-Lok
Sta-Lok has been engineering and fabricating terminals for 40 years and offers mechanical fittings for metric and inch-dimension stainless-steel wire. The maker provides eye, fork, stud, toggle, stemball, insulator fittings, and even has body length variations that can compensate for the removal of a failing swage.
The internal wedge slides like a sleeve over the inner strands of unwound 1×19 wire, and another component called a former acts like a bushing as the socket-like fitting tightens down on the outer strands. It also makes the terminal easier to use with right-laid wire, which can be accidentally unwound with Norseman terminals (though not with Hi-Mod).
Torque delivered by a large wrench forces the wire and wedge tighter and tighter into the compressing socket. The 316 stainless-steel fittings showed no sign of magnetism, which is evidence of high quality, high-nickel and chrome content austenitic stainless-steel.
Another big plus is the reusability of these fittings. Simply disassemble the fitting, and its ready to be reinstalled, as long as another unused wedge is available. Sta-Lok also offers wedges for use with 7×7, 7×19 and Dyform wire ropes.
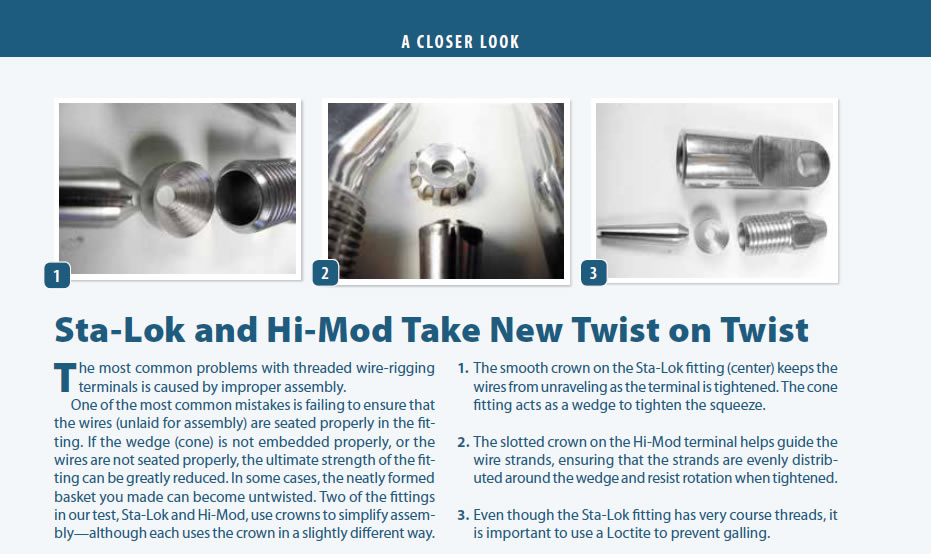
Each of the three systems we evaluated followed a similar assembly process. The main difference is in how the cone or wedge (when used) interfaced with the socket and other components during the compression process. The Sta-Lok fitting bends the ends of the cover yarns over the top of the wedge. The Norseman bends those yarns twice, once to form them over the top of the wedge, and once to straighten them again. Theres no bend of the yarns with the Hi-Mod.
Conclusion
We noted that there were far more similarities than differences among these three terminal brands. All were machined from impressive, nonmagnetic, austenitic, 316 stainless steel, and all used thread-induced compression to wedge outer wire strands and squeeze inner strands to resist slippage. The finish quality of the Hi-Mod was outstanding, and it, along with Norseman, engraved the wire size on the terminal, a seemingly minor but important value added.
Both Hi-Mod and Sta-Lok use a cup-shaped insert to help guide the ends of the outer strands into compliance, although in each case, the insert serves a slightly different purpose; the Hi-Mod keeps the outer yards from turning, and the Sta-Lok helps form the wires around the wedge. Norseman foregoes a crown (or shaper), and instead relies on the concave shape of the interior of the end fitting to evenly bend the wires. We found that putting up the Hi-Mod and Sta-Lok terminals was made easier with the added inserts. However, we had no trouble with the Norseman approach, as long as we paid close attention to relocating the outer wires evenly and making sure none were caught in the cones expansion slot.
Sta-Lok was the lightest and most compact terminal. Hi-Mod was the best finished, and the Norseman is a sea-proven workhorse. All of these products are manufactured in the United Kingdom, and after our near photo-finish first round, we came away feeling that all three are exemplary products, well-engineered, and built to exacting standards.
Hi-Mod, with its ring-crown, bushing-like wire aligner and superb finish nosed out competitors for the Best choice pick, but not by much. Those looking to get the most bang for the buck should consider the Sta-Lok and Norseman, both of which are prime value candidates. Buyers likely will be able to find the Norseman products at a deep discount given that the company is no longer in business.


Well said and presented. Informative. Thanks.
As a rigger with 40 years experience, I vote Norseman #1 by a nautical mile. Sta-Lok 2 and Hi Mod 3.
I’m looking forward to when you report on the comparison of Dyneema type lines v Steel lines for Standing rigging.
On the plus side is the fact that we could easily store enough Dyneema rigging in a small space for replacement if/when needed, compared to an unwieldy coil of steel and the accompanying steel fittings.
Dyneema is the easiest line to splice compared to any other line out there and it’s strength is much higher for equivalent diameter steel line. Several production boats are now offering Dyneema type rigging.
Not sure of the ‘Cons’
Given the common wisdom of replacing the rig every ten years, I am left wondering if there is a risk in the re-use of the Sta-Lok and other compression type fittings. Even with new cones, aren’t you still using a stainless fixture that could be 20 + years old?
Having just had a back stay failure, I am faced with replacement options. The boat is rigged with Sta-Lok and my first inclination was to replace the wire and re use the Sta-Lok fittings with new cones. The rig failure by the way was due to an insulator failure and the replacement will not include insulators. A rigger I consulted leans slightly towards swaging, primarily due to cost but also as a matter of questioning the potential risk of using a part, however well made, that is older than her children.
roller swaging more desirable and results in a perfectly smooth swage? was this a typo?