

The modest mug, basic in shape and function, finds its way aboard all but the most elegant or the most rudimentary of vessels, because it is so useful. Equally at ease with soup or stew, coffee, tea, or chocolate, bread sticks, spoons, or even flowers, it serves faithfully in rough water and smooth.
288
While almost universally carried aboard boats, the stowage of mugs varies as much as their uses. On some boats they rattle about in the galley sink, while in others they may be neatly nested in a drawer, hung from hooks, or (best of all) resting in proper racks. A mug rack is preferable for several reasons: the mugs don’t bang around, are readily accessible, and if clearance above the rack is sufficient it can even serve as a holder while filling the mugs.
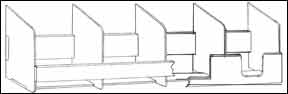
A functional, simple rack is shown, based on an idea from John H. Livingworth’s classic book, Offshore. This rack appears in some beautiful sketches of the interior of the late Captain Illingworth’s Mouse of Malham (one of a whole series of Malhams that he owned: Maid Myth Minx Mouse and Monk of Malham of which the Myth of Malham is most famous.)
The great value of this style of rack is that, even while holding the mugs snugly, their tops and handles remain free. Thus the mugs can be filled while in the rack by a cook with only one hand free in a seaway.
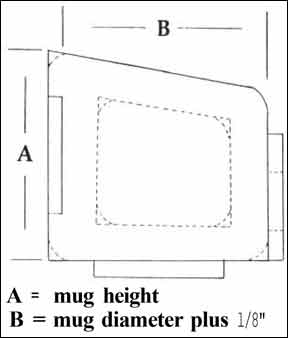
The illustration is pretty self-explanatory. Note that two styles of front bar are shown in the perspective drawing. The single, straight bar shown on the left works well if the mug handles clear the bar or fit into a corner. For most modern mugs which have a longer, deeper handle, a cutout like that shown on the right will be needed. The bottom and back bars should be about two-thirds the width of the sides of their’ respective uprights.
288
Construction is simple. Ideally, 1/4″ or 3/8″ stock should be used for the sake of lightness. Further, the cross section shows in dashed lines additional optional cut-outs from the uprights, again in the interest of lightness.
All the pieces can be cut with a saber saw, although a table saw will simplify cutting the long, straight pieces of the face, back, and bottom. To cut out the unnecessary center sections of each divider, you can cut the inside comers with a hole saw or spade bit used in an electric drill, and make the straight cuts with your saber saw.
For the sake of safety and appearance, round all exposed sharp edges and corners.
Note that the rear longitudinal piece is rabbetted into the uprights, so that the uprights function as bearing or support surfaces against the vertical surface to which the rack is fastened. The bottom longitudinal may be rabbetted or not as shown in the two different views.
If you’ve never cut a rabbet, this is a good time to start. After cutting out the uprights, carefully mark the bet. Then, with a fine toothed saw (a mitre box saw is good), make a series of closely spaced cuts to the exact depth of the rabbet. Be sure that there’s a cut at each end of the rabbet Then, with a sharp chisel, slice down on the inner line of the rabbet and you should have a nice, clean cut rabbet. If your first try is a little sloppy, your second will be better. Depending on how much of a perfectionist you are, either throw away the less perfect attempts or use them in the center of the rack where gap filling glue (epoxy is best) will make the joint firm and the location will hide the imperfection.
Once everything is cut, assemble carefully, using a square to keep things properly at right angles. You can use glue alone for fastening, but small brass brads will help keep things together and aligned while the glue sets up.
Sand and finish to taste.
-John Pazareskis


