

So I was thinking about Bitcoin today, the digital crypto-currency that seems no less cryptic than whats in my wallet these days, and this got me thinking about giant stone money on the island of Yap, and because I spent most of my time on Yap rebuilding an alternator, this got me thinking about alternator belts. Before you fire up ye ol iron genny for the season’s first smoke-belching run out to the mooring, to the dock, or to the fuel station (I sure hope its not to the pumpout station), you, too, might want to think about your alternator belt.
Many of the following tips are culled from editor-at-large Nick Nicholsons Offshore Log report on alternator care, written during his circumnavigation. For a more in-depth discussion of alternators, refer to Nigel Calders Boatowners Mechanical and Electrical Manual, which covers the topic in good detail.
- Check belt for excessive wear. Compare the belt width and depth with your spare belt (you have one of these, right?). When the engine area around the belt is coated with black dust, the belt is probably slipping or misaligned. Small-case, high-output alternators get very, very hot. There must be a constant, high-volume flow of clean cooling air through the alternator, if it is to last a long time. Black dust is like an insulator around your alternator. Paint can have the same effect: Don’t paint an unpainted alternator; it wasn’t meant to look pretty.
- Obviously, you must have the right size and type of V-belt. Look for A-series industrial belts, available from most autoparts stores. A quirk of these belts is that the belt number is not identical to the belt length: an A41 belt, for example, is 43 inches long.
- Check belt alignment. The belt must be properly aligned with the engine and alternator pulleys. Do not assume that the pulleys are aligned, even if you have a factory-installed alternator. A misaligned belt will often chirp-as opposed to a squeal or screech for a slipping belt. You can carry out a basic alignment check using a straight edge placed across the pulley faces. If the belt walks up one side of the pulley while the engine is running, misalignment is often the cause.
- Check pulleys for corrosion and proper operation. The pulley should not wobble on its axis. If the pulley-end bearings have failed (listen for distinct rumbling or roughness as you spin the unloaded alternator), check alignment carefully after replacing the bearings, as this may have contributed to the failure.
- Proper belt tension is an equally important issue. The correct belt tension depends on the pulley arrangement on the individual engine, as well as the type of accessories driven by the belt. A belt that is too tight can cause problems, but loose belts are more common. A loose belt will both reduce output and contribute to overheating. Again, check for black dust. If there is a significant amount of dust on your engine or alternator, the belt is too loose, the pulleys are misaligned, or you have the wrong belt size. Many engines send their RPM through the alternator, so if your RPM needle jumping around erratically, you could have a slipping belt.
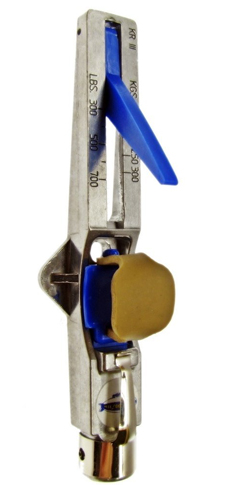
- A Gates Krikit V-Tension Gauge is a handy tool to have on board for checking belt tension. It is easy to use, and the instruction sheet gives belt tension guidelines for a variety of pulley and accessory combinations. You can find them at most auto parts stores (it’s part # KR-1 at NAPA auto parts).
- The engine compartment must be kept clean. A lot of air gets sucked through an alternator. If your engine runs dirty, that dirt will find its way into the alternator, coating the windings and other components. Wipe the engine down regularly with a light solvent, and clean the alternator case and fan as well.
- Make sure the alternator gets plenty of airflow. This may mean increasing engine compartment venting. A beautifully insulated engine compartment that reduces noise is very efficient at keeping the heat inside.
- New belts tend to stretch during the first several times you run your engine. After replacing the belt, allow a run-in period of about 10 minutes and check tension again. Continue to monitor tension closely after belt replacement, and make it a part of your normal pre-ignition check to manually test belt deflection by applying pressure with your finger. If the belt deflects more than 5/16-inches, pull out the Krikit and re-adjust belt tension. If the belt is properly tensioned, sized, and aligned and black dust is still a problem, you may have to adjust the regulator to reduce the load on your engine-this applies primarily to high-output alternators.
10. After your final adjustments, make sure your alternator mounting bolts-at the bracket and at the alternator-are tightened down. Some manufacturers give torque for the bracket numbers, 70 to 80 foot-pounds or thereabouts.
Bottom line: By paying a bit of attention to your alternator belt before the season begins, you can save yourself some big Bitcoin down the road.


