

If your potential dream boat has more than 20 years behind her, one item that will likely come up on a survey is keel bolts — the heavy duty fasteners that keep your keel from going on a bottom tour while you reach for handholds on your suddenly tippy craft. And even if you are not in the market for a new boat, it is always a good idea to take a close look at these essential structural components. A proper inspection will require the boat to be out of the water.
Despite advances in imaging technology, keel bolts are still very difficult to fully inspect without a bit of surgery. (We will be looking at keel-bolt imaging options in a future report.) Fortunately, some hints of trouble are obvious, like large gaps in the keel-stub joint, weeping rust stains near the keel-stub joint or crumbling bolt-ends in the bilge.
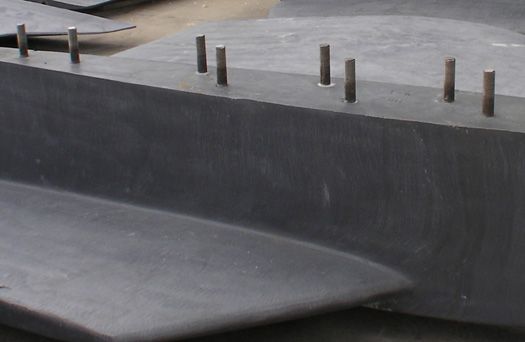
Keel Bolt Inspection
This year new World Sailing rules requiring a keel inspection took effect. Additional rules related to keels take effect next year. The rules describe the type of inspection required to participate in one of the offshore racing categories.
I’ve included an excerpt from the relevant rules below. The “Mo” preceding each designated subchapter of the rules indicate the category of race, with the lower number indicating the more strenuous race. For example a Category 4 rules apply to boats participating in “short races, close to shore in relatively warm or protected waters normally held in daylight.” Category 0 rules apply to “trans-oceanic races … where boats must be completely self-sufficient for very extended periods of time, capable of withstanding heavy storms and prepared to meet serious emergencies without the expectation of outside assistance.” There are separate categories for monohulls and multihulls.
It is worth noting that none of the new rules apply to Category 4 boats, those participating in near-shore events. Nevertheless it is a good idea to carry out an inspection of keel bolts at each haulout or after a grounding.
World Sailing Rules
Mo3 3.02.2 Effective 1 January 2023, at a haul-out within two years prior to the event, the owner or his/her representative shall inspect the integrity of the keel and rudder following the recommendations in Appendix L.
Mo0,1,2,3 3.02.4 Effective 1 January 2022: Inspection after Grounding – an appropriately qualified person shall conduct an internal and external inspection after each unintentional grounding
APPENDIX L
Model Keel and Rudder Inspection Procedure
The model form is not the only means of meeting the needs of OSR 3.02.3 Evidence of Periodic Structural Inspection, Organizing Authorities may develop on-line forms.
Structural Inspection of a boat shall be completed by a qualified person both internally (may be in the water) and externally (out of the water). The
purpose of this inspection is to identify and report to the Owner the condition of the keel and keel structure observed during this inspection. It is the responsibility of the Owner to undertake any repairs.
Consult the Owners’ Manual for the specific boat, steering system and type of keel (e.g. fin, lifting, swinging, full length). Inspect in detail any high-load areas: keel attachment, keel floor, steering systems, rudder(s). Pay special attention to prior repairs, especially following groundings.
Internal Inspection
Check backing plates, bolting arrangements, sump area and keel floors for any signs of cracking, weakening, or de-laminated tabbing. Lead or lead alloy keels may require tightening of bolts to ISO
standards due to lead creeping. Inspect keel bolt nuts for corrosion. Check bolt holes for “ovaling.” Visually inspect for possible de-bonding of the supporting structure.
External Inspection
Check there are no signs of stress cracks (not gelcoat cracks) around the keel attachments to hull, or movement or opening around the keel/hull interface which may allow water ingress and consequent keel bolt crevice corrosion. If in doubt, sand back bottom paint/gel coat to identify depth of crack. Check keel tip deflection to insure immediate return and no internal concomitant movement in the keel floor. Visually check high stress regions, particularly around the forward and aft
hull attachment areas of the keel, for signs of paint or gelcoat cracking or large, deep blisters, which can indicate separation and structural weakness.
Rudder/Steering system
Check bearing area for any damage/stress cracks; check rudder shaft and blade integrity, especially at any shaft joins and at upper connections to hull/deck. Undertake a tip deflection test to identify any excessive movement. If applicable, check rudder straps and gudgeons for corrosion or cracking.
Lifting and swing keels
In addition to above, check there are no significant stress cracks in structure around pins supporting the keel. Check for extensive corrosion on pins, cylinders and supporting metal structure.
Keel Bolt Repairs
The new rules prompted me to plumb the archives of our files on keel bolt repair, and I came up with several articles going back to some of our earliest issues. (This is one of those fundamental repair jobs that hasn’t change much over the centuries.) Most of the articles were responses to inquiries to PS Advisor, our question and answer section at the back of the magazine.
For some of our more recent articles associated with keel bolts check out: Sistering Keel Bolts; When Keel and Stub Part Ways; and Bilge Oil and Keel Worries. There is also an interesting article from our archives in keel bolt inspection. (I’m still looking for Part II to this article which first appeared sometime before 1998.) If you search the website using the term “keel bolts” (include quotations to narrow the search) you’ll find additional reports on the shocking keel failures that prompted the new World Sailing rules.
Repairing the Keel Bolt “Smile”
A typical problem that many owners face is the ever-widening gap between the keel and stub, often referred to as a smile, since it usually appears at the bow of the boat and assumes the sardonic curve of a slack tightrope. The course of action described below is the “keel repair light” for a minor separations. If the separation persists or there is significant corrosion or damage that is interfering with a good seal at the keel-hull joint, a more complete and lasting repair is recommended in When Keel and Stub Part Ways. Keel bolt repair is one of those mentally stimulating jobs, because no repair is ever the same, and a proper fix often require a bit of creative engineering. Mars Metal, the maker of most lead keels in North America offers a complete description of keel maintenance on its website.
Keel bolt replacement is also an interesting project because you find yourself wielding some unlikely tools, like the pickaxe I used to dig a trench under the iron keel of my former boat a 1937 Atkin ketch. The holes were required to punch out the keel bolts from above. Amazingly, all but two of the pre-World War II keel bolts were in serviceable shape. They don’t make them like they used to I suppose.
The following query from a reader is typical of questions we get on this topic.
Dear PS,
Our 37-foot boat has a bolted-on keel, and the joint between the keel and the hull keeps breaking open. Should I drop the keel and put bedding compound between the two, or should I try to fiberglass over the joint? The keelbolts are tight.
We’d not recommend simply fiberglassing over the joint. Without resolving the root cause, movement in the keel will likely crack the laminate and all your repair work will be for naught.
There are several possible causes of this problem, including cast-in bolts that are slowly pulling out of the keel, or inadequate structural support for the keel in the bottom of the hull. If you tighten the bolts every year, and more thread shows above the nuts inside the hull, the bolts are almost certainly pulling out of the keel, and you have a big job ahead of you, which would include cutting holes through the ballast near the top, drilling through vertically from the inside of the hull into the openings in the keel, and installing new bolts with nuts and big washers at both the top and the bottom.
We’d also look for signs of compression of the hull laminate in the bilge under the keelbolt nuts. If it’s a cored hull without solid glass up the middle of the hull, the core could be crushing under the nuts, allowing the keel to drop slightly more every year. We’d be tempted to back off the nuts in the bilge, and jack the boat up slightly off the keel. If the joint has indeed opened all the way through, you may be able to lift the hull using a series of screw jack hull poppets, but you must use a minimum of six, and place them only under strongly reinforced sections of the hull, such as under bulkheads.
The boat should be totally emptied of gear, and the tanks should be pumped out to reduce the weight as much as possible. This is potentially a very dangerous job. You must stop immediately if the keel starts to lift off the ground, if the hull begins to dimple under the poppets, or if the chain between the poppets becomes heavily loaded. Sometimes, you can separate the keel by driving a series of hardwood wedges into the joint as you jack up the hull. It’s far safer to do this job with a Travelift or crane, and if you do it in the off-season, the cost should not be excessive.
With the keel free of the hull-but dropped no more than an inch or so, with the bolts still in their holes-thoroughly clean out the joint with a scraper or putty knife, finishing off by flushing thoroughly with fresh water. Allow both the top of the keel and the bottom of the hull to dry. Don’t stick your hand in the joint, ever! We’d put a thick washer of polysulfide compound around each bolt where it enters the hull. but we’d fill the rest of the joint with a stiff, reinforced epoxy putty mixed from resin and Gougeon Brothers 404 high-strength high-density filler.
The boat should immediately be lowered back down on the keel, the keelbolt nuts set up firmly, and the excess squeezed-out putty cleaned away. While you’re at it, replace the existing washers under the nuts in the bilge with large plate washers cut from stainless steel stock at least -inch thick. For a 1-inch diameter bolt, make these plate washers about 4-inch square, and bed them in polysulfide, too. Give the compound a couple of days to cure fully, then re-torque the nuts using a 3/4-inch drive socket and a breaker bar, with a 2-foot length of steel pipe slipped over the breaker bar to increase your leverage. Most manufacturers will provide torque values for the keel bolts, otherwise J/boats offer a guide to torque values based on bolt diameter that can be used.


