

Small boat sailors are plagued by a lack of storage space, and nowhere is this pinch felt more dearly than dinghy storage. Transportation to and from shore is vital for all but marina hoppers, but a dinghy that is large and seaworthy enough to do the job is too big to store on your average 35-foot cruiser.
Inflatable dinghies can be rolled up and put below or lashed on deck, but they’re bulky, heavy, and time-consuming to inflate. They don’t row well, which means you’ll need an engine, which must be removed and stored each time. A lot of bother. A small rowing pram is another answer, but there must be room on the bow to store it. Kayaks are a fun, seaworthy, and fast option, but a hard kayak needs space. Inflatable kayaks are an option (see “Kayak Test Update,” September 2020).
For cruising in protected waters, towing is another possibility. Of course, this slows the boat a fraction of a knot, and in rough weather the dinghy can flip. If the dinghy is powered, you need to remove the engine before towing—more hassle. Even kayaks can be towed, but with even more limitations on the weather. You should never tow a tender you cannot bring on board if it gets rough.
FOLDING KAYAKS
And then there are folding kayaks. The original Klepper, using a wooden frame and a rubberized canvas cover, goes all the way back to 1907, and they have racked up an impressive history of explorations (www.klepperamerica.com). They are expensive ($3800-$5200), relatively durable, as heavy as a hard kayak, time consuming to assemble, and very able paddlers. These are better suited for land-based adventures to places where you can’t take a hard kayak. Folbot made a related line of kayaks, but they are now out of business.
Enter the Oru kayak, comprised primarily of a single sheet of very heavy duty corrugated polypropylene. Rather than supplying a carrying case, the floorboards become the top of a suitcase-size package with a shoulder strap. Oru provides clear instructions and a video explaining the simple setup.
Snap the seat in place, and you’re ready to go. It took us about 7 minutes on our third effort, just about exactly the same total as inflating our inflatable Airis Sport. Folding is a little counterintuitive the first time, but watch the video and you’ll see it takes only 2-3 minutes until you are packed up. Oru makes a whole line of kayaks for different types of paddling, from the simple and lightweight Beach LT (tested here), to the higher performance Beach ST and Coast versions, and a two person version of the Beach LT (the Haven).
OBSERVATIONS
Load carrying. The Beach LT has a wide open cockpit, almost like a canoe, which combined with considerable width, gives it good grocery carrying capacity, at least one third greater than the typical hard kayak and far more than most inflatables. Carrying a couple weeks of groceries for a couple will be a snap. The relatively low freeboard and lack of cockpit coaming restricts it to sheltered waters when heavily laden.
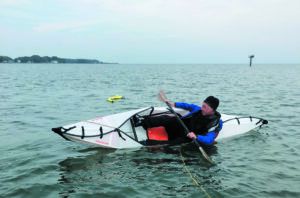
Paddling. The stability is considerable, though different from the common flat-bottomed recreational kayak. The V-bottom makes it feel initially tippy to some paddlers, but it stiffens up as it leans and feels very stable at speed. Nicely angled gunnels eliminate paddle strike, even in such a wide boat. Unfortunately, there is no cockpit coaming on this model (there is on the Beach ST), and as a result, if the boat heels past the gunnels, flooding is rapid and complete.
Smooth lines and extremely light weight (almost half the weight of a comparable rigid kayak) result in fast and responsive paddling, better than most hard kayaks in this size range and much better than the inflatable.
Seating. The backrest is a little floppy, more like a sit-on kayak than the firm support we expect from a sit-in kayak. How much this impacts comfort depends on you paddling style. I tend to lean forward and did not mind, while our other tester likes to lean back when paddling hard. On the other hand, she liked that she could sit cross legged in the wide cockpit.
Righting. No kayak test would be complete without flipping the boat over, bailing it out, and reboarding. Sit-on and inflatable kayaks always do best; just collect your stuff, flop over the side to the hips, and scoot back into the seat. Sit-in kayaks vary according to the cockpit design. We’ve flipped a Wilderness Aspire in mild whitewater and reboarded without bailing in a minute or less.
With whitewater and sit-on molded kayaks, the trick is to flip the boat quickly, to avoiding scooping up any more water. With the Oru Beach, this is impossible because of the lack of coaming. No matter how quickly we righted the boat, it was always completely flooded and required a lot of bailing. Reboarding without bailing first is impossible, so always carry a large scoop on open water. Our recommendation is to avoid open water where capsize and self-rescue may be necessary.
Durability. The hinges are rated 100,000 fold cycles. We didn’t beat it up, but Practical Sailor reader feedback has been good. Online reviews seem variable. Some of the early models had faults that have been resolved. Part of this may be the unique nature of the boat. Low temperatures can be a problem. You should not use the Oru in air temperatures below freezing (32°F/0°C) and don’t try to fold it below 50F. The kayak’s plastic hull can become brittle and crack at temperatures below freezing, and the cracks will reduce stiffness, and probably the hull’s life expectancy.
Other notes. Some smaller users found certain assembly steps required quite a bit of hand strength; we understand this gets easier as the kayak “breaks in.” We also noticed that temperature makes a difference. The boat assembles easier on a hot, sunny day than on cool and breezy day.
It is also a matter of practice, learning the easiest way to perform each step. Assemble it on a grass lawn the first time; it helps if you can spread out the parts, read the instructions, watch a few videos, and take your time. Assembling on a breezy day on-deck is safer if you add a painter to the bow (clip it to something before you start) and pull out the bulkheads and any parts that might blow away. Don’t fold it below 50F. The instructions say not to, we didn’t try it, and we can only assume it will reduce the life expectancy.
CONCLUSIONS
The boat is in a class by itself, so it’s hard to know what to compare the Oru Beach LT to. It paddles like a hard kayak, assembles in about the same time as inflatable, and should hold up to ordinary use. We still like our hard kayaks for banging into rocks and all-day comfort. We like the inflatable for whitewater and when backpacking is required. We’re fortunate that our 24-foot test boat is a trimaran with wide wing decks available for storage of a hard dinghy.
We can see why our readers like this one for cruising on small boats. There’s a lot to like in this origami boat, which, like the inflatable kayaks we tested, would make a good second tender for boats with crews that live on different schedules.
ORU BEACH LT IN CONTEXT
| ORU BEACH LT | PERCEPTION JOYRIDE 12.0 | PADDLE NORTH KARVE | |
|---|---|---|---|
| TYPE | Folding | Rigid | Inflatable |
| WEIGHT | 25 Lbs (11.3 kg) | 54 lbs (24.5 kg) | 32 lbs. |
| LENGTH | 12’1” (368 cm) | 12’2” (371 cm) | 12’ (366 cm) |
| BEAM | 29” (74 cm) | 27.25” (69 cm) | 33” (83 cm) |
| COCKPIT | 24” x 69” (61 x 175 cm) | 23” x 51” (58 x 130 cm) | 20’ x 40’ 51 x 102 cm) |
| STORAGE | 140 liters | ~ 140 liters | ~120 liters |
| MAX HEIGHT OF PADDLER | 6’6” (198 cm) | about 6’6” (198 cm) | about 6’6” (198 cm) |
| CAPACITY | 300 Lbs (136 kg) | 350 lbs. (159 kg) | 350 lbs. (159 kg) |
| STORAGE BOX DIMENSIONS | 33” by 12” by 29” (84 x 31 x 74 cm) | NA | 13’ x 19 x 40’ (33 x 48 x 102 cm) |
| SHIPPING BOX SIZE | 35” by 15” by 31” (89 x 41 x 79 cm) | NA | 15’ x 22’ x 42’ (38 x 59 x 107 cm) |
| SETUP TIME | 5-10 minutes | 0 minutes | 10 minutes (foot pump) |
| PRICE | $1,200 | $680 | 1300 |
What makes the Oru unique is its origami like construction that allows it to shapeshift from a rectangular box into a kayak. After the third try, we were able to do it in 7 minutes.

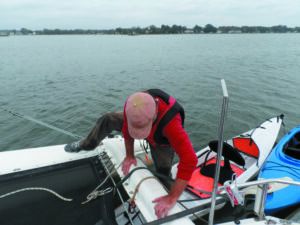
1. The F-24 trimaran’s tramp offers plenty of room for setup, but you should practice on land a couple of times before trying on the boat. Assembly on the foredeck of a small monohull will be trickier, but no less challenging than inflating a kayak of similar proportions.
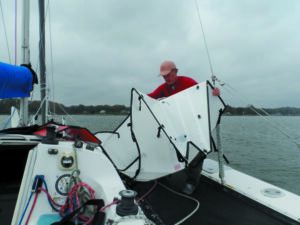
2. The kayak opens right up once you release a few Fastex buckles that keep the folded kayak hull in its compact form for storage and carrying.
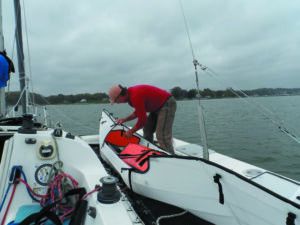
3. The bulkheads are put into place and a series of buckles are tightened to pull the two sides closer together. This relatively simple step is probably the trickiest in the whole process.
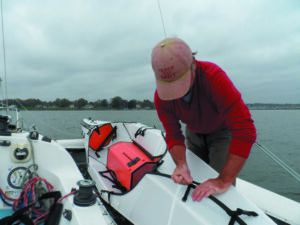
4. With the bulkhead in place, pulling the hull straps tightly together gives the kayak its shape.
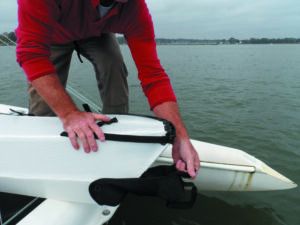
5. Secure a neoprene bra over the bow and stern to keep splashes out at the seams.

The Oru kayak is unique among kayaks, offering the features of a big rigid hull boat in a package that compacts to the size of an inflatable for stowage.
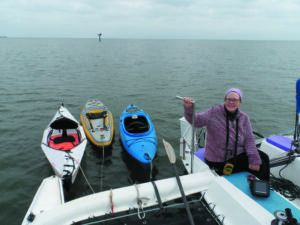
1. We also tested the Aris Sport and Wilderness Systems Aspire side-byside for comparison.

2. Standing is okay is smooth water, but the boat is not stable enough for standing and casting. Standup fishing is possible—with practice— on some beamy inflatable standup kayak/SUPs.
3. Boarding the kayak from the deck requires some practice. Ideally, you’ll have a stern platform or a ladder that allows you to drop down gently into the boat.
4. Testers deliberately capsized several times. Each time it filled quickly with water.
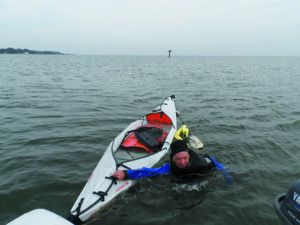
5. You’ll want a good scoop bailer tied to the boat, because you can’t reboard while the hull is full of water. You should practice capsizing and reboarding in protected waters.
Throwing a “yak” on deck is the common option for stowage. Except for multihulls and larger boats, this means that the kayak is usually in the way. The problem is exacerbated if the boat is stowed along a side deck, since this will impede movement forward.
For nearshore sailing, racks are a possibility, but these, too, introduce several problems: the risk of bending or breaking stanchions with a boarding sea (also a problem with side-deck stowage), anchor dancing due to the extra windage forward, and the inevitable snagging of sheets.
Yes, racks are almost a standard feature on big cats these days, and so long as these high-freeboard boats are fairweather coastal cruising, a stanchion rack will do the trick.
You can stow the kayak on top of your dinghy davits. This worked with the low davits on our PDQ, where the kayak was still easy to launch or recover. The same setup on high davits is trickier and can cause more weather helm.
TOWING
Sometimes it’s not worth the trouble to pull your kayak on-deck. On many bay cruises that involved kayak tours, we simply had too many kayaks to stow them all on deck. Recently, we tried towing a few different kayaks in a good breeze and in open water as an experiment. Here’s what we’ve learned so far.
• Rocker. More is better for towing, not so good for paddling.
• Width. Same. Specifically, width forward helps (bluff bow).
• Skeg. This definitely helps keep the boat straight.
• Trim. Keep the bow-high. This keeps the bow from digging in and yawing. You accomplish this by using a bridle and a relatively short tow line.
• Bridle. Instead of towing with a single line, we tow with a bridle that attaches to cleats about 5 feet apart. We’ve found that a bridle that is 2-5 feet wide and 6-8 feet long reduces yawing and keeps the bow up.
• Cockpit covers. We never got much water in the kayak during our coastal jaunts, but it is a good idea for longer passages. Self-draining cockpits are also a boon.
• Tow eyes. The fabric lifting straps on most kayaks aren’t meant for towing, so sometimes you have to get creative. On a rigid dinghy you can install a padeye, backing it as you would on a dinghy. Inflatables are a different story. At a minimum, use a cow hitch to attach the tow line to any fabric handles, as this will reduce the chafe.
The key to carrying kayaks is figuring out how to transport them. Towing works more often than you would think, but we only do this on flat water, and make sure you have an option to get them out of the water when it blows.


Hi Darrel, I met you last week on Picnic Key while cruising on my trusty Catalina 22, FAR FETCHED…I have read and enjoyed MANY of your articles.
Thank you sooooo much, John Tagiuri