

Earlier this year, reader and occasional contributor Fred Hatch found himself facing a quandary common among boat owners. The topsides of his 32-foot sloop were well faded, and small blisters were beginning to show along the waterline. Would he be in for an ambitious haulout and big yard fees, or might there be other remedies? He recounts his haulout saga:
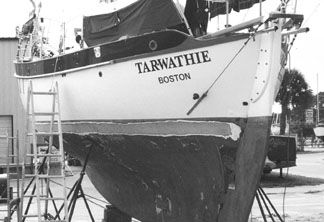
Because it had been a couple of years since Tarwathie’s last haulout—and the boat had spent much of the interim in tropical or semi-tropical waters—my wife, Tonia, and I were a little apprehensive about what we’d see when she came out of her natural element. We could see from the dinghy that she had some blistering—pimple size bulges—along her waterline, but we just hoped the whole bottom wasn’t covered.
After the boat was washed and set down, a closer inspection showed pimple blistering all along the waterline and down about six or nine inches. There were about six quarter-size blisters visible elsewhere on her bottom. Later on, as we prepped her for painting, we would discover another half dozen.
Most curious was the fact that the major blister problem existed only along her waterline and not over the whole bottom. I reasoned that this was due to the agricultural chemicals that floated on the surface of the tidal river that had been her home for two years. I suspected chemicals because some years ago a professional paper on blistering listed chemicals in the water as a major cause of severe blistering in certain areas of that coast.
I wasn’t too surprised to find blisters on Tarwathie’s bottom even though I had applied of Interlux Interpertect (10-mil) 10 years before. As we know, all barrier coatings and vinylester resins only slow down the rate at which a laminate can absorb water. In other words, barrier coatings are not 100 percent effective in keeping water out of the laminate.
The topsides were also going to get attention during this haulout, though not to the extent we intended. Once she was set and blocked and the slings were removed, we discovered that the yard had neglected to wash the slings after hauling a heavily barnacled work boat just prior to our haulout. Our topside paint was now scraped and gouged in four places. To the yard’s credit they immediately said they would pay for the repair.
So began our six-month saga in the yard. The work wasn’t going to take six months, but with our own full-time jobs and the time required to dry the blistered areas, it would be six months before Tarwathie would see salt water again.
The first thing we now did was to take a grinder to the blistered waterline and remove the bottom paint, Interpertect, and gel coat down to the raw laminate. Fortunately, the blistering didn’t go any deeper than the gel coat. While I was sanding, Tonia searched for and dug out any bottom blisters she could find, and also cleaned out and prepped the through-hulls.
Next I decided to remedy a problem I had lived with since coating the bottom with Interlux Interprotect 3000 10 years before.
A little history is in order. In the spring of 1993, I coated Tarwathie’s bottom with Interprotect 3000. I used that because it was still early in the year. Unlike Interprotect 2000, which is harder to work with in colder temperatures, Interprotect 3000 applies evenly in colder temperatures and provides longer overcoat times, which better fit my work schedule at the time. For the most part, the difference in the two products is insignificant. They both do the same thing—slow down water intrusion into the laminate. However, when it comes to applying your first coat of bottom paint with the 2000, you apply it within a few hours of your last coat as instructed by the time chart on the can’s label. With the 3000, you apply your first coat of bottom paint after waiting the prescribed time on the label (which varies relative to the ambient temperature) and then apply a coat of “No Sanding Primer,” or you can sand with 80-grit paper.
I decided to take the easy route and use Interlux No Sanding Primer on a rather windy day. I believe the material dried too fast in the wind and didn’t etch the 3000 properly, so every year since the bottom paint has dried and started flaking off just after we haul the boat. During every haulout I would go around and remove the lose paint, and then sand and fair the bare areas and repaint.
I decided that our most recent haulout presented a fitting chance for me to eliminate the problem for good. Fortunately, I was able to remove all the paint in about 12 hours of work with a simple scraper. No chemicals were required; I simply put a tarp under the boat to catch the chips and started scrapping.

Once I had all the paint off, I called Interlux and asked what grit paper I should use to prep for fresh Interpertect. I also asked if I could apply Interprotect 2000 over the old 3000. They told me yes, and specified 60- or 80-grit paper. Wanting good tooth for the new coatings, I used the 60-grit paper on a random orbit vacuum sander.
The old paint had left a faint blue residue on the bottom, which I used as a tracer coat; sanding until the blue was gone left a very smooth and fair bottom. Each side of the bottom took about eight hours of sanding. Again, since the total work time was broken down over several weeks, my arms, shoulders and back never became unbearably sore. They were just sore enough to remind me why I didn’t do this type of work for a living anymore.
Once the bottom was stripped, sanded, and rinsed with fresh water, we left it to dry. The area along the waterline where we had stripped off the gel coat gave very low moisture meter readings right away, confirming that most of the blistering damage had been confined to the gel coat. We checked the rest of the bottom periodically for moisture and by the time we were ready to start applying the new barrier coat and bottom paint, it was as dry as the topsides.
Once the bottom was dry enough, we took a week off from our regular jobs to finish the bulk of the haulout. We began by applying 3M Premium Fairing Compound to the waterline where we had removed the gel coat. This product is designed for use above and below the waterline; it’s made from vinylester resin and Scotchlite Silica balloons. (Unlike the red phenolic balloons, 3M Scotchlite Balloons are made of silica and cannot absorb water.) I’ve admired this product since I first received a sample from a 3M rep years ago. It mixes easily, applies very smoothly, is ready for sanding in an hour or two, and sands easily.
With Tonia mixing, I applied the fairing putty on the sunny port side of the boat; by the time we had finished with the starboard side, the waterline was ready for sanding back where we had started. I then faired the compound with 60-grit paper on a random orbit sander. Then, after a quick rinse with acetone to remove any residue, I applied a coat of Interlux 1000 Clear Epoxy Sealer to the faired area.
After allowing the 1000 to dry overnight, we used fresh water and a 3M Scotchbright pad to wash off the epoxy blush. Because it’s water soluble, it is easily rinsed away, preventing it from clogging sandpaper and from causing unwanted chemical contamination between coatings. We then sanded the 1000 with 60-grit paper to prep for over coating with 2000.
Now, after a final rinse of the whole bottom with fresh water and a quick wipe down with acetone, we were ready to apply 10 mil of Interprotect 2000. By applying one coat before finishing up our day, we were able to apply the balance of the Interpertect the next day and meet the overcoat time necessary for our first coat of bottom paint. One of the advantages of doing boat work in Florida in the spring is the climate; the average daytime temperatures in our neck of the woods easily allow for the use of temperature-sensitive products like Interprotect.
While I was applying the three coats of bottom paint, Tonia disassembled, cleaned and greased all the seacocks, sanded and greased the Max Prop, and installed new zincs.
Once the work on the bottom was done, we started the refinishing work on the topsides. Originally we were just going to wash and wax the topsides and wet sand out a few small scratches. However, with the damage done by the yard, we were forced to go a little further.
In the fall of 1998, I had sprayed Tarwathie’s topsides with Awlgrip All Craft 2000, an acrylic paint. Awlgrip sold it to us with the promise that it was repairable. Now, we were destined to test that vow.
After consulting with some local yacht painters, we wet-sanded the areas to be repaired and had a coat of Awlgrip 545 primer applied to fill in the deeper gouges. After wet sanding that with 400-grit paper, we masked off the area to be sprayed and had a local yacht painter apply several coats of Oyster White All Craft 2000. Once this fresh paint was dry and ready for sanding, we wet sanded again and faired the edges using 3M’s 1,500-grit wet/dry paper, and then buffed out the entire topsides using 3M Imperial Microfinishing Compound-Liquid on a lamb’s wool pad and a rotary buffing machine.
After all that, we applied a coat of Awlgrip AwlCare Polymer Sealer, a material developed to protect and enhance Awlgrip painted surfaces. This sealer is applied like a liquid wax and when it’s dry it is easily hand buffed out. (Six months later water still beads up on the surface.) Then it was time to finally stand back and examine the areas that had been repaired. To our surprise, we couldn’t find them, nor could anyone else. Even the painter who had done the spraying was baffled.
Before hauling out, Tarwathie’s topsides had been dull and faded from lack of care over the past couple of years. Now she was shining like she did when she first came out of the spray booth almost five years before.
All in all, Tarwathie went back into the water looking like new. Her previously faded topsides, which I feared would need to be repainted, looked almost perfect, and it had required only a reasonable amount of work. While her bottom had required more time and effort than we had anticipated, we were satisfied that she was once again in fine shape to carry us onward.
PS has tested numerous repair products (see our test of gelcoat repair kits, August 15, 2001), and every time we’re reminded that there’s no substitute for proper surface preparation in hull repairs. However, before you repair blisters, it’s important to investigate their cause. Here’s where retaining a competent surveyor can put you ahead of the game to determine what will ultimately be the best fix.


