

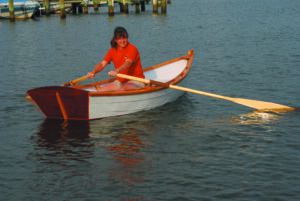
Spring and fall on the Chesapeake Bay delivers cruising at its best. Last fall, we were ready to go, the crowds were gone, along with the heat and humidity. Last on our predeparture list was a quick check of the inflatable dinghy.
Sadly, the old Avon had become a deflatable, and Plan B, our favored rigid dinghy, was in the midst of a refit. Option C was a 50-year-old, 7-foot Montgomery pram that had been a part of Wind Shadow’s original inventory. Her FRP hull was intact, and oars and oarlocks were at the ready, but there was a catch. Sporting a square rig upgrade and a pink interior favored by one of our granddaughters, who affectionately dubbed it “The Conch Cruiser,” it was sure to turn some heads. Yachting pretentions be damned, the old Monty became our shore chariot.
The cruise was a good reminder of the credibility found in a pair of wellcrafted spruce oars and the familiar heft of bronze oarlocks. Perhaps the appeal is based on the absence of complexity, the promise of reliability and the interaction one has with a rowboat. Whatever the cause, rowing remains a valid means of propulsion and a familiar activity for many sailors.
The Vikings went to sea aboard nimble long boats that performed well under sail and could also be rowed efficiently in a calm. Smaller versions of these round-bilge, lapstrake hulls are still seen throughout Scandinavia. Even smaller, lighter design derivatives are seen in Adirondack Guide boats, Catalina wherries and other regional watercraft. These easy-to-row hulls are quite maneuverable, but their payload carrying capacity is minimal.
Today, cruising sailors making dinghy decisions tend to opt for an inflatable, and the thrust is delivered by a four-stroke outboard rather than smoothly feathered pair of oars. Most inflatable dinghies range from around 8 to 14 feet and harness 4- to 20-horsepower outboards. Speed, stability and payload capacity have tipped the scale, causing oar makers to face the fate of the buggy whip industry of the early 1900s. Fortunately, despite the popularity of outboard powered RIBs, there are still some valid reasons for going retro and opting for oars and a rowboat.
Topping the traditionalist’s list is the simplicity of the propulsion system, the silence and aesthetics it delivers— plus there’s the physical benefit of the gentle exercise. For those on a tight budget, a pre-owned, all-but-forgotten rigid dinghy can’t be beat. They seem to be tucked away in the corners of almost every boatyard and can usually be bought for a small fraction of what a new inflatable and outboard costs.
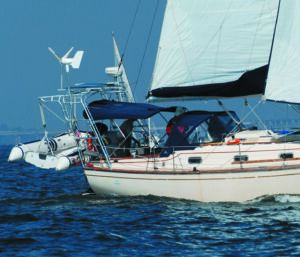
For many, the rigid dinghy is a waterborne version of the family “station car.” Like the weathered jalopy used to ferry commuters to the train or bus depot, the typical hard dinghy shuttles the crew out to a moored boat and back to shore when they return from a sail. In the mooring fields of the Northeast, where marinas are scarce, dinghies are regularly dragged up and down sandy beaches that are more like gravel. The best boat for this job has a wider, stable hull shape and enough freeboard to float the crew, cooler and whatever else gets shuttled to and from the shore.
TOWING VS. STOWING
The next step in dinghy decisionmaking is where to keep it underway. Towing immediately comes to mind, and on a light wind, flat-sea day it’s an elegant solution. Add more wind and steep, short seas and the drama begins. A gusty afternoon sea breeze, squall or an approaching front can quickly alter the sea state—even in relatively protected bays, lakes, and sounds. Just when it’s time to tuck a reef in the main and roll in some of the jib, your docile little tender starts acting like an unguided missile.
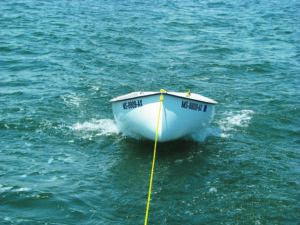
Some sailors try shortening the painter’s scope, so that the bow of the dinghy is close to the transom. Others add 100 feet of line to the painter and watch the little critter yaw back and forth teetering on the verge of capsize. The bottom line is that the more towable dinghies are almost always slightly longer, lean hull shapes with a pinched stern. Their tow point is lower on the stem. However, the worse conditions become, the more likely even these more seaworthy examples will end up swamped or capsized. Towing can lead to trouble, and even larger RIBs aren’t immune to capsize.
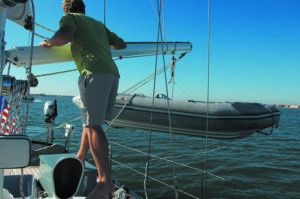
Most offshore and coastal cruisers recognize the towing dilemma and know that bad weather means big trouble. That’s why schooner skippers who fished the Grand Banks favored nesting dories that could be conveniently stacked on deck. Cruising boats can often fit a lean, little rowing dinghy on the foredeck, even when there’s a forestaysail set. Roller furling headsails lessen foredeck work and the dinghy doesn’t become an obstacle. All it takes is a lifting harness that balances the dinghy, and a jib or spinnaker halyard to hoist and lower the tender on deck. The lifting harness can also be configured to make the dinghy easy to invert and position over its chocks.
DAVIT PROS AND CONS
Davits are another efficient way to handle the dinghy haul out. There’s much to be said in favor of wellengineered and carefully installed davits. But over-enthusiasm about their carrying capacity is a problem.
When sized appropriately, and well reinforced, davits simplify dinghylaunching and recovery. However, it’s important to keep in mind that most older fiberglass sailboats weren’t designed to handle the potential loads of this equipment. Deck reinforcement often ends up in the hands of the installer, and the dynamic loading caused by a seaway is not always anticipated. There’s a big difference between a load calculation based on dinghy weight plus a safety margin, and the actual loads in heavy-weather conditions.
During calm weather, overloaded davits may go unnoticed. Some sailors even hoist their RIB with the outboard attached. However, as conditions deteriorate the advantage of davits begin to diminish. All too often, we see an inflatable RIB dangling in a vulnerable, low-slung position, just a couple of feet above the water. All seems fine right up until it’s time to reef the main and roll in some headsail. That’s when wave height increases and it becomes clear that the precariously perched dinghy’s windage has now also become a factor.
Offshore, the impact of a breaking wave can generate enough force to damage the davits or even tear them free from the deck. As heel increases along with pitch, roll and yaw, the chance of dragging the bow or stern of an oversized, davit-slung dinghy increases. Imagine having a wave deposit 200 gallons (1,640 lbs.) of seawater into a davit hung dinghy. Add in the impact of a breaking wave and it becomes clear that the davit arms also behave like massive crowbars, stressing the FRP deck structure at their bases. Raising the height of the davit hoist to keep the boat clear of breaking seas, but it raises the center of gravity, increases windage, and adds leverage to any forces on the dinghy hull. So, when sizing a dingy to be hung in davits, it’s important to keep moderation in mind and recognize that what’s right for the Waterway may not fit the bill for a run to Bermuda.
BACK TO BASICS
There’s a plethora of used prams and pointy bowed FRP dinghies in the used boat marketplace. Like many cruising sailors, I appreciate both an inflatable and a rigid dinghy. On long-term, long-distance cruises I carry both. For those who like to row and those eager to get where they are going, the most important performance upgrade involves ditching the feeble 5 1/2’ oars and upsizing to a pair of 7-footers. Ash is a great wood for baseball bats and for those McKenzie rowing dories whizzing down wild rivers. But for a dingy gondolier, a lighter pair of spruce oars are a treasure worth owning. Forget about a varnished finish; epoxy prime the bare wood and follow up with a couple of coats of one part urethane enamel such as (Interlux, Brightside, Pettit, EZ Poxy). The other worthwhile upgrade to consider is a rubrail replacement that makes coming alongside less torturous to your sailboat’s topsides and to the gleaming hulls of boats belonging to friends.
THE PHYSICS OF ROWING
A rowboat is a classic example of a simple machine, one that underscores Newton’s laws of motion. All rowers experience his first law—a rule that describes how a body at rest remains at rest unless an external force is applied. In this case, a well-shaped lever, the oar, sweep or scull, transforms human energy into pressure against the water column.
His second law of motion defines how the change in momentum and forces interact. In this case, the details of the action/reaction geometry define how much thrust will be produced and over what duration. Factors such as oar length, pivot point, stroke rate, and blade configuration interact with the physical ability of the person pulling on the oar(s).
Oarlocks act as a fulcrum and the ratio of oarlock-to-handle length versus oarlock-to-blade tip also play an important role. When it comes to rowing, the force applied is derived during the “drive” phase, and the process is a good demonstration of Newton’s third law of motion. This act of “pulling on the oars” creates a force, and the water being pushed against generates and equal and opposite force. The net result propels the boat forward.
Equally as important, is the kind of boat that’s being rowed. When it comes to pure speed, the primary design factors include hull shape, skin drag and windage. The best boat for an A to B sprint in flat water has a very long waterline, extremely narrow beam and is as light in weight as possible.
It’s no surprise that rowing regattas are populated with needle shaped, stiff, carbon fiber/epoxy, foam sandwich hulls. Keep in mind that rowing is a displacement mode phenomena and racing shells are at the opposite end of the design spectrum when compared with a beamy, little 7-foot cruising dinghy. Even so, there are factors that remain consistent in all rowing.
The most noticeable similarity is the four-part stroke that’s common to all rowing. The propulsion phase is referred to as the “drive” portion of the stroke. It’s the power imparting phase that upholds Newton’s notions. The onset of the “drive” begins with the “catch” or point where the oar blade rotates perpendicular to the water surface, submerges and the rower engages arms and shoulders in a backward pulling motion. The drive phase ends with the “extraction” as the blade(s) is lifted from the water. More experienced rowers feather the oars at this point. This involve twisting the wrists, so the blades become parallel to the water surface. The technique is most valuable when rowing into a headwind or choppy sea.
The final phase of the stroke is called the “recovery”, and it involves extending one’s arms as the rower leans forward in order to return the blades to where another “catch” can be performed. This signifies the start of another power portion of the stroke called the “drive”. In competitive rowing, a sliding thwart (seat) is used to both extend the length of the drive and add leg strength to the equation. Those seated on a fixed thwart are not able to engage their legs in the rowing effort and the length of the “drive” is much shorter.
Row your way to success with the right hardware and a good boat.
As the old cruising joke goes, what can go wrong will go wrong, and at the worst possible time. Cruisers often laugh about the inevitability of gear failures, when in fact these failures are usually avoidable.
Matching the right equipment for the job, making routine inspections and taking a zealous approach to maintenance and replacement schedules can keep even the most demanding cruises trouble free—but it all begins with knowing your boat.
OARS AND OAR LOCKS
The machinery involved in rowing delivers epic reliability and requires very little maintenance. Oars range from 9.5 foot long, feather weight, asymmetric shaped blade, carbon fiber elegance to stubby, five footers that often seem made of ironwood. Spruce is the right choice for the oars of most sailboat tenders and it pays to shop for them in person.
There are still a few oar makers supplying the waterfront. Some continue to machine-sculpt oars from slabs of spruce while others laminate their blades and looms. Shaw and Tenney (www.shawandtenney.com), premiere oar makers, create a wide range of spoon and flat blade, high quality, spruce oars. Fancy Oars, now run by Mr. Van Fancy, keeps the family tradition alive. Caviness (www.cavinesspaddles.net)builds a wide range of oars for rafters and drift boats as well as dinghies. Sawyer (www.sawyerstation.com),Smoker (www.paddlesandoars.com), and other brands also offer a wide range of tender and work boat oars and paddles. Their rough water, rocky shoreline favorites are made of ash or fir that’s strong, stiff and rugged enough for fending off rocky bottoms. The use of high modulus epoxy laminates and composite blades also adds durability, especially for those traveling fast running rivers.
The anatomy of an oar starts at the handle and runs to the tip of the blade (handle-loomneck- blade-tip). The button and leather are placed over the loom right where it makes contact with the oarlock. The feel of an oar varies from person to person. It begins with how the handle diameter and shape fit the grip of the rower. The flex of the loom and way the blade catches the water also play an important role.
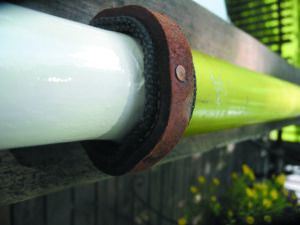
Oarlocks are the fulcrum in this wood grained, lever system called rowing or sculling. The hardware evolved from simple notches or holes in the rail of the boat into thole pins—wooden dowels upon which the loom of the oar presses during each stroke. In some instances, double thole pins were used per oar and in other cases lines or leather strops kept the oar snug against a single pin or wooden fitting.
The advent of iron and the more elegant alloy, cast bronze, improved the machinery. Sockets were attached to the rail at just the right height and distance from the person rowing. Oarlocks provided a bushing surface that rotated with the alignment of the oar.
Great debates arose over whether horn-type oarlocks were superior to ring-type oarlocks. One oarlock variation that has a large following on inland waters is the pintle type oarlock design that incorporates a U-shaped body fastened to round or square shaped oar looms. When inserted in the socket, the oar is pinned in place and cannot slide out of the oarlock. Used on Adirondack Guide boats and on wherries across the country, the design does not permit the rower to feather oars during the recovery phase of the stroke. Over the years, I’ve come to favor traditional bronze horn or ring type oarlocks. Adding retaining chains to the former helps prevent an oarlock from inadvertently being launched over the side.

OAR AND OARLOCK SOURCES
When it comes to top quality in wooden oars and paddles, and a budget that will support the investment, Shaw and Tenney of Orono, Maine gets the nod. A pair of their spruce flat blade 7’ oars, with leathers sewn in place, runs about $380. Caviness now makes a lineup of lighter Basswood laminated oars and a couple of their 7-footers run about $160. But comparing S&T oars with Caviness oars is akin to comparing violins and fiddles. Certainly it is true that a lot of fiddles sound beautiful. And for those on a tight budget or only occasional rowing out to the mooring, the Caviness Basswood oars, which are considerably lighter than their traditional Ash rendition, makes sense.
Throw in a set of Perko bronze oarlocks for about $50 and have some fun on the water (www.perko.com). But those looking for higher quality sandcast bronze oarlocks may want to join the search for a set of asymmetrical, halfmoon shaped oarlocks from UK-based Davey and Company (www.davey.co.uk). Closer to home, Port Townsend Foundry (www.porttownsendfoundry.com), has an the array of oarlocks made in USA.
1. The 7-foot oars fit neatly inside this ruggedly-built tender which can also convert to a sailing dinghy.
2. Long oars provide plenty of power to this slim little rowing dory.
3. Silicon bronze oarlocks of the ring and u-shaped design permit the oars to be feathered.

It’s not easy to part with a good sailboat. But it’s even more difficult when you close the deal before you are even sure you really want to sell. In truth, I was only in the initial stage of thinking, “well maybe it’s time to simplify some commitments,” one of those commitments was having two sailboats to maintain.
Deadlocked by indecision is where I found myself when a new resident in our Chesapeake Bay community stopped by and asked if I knew of any well-maintained Cape Dory Typhoons that just might to be up for sale. By the end of that short, pleasant conversation, plans for a change in ownership were taking shape. Unfortunately, COVID-19 put a hold on title transfers along with vessel registration, but the short hiatus led to one last interesting modification to Merlot.
Her new owner to be, Andy, spoke fondly of his winter visits to the Bahamas, and the locally designed and built Abaco dinghy he sailed. These small, open daysailers epitomized simplicity. Andy spoke eloquently about sculling his way home in a calm with no need for a cantankerous outboard. Merlot’s old 2-stroke outboard was indeed cantankerous. On the good days it was hard to start and remained absolutely silent on others. So, I began thinking seriously about a 10-foot sculling oar for Andy.
Plans took shape for a sculling oar and an oarlock that could be transom mounted. Naturally, the actual project took three times longer than anticipated, but the design phase was pretty straight forward. I checked the angles, clearances and length of a sculling oar to be slotted in a removable mount that would attach to the Typhoon’s outboard bracket. It would be secured in place with two 3/8-inch stainlesssteel screws, washers, and wing nuts. This removable, stern mounted sculling oar slot could be left in place or removed when and if an outboard was mounted for more long-term, longdistance powering.
For years, I looked at a pair of 7-foot ash oars hanging from the overhead in my shop. They were too heavy for dinghy rowing, but now seemed just right for modification into a sweep for sculling. The increase in length and blade surface involved a scarf joint in the loom and an alloy sleeve. The blade surface was extended by adding about 2/3 of one blade to the full length of the other. Care was taken to make sure the sections aligned and the scarf was overlaid on both sides with an epoxy bonded, biaxial FRP laminate.
I used a “dry fit” technique that positioned the blade-to-blade junction on a bench with a simple jig holding the two parts in proper alignment. Care should be taken to not over-squeeze the joint and cause too much of the epoxy to escape.
Contrary to earlier glues with less shear strength and a need to be minimized in a joint, epoxy is what’s called a “bad carpenter’s best friend.” It cures well in higher volume amounts, has excellent gap filling capacity, and remains exceptionally waterproof.
Once the epoxy has cured, remove the clamps and any tape or other surface covering material. This is a craftsman’s seminal moment; not only do you see how aligned your scarf happens to be, but you will also see how well you have done in keeping the epoxy in the joint rather than all over the surface. A few minutes of cleaning up while the resin was uncured, beats an extra hour of sanding to remove the hard stuff that can accumulate in all the wrong places.
Over in my scrap tubing collection resided a useful piece of anodized aluminum tubing, that was once part of the lower section of a broken windsurfer spar. It had an inside diameter that was just a couple of millimeters larger than the outside diameter of the new sculling oar.
I cut a piece that easily slid over the shaft splice and created a belt-andsuspenders reinforcement for the scarf. The tube section also provided chafe protection for the portion of the oar that made contact with the wooden sculling notch mounted on the outboard bracket.
When the blade-to-blade scarf had cured, I planed and sanded the junction area, so the contour was smooth and even. Finally, the joint was strengthened by laminating bidirectional roving and 10-ounce boat cloth to each side of the extended blade. The next morning, I mixed a batch of low-density West 407 filler and 105/205 resin and stirred it up as a final fairing putty. After sanding the sculling oar, it was painted with Interlux 404/414 epoxy primer and Brightside.
The traditional notch in the transom, seen on Bahamian dinghies and other craft set up for sculling was not a feasible solution. But a piece of 3/4-inch marine plywood was notched for the sculling oar and affixed to the outboard bracket with two 3/8-inch machine screw, washers and wingnuts. This allowed for a quick transition to Torqeedo power when and if Andy had enough exercise or found an uncooperative head wind.
SCULLING TIPS
Sculling, like rowing is easy to learn but takes some time to become proficient. The major difference is when rowing, the oar blade enters the water at approximately a 45 degree angle to the centerline of the boat at the “catch” that initiates the drive portion of the stroke. It passes though about 90 degrees to the “extraction” point. As the blade is lifted out of the water and feathered through the “recovery”, the cycle is completed. This feathering motion is initiated by twisting the wrist downward and turning the blade parallel to the surface of the water. It’s a technique that improves a rower’s efficiency, especially when pulling to windward. It’s also a technique at the heart of sculling.
Sculling involves a figure-8 push/pull continuous motion. The handle of the long stern sculling oar is moved left and right across the vessel’s centerline, but it is not lifted from the water, and the recovery phase of the rowing stroke is eliminated. This motion seldom makes more than a 20-degree angle with the centerline and the figure-8 pattern involves a push/pull arm motion. Twisting the wrist results in a more of a propellerlike, push against the water. During these continuous push/pull transitions, the force generated by the oar blade’s motion is transmitted up the shaft and into the bracket—causing the boat to move forward.


