

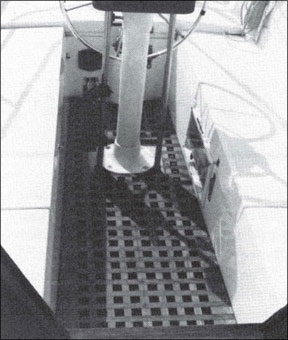
A snug-fitting teak grating adds safety and a touch of class to the cockpit of any boat. Spray or rain runs under the grating to the cockpit drains, leaving a reasonably dry footing for hopping about the cockpit as you haul in sheets to tack or trim sails. Unfortunately, you can’t buy a grating off the shelf to fit your boat, and having a grating custom-built can be acostly and nerve-wracking experience. The solution to both of these problems: build your own grating. Its a fun job that can keep you busy for a few winter evenings, and you can build it for less than one-third the cost of a custom-built job. And whether you build your grating the professional way by gluing cross members into dadoes cut in longitudinals, or the no-tools way by gluing pieces of teak on top of each other, the end result will be very satisfying-something about which you can be proud to say, I built it myself.
Making the Cardboard Template
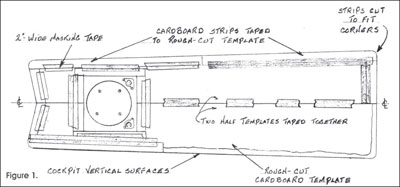
No matter how you build your grating, a carefully made cardboard template is necessary to ensure a good fit. Take some large pieces cut from corrugated cartons-the larger the better-and cut them to fit loosely into the cockpit area. Cut the cardboard to fit loosely around the wheel-steering pedestal if your boat is so equipped. If more than one piece of cardboard is needed to cover the entire cockpit, tape the pieces together with wide masking tape. Apply the tape to both sides to join the pieces securely. Make two half templates cut to fit around the steering pedestal, or two full-length half templates for a tiller equipped boat with no obstructions on the cockpit sole (see Figure 1).
Measure for a centerline at the forward and aft ends of the cockpit and draw a pencil line all the way down the center of the cockpit sole. Place short lengths of pine 1×3 along the edges of the cockpit to raise the templates above the cove formed in the fiberglass where the sole meets the sides and ends of the cockpit. Place a additional piece of wood under the center of the templates so that you can walk and kneel on the templates without pressing them down.
Align the straight edge of one half template with the centerline and fasten it in place with push pins or thumbtacks pressed into the lx3s, then lay straight strips of cardboard about 2 or 3 three inches wide along the edge of the template, press them against the vertical surface and tape them in place. Tape these strips in place all along the side and ends of the cockpit to develop an accurate pattern of the cockpits dimensions. Check occasionally to be sure that the large piece of cardboard doesn’t shift away from the centerline.
Place the second half of the template in position so that its straight edge is in contact with the straight edge of the opposite half and thumb tack it in place. Repeat the taping of strips of cardboard along the outer edges of this half template. If there is a steering pedestal, tape strips of cardboard around the pedestal to form a square opening about l/4 inch from the pedestal base and guard rail stanchions. The end result of this effort will be an extremely accurate template in two halves outlining the full dimensions of the cockpit at about one inch above the cockpit sole.
Check again to be sure that the cardboard strips make contact with the vertical surfaces on all sides of the cockpit, then carefully lift the two halves and apply tape to the underside of the templates to hold the edge strips in place. Handle the templates carefully as you take them home to begin work on your grating.
Laying Out the Pattern
On a large table or workbench, lay out the two half templates, align their ends and tape them together with short strips of tape every foot or so. You may notice that the aft end of the template is narrower than the forward end simply because cockpits typically are wider amidships than at the stern.
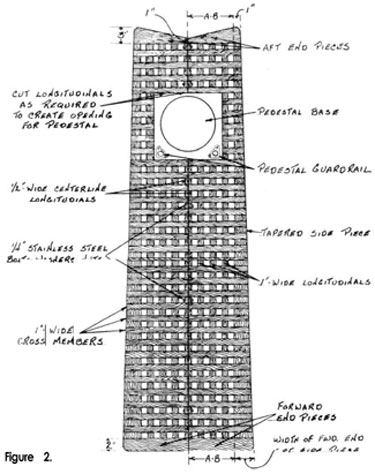
Measure in one inch from the edge on both sides of the template at the aft end and make a pencil mark. Measure the distance between this pencil mark and the center joint between the two halves and mark this distance (A-B) on the forward end. Connect these two marks on each template half with a line drawn with a straightedge or a straight board long enough to reach from end to end. This establishes the shape of the tapered pieces that frame the grating along each side (see Figure 2). The rudderpost housing may protrude into the cockpit, requiring the aft end of the grate to be notched to fit. Also cut U-shaped notches in the corners as necessary to prevent restricting the flow of water through the cockpit drains.
Measure two inches from the forward end of the templates at both sides and draw a line across the template to establish the size and placement of the end pieces that fit snugly against the companionway bulkhead. Note that the corners are round to fit the curve of the fiberglass where the bulkhead meets the vertical surface of the sides.
With all four edges of the grating laid out, you now have a long rectangle of space inside the edges to be filled with l-inch teak strips, crisscrossed with approximately l-inch spaces between them. By varying the sizes of the spaces slightly, you can make the grating come out even. For example, if the space between the inside of the tapered edge strip and the centerline turns out to be 7-1 /2 inches, then four l-inch spaces, three l-inch strips, and one l/2-inch strip along the centerline would work out very well. An S-inch space between the edge strip and the centerline calls for an increase in the spacing size from 1 inch to l-1/8 inches to make the grating come out even. Smaller variations can be worked out by trial and error, using dividers to vary the spacing between the strips until all the spaces are uniform. On the other hand, the width of the tapered side pieces could also be increased to help produce an even spacing of the strips.
Using the same principle, lay out the spacing for the cross members running from the centerline to the sides of the grating. Start with whatever spacing worked out for the longitudinal strips, then vary the spacing slightly so that the cross members come out even from end to end. Only very small variations are needed for the spaces between the cross members because even a 1/32-inch increase in spacing multiplied by the 30 or so spaces from end to end adds up to a difference of about an inch in the overall length of the grating.
The Professional Method
If you have power tools, particularly a table saw or a radial arm saw, and a disc sander, youre well equipped to build your grating the professional way. Although not as simple as the no-tools method which well discuss later, the professional method is still a fairly simple process of gluing cross members into dadoes cut in the longitudinal strips and tapered side pieces.
Begin by totaling up the number of l-inch-wide longitudinals running from end to end in your grating layout, plus the two tapered side pieces. Allow about l/&inch for saw kerfs and buy enough 5/4 teak (about l-l/B inches actual thickness) to be cut up for these parts. Next count the total footage for the l-inch-wide cross members, plus the two end pieces and buy l/2-inch teak (l/2 inches actual thickness) for these parts. Buy about 10 percent more than you need.
Rip the 5/4 teak into the number of l-inch longitudinals required, plus two l/2-inch-wide longitudinals which, when joined at the centerline will make a l-inch strip. Then cut the two tapered side pieces to size.
Lay all of the pieces out on the templates and carefully mark the location of the l/2-inch-deep dadoes that must be cut for the cross members. Clamp all of the parts required for each half of the grating together and cut the dadoes through all the parts at one time for maximum accuracy. A dado cutter will speed the job, but teak is a dense wood that dulls ordinary steel blades in a surprisingly short time, so making repeat cuts with a carbide-tipped saw blade is recommended.
Start cutting the dadoes near thecenter of the pieces and work your way towards the ends until the clamps get in the way. Remove the clamps and press a few l-inch cross members into the dadoes already cut to maintain the alignment, then continue cutting dadoes to the ends of the strips.
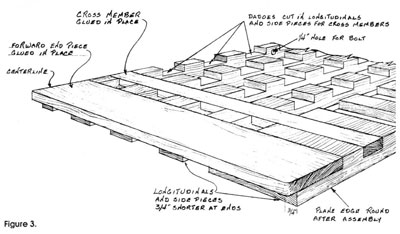
Now lay out the tapered edge piece and longitudinals in their proper positions on one half the template and press a few l-inch cross members into the dadoes for alignment, making sure that boththe longitudinals and the cross members are in line with the layout lines on the template. Cut the end pieces to shape from l/2-inch teak and glue them into the dadoes cut inthe ends of the pieces (see Figure 3). Use epoxy or resorcinol glue to create strong, water-resistant joints in your grating. Use weights such as pails of water, cans of paint, or olddoorstops, anything that will put at least 10 or 15 pounds of pressure on the glue joints while they dry. Clamps are impractical as you are working on the flat surface of the template. I used lead blocks, antique cast-iron irons, and even a couple of railroad brake shoes that I found along the tracks to press the glued parts together, and they worked fine.
Next, glue the cross members into the dadoes, setting them flush with the outer face of the l/2-inch longitudinal at the centerline and allowing them to protrude slightly beyond the tapered edge to be planed flush later. Work your way from one end to the other, using your weights to press the cross members down into the glue. If you run out of weights, take a break for an hour or so, then continue gluing.
When all the cross members are in place and the glue has dried, put a weight on each end of the half grating and place the parts for the second half alongside so that the overall alignment is perfect. Then glue the end pieces and cross members in place, weight them down, and let them dry.
At this point, your professionally-built teak grating is complete except for rounding off the bottom edges of the tapered side pieces to fit the curved corners of the fiberglass cockpit, sanding the ends of the cross pieces flush with the side pieces, and finish-sanding the top surface of the grating.


