


A proper below-the-water line sea cock consists of three parts: the outside portion or mushroom, which threads into the flanged valve, the flanged valve, and the backing plate.
A flanged seacock is normally through bolted to the hull, with the bolt heads fared over. However, for my project, the hull was only 7/32-inches thick and the counter sink depth for the matching 1/4-inch bolts is 6/32-inch, before any allowance for fairing. This is not enough thickness to be strong or allow effective sealing.
Cored hulls present a similar problem. With outer skins often less than 1/8-inch thick, they are unsuitable for countersunk fasteners. You could remove core around each bolt (you will need to do this around the intake hole), fill with thickened epoxy, and redrill, but there is a simpler, stronger way that eliminates the need for extra holes.
Instead of mounting the through-hull directly to the hull with bolts, I bolted it to a pre-cast fiberglass backing plate, which is in turn bonded to the hull. The valve and other parts can be either bronze or reinforced plastic that meets American Boat and Yacht Council (ABYC) standards. I chose Marelon for weight, cost, and corrosion resistance. The other seacocks on the boat were Marelon. Silicon bronze is another option. Beware of cheap brass with a high zinc content.
The backing plate thickness should be at least two bolt diameters thick to allow for threads and the counter sink.
For a backing plate, I used -inch precast structural fiberglass (McMaster/Carr 8537K46). As a rule of thumb, the minimum diameter of the backing plate should be equal to the diameter of the seacocks base plus eight times the diameter of the mounting bolts. In my case, the bolts were 1/4-inch, so the plate should be two-inches greater in diameter. While the backing plate can be any shape, I chose round because it is easily cut with a hole saw and reduces stress risers on the hull.
The outer edges should be tapered to further reduce stress-risers and improve bonding, and the bonding should include a perimeter filet.
Large diameter hole saws work best in a drill press with the work firmly clamped. The drag is substantial and the saw can suddenly grab and cause injury. A hand-held -inch drill can work; clamp the work, stay straight, keep the pressure light, use both hands, and do not wrap your hands or thumb in such a way that they can be trapped if the drill catches and spins. Soapy water in a squirt bottle provides lubrication and cooling.
After cutting the blank (5 inches) I ran a 3-inch hole saw in reverse to lightly scribe a circle that matched the bolt pattern. This insured that the second hole for the through-hull would be concentric with the backing plate and seacock. The 1/4 -inch pilot hole also served as our clamp when bonding.
The holes for the seacock bolts in the backing plate were marked, drilled at tap size (13/64-inch for -inch USS thread in fiberglass), tapped, and counter-sunk for the heads.
Degrease the bolt threads before applying epoxy; new bolts will have machining oil in the grooves. After roughing-up the screw heads just a bit on the grinder, thread them in all but the last -inch, apply epoxy to the underside of the head and threads, and tighten securely. The threading and epoxy prevents them from rotating when the nuts are tightened.
The threads alone in good FRP are quite secure; testing has confirmed that as long as the backing plate thickness is greater than two bolt diameters thick, the bolts will break before the threads strip. Studs alone, without heads are also secure, and some professionals prefer bronze studs with bronze seacocks, reasoning that dissimilar metals are avoided and the studs can be more easily replaced if corroded.
Drill a 1/4-inch pilot hole in the desired seacock location. Dewax both the hull and backing plate by wiping with xylene. Using a disk grinder with about 60 grit paper, grind the backing plate to match the curve of the hull, and sand the hull interior to provide a good tooth for the epoxy.
Mix up a few ounces of epoxy, thicken with Cabosil M-5 or equivalent to a mayonnaise consistency, generously coat the backing plate, and clamp in place using a long greased bolt through the center pilot hole (remove the bolt while the epoxy is in gel state). When the epoxy cures, use a hole-saw to drill the hole for the through-hull, using the pilot hole as a guide. Start drilling from the inside, as it is more critical that the valve be square here, but finish from the outside to avoid chipping gelcoat.
Very generously coat the internal threads with a Teflon pipe sealant and mount the seacock on the inside, using either polyurethane sealant or a thin butyl rubber gasket. Dry-fit the mushroom through-hull to determine excess length, cut off the excess, and taper slightly to ease threading. Screw the nut on completely first so that you can use it to straighten any bent threads-you wont use the nut for the installation, but it is handy for this.
Place a generous ring of Sikaflex 291 or equivalent on the underside of the mushroom flange, insert and tighten securely, but not tightly. A special tool can be purchased to grab the internal groove of the mushroom, or you can make your own by slotting an appropriately sized pipe.
Should you decide to forgo the flanged through hull, you still need the backing plate. Typically the threaded through-hull fitting is not threaded clear to the head and has a minimum clamping distance. Perko, for example, specifies a 3/8-inch minimum.
If the hull is thinner than the minimum the nut cannot be fully tightened, although it will feel like it is, any effort to tighten it will fail or crack the nut. Additionally, there is not enough thickness to provide good stability. Instead, bond into place a backing plate as described above and drill through the resulting sandwich. A thin hull needs this support.
If the hull is cored, remove some core after drilling and fill with thickened epoxy. Above waterline fittings can be bedded with butyl tape; it is neater to work with than polyurethane, there is no cure time, and it holds the mushroom nicely in place for one-person installation.
Does this installation require extra work? Of course. But this approach works on thin and cored hulls, is super strong, and requires only one person. Although threading the backing plate takes a little extra time, the parts go together quickly on installation day, and I know that the valve is as secure as it can possibly be.
Thin-hulled boats often require special attention when adding or replacing seacocks.
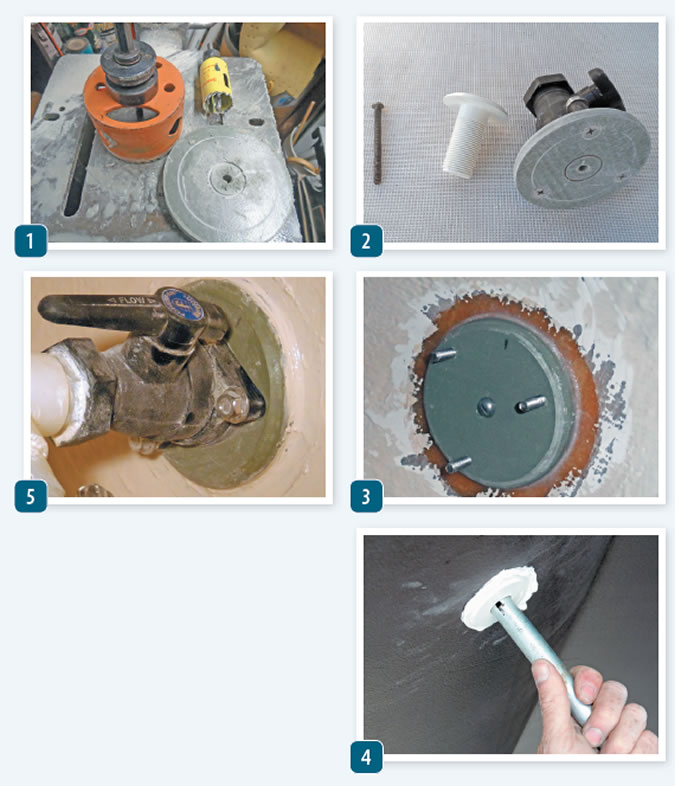
- A hole saw is used to score the backing plate to make it easier to center the bolts for the through hull flange.
- Ready for assembly, from left: the machine screw used to clamp the backing plate into place, the Marelon through-hull (ABYC approved), and assembled through-hull and backing plate.
- Inside the hull, the long machine screw (center) is used to clamp the backing plate in place while the epoxy cures.
- Once the backing plate epoxy adhesive has cured, you can use the center hole as a guide to drill the hole for the through-hull mushroom. A pipe with two notches cut into the end that will mate with nubs on the inside of the through-hull serves as a homemade through-hull wrench. Use a generous amount of Sikaflex 291, or a similar below-the-waterline adhesive to bed the through hull.
- The final assembly, inside the hull, now gives adequate reinforcement to the seacock, creating a rugged installation that complies with ABYC requirements.


")