

One reason for my aversion to scrubbing is that a Corsair F-24 trimaran is a folding trimaran, making it a nightmare to clean. Comprised of a puzzle of panels intersecting at multiple angles, the boat has nooks and crannies everywhere. It’s almost as if the builder strove to discourage owners from spending any time with a brush and bucket when they could be sailing.
The other problem is rigging. Because I’m always experimenting with ways to improve sail trim, there are dozens of lines crisscrossing the deck, ready to trip the unwary sailor and entangle long-handled scrub brushes. But a few times each year, I cave in. By that point, the boat needs a serious scrubbing, and I like to do it right.
Our online archives are chock-a-bloc with reports on various cleaning concoctions. We’ve tested everything from stain cleaners to boat soaps. Comparing familiar brands of boat and car care products, these archive reports are helpful, but I generally stay away from specialty marine cleaners because they are overpriced. Most of what I need can be found for less at home supply stores, local hardware stores, or even the supermarket. When I can, I like to make the cleaner myself (see Inside Practical Sailor, “Homemade Mildew Preventers that Really Work”).
After multiple deep-cleaning sessions with my F-24, it became clear that how I cleaned and which tools I used for cleaning were more important than which brand of surfactant I used. So, in this report I’ll focus specifically on the tools and techniques that make it easier to deep-clean a sailboat hull and deck. What brand boat suds you use will matter little if you use the tools and techniques described here.
BRUSHES AND BUCKETS
Choose the right brush for the job. Some boathooks have a threaded tip to screw a brush onto. Using a boathook/brush combination can be exasperating on a sailboat because the hook tends to snag on stanchions, lifelines, and running rigging. However, an extendable boathook/brush is perfectly good for washing topsides, since there are no lines to snag.
Most deck brushes are sold with long metal handles; we find it easier to grip a wooden handle, especially when the handle is wet. Many hardware stores stock wooden replacement handles for mops, brooms, and boat brushes that are interchangeable with metal handles. If you check your broom closet, you might find you already have a wooden handle that fits your boat brush.
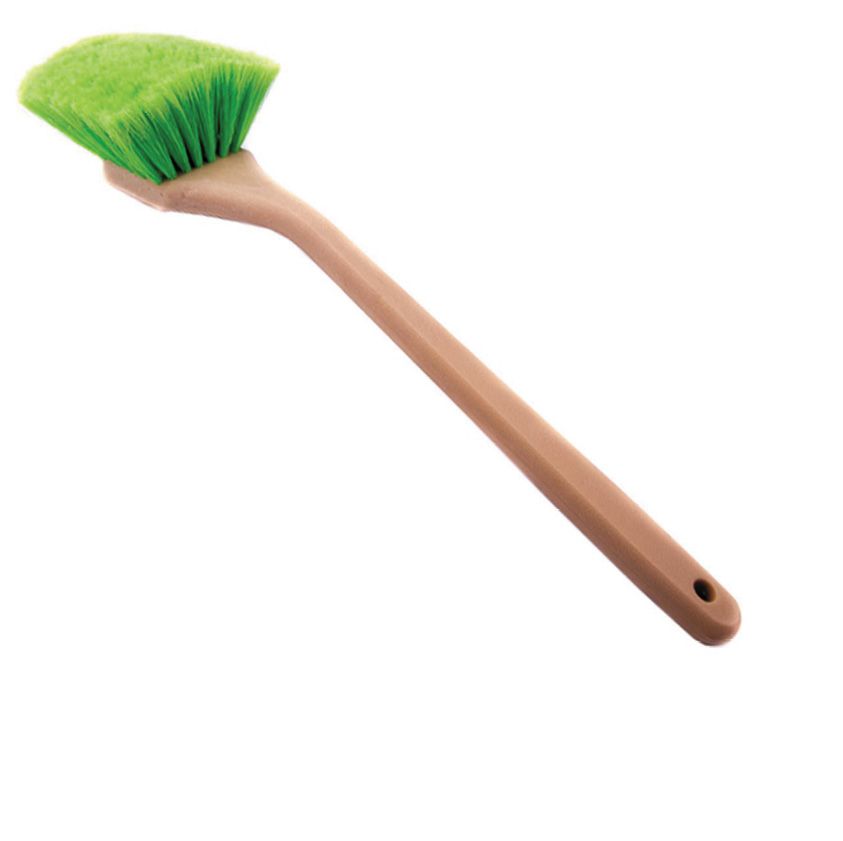
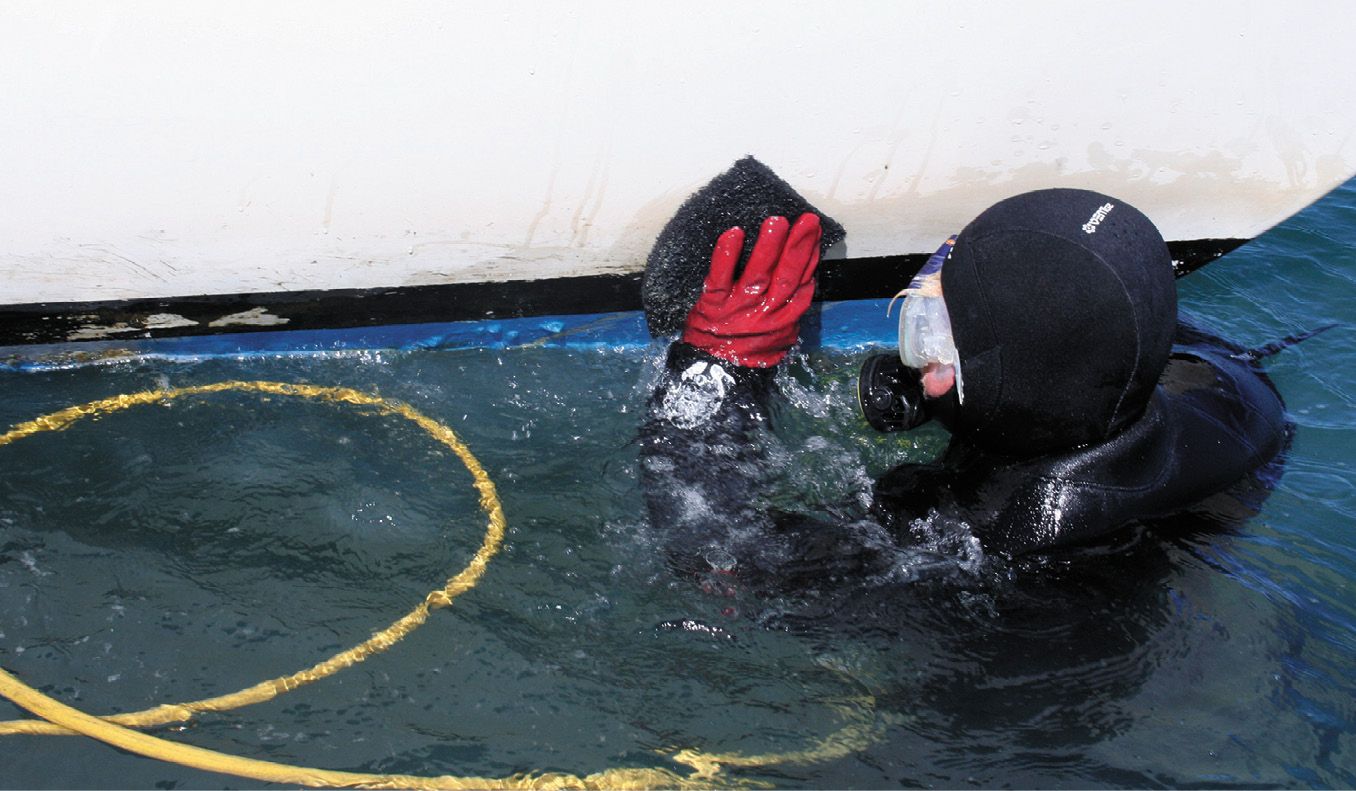
Have a variety of brushes on hand. Our arsenal includes a standard long-handled deck brush, a variety of handheld scrub brushes, including one with a 20-inch handle (see photo below), and a small selection of spinning brushes that work with an electric drill. The deck brush does most of the work, the smaller brushes are great help in corners, and the electric drill brushes makes short work of big jobs in tight places.
A plush, soft deck brush that holds a lot of soapy water is best for your first pass. Use this to spread the soap so that it can soak in and work. We usually must remove tenacious lichen and algae, so after coating each section to be cleaned with suds, we switch to a stiffer brush for scrubbing. If your hull is still gleaming with a wax finish, stick with a soft brush for cleaning.
A big bucket can be a big headache. Anyone who has slalomed past stanchions and shrouds with a 5-gallon bucket can understand why downsizing to a 3-gallon size makes sense. The smaller bucket contains sufficient soapy water and it’s less tippy, making it much easier to work with. Our favorite bucket is a stubby version of a 5-gallon bucket, sturdy, squat, and wide enough to take a deck brush.
Keep your brushes clean. Brushes don’t scratch, but they can collect grit that will quickly mar a paint finish or leave scuff marks on your gelcoat. Hose the boat down before you start. Dunk the brush in the cleaning bucket often but keep it off the bottom where grit collects. Change the bucket water frequently. You don’t want it to get too dirty.
Wash from the bottom up. Although painters generally work from the top down to catch drips, if you take this approach while cleaning, especially with strong cleaners, streaks are inevitable. Many cleaners, even if they are extremely diluted, become very corrosive if you allow them to dry up and concentrate. Rust removers, bleach, and alkaline degreasers are common examples of solutions that can do more harm than good if you use them incorrectly. No matter what chemical cleaner you use, limit the area you are working in so that it can remain completely wet until after rinsing.
Allow time for a soak. All cleaners work better if we give the chemical time to soak through the dirt and do its work. After pre-wetting the surface (a step many people often skip), spread the cleaning solution, wait a few minutes, and then begin scrubbing at the first area you wetted. Rinse the surface off completely before it dries to avoid streaks.
For minor algae stains one of many bleach-containing products will do the trick. We use Star brite Mold and Mildew Cleaner, but a few ounces of household bleach in a gallon of soapy water will do the job just fine. Spray it on, spread it around with a soft brush, wait 10 minutes, and rinse fully.
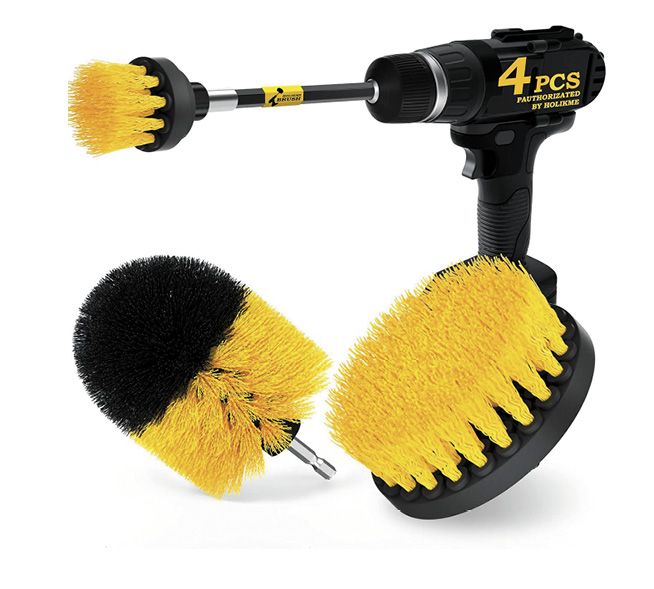
DRILL BRUSH
Regular cleaners are ineffective on our non-skid deck. The non-skid gets so caked with lichen, physical removal seems like the soundest approach. After vigorously scrubbing for several minutes, our neck, arms and shoulders suggest we seek electrical assistance. A set of drill brushes from Holikme are just what the doctor ordered.
Unlike the back-and-forth motion of a hand brush, the swirling bristles of the drill-brush are particularly effective in grooves and crannies, cleaning them from every direction. The speed of a drill is low enough that you aren’t going to damage the non-skid. We use our cordless drill-driver on the “driver” setting.
As when polishing or scrubbing any surface, keep the hull or deck wet. As long as you keep soap and water on the surface the bristles will be well lubricated. You don’t want the brush to get warm.
Also be careful working in tight spaces. The edge of the brush tends to bump into bulkheads or other vertical surfaces. The tool can leave a few black marks, but they are easily wiped off. Wrapping the hard outside edges of the brush with athletic tape will prevent marking. Take care to rinse the brush frequently when using it on painted non-skid. The brush will pick up loose grit, which can act as sandpaper on a smooth surface. You can prevent this by frequently rinsing the scrubber in the bucket.
Holikme has a 22-piece kit ($18) with an assortment of specialty brushes and polishing heads. Since we prefer to use a buffing machine for buffing and polishing, we didn’t see the value of the extra drill-head polishing pads. The 4-piece set ($7) containing a 4-inch diameter round flat brush, a 3.5-inch round head brush, a 2-inch diameter crevice brush, and a six-inch extension meets our needs. We rely mostly on the 4-inch flat wheel scrubber, but the round-end brushes used with the extender are helpful in pockets and corners. The brushes come with two stiffness ratings (medium and stiff), but we can’t tell much difference between the two.
The brushes will work with any drill, but since you are working around water you should use a cordless drill to minimize shock risk. Going cordless also makes it much easier to move around the boat. The drill-powered scrub brush is very effective, and it is now our go-to tool for dirty crannies that require more than just elbow grease. Near hardware, the brush is superior to even a pressure washer since it won’t remove bedding compound and cause hardware to leak, which can happen if you are too aggressive with a pressure washer, as discussed below.
PRESSURE WASHERS
When using a pressure washer, you want to use a water pressure (psi) that is safe for the surface you’re cleaning. In practice, how you use the pressure washer is often more important than the rated pressure. Because of the harm a pressure washer can do to sealants and bedding compounds around windows and hardware, we prefer not to use a pressure washer to clean a deck.
An industrial pressure washer used for cleaning boat bottoms during haul-out typically operates at 2500–3500 psi. Home pressure washers are more commonly limited to 1000–1500 psi. Gelcoat, the most common substrate on a contemporary boat, has a yield strength of about 5000–8000 psi, so ordinary pressure washers are safe. Still, you need to be careful. Using the smallest nozzle within a few inches of the hull can damage new gelcoat, and even nozzles with a wider spray pattern can etch older gelcoat.
Polyurethane sealants, which have a yield strength of only 200–400 psi, are extremely vulnerable. The pressure washer can cut bedding compound to ribbons if the stream aims in the wrong direction for just a second. We avoid using a pressure washer anywhere near a deck fitting.
The water impact on the surface varies with the nozzle angle and the distance from surface to nozzle. To minimize any chance of harming the surface, use the nozzle with the widest angle that still does the job. A wide-angle nozzle might not clean the fastest, but it is effective without being too aggressive. Because of its penetrating power, 0-degree nozzles (red) are not recommended for the inexperienced or for any cleaning job for that matter.
The 15-degree angle (yellow) nozzle is for heavy duty cleaning. Your local yard probably uses this to clean boat bottoms. When bottom cleaning, don’t try power-washing stubborn hard growth; use a metal scraper instead. The scraper is safer for the boat than high-pressure water. A 25-degree (green) nozzle is much less damaging, but it is still powerful if you get too close. A gentle 40-degree (white) nozzle is safe if you keep it at least 6 inches away from the hull.
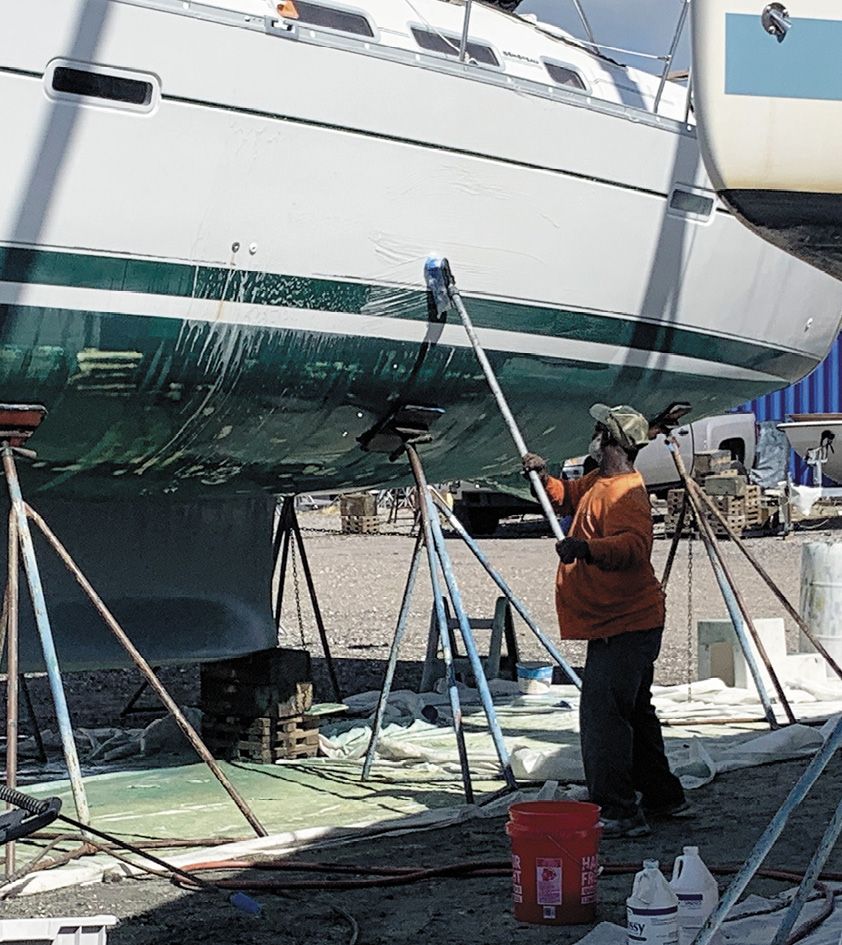
Never use a ladder while operating a pressure washer. The kickback when you open the nozzle will knock you off balance. Working from scaffolding is less dangerous, but still risky. A safer option is to buy an extension for the power-washer wand, or to stay on the ground and use a long-handled deck brush instead.
Always wear boots and heavy work gloves. A pressure washer can lacerate your toe even when you are wearing sneakers. Because the handle is usually wet, it is too easy for your hand to slide in front of the nozzle. Never shorten the wand; the wand is a specific length based on the machine’s pressure class. The wand should never be shortened for convenience or to work in tight spaces.
Always wear eye protection. It’s not just the water that might get in your eye; any dirt and sand dislodged during scouring can fly back in your face. Most pressure washer injuries occur when one person inadvertently sprays another, or flying debris kicked up by the pressure washer hits someone. Occasionally, the push-lock nozzles can unlock from the wand and shoot off like a bullet.
Never pressure wash wood—especially not a teak deck. It will tear out the soft fibers between the grain, eroding the wood and leaving a rough surface. If you must use a scrub brush, scrub across the grain.
3M SCOTCH-BRITE PADS
Every year we get reports from sailors who used Scotch-Brite pads or another light abrasive scrubbing pad to remove a hull stain, only to find that when the hull dried, the gelcoat or painted surface had lost its gloss. No surprise there. Scotch-Brite scrubbing pads and similar scrubbers come in various grits and many of the most popular colors—green, red, and black—are recommended for roughening up a surface prior to painting. This creates “tooth” for a new coating to bond. Scotch-Brite pads are great for scuffing bottom paint or taking the shine off a gloss surface. They are especially handy when prepping outside corners, edges, and other places where sandpaper can cut too deeply. For cleaning, however, you must choose your scrub pad more carefully, and use it with care.
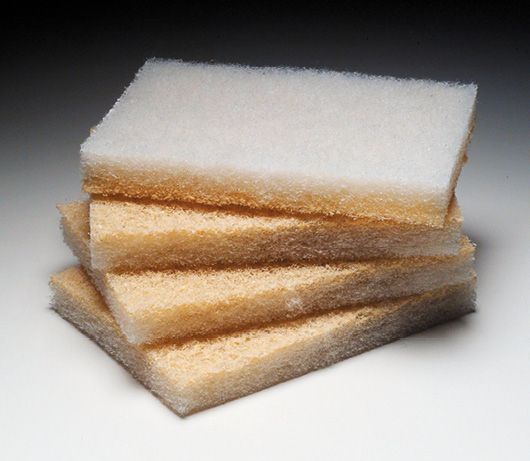
The basic structure of a 3M Scotch-Brite pad is made with an unwoven polymer fiber such as cellulose, nylon, or spun polypropylene. There are several varieties of pads, identifiable by name and/or color. Each type is made with a different blend of resins, hardening materials, and abrasives (aluminum oxide, titanium dioxide, etc.). Although the base polymers may be considered harmless, the added abrasive material makes them extremely tough.
For cleaning, we stick with the softer white pads. We use white non-abrasive aircraft pads for topsides and white pro pads for cleaning stainless steel. If less aggressive methods won’t work, we also use the pro pads for cleaning bottom paint when the boat is in the water. We use green pads if we are willing to accept minor abrasion. Red pads are more aggressive than green and are equivalent to fine sandpaper. Here is the composition of the pads we use, listed from finest to coarsest:
• White aircraft cleaning pad. Polyester, no abrasive.
• White pro. Polyester, resin, fine syenite, titianium oxide
• Green pro. Ultrafine. Nylon, resin, silicon carbide, carbon black. Equivalent of 240 grit.
• Red pro. Very fine. Nylon, resin, aluminum oxide.
The white aircraft pads are the only ones we only recommend for cleaning gelcoat. We use the green and red pads on gelcoat, but only when our intention is to clean and lightly sand at the same time. Note that other manufacturers use different color-coding schemes for their abrasive pads, and these might deliver different results from 3M pads. For example, Star brite’s red pads are non-abrasive.
CLEANING LINERS AND UPHOLSTERY
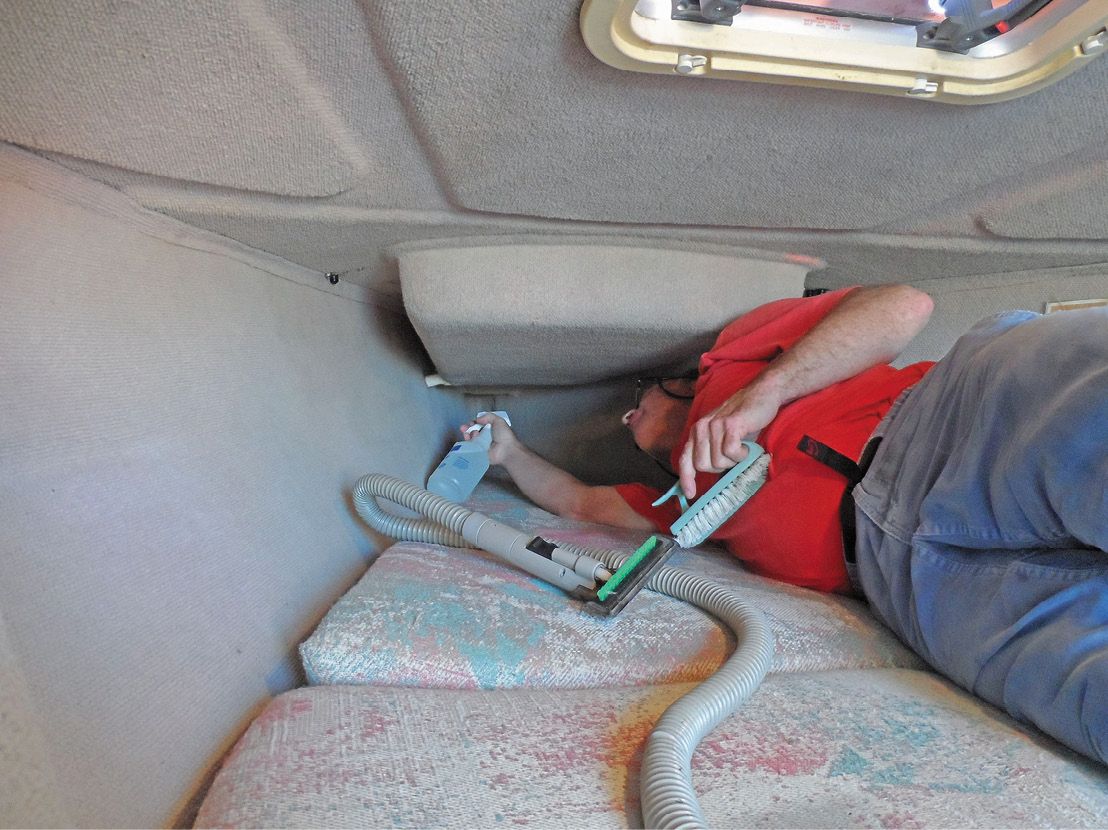
To clean interior fabrics, you need to wet it with a cleaning agent, allow it to soak for a few minutes, scrub lightly with a brush, and then vacuum the dirty water away. For bad stains, you’ll have to repeat the process and make several passes with a vacuum to make sure all the dirty water is removed. Finally, use a fan to dry the area.
A pressurized garden sprayer is best for wetting the fabric, although you can use a spray bottle for small jobs. Our preferred wetting agent for most materials is our DIY Formula B—1 quart hot water, 2 tablespoons baking soda, 2 tablespoons Borax, 1 tablespoon trisodium phosphate (TSP). Recently, we’ve found the inexpensive home cleaner, Fabuloso 2X Concentrated Multi-Purpose Cleaner, is also tough on boat fabric stains. Because Formula B has proven an effective mildew preventative, we always apply it as a final cleaner-treatment.
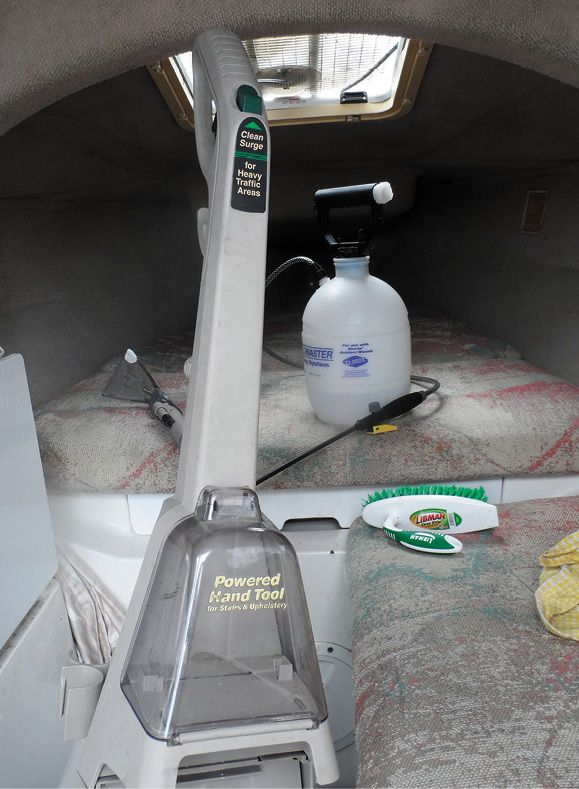
Our carpet vacuum came with a power brush attachment, but it doesn’t work and constantly gets in the way. We replaced it with a plain attachment and scrub with a hand brush while we vacuum. A shop vac works just as well as a purpose-built carpet cleaner. It helps to have a clear suction attachment (about $12) so you can monitor the extraction of the dirty water.
CONCLUSION
I hate scrubbing, but I do like the results. I recognize that I need to be careful or I’m just making life more difficult. I won’t take damaging short cuts, such as using an aggressive Scotch-Brite pad or a pressure washer where they don’t belong. Importantly, I won’t skip steps in the long-proven cleaning procedure used by many industries: thoroughly wet the surface, soak with the appropriate cleaning agent, scrub from the bottom up, and rinse well. As for tools, an old-school wooden handle is best for the deck brush, and a drill brush is a real time-saver when cleaning non-skid. On standby, keep a few brushes with hand grips and short handles for smaller jobs or for cleaning tight places.
Finally, and most importantly, don’t let cleaning get in the way of your sailing. Short tacking into a steep chop can rinse a good deal of dirt away, and even the dirtiest hull can be made spic-and-span with some elbow grease.
CONTACTS
3M, www.3m.com
HOLIKME, www.holikme.store
SAILRITE, www.sailrite.com
RESOURCES MARINE CLEANERS, www.practical-sailor.com/product/ marine-cleaners-the-completeseries
THE MILDEW FREE BOAT, www.practical-sailor.com/product/ the-mildew-free-boat-complete-series


