


The Practical Sailor team has just shipped the September 2013 issue off to the printer, and it was another one of those issues that left me absolutely floored by the efforts put forth by our test teams. Although every issue stands out for something, a few stand out for the Herculean efforts required from all of our testers. Genoa tracks and adjustable lead cars, anchors, and Automated Identification Systems (AIS) are the headline tests in the September issue, along with an update on handheld LED spotlights and details on upgrading an onboard electronics network to the new NMEA 2000 standard.
I know some readers often skim over our How We Tested section of each test article, but the test details are helpful to sailors as well as manufacturers, who often use our evaluations to improve their own products. Unfortunately, we don’t have the space to truly convey the amount of time and effort that goes into each test. The construction, the calibration, the repetition, the sweat-and yes, blood-that goes into each test rarely makes it into the pages of the magazine. But since so many of our readers are involved in fields that require similar testing, I think most can appreciate the effort involved. And any sailor who has done a simple installation on his or her own boat can recognize that it’s rare that any boat project is as easy as it first seems.
On older boats, the complication factor is almost sure to multiply when you talk about installing deck hardware. Access to belowdecks bolts and backing plates is often tricky, and the condition of the deck itself can pose problems. Along withgenoa-sheet adjustment systemtest report, we included a rundown of track installation tips. The tips offer a general view of the scope of a genoa track upgrade, remedies for common problems, and techniques for preventing future damage to the deck core. Although the tips apply specifically to genoa tracks, much of the advice is relevant to any deck hardware installation. Im including the article here for blog readers, who will hopefully help add to the conversation. If you have deck hardware installation advice or experiences to share, or questions regarding deck repairs or installation, post them in the comments section below.
Genoa Track Upgrade
Upgrading your genoa-sheet adjustment system can be as simple as slipping a new car, control blocks, and end stops onto the existing track, and going for a sail the same day. But like most boat projects, its rarely as simple as it should be. In many cases, the old pin-stop T-track is the wrong size or shape for the new leads. However, if your boat is younger than 10 years old, its worth checking what the hardware manufacturer has to offer in track-compatible upgrades.
The next step is to consider is a total track and lead car makeover. In many cases, the new track will have identical fastener spacing to the old one, and if the under-deck access to nuts and washers is straightforward, this too is a relatively easy makeover. However, when a hard-to-remove headliner-or worse yet, an embedded aluminum backing plate-has been used to hide fasteners, the simple upgrade becomes an ordeal.
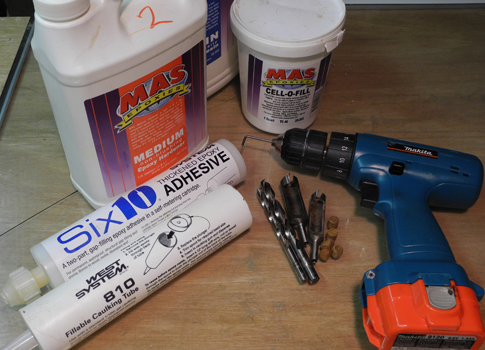
Over time, stainless-steel screws form a corroded partnership with aluminum backing plates buried invisibly in a cored fiberglass (FRP) deck. The old fasteners often break off rather than spin free, and if the slotted or Phillips heads become stripped, an angle grinder with a cutoff blade may be needed to cut the screw just beneath the old track. Investing in a properly sized, high-quality screwdriver will lessen the likelihood youll need to amputate damaged screws.
If the removal process leaves you with broken screws embedded in buried aluminum strips or plates, it usually makes sense to simply shift the new track a couple of inches fore or aft and bore a complete set of new holes.
Well-built sailboats have no core or have a much higher-density core material in the area where genoa tracks run. If your boat has a mushy core here, it pays to spend a little extra time routing out the mush in the screw holes. Use a simple L-shaped bent-nail reamer attached to a power drill to chew up a half-inch or so of soft foam or balsa core surrounding the holes. Then plug or tape the bottom exit points, and fill the void with thickened epoxy using a slow-cure hardener. Once it solidifies, re-drill the hole, and you will have created a strong, compression-resistant, water-tight sleeve around each track fastener.
Use larger-diameter shoulder washers to help spread the load and bed each fastener with a durable, medium-strength sealant such as 3Ms 4200. Theres some debate over whether its best to mark track hole locations on the deck and remove the track before drilling or use the track as a drill jig. Following the former technique keeps you from unintentionally damaging the anodizing while drilling. But by using the track as a jig, the holes end up exactly where they belong. The latter may be necessary if theres any curve to the track or deck camber to cope with. If the track holes are drilled using the track as a guide, be sure to place sufficient sealant on the fasteners to coat the damage done to the anodizing in the screw holes.
Before going shopping for a system, note the screw-hole spacing and diameter of the fasteners securing the old track. The 4-inch spacing on many U.S.-made tracks may look exactly like 100-millimeter, internationally made products, but the slight variance will prohibit using the old holes in the deck. Harken, Antal, Seldn, and Ronstan solve this problem with a variable hole spacing track incorporating bolts that slide on a slotted recess in the lower section of the track.


