

Cored decks are a soggy subject for many owners of older boats, but owners of new boats have to be wary too. I turn to one of our regular contributors, Capt. Frank Lanier, for this week’s blog on this topic. Captain Frank Lanier is a 27-year Coast Guard veteran and Accredited Marine Surveyor with over 30 years of experience in the marine and diving industry.
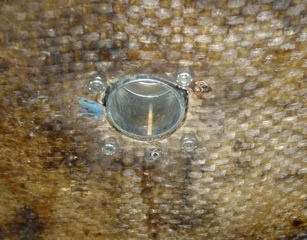
Mounting hardware directly through a cored decking without taking the proper precautions to prevent moisture entry is asking for trouble. Photo 1 shows a leaky lifeline stanchion that has caused the coring beneath its base to rot. The mounting nuts are drawn up so tight they’re crushing the panel, no doubt caused when the owner tried to stop the stanchion from wiggling, and to try and stop the leak as well. Note the inadequately sized washers and lack of a backing plate.
Anytime you screw or drill through a cored panel, the first rule is to properly seal the core against moisture entry. There are a number of ways to do this, but the best one is to avoid breaching the core material in the first place. In a perfect world, your boat’s manufacturer has anticipated where all deck penetrations are necessary (stanchion bases, cleats, etc) and has “de-cored” these areas by reverting to solid fiberglass, allowing you to mount hardware without drilling into the core.
In the case of new installations however, chances are slim-to-none that any of these areas will coincide with whatever aftermarket doo-dad you want to mount, meaning you’re going to have to seal and protect the core the yourself. There are a number of ways to handle this problem, and how you deal with them will depend on a variety of issues, such as what sort of hardware you are mounting, what kind of access you have below decks, what sort of loads are expected, etc. In all the recommended approaches, the object is to make it impossible for any leaks to get to the core.
The typical approach to sealing core for any new hardware installation is to carve out about 3/16-inch of the surrounding core using a makeshift “bit” on a drill. A bent nail works, but we’ve had more luck with a DIY modified roofing nail core-removing-bit, which made quick work of the core without damaging the inner or outer fiberglass skins. Once the core is removed, you mix up some high-density epoxy filler compound to a non-sag consistency (peanut butter-ish), and spread it into the cavities you just carved out. For the nitty gritty details on how to seal core for hardware mounting (and a range of other repair and maintenance issues), check Chapter 7 of the free book “Fiberglass Boat Repair And Maintenance” published by Gougeon Brothers. You can order a hard copy or download a free PDF. It’s a good how to booklet and well worth space on any vessel’s bookshelf – or hard-drive.
And for a more detailed discussion on the pros and cons of cored construction, check out our October 2007 feature “In cored hull construction, does high-tech mean high-quality?” Don Casey’s book “This Old Boat,” also offers some tips on how to address cored deck installations.
Our two-part series on core repair explored some unconventional methods of repairing plywood and foam deck core using glue injection, as well as described a step-by-step decl core replacement project. We’ve also looked at ways to ensure maximum penetration of any glue or resin injection using a grease gun to force the resin laterally through the core. If you are repairing hardware be sure that it is well reinforced with a backing plate. In an August 2016 report “How Big Does a Backing Plate Need to Be?”, Practical Sailor tested various backing plate materials as well as discussed the proper sizing.
If you are facing a deck core repair or replacement project, two other reports worth reading are Practical Sailor June 2013 “Through-bolting Fiberglass: An Inquiry into Failure Modes,” and Practical Sailor October 2007 “Cored Hull Construction, Does High Tech Mean High Quality?.”


I just recorded my Mainship mk1 78 model. The cabin top felt pretty good and I thought it would be spot repairs. 90% was gone. I cut gutted recored with balsa and refiberglassed. The flybridge and the railings are all 3M 5200 attached. No penetration anywhere in that cabin top except the 1 controls tube that allows the controls and electronic feeds down below. You nay sayers, it’s solid as a church. 3M 5200 sheer strength is about 750 psi. Cheers rl.