

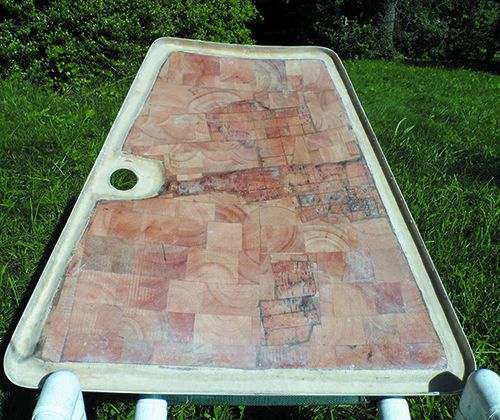
The factory skimped on resin when laying up the internal skin of the anchor locker hatch on our Corsair F-24 test boat. The goal was to save weight, but the result was hundreds of pinholes, which over the course of thousands of warming and cooling cycles, sucked in a substantial volume of humid anchor locker air. The core became damp, bacteria moved in, and the balsa decayed to the consistency of garden mulch. Small wonder the hatch bent noticeably under foot.
Fortunately, the skins had not yet cracked. The other positive was that the hatch could be taken home for renovation, and that makes any job easier.
Deck Core Basics
When repairing deck core, work can proceed from either the interior side or exterior side. Working from the exterior means your repair will need to match surrounding skin, whereas interior work is usually hidden from view.
For deck repairs, working from the outside means that gravity is on your side. The old core doesn’t land on your face as you remove it, and bonding in new core material is straightforward.
Working from the inside requires removing interior liners and modifying your laminating technique. Larger jobs tend to favor working from above, while small jobs go faster from inside. It all depends on geometry. In our case, we just flipped the cover over.
We cut away the skin using delicate, shallow cuts with an angle grinder. A vibrating multi-tool with a carbide blade is handy for small areas. The skin was then peeled back using a dry wall knife and a pair of pliers.
If it is undamaged and you are working from the top side, save this for later reinstallation. It will preserve the non-skid pattern and smooth curvature in the corners. Even when you are careful, thin skins are often destroyed during the removal process, which means you’ll have to laminate a new one—something to consider when deciding which side to work from.
Whichever method you choose, be sure to wear gloves while laminating. Change the gloves every 10 minutes or whenever they begin to get sticky; if glass fibers are sticking to your fingers, you need new gloves. Likewise, have a stack of disposable brushes and polyethylene spreaders available.
Cleaning Out Old Core
Some of the old core will fall out, bringing comfort that you are doing the right thing. Some will come out with a scraper. We’ve found that a wire cup brush, in either a cordless drill or angle grinder, makes fast work, with less risk of cutting into the second skin than with vigorous use of a scraper or chisel.
You don’t need to remove undamaged core; when it gets really difficult to remove, you’re probably done. We left some core, after determining that it was like new and that we couldn’t remove it without damaging the skin. Allow the panel to dry.
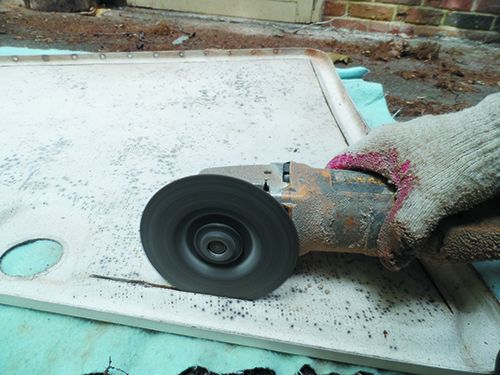
1. A cutting wheel was used to trim the outer laminate to access the core.
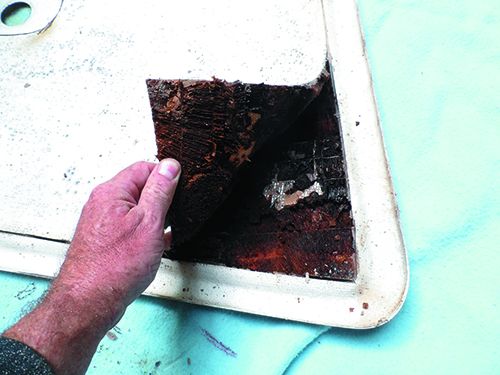 2. The outer laminate easily pulled away to reveal the rotten core.
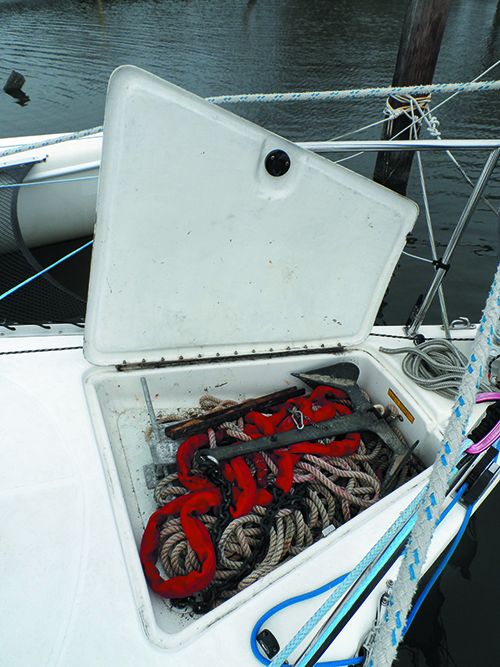 3. The new bow hatch is better than new, stronger and impervious to water.

Bonding New Core
You can use either polyester or epoxy resin (see “Epoxy Versus Polyester Resin”). If you’ve worked with neither before, practice on some sample laminates.
Some sections could be solid glass instead of core. Lay those areas up with cloth or possibly Coosa Bluewater 26—see “The Multipurpose Core.” For cored areas, coat the sections of replacement core with resin thickened with colloidal silica to a peanut butter consistency. Press into place with a grooved laminating roller.
Use lightweight cores for overhead panels. Plywood is not recommended. Marine core is typically scored with kerfs and attached to a scrim backing so that it can follow curves. If the curve is concave, the kerfs will open the blind side, so be certain to apply enough thickened resin to fill these kerfs as they open.
There is no reason to apply core in large sections, since it is scored anyway. Small sections, generally not much bigger than 6 inches square, are easier to manipulate. Cut smaller pieces to fill the larger gaps, and then spread thickened resin over the entire area using a flexible spatula, forcing it into the remaining hair line cracks. Allow to cure.
Use 60-80 grit on an orbital sander (or a disk grinder with a very light touch) to sand the new core smooth. Even if you matched the original core thickness, there will be irregularities resulting from bumps of old resin and angles from the core.
Laminate a replacement skin, matching the original schedule. Several layers of 17-ounce biaxial cloth with ¾-ounce mat attached (1708), followed by a single layer of 6-ounce finish cloth is common on cruising boats. Smaller boats may use only a few layers of 6-ounce finish cloth. Bevel the core edges to a 10:1 taper.
From the Inside
If you are working from the inside on an overhead panel, lay the cloth on a plastic disposable work surface and pre-saturate the fiberglass cloth, using a squeegee and roller, before placing on the ceiling. Some like to do this on a bench outside the boat and carry the sections in on waxed paper.
Don’t attempt to saturate the cloth directly on the surface; the resin will drip all over you and the glass will keep falling off.
Rub the pre-wetted laminate down firmly with gloved hands and a roller until it begins to cure. If applying more than a few layers overhead, allow the initial layers to gel. This prevents the whole mess from falling off in a sticky pile. Allow to cure.
Use vinegar to wipe surrounding areas that were not covered with drop cloths, being careful not to get any on the bond areas.
From the Outside
If you are reusing the old deck skin, carefully grind the core to fit the original skin, test fitting frequently. You will add thickened resin to bond and fill low areas, but there can’t be any high spots and it is best if the fit is very close.
Unlike a new skin, you won’t be able to roll it in for a perfect bond. This is why we dislike this method other than for very small sections. Press the skin in place, weigh it down with sand bags, and hope for the best.
Finishing and Cleanup
If you are working from the inside, all that remains is to grind it reasonably smooth and replace the liner or paint to match. If you worked from the outside, bevel the joints 10:1 with a hand grinder, add fiberglass tape to match the original thickness, and finish with gel coat or paint.
Clean your tools with vinegar. As long as the cure is not too far along, vinegar stops the chemical reaction and eliminates the stickiness, allowing clean-up with soap, water, and a brush.
Further Reading
“Can Glue Injection Fix Rotten Core?“
PS Technical Editor Drew Frye is the author of “Circumnavigating the Delmarva—a Guide for the Shoal Draft Sailor,” available for Kindle through Amazon.
This article was published on 24 July 2020 and has been updated.


Injectadeck has very specific instructions, it looks like they used it like Git’Rot’ against wet wood? That was not a proper demonstration of the process of injectadeck. I have been using it for three years on several boats. The aforementioned product doesn’t work at all nothing can soak into wet wood or stick to its slime. Injectadeck adheres fiberglass layers together very well, displaces water, hardens in a void.
(Inject-a-Deck was reviewed in “Can Glue Injection Fix a Rotten Core,” July 2020)
Inject-a-Deck can work. There is no question it can firm up a mushy deck and that it is much easier to use than other methods. But we tested it a number of times, in several ways (wet and dry) and concluded that other products were stronger and better suited limited repairs and areas where great strength was required. In fact, we warmed up to the idea that injecting epoxy and Git-Rot is probably not the best method for larger areas of extensive damamge or rot, that the repair materials does not need to be strong like epoxy, only as strong as the original core, and that foaming products, including the original Gorilla Glue, have considerable advantages.
The best repair method is core replacement, but even that method must be approached circumspectly. We recently reviewed a “professional” repair to a PS test boat and found that the contractor had made critical errors, resulting in a repair that was far weaker than what he started with. He hid his tracks well enough that any surveyor could miss the hidden damamge. The result was a sudden failure of the core repair underway.
* He reused the original skins by gluing and fairing the edges together, without scarfing in reinforcing lamination. Invisible joints that were very weak.
* Cut through critical carbon fiber reinforcements buried within the laminate and did not replaced them. You never know what is inside the deck, and it apparently did not concern him when he got black sawdust, or when he pealed the deck up and saw the carbon plate.
So injecting foam, such as Inject-a-Deck can fall within the “do no harm” philosophy. You won’t hurt anything. It would have been much better, in this case, if the contractor had just injected foam, rather than cut through good laminate he was not committed to properly replacing. Sometimes you don’t know what you are getting into.
Bacteria do not cause core decay. The statement: “The core became damp, bacteria moved in, and the balsa decayed to the consistency of garden mulch.” is misleading because 1) the damage is caused by fungi, not bacteria, and 2) the fungal spores have inhabited the balsa ever since it was changed from being a tree to being small blocks. The spores are patiently waiting for the substrate to become damp to the degree that they can become active.
Good point on the fungi, although that is only true to a point. Rot results from a mixed community of bacteria and fungi, the fungi being more active in the presence of oxygen and during the initiation of rot, and the bacteria becoming more prevalent and active in anaerobic conditions (prevalent in cores) and as the core gradually becomes mulch. But yes, most of the damage is caused by fungi. I took too much literary license, and I knew better. In the end… wood rots. The distinction is mostly relevant when choosing a rot-preventative.
A good read. I’ve done everything from below with Vinylester resin. Of course, you need an excellent full facemask with the right cartridges. Good to know about the “professional” repair mentioned in the above comment. I’ve been “peg boarding” from the inside to dry out the core which did dry quite well with heat lamps (and a temperature gun to not get over 110 degrees). However, if the fiberglass flexed when pushing the drill to drill the hole, I just peeled that area and replaced the core. This winter I will work on the doghouse and this method of looking for some flex won’t work since the interior doghouse glass is thicker. Not sure what I will do.
The softening temperature of vinyl cores is about 190F and epoxy, gelcoat, and vinylester are are a bit higher than that. I would think 150F would be a safe temperature for drying core. I’m sure decks pass 110F in the sun all the time!
Drew I agree, and it’s good to know what you just wrote. And to your point on a hot sunny day in late August here in RI, in the afternoon, the deck was 116F on my temp. gun. The boat I’m working on came from Lake Lanier, Georgia, I’m sure it hit 110 air temp…