

Radios occupy an important place in the contemporary sailing scene, supplying weather reports, time ticks, entertainment, and news. High quality radios are also expensive. In other words, they’re valuable pieces of equipment and deserve to be protected.
One way of protecting a radio is to store it securely chocked in a locker. Unfortunately that means it must be taken out to be used — always a bother and limiting accessibility — and when in use it’s vulnerable, since it is not secured as when stowed.
288
A far better solution is to design and build a special box or shelf in which the radio can live in snug, safe, availability.
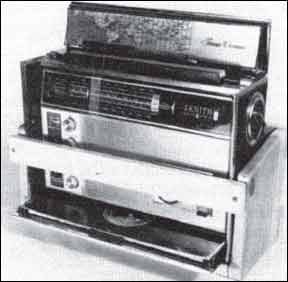
Each make and model of radio presents a different set of dimensions and design problems. The Zenith Transoceanic shown have, illustrates a typical case.
The task is to design a compact, solid, but lightweight and secure radio box which would leave all controls accessible.
To begin with, note that on the back of the radio case there’s a bulge which covers the battery compartment and also a line of ventilation holes. Second, the band selector — the circular dial knob — protrudes from the side of the radio.
Finally, note that the controls are all set in from the forward, vertical edges of the radio.
These factors are all worked into the design (see photos).
First, the height of the rear of the box is kept just below the line of the ventilation holes. Second, to leave the band selector clear, the sides of the box are angled down as they go forward. Third, the back is skeletal rather than solid. This is done to save weight and allow the battery case bulge to slide in between the horizontal cross strips, thus cutting down the depth of the box. Finally, the sides end flush with the vertical forward edge of the radio because the inset front control panel enables the removable front cross piece to ride on the forward edges of the radio without interfering with the operation of all the controls.
You can save a few more ounces by making the base skeletal like the back, but a solid base makes more useful shelf for those occasions when the radio is not aboard.
After deciding on the basic design, careful measurements are made. The only tricky part here is the length of the box, because the Transoceanic has slightly padded sides. In this case, a slightly tight fit is used, one which would ever so slightly compress and, hence, grip the soft sides.
The material used in this box is lumber yard pine, which is available, reasonably priced, lightweight, and pleasant to work. Also, when varnished, it makes a nice contrast to varnished teak bulkheads. This, of course, is a matter of taste; mahogany, either “real” or Philippine, or teak (a bit heavy) will do nicely; cypress is lovely if you can get it.
The sides and bottom are laid out on lumber yard “one inch” stock which is actually a bit more than 3/4″ thick. The 1/2- thick back and front cross pieces can be ripped from a 2×4.
Construction is simple, with butt joints throughout.
After all the pieces are cut and checked for size and straight edges, the sides can be glued to the base. Each piece is also held by a couple of galvanized finishing nails, driven below the surface with a nail set. The purpose of the nails is to hold the pieces while the glue sets up.
Before the glue sets up, the sides and bottom must be squared and the back cross pieces attached, again with nails and glue.
The recommended adhesive is epoxy resin, but resorcinol or urea (called “plastic resin” on the cans) can also be used.
The advantage of epoxy is that it has film strength, and thus has greater gap filling qualities than the other two kinds. This greater gap filling quality makes up for less than perfect fits.
On the other hand, if you make good fits, plastic resin glue is a good choice. It comes as a powder which you mix with water to a syrupy consistency. While not “waterproof” — it cannot stand boiling — it is water resistant and suitable for any gluing job which won’t constantly be wet and is not made of oak — (the tannic acid of oak, affects the bond). In addition to being economical, plastic resin glue utilizes water cleanup which, if attended to with a damp rag during the wet stage, can save a lot of sanding during the finishing stages.
We have no great fondness for resorcinol, which many swear by. It has always been difficult for us to get a good mix with resorcinol; application often requires rubbing the stuff into the wood; and the final product includes dark maroon glue lines. Ugh.
So far this project has required a bit of thought and a single, short,’ pleasant evening at the work bench. What remains is finishing, which consists of filling the nail holes with plastic wood, slightly rounding all the edges with coarse sandpaper (50, then 80 grit); fine sanding the whole thing including the unattached, front cross piece; and four coats of varnish (the first coat thinned by 25 as a sealer).
The last task is to locate the front cross piece on the box, drill the appropriate two holes and drive in the screws (we used roundheads).
So protect your investment. Study the radio, design a snug box which allows access to the controls, and go to work.
-J. Pazareskis


