

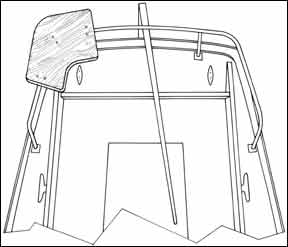
For those who enjoy fishing or charcoal cooking, here’s a design for a stern rail mount work surface useful for fish cleaning and meat cutting, and big enough to hold a hibachi when moored. I got the idea from yacht designer C.W. “Chuck” Paine, and Chuck got the idea from some Caribbean charter boats. You could also clamp a vise to the work surface and thus have a handy little work bench for onboard repairs and modifications. Mounted as it is on the stern rail, it is at a useful height, and offal and mess are easily cleared overboard. A hibachi used on the surface demands careful use, of course — as with any open flame on a boat — but it’s about as far outboard a position as can be found. It’s also a lot cheaper than those charcoal grills designed to be clamped to the stern rail.
288
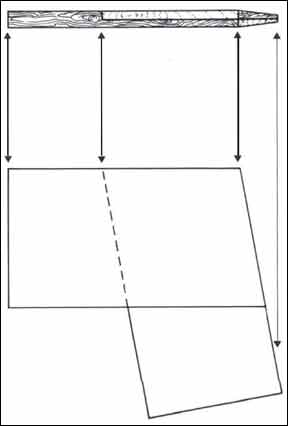
The illustrations are essentially self- explanatory. You’ll have to decide on a size to suit your boat and needs — the illustration shows a unit on a 30-footer in which all dimensions run between 12″ and 24″. You’ll also have to measure the angle of the corner between the side and stern of the top tube of the stern rail. This is most easily done with an adjustable bevel, but lacking this tool, you can get the angle by placing a sheet of cardboard over the corner and running a pencil along the tube around the corner.
Sheet plywood isn’t particularly good for this application; the exposed edges would look tacky; the top veneer would rapidly become hacked up; and, if painted or varnished, the finish would quickly be destroyed.
For this job, the only proper material is a hardwood which can be left unfinished to weather by itself; teak is the best choice, but a really hard “Philippine mahogany” would do. Philippine mahogany is actually any number of different woods, some soft and punky, some hard and tough with interlocking fibers. It’s the latter sort which is needed for this job.
288
Use stock about 1 1/2″ thick — the thickness isn’t critical. Since you won’t be able to find a plank of solid wood wide enough from which to cut the work surface (and if you could the grain would run badly along one of the arms), you’ll have to join the two arms.
The best way to join the two arms is with a “half lap” joint. This is one of the simplest joints used in boat- building. Happily it’s also one of the best because the expansion and contraction of the wood minimally affects the joint.
If you’ve never made a half lap joint, now’s a good time to try one. They’re simple to make As can be seen from the illustration, the name, half lap, comes from the fact that you cut away half the thickness of each of the planks, so when they’re lapped or joined the two together have a thickness equal to that of a single plank.
The first step in making the joint is to mark the edges of the joint, and, in this case, the easiest method is to lay the planks at the appropriate angle one over the other and mark the edges of the intended joint. Note that the illustration shows the planks with a straight outline. You can cut the curved outlines — if you desire them with a saber saw after the joint is finished.
In addition to the edges of the joint, while you’ve got the planks lying at the proper angle, also mark the parts of the planks to be cut off, ie, those little triangular parts which extend beyond the edges of the opposite plank. Cut off this excess material, and you’re ready to begin work on the joint.
Make a series of closely spaced saw cuts across the grain and parallel to the edge of the joint — say 1/8″ apart. These cuts should be exactly half the depth of the wood, and the first one should run exactly along the edge of the joint. You can cut these with a hand saw, but, if you’ve got one, a portable circular saw is quicker and easier. If you do choose to use a circular saw, be sure to make some experimental cuts in a piece of scrap; even experts have trouble setting accurately the depth of a circular saw cut. Experiment until you get the bed-tooth adjustment exactly right, then make the parallel cuts on your planks.


