


So, you’ve finally purchased that new (or new-to-you) boat of your dreams. As with any budding relationship, put this honeymoon period to good use by getting to know your new boat and familiarizing yourself with its systems. A good place to start is by inspecting the electrical systems. Regularly inspecting your boat’s AC and DC electrical system can prevent everything from a flickering chart plotter to a three-alarm fire and prepares you for troubleshooting electrical problems when professional help isn’t around.
It helps to know what to look for, but during my three decades as a surveyor licensed by the Society of Accredited Marine Surveyors, I’ve seen plenty of instances when applying a bit of common sense would have prevented a world of woe. While the following guide won’t guarantee you’ll catch every trouble spot in your system, it covers many of the most common problems I encounter during my work.
SAFETY FIRST!
Although the inspections and checks mentioned in this article are geared towards the average boater, you should always seek the advice of a competent marine electrician when you are in doubt. Ideally, your professional advisor should be familiar with the standards and recommendations provided by the National Fire Prevention Association (NFPA) and the American Boat and Yacht Council (ABYC).
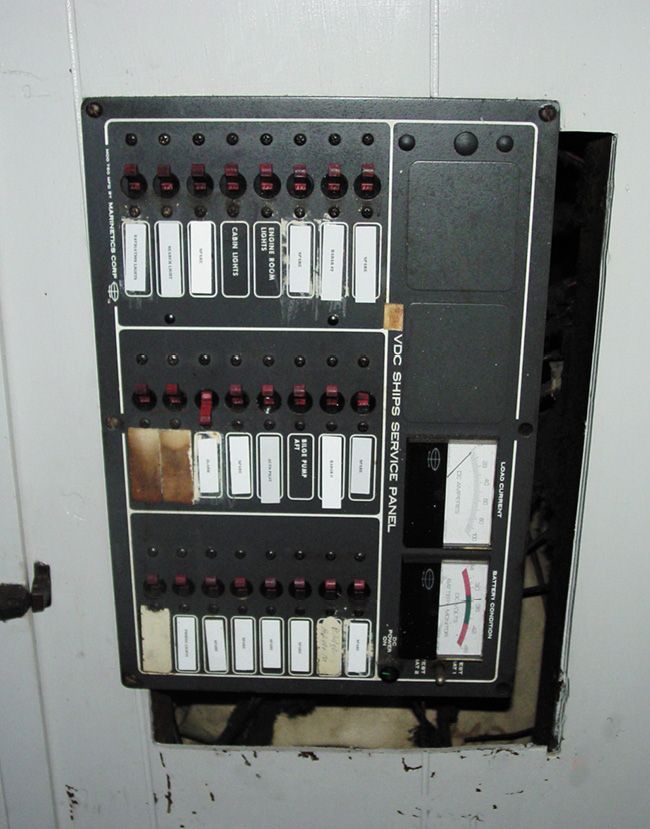
ELECTRICAL PANEL INSPECTIONS
Check circuit breakers by flipping each individually and verifying that their respective circuits are energized. Replace any breakers with a worn or loose feel during operation. One common problem I’ve observed is caused by the owner who has a bad habit of using circuit breakers as an on/off switch for energizing equipment. This not only wears out breakers quicker, but also causes arcing, which can damage both breaker contacts and sensitive electronics equipment.
After securing all AC and DC power (i.e. turning off all battery switches, dockside and vessel AC breakers, inverters, and auto-start generators), open and inspect the rear of each AC and DC panel for problems. Be on the lookout for issues such as corrosion, charred terminals, broken wires, or exposed conductors. Check all breakers and fuse holders (ensuring everything is secure) and neaten up wiring behind the panel using wire ties or other wire management tools.
All panel connectors should be crimp-on ring terminals, preferably the type with attached heat shrink tubing to prevent moisture entry and corrosion. Replace all electrical tape joints and household type twist-on connectors—both will eventually fall off, leaving exposed, energized conductors. [Editor’s note: Practical Sailor’s initial report on our long-term wire test included advice on creating a watertight seal. (See “Marine Wiring: Are the Pricey Options Worth the Cost?” PS July 2010).]
WIRING
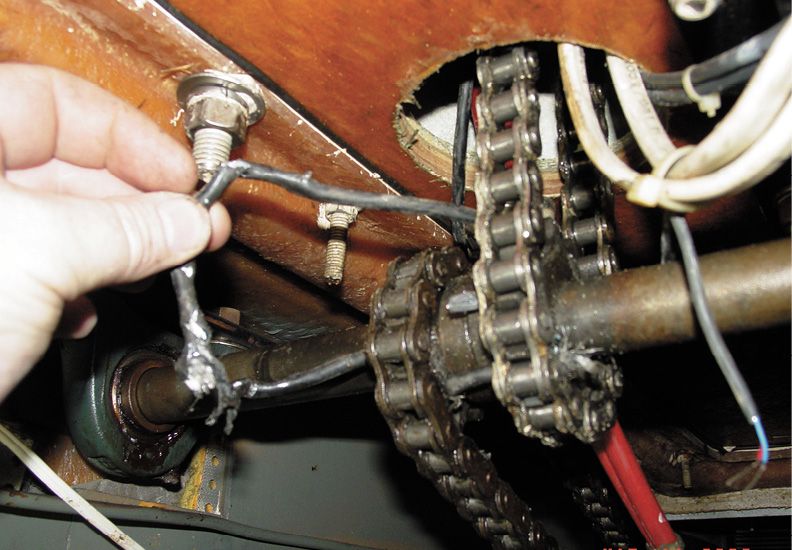
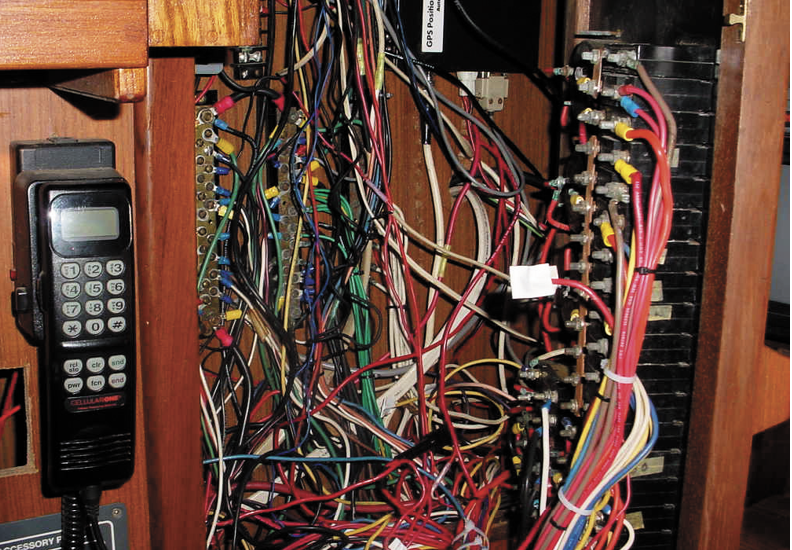
Inspect all spaces for loose or dangling wire runs and damaged conductors. Check for chafe, particularly where wires pass through bulkheads or other partitions. Wiring should be supported at least every 18 inches with non-metallic supports except in the engine room, where metallic wire supports are required.
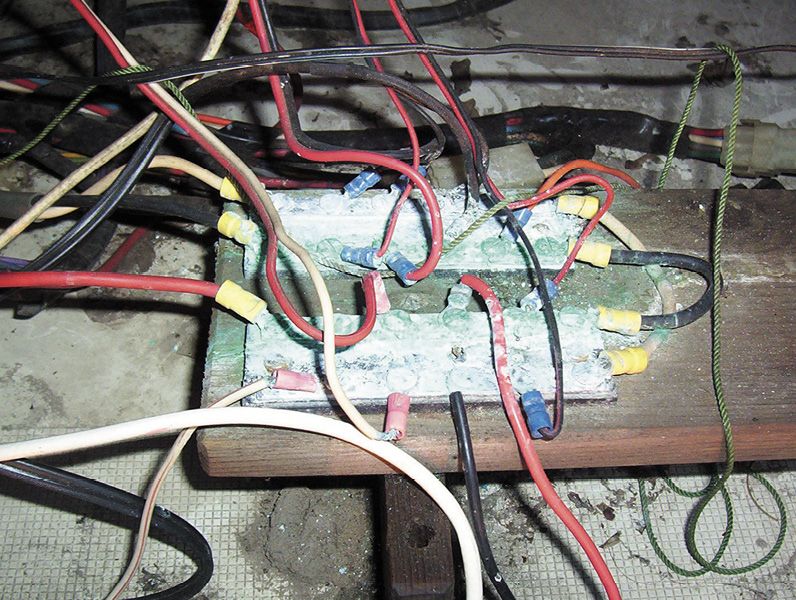
Unprofessional wiring plagues many of the boats I survey. A tangle of wires with little or no organization or support can turn a simple maintenance project into a three-day head-scratcher. And when it comes to troubleshooting, good luck. Tracking down shorts can be challenging enough with a well-organized and labeled electrical system. Add a rat’s nest of messy untraceable wiring and you might as well be blindfolded.
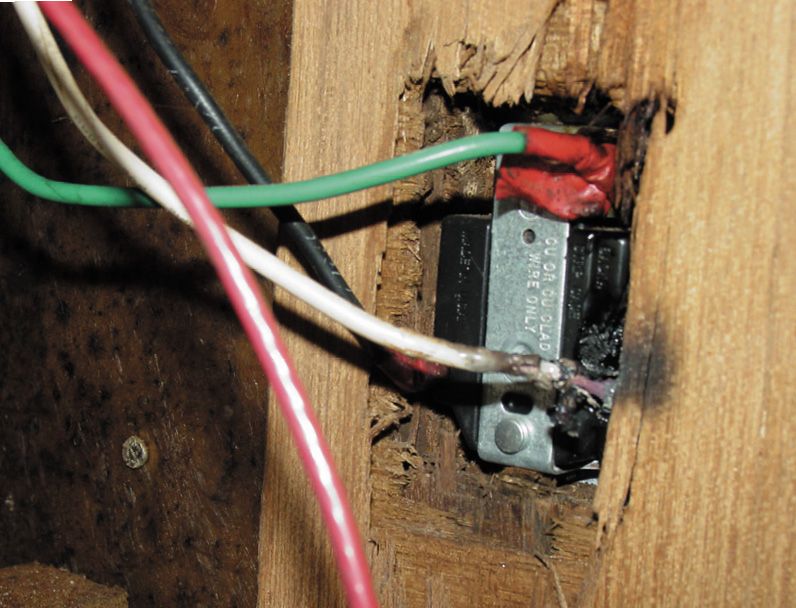
Another common faux pas is the use of twist-on wire nuts or electrical tape to join wires. On older boats, I almost always find dead ends—old wires cut from removed equipment, yet left in place.
With regards to AC system wiring, one of the most common Do-It-Yourself mistakes I see during surveys is the use of residential style, solid copper wiring (ROMEX). Solid wire is susceptible to breakage due to vibration, causing arcing and possibly fire. Replace any solid wiring you find during your inspection with multi-strand, marine grade wire.
[Editor’s note: In part two of a long-term wire test, Practical Sailor found that high quality tinned UL 1426 “Boat Cable” resists corrosion better than stranded automotive wire, which is often used in boats (see “Marine Systems: Wire Exposure Test Update,” PS December 2010).] However, the test also demonstrated that stranded automotive wire will withstand wet, salty conditions if the terminals are sealed against moisture intrusion. So, if your boat has basic stranded wire that is not pre-tinned, there’s no need to start ripping it out unless it has gone bad.)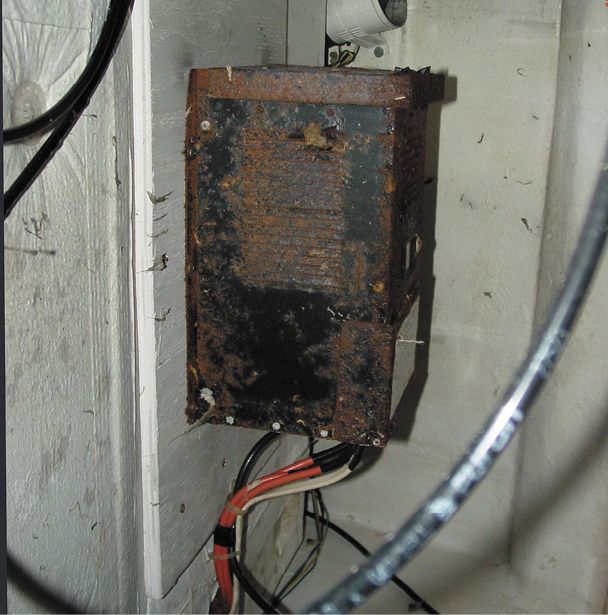
BATTERY INSTALLATION
Your DC system inspection should start at the heart of the DC system—your batteries. Section E-10 of the American Boat & Yacht Council’s “Standards and Technical Information Reports for Small Craft” covers battery installation requirements in detail. Here, I’ll focus on battery basics and the battery problems I most often encounter during a survey.
The basic requirements are the same for each of the more common battery types—wet-cell, gel-cell, and absorbed glass mat (AGM)—however newer battery technologies (such as lithium) have their own unique requirements. We’ll be addressing lithium-battery systems in a separate article.
First off, ABYC requires that all batteries be firmly contained in liquid-tight, acid-proof battery boxes or trays that will safely contain any acid leaks from the batteries. You can find prefabricated battery boxes or trays at marine stores; you can also make your own box or tray if it meets the above requirements. Just make sure that the mounting hardware won’t compromise the leak-proof quality of the containers. A point to remember is that the trays or boxes do not have to be large enough to contain all the electrolyte in the battery — just spillage due to boil over.
A lot of boat owners fail to include a tray or box when installing gel or AGM batteries. Since the electrolyte is in suspension, they believe that it can’t leak out. I must then explain the standard still applies, as even gel or AGM batteries can weep electrolyte when overheated. I also remind them that they or someone else might one day replace the gel or AGM batteries with a wet cell battery.
Batteries are also required to be secured against movement—specifically no more than one-inch in any direction for at least one minute when exposed to 90 pounds of pull, or twice the weight of the battery (whichever is less). Unsecured batteries are one of the most common issues I find during a marine survey, followed closely by those that are improperly secured. A good example of this is an installation that has a properly secured battery box, yet the battery inside is significantly smaller than the box was designed for, allowing for excessive movement of the battery inside the box.
Section E-10 also requires that positive terminals be covered to prevent accidental shorting (from dropped tools, for example). This is another common issue I find, one that can be easily satisfied by covering the positive terminal with rubber or plastic terminal caps, boots, or a non-conductive shield. If a typical plastic battery box is used, the lid of the battery box satisfies this requirement.
Lack of proper ventilation is another common problem. Ideally, batteries should be in a cool, well-ventilated area. On many boats I’ve surveyed, the batteries are shoved into small, hot spaces with very little air movement—unventilated lockers, bilge spaces, and the engine compartment. Adequate ventilation is critical to remove fumes and gasses generated during charging. Proper ventilation also helps keep batteries as cool as possible, which increases their service life.
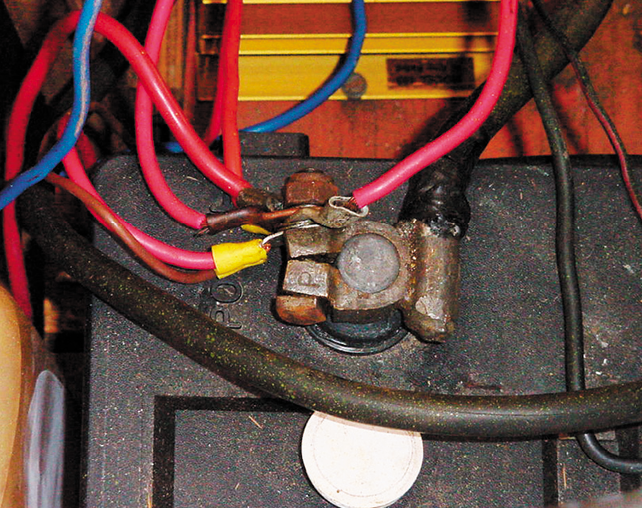
Finally, E-10 requires that battery terminal connections provide a secure mechanical and electrical connection. One of my personal pet peeves is the use of wingnuts at the battery terminals. Almost impossible to torque properly, wingnuts will invariably loosen due to vibration and boat movement. When I spot them during a survey, I always recommend that the owner replace these with marine grade, stainless-steel Nyloc nuts, which won’t vibrate loose.
BATTERY CHARGERS
Your battery is only as good as its charging system, and chances are your boat will have multiple DC charging sources. I’ll talk only about the two most common charging sources here: engine alternators and AC powered battery chargers. (Inspecting charging systems that rely on renewable energy—solar panel, wind generators, etc.—will be the subject of a future report.)
First, determine the type of battery charger you have. Ideally it is one of the more modern “smart” chargers that provide numerous charging options and features, such as multi-stage charging and the ability to select between different battery types.
What you don’t want to find is a cheap, automotive-type battery charger that the previous owner bought at the local S-Mart. Automotive battery chargers are not designed for marine use and can cause a multitude of problems, from stray-current corrosion to shock hazards.
The battery charger should be mounted in a cool, dry area with plenty of ventilation. A high location is generally better, since these spaces have better ventilation and less exposure to the corrosive humidity of the bilge. Chargers should be installed as close to the battery bank as practical, but not mounted directly over the batteries. Batteries (particularly wet cell types) produce corrosive gases while charging, which can quickly damage a charger located above them.
Finally, confirm that the battery charger leads are securely connected to the battery using marine grade, crimp-on ring terminals. Spring clips and alligator clamps are not acceptable.
INVERTER / BATTERY CHARGER UNIT
Your boat may also have a combination inverter / charger unit. In basic terms, an inverter converts your boat’s DC battery power to 115V AC electricity.
As with battery chargers, inverters should be in a cool, dry, well-ventilated area away from the bilge and corrosive gasses generated by batteries while charging.
ABYC recommendations include a means to disconnect the positive DC lead going into the inverter (such as a dedicated battery switch), so that it can be shut down in the event of an emergency.
They also require that the ground for the inverter case be connected to the engine negative terminal or DC negative bus bar. It is also required that the ground wire is rated to carry the same amperage as the DC positive conductor supplying power to the inverter.
Most of the inverter / charger installations I inspect while surveying lack the required cut-off switch, while maybe 1 in 50 will have a properly sized case grounding wire—many have no grounding wire at all.
Inverters that integrate into your existing AC system come with additional installation requirements. There must be a visible means of determining that the inverter is online (usually by meter, control panel, etc.) and a warning at the main AC panel stating that the system includes an inverter. This is important to warn and prevent shocks to technicians working on the AC system.
ALTERNATOR
While that squeal coming from your engine compartment may sound like a scene from Deliverance, it’s likely your boat’s way of saying the alternator belt needs replacing. Your alternator converts the mechanical energy provided by your engine to electrical (DC) energy to charge your batteries. It’s attached to the engine and powered via a pulley and belt system (newer engines use a serpentine belt). If the belt fails, the alternator stops charging the batteries, which in turn will eventually discharge and fail to start the engine (if no other charging sources are available).
With your battery switches off and engine off, start your visual inspection with the alternator belt.
A belt that’s beginning to disintegrate will show signs of fraying or cracking, which you can usually see without removing the belt. Use a flashlight and hand mirror if needed.
The presence of “belt dust” (a black residue) on the alternator and around front of the engine means the belt is deteriorating, possibly due to a misaligned drive pulley– another common problem I see while surveying. If in doubt, get out a straightedge to verify all pulleys are square and correctly aligned prior to installing a new belt.
Next, inspect the alternator itself, checking for loose or charred connections or wires. There should also be a protective rubber boot on the positive post of the alternator, the purpose of which is to prevent accidental shorting.
AC SHORE POWER INSPECTION
Barring improper use or some owner MacGyverism gone bad (jury-rigged adaptors, botched plug installations and the like) overheating and corrosion are the primary causes of shore power system problems. Loose or corroded connections generate heat and the potential for fire. This is a problem especially prevalent among vessels that continually run high energy loads, such as water heaters and air conditioning units. Be especially diligent when inspecting a former liveaboard boat. In my experience, the AC systems aboard liveaboard boats are often jury-rigged by an owner who didn’t bother to abide by any safety guidelines.
Before starting your inspection, turn off your boat’s branch circuit breakers, main AC breaker, then the shore pedestal breaker. Next, unplug the shore power cord at both ends and verify that all other sources of power (such as generators and DC to AC inverters) are turned off and their respective breakers are placed in the off position.
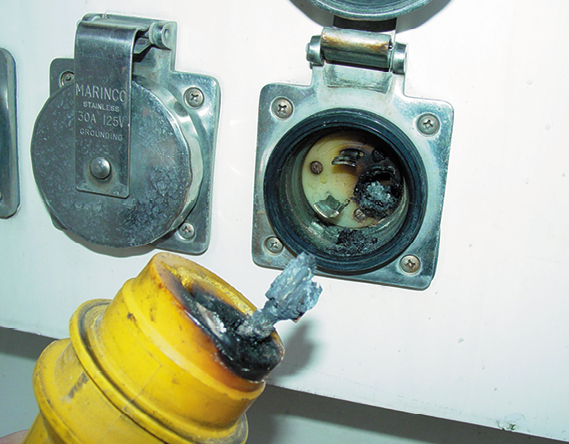
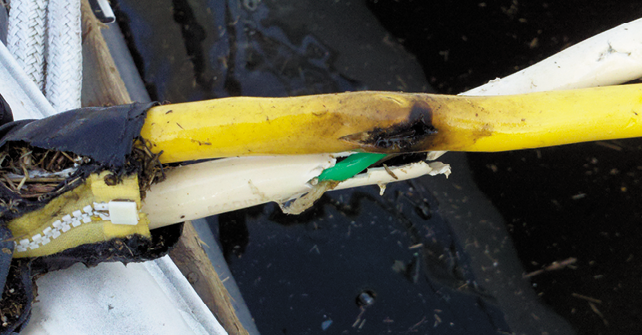
Inspect the power cord for chafe, cracks, split insulation, or electrical tape repairs. If the cord has any of these, replace it. Plugs and inlets (both at the boat and dock pedestal) should be checked each time you disconnect shore power (prior to getting underway for example) or monthly at a minimum. Look for discoloration (an indication of overheating) or corrosion on or around pins and plug inlets.
Next, check the “feel” of the connection when you plug it in. Connections that feel loose or don’t seem to be making firm mechanical contact probably won’t provide good electrical contact either and should be replaced.
A common problem I see when conducting surveys is a shore power cord that is missing the screw-on retaining ring at the plug. The purpose of this ring is to secure the plug into the inlet and prevent excessive movement of the plug (and connections) due to boat movement from wave, wind, and wakes. Movement of the plug while energized can cause micro-arcs and sparks at both plug and inlet pins and sockets, resulting in resistance, heat build-up and worst case, a fire.
While you’re at it, inspect the shore pedestal plug you’re using as well. Avoid using worn or damaged pedestal plugs and report any found to marina personal as soon as possible.
CONCLUSION
If you haven’t recently inspected your electrical system, the off-season is a good time to do it. Time spent heading off potential electrical problems by conducting routine inspections, cleaning and sealing connections, or running new wire is more enjoyable when you know your work will likely save you a sailing day.
Remember, you are not just heading off potential electrical problems. A complete inspection of the electrical system offers an opportunity to reacquaint yourself with each component and become familiar with the various circuits that connect them.
If you don’t have an up-to-date wiring diagram of the boat, make one. Trace any wires you’re unfamiliar with, diagram and label them for future reference. Having an updated wiring diagram will help identify faults, simplify troubleshooting, and make you more self-sufficient in the event a problem occurs.
Many modern boats have high energy needs that require high-capacity battery banks. These big battery banks rely on high-voltage charging systems, thick, well-insulated cables to carry high currents without overheating, robust connectors at every union, and reliable circuit breakers to provide essential over-current protection. Since so much heat and electrical energy is concentrated in the boat’s battery compartment, it makes sense to begin your electrical inspection at the batteries.
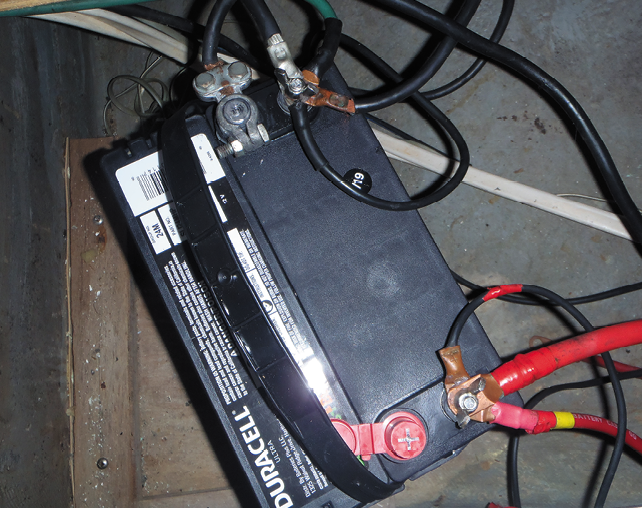
1. Never rely on wing nuts to secure wires or cables to the battery terminals.
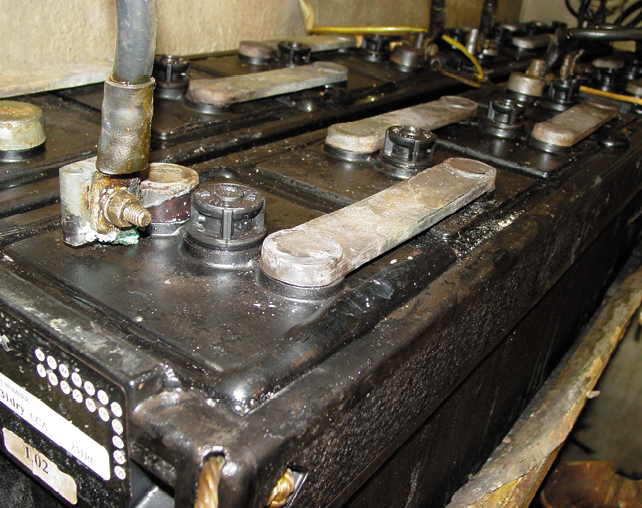
2. Batteries that are bulging at the sides or top should be immediately replaced.
3. You can wire essential accessories (VHF radios, bilge pumps, etc.) directly to the battery, but the work should be neat and each circuit needs a properly sized fuse.
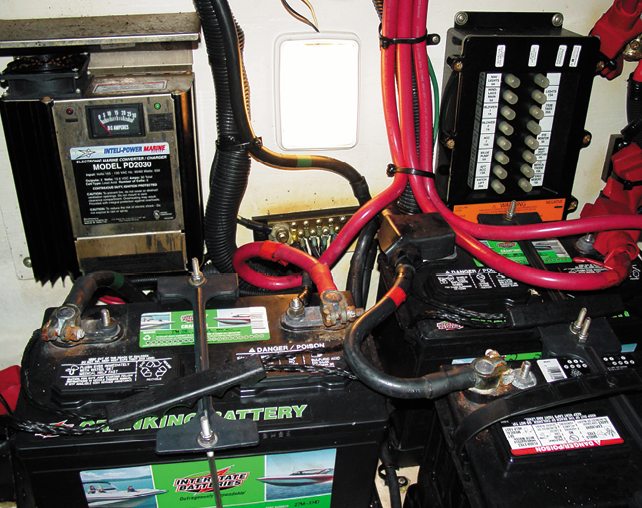
4. A battery charger installed directly above a battery can be exposed to harmful corrosive gasses.
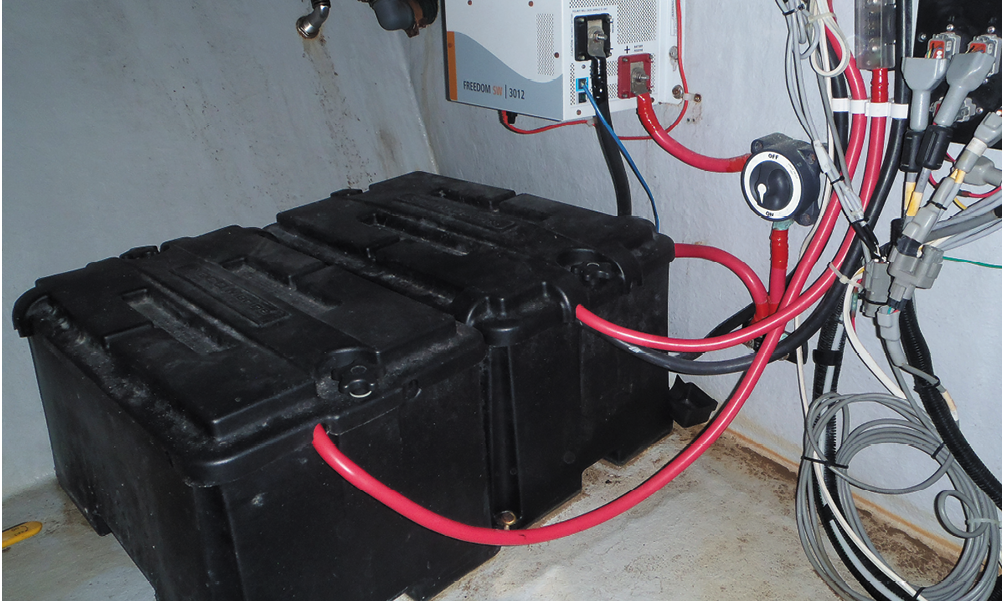
5. The battery switch in this image makes it easy to
disconnect DC input to the inverter—a good thing.
Many of the boats I survey show evidence that someone has been plugging and unplugging the shore power cord in while it is energized. This can cause micro-arcs and sparks that can ruin connectors as well as damage any onboard AC powered equipment that might be energized. Before unplugging the shorepower cord or switching from shorepower to the ship’s generator, always turn off individual appliances, branch circuit breakers, and the boat’s main circuit breaker. This will prevent any arcs and protect onboard equipment.
Keep your plugs and connectors dry and corrosion free. If you accidentally drop a plug in the water, turn off power to the cord, allow the connector to dry, then spray it with a good marine grade contact cleaner / preservative to help prevent corrosion (see “Corrosion Protection Coating Test,” PS April 2007).
Avoid storing cords in leaky lockers where water can pool, cockpits, or other open areas where exposure to rain or spray can promote corrosion. Storage bags (available from most marine retailers) are an excellent investment in this regard—they keep cords and adaptors readily accessible while protecting them from dirt and moisture.
Securing your power cord at the dock power pedestal with a small length of line provides strain relief and helps prevent the plug from coming loose. You’ll also want to provide support to the rest of the cord so that it doesn’t hang in the water or generate undue strain at the dock receptacle.
Finally, it’s also good practice to keep a spray can of electrical contact cleaner and a small brush (an old toothbrush works fine) in your tool kit for use in cleaning contacts, both at your home dock and while traveling to different marinas.


