
")
This is Part 1 in a multi-part series detailing the rebuilding of our then 35 year old Cape Dory 36 sailboat. The purpose of this series is not to provide step-by-step instructions, but rather provide useful insights and general knowledge should the reader want to undertake a similar project.
My choices and methodology reflect my experience, philosophy, and vision. While there is more than one way to accomplish such an extensive project, our approach worked well for us and the result exceeded our expectations. I had no previous boat building or woodworking experience. While it is undeniably true most boat rebuilds are not successfully completed, there are steps you can take to put the odds in your favor. Part I describes what might be called “best practices” to ensure the rebuild has the highest chance for a successful outcome. It covers important topics that framed our project from beginning to end.
Let’s address up-front the biggest criticisms I hear from the naysayers about boat rebuilds. “It will take you longer than you think; it’s cheaper to buy a boat ready to go than rebuild one; and my favorite—you will fail because it’s harder than you think and your boat will be relegated to the boatyard of broken dreams.” All three statements are true…for “some people.” My observation is those who vociferously oppose the idea failed in their own attempt. But, for me, and many others, a rebuild was the only affordable way to get the boat I wanted. Starting with the right boat, establishing a budget you can afford, showing restraint in outfitting her, and remaining committed to the end will get you across the finish line.
REBUILD VS REFIT
I define a refit as actions taken to repair a boat and make her ready to go to sea again. New standing and running rigging, new sails, paint, system upgrades and repairs to machinery to include a new engine comprise the projects normally associated with a refit. I define a rebuild as more extensive and invasive as it will include major projects to reconstruct a boat from a degraded condition to a “like-new” condition. It will likely include everything described in the refit but probably include major structural projects that require gutting the boat in part or in total.
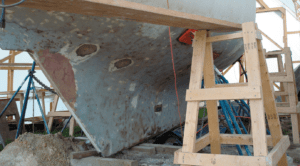
A life-long sailor, I have owed the Far Reach, a Cape Dory 36 (Hull #61), since 2001. In April 2009 I gutted her to a bare hull. Only the hull, deck, rudder, hatches, cleats, a few bulkheads, and ports from the original boat were retained. Every piece of hardware, wood, and fastener was removed from the boat. We made major design changes and numerous modifications to the interior and exterior. She also got a new, lighter, taller rig. This was a major rebuild. She emerged from the rebuild in May 2015 a new boat. She is a stronger, faster, more capable boat than when first launched in 1982. Since her relaunch I have sailed her 11,000 nm, mostly offshore, mostly singlehanded. She has safely carried me from NC to the Virgin Islands and back three times.
THE VISION
One of the things I have learned in sailing (and in a lifetime of military operations) is that complexity creates friction. Friction can make the easy difficult, and the difficult impossible. The more complicated systems and plans are, the more likely there are to be problems and the more extensive the knowledge and resources required to fix them. The older I get the less tolerant I am of needlessly complex and fussy systems which detract from the beauty of the simple voyaging experience I crave.
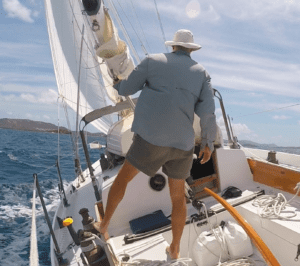
While I envisioned my voyaging boat to be sailing centric, I was determined she would also be simple enough that I could fix anything that needed repairing. I also desired there to be as few barriers as possible between me and the physical sailing environment I enjoy. I wanted “my wits” to be at the center of my decision-making, vice technology. I wanted to be sailing with my head “outside” the boat looking at the water, the sails, the wind and not “inside” the boat looking at instruments. I wanted adventure, not convenience. What is the satisfaction in sailing a boat that does everything for you?
Along with simplicity, I wanted the boat to be elegant with a comfortable and inviting interior I would enjoy being in for long periods of time. There is no right or wrong way to enjoy sailing but that is the vision that guided all our decisions.
An important part of the vision was a strong and reasonably fast boat. She had to be watertight. No wet clothing, charts, books. No mildew from water leaks. No ruined electronics. She needed to have lots of storage and be tough enough that I could sail wherever I wanted without worrying about her not being up to the task even if I was not. The boat had to be easy to handle for one or two people.
THE BOAT
After looking at all kinds of boats I ultimately chose a down-on-her-luck 20-year-old CD 36 because I liked her looks, she was designed by a legendary architect (Carl Alberg), and did not have a liner which made planned interior modifications less complicated. She was of conservative design with attached rudder and a solid fiberglass hull. She had a reputation for being well behaved under sail. She was in the displacement range (16,100 lbs) that could accommodate a small family or a couple for voyaging. And I could afford her.
THE BUDGET
I created a rebuild budget based off my best estimate that supported the vision. My time and labor I viewed as zero otherwise you’re kidding yourself. I could afford my labor—I couldn’t afford someone else’s labor. I avoided the temptation to hire professionals to accelerate the rebuild with two exceptions—I paid $600 to have the topside sprayed and $1,500 for upholstery. By keeping the boat simple, with few systems, most of the money went into wood, fiberglass, epoxy, and fasteners. I sold most of the components and equipment I removed from the boat. All that money went back into the boat fund. I stayed close to the budget until the very end then added about $10K to purchase new sails which was the result of an unforeseen opportunity to get a new taller mast at a huge discount. More on that later.
SKILL
I had practically no building skills when I started this project. To prepare myself I joined a woodworking fellowship. One night a week for eight months I joined a group of men at a woodshop and they guided me as I built a kitchen workstation from scratch. They taught me how to measure, mark, and cut wood. I learned how to plane and joint wood and how to glue and clamp. I learned how to use tools safely. Opportunities like this exist in nearly every community. You just have to look for them. Everything else I learned as I went.
COMMITMENT
When people ask me the secret to rebuilding a boat, I say it’s not the budget or the lack of skill or a shed that will keep you from success. It is a lack of commitment. You will face a thousand obstacles. You need the determination of a junkyard dog. You need a vision and a ruthless determination to feed it from start to finish. I documented the rebuild on a website for two reasons. First, to give back to the community so others could benefit from my efforts. And, second, to remind myself of the progress I had made when the going got tough and it felt like I would never get to the end. One of the advantages I had was I am a life-long sailor. I started sailing as a pre-teen, have owned and raced sailboats for many years, and I lived on a boat and sailed in the Bahamas as a kid. So, I knew deep down inside what I was working towards. I knew why I wanted a simple, seaworthy, elegant, and reasonably fast sailboat. So, for me, I never thought for a moment I would not complete the project. What I did not know, however, is how long it would take, how difficult it would be, or how it would turn out.
REFERENCES
I have an extensive sailing library that shaped my philosophy of sailing which is heavy on simplicity and skill and less on technology and complexity. My books mostly cover the golden age of voyaging—1900s to 1990—before the widespread use of SatNav/GPS and “convenience” systems. I relied on books like Skene’s Elements of Yacht Design, Chappelle’s books on yacht construction, books by Eric Hiscock, Hal Roth, Don Street, the Pardeys, Harry Pidgeon, Vito Dumas, John Guzwell, H.W. Tilman, the Smeetons etc.
I also have books on metallurgy and wood and fiberglass construction principles to expand my knowledge in related disciplines. I seldom get important information from the internet. I rely on books and the experience of sailors I admire to inform me and I turned to them often for advice and insights as I made my way forward.
There are common themes in these books—boat strength, self-reliance, and simplicity. I think you get into trouble when you randomly mix philosophies. If you are all about a simple strong boat you can maintain yourself, then incorporate leading edge technology and complex electronics, mechanical systems, and exotic materials, your boat gets out of synch with your vision (and perhaps your skills) not to mention it drives up the cost.
During my voyages I have met many boat owners trying to cruise on a finite budget but were exasperated trying to find parts and qualified technicians to repair equipment too complicated for the owners to repair themselves. Every piece of equipment on a boat, be it mechanical or electronic, will be tested to the max when ocean sailing and voyaging to remote destinations. Most will fail or give you trouble at some point.
If it’s simple, it’s less likely to fail, and if it does you can fix it yourself. But, if you want convenience, comfort, and technology you will be unhappy with a simple sailing-centric philosophy. So, it’s important you know what you want when you start a rebuild, develop a realistic budget, then stay on track to achieve it—simple, complicated, or somewhere in between. Because my boat is very simple, it cost me far less to rebuild and maintain.
MENTORS
A mentor is more than an expert. He or she is an experienced advisor you trust and respect to guide you through a project. A mentor is inspired by your dedication to the task and your ability to be taught. I had two mentors. One is an expert restorer of classic fiberglass boats (Tim Lackey, lackeysailing.com). He has an incredible range of skills and a pragmatic philosophy that kept me on track and was amazingly supportive. I could not have had a better teacher and advisor. The other is a certified Swedish furniture builder (Kaj Jacobson, knjwoodworking.blogspot.com), a craftsman with jaw dropping woodworking skills who built his own boat (FC 34) from a bare hull into a piece of art.
Neither of these men have physically seen my boat but their fingerprints are all over it. They were instrumental in guiding me during the rebuild. They invested a lot of time helping me understand what I needed to do to achieve my vision even if it was not their vision. The fact they are sailors and appreciate the benefits of an uncomplicated boat was helpful.
Mentors, like books, need to be philosophically aligned with your vision. If not, then they are not the right mentors. However you do it, you need to develop a relationship with a competent mentor. I can count the number of times on one hand where I did not follow the recommendations of my mentors and each time it proved to be a mistake. If you ignore the advice of mentors they will tire of the investment in time they make supporting you, and leave you to carry on without them. So, choose them wisely and then listen to them.
PSYCHOLOGY
Big projects like a boat rebuild will be exhausting in terms of time, energy, money. If I were ever to write a book on rebuilding a boat, I would devote a whole chapter to this one subject. The ability to maintain your sanity and sense of humor through the project is essential. I had more than one temper tantrum and several times I got so frustrated I had to lay my tools down and walk-it-off to clear my mind.
I once commented to a friend how excited he must be to have his own rebuilt Hess 30 finally sailing and he said to me, “To be truthful I am too exhausted to enjoy it right now.” Well, that turned out to be exactly how I felt when we finally splashed the Far Reach after six years. I was just numb from the degree of mental and physical effort it took to complete such an enormous project alone. I then understood why so many people give up—it feels at times like it will never end and for many people eventually the vision dims to a pin prick then disappears altogether. With the boat in the water I pressed ahead without a break completing additional projects to prepare our boat for our first 1,600 nm offshore voyage. By the time we took our departure from Cape Lookout, six months after we launched her, I was completely mentally exhausted driven only by the singular focus to sail to the West Indies.
TIME
There are things you can do to put the odds in your favor of a successful rebuild. The shed I describe on page 13 is one of them. Accept it will take longer than you think. Work on the boat every day—even if only a half hour so you don’t lose momentum. You have to make time for boat work. I was recently retired but I taught homeschool from 0800-1200 five days a week. I typically worked on the boat from 1300- 1800 every day. Longer on the weekends.
It can be done and I know a lot of people that have completed big projects using this strategy—“eating the elephant a bite at a time.” That is why having the boat at your home is so important. You have to be ruthless about protecting your time. Time is not recyclable. Every five minutes you spend on social media is five minutes you won’t have to work on the boat. It’s five more minutes you have to add to the length of time required to finish the rebuild and launch the boat.
It’s a battle of inches, not miles. No one should believe a boat rebuild is going to be easy. I estimate I spent 6,000 hours on the rebuild of which probably half was spent reading, thinking, planning, drawing, researching, and ordering supplies. That comes out to about 3 hours a day plus 8 hours over an entire weekend for 50 weeks a year, for six years. A simpler rebuild might have taken 3,000 hours or less. An experienced builder could do it faster. Most rebuilds will not be as extensive as mine.
PLANNING
Often overlooked is the significant time put into planning. I drew out and diagramed every project from interior layout to joinery. In the evenings I looked at websites of classic boats to get joinery ideas. Usually, I worked several projects simultaneously. Varnish was drying on one project while I was fabricating or milling wood for another. To keep the momentum going I learned to plan several projects ahead so I could order items and have them on-hand for a seamless transition from one project to another. Loss of a momentum between projects is a killer, but you can reduce this lost time by having the next project spooled up and ready to go as soon as the current one is complete.
COMPROMISE
You need to be clear in your own mind what your rebuild priorities are. Mine were sailing performance, strength, simplicity, self-sufficiency, comfort and convenience, in that order. Safety is not on the list. Safety is inherent in the first four categories and is more about what’s between your ears and less about what’s bolted to the boat. I had to make some hard choices when it became apparent some ideas would not work. But I stayed true to the vision and made changes that aligned with my priorities. It all worked out.
TOOLS
A large part of my rebuild was wood centric and most of my tools reflect that focus. None of my tools are “high end.” I have a table saw; a modest dado blade set; an inexpensive jointer and planer; a good jig saw; a modest chop saw; a hand-me-down bench top drill press; a couple battery powered drills; a desk top belt sander and a small bench top router table; an inexpensive dust collector; some hand planes, spoke shave, and draw knife; a couple cabinet maker’s files; a wide range of drill bits, an RO sander, a shop vac, etc. Nothing fancy.
I lusted for a band saw. I did not have room. I gained access to one when I needed it. Depending on your boat and your vision you might have less wood work in your project than mine. Unless you are rebuilding a wood boat you will probably not have more. I estimate I spent about $2,500 in tools acquired over time. But tools like your skills are an investment and you will use them for all kinds of other projects.
CONCLUSION
From beginning to end a rebuild is a major undertaking. A thoughtful, realistic, holistic plan will help you complete it. With the background out of the way, next month we will dive into the project.
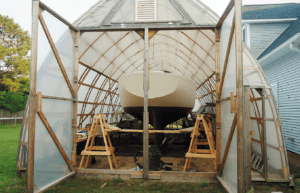
1. It took a month and $1,200 to build the Stimpson Bow Roof Shed (www.bow-roof-shed.com). The shed allowed me to keep working regardless the weather. The strength was impressive, surviving hurricanes, snowstorms, and heavy downpours.
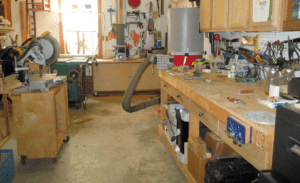
2. I put together a small workshop with modest tools. In this photo you can see the chop-saw to the left, table saw behind it, and a small bench top belt sander. To the right you can see an inexpensive dust collector. The hose is long enough to reach all the tools. Under the workbench to the right you can see a bench-top router table and a two-speed thickness planer. The drawers hold hand tools. My neighbors were very supportive. My wife joined the home owner’s association committee to head any issues off that arose. None did, although after a couple of days of non stop sanding one neighbor did confront me asking “Will this noise ever cease?” I got her to laugh by replying, “No. Never.”

We gutted the original interior to improve storage and ensure the Far Reach was safe and practical offshore and comfortable to live aboard at anchor.
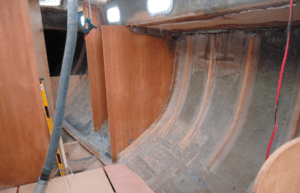
1. September 2010. The original interior was gutted to a bare hull keeping only a few structural bulkheads in place. I cut out and removed the one-piece fiberglass overhead liner because I wanted complete access to the underside of the deck.
Also, I did not want to see any fiberglass inside the boat taking away from the traditional aesthetic we desired. The floor timbers and sole were also removed to make way for water tanks and storage.
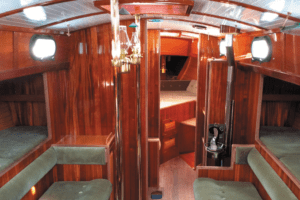
2. March 2015. We designed and installed the new interior (covered in Part II) pulling it toward the centerline creating more storage space outboard and under the furniture. We added pilot berths with lee cloths for safe comfortable sleeping offshore while keeping the settees and saloon table open for use. We eliminated the ubiquitous V berth in the forward cabin preferring a more companionable double berth we use when not underway. The saloon stanchions support a fold-over varnished ash table I built after we launched the boat. The boat is easy and safe to move through even in rough offshore conditions as there is always solid furniture and the saloon stanchions to grab. The storage space is huge for a 28’ waterline.
To keep the visual aesthetic grounded we worked from light overhead to a dark sole. In between, the vertical surfaces are V groove African Mahogany with seven coats of high gloss varnish which reflect light and create a sense of more space. The horizontal surfaces are varnished ash. The raised panel inset cabinet doors are varnished bird’s eye maple.


Loved your article… after reading it, it brings back fond memories of my two loves, my 1982 Cape Dory Typhoon “Windsong”, and my 1984 Cape Dory 25D “Feather” recently sold and miss, as my 82 years have caught up to me health wise, and I’m left with great appreciation for the truly fine design and strong build of the Cape Dory line. My question was, what did you repower your vessel with?
Bob, I am glad you enjoyed the article. The Typhoon and 25D remain the most sought after boats in the Cape Dory line. Both are lovely capable boats.
I sailed the Far Reach without an inboard engine for five years including two round trips from NC to the Virgin Islands. I relied on a 14’10” ash sculling oar as my primary means of non sailing propulsion when practicable. It works surprisingly well if set up properly.
I also had a custom built swing arm bracket I could bolt to the boat. I used it to hold a Honda 9.8 HP outboard when we needed to move the boat down narrow canals or in restricted water when the conditions exceeded the capabilities of the oar. The little outboard would move the boat at 5 kts at 3/4 throttle on flat water. I demonstrate how the outboard bracket works on our YouTube channel, Far Reach Voyages. In 2021 I installed a small diesel with a two blade folding prop which is the subject of a future article in Practical Sailor.
Wery nicely spelled out what it takes to fulfil ones dream. Yes I sord of missed that
part , like Bob Nelson . You didn’t use oars “”””
Helmet, Thanks. I answered your question in my reply to Bob Nelson.
I have broken way more tillers than wheels on boats. Plus easy to lock down the rudder with wheel steering, not so much with a tiller.
When Andy made the CD line, he said he regretted not stiffening up the deck supports. Did you address that issue?
Robert, Your experience is different than mine. I have never heard the argument a wheel is more reliable than a properly built tiller. The strengthening of the hull and deck are addressed in Part 2.
Totally agree with your philosophy of keeping things simple. If your head is out of the boat then you don’t need expensive power consuming, high maintenance instruments to know where the wind is coming from.
Have you repowered and how?
Tillermate, a locking tiller mechanism from Canada is the best I have used – never broken a tiller yet!
Kate, regarding repower see my reply to Bob Nelson. Thanks for the comment on the tiller lock. I have looked into them (Practical Sailor ran a test on them a while back) but I have been reluctant so far to bolt anything to the tiller to snag lines. I usually tie a short length of line around the tiller with a clove hitch and lead the ends to cleats on the coamings. However, I seldom sail without the self-steering windvane which negates the need for a tiller lock when engaged. Still, a tiller lock seems very useful.
Sound advice. Looking forward to the part 2
Rebuilding my Pearson Triton 28 Misty. 1965 Interesting that I pretty much came up with the same conclusion as to my rebuild as you. Took a woodworking class , read the old ” books” and new
books. Planned about 3 project ahead so when the epoxy was drying (every piece of wood coated with 3 coats) then varnished, started making patterns and cutting wood. Rewired and plumbed everything. Made a project book one page for the planning and opposing page for supplies and tools needed so when I had to drive to the boat I would not forget at home what I needed 45 minute drive. Project book kept me on tract.
It takes lots of time I’m in to it for about 5 years. I see the light at the end of the tunnel nw had to take breaks along the way. I work on the boat everyday! Thanks for you sharing of your experience.
Thanks. Good luck with your rebuild. Hang in there!
A great read. Thanks for the effort.
Thanks. I enjoyed writing the series.
Personally, I use oil based sign paint on my boat and though it doesn’t hold a shine long, it’s relatively easy to use and easy to redo. I haven’t found the two part to be more resistant to anything but the sun and to mildew. I like pumice for nonskid—inexpensive. I also haven’t found the two part more resistant to scratches and chipping. Anyone reading this agree?
Susan
You did not mention what kind of surface you are painting, or under what conditions.
I use a one part LPU paint, like Interlux Brightside on exterior wood and have had excellent result. That’s where I would use and oil based or alkyd based paint.
A two part urethane paint (like Awlgrip) is not normally a good choice for wood because the paint does not give when the wood expands and contracts with changing temps and humidity. The paint will crack.
Both kinds of paints require similar preparation but the two part typically last twice as long on fiberglass. There is a C&C 39 in the boatyard near the Far Reach. It was Awlgripped 17 years ago with flag blue. It still looks pretty good.
But if a one part alkyd paint meets your needs then perhaps that is the best choice for your specific situation.
Totally agree with your philosophy of keeping things simple and your head outside the boat. My Cal 2-29 doesn’t even have a depth sounder; her only “instruments” are a compass, some telltales on the sails and a wind vane on the masthead. Well, ok, sometimes I’ll pull out the GPS on my phone to see how fast I’m going but that’s about it.